oil YAMAHA DT125R 2000 Owners Manual
[x] Cancel search | Manufacturer: YAMAHA, Model Year: 2000, Model line: DT125R, Model: YAMAHA DT125R 2000Pages: 91, PDF Size: 4.67 MB
Page 6 of 91
EAU00009
TABLE OF CONTENTS
1
2
3
4
5
6
7
8
9 GIVE SAFETY THE RIGHT OF WAY..................1-1
DESCRIPTION....................................................2-1
Left view............................................................2-1
Right view.........................................................2-2
Controls/Instruments.........................................2-3
INSTRUMENT AND CONTROL FUNCTIONS....3-1
Main switch.......................................................3-1
Indicator lights...................................................3-1
Oil level indicator circuit check..........................3-2
Speedometer....................................................3-3
Tachometer.......................................................3-3
Engine temperature gauge...............................3-4
Handlebar switches..........................................3-4
Clutch lever.......................................................3-5
Shift pedal.........................................................3-5
Front brake lever...............................................3-6
Rear brake pedal..............................................3-6
Fuel tank cap....................................................3-6
Fuel (except for Switzerland and Austria).........3-7
Fuel (for Switzerland and Austria)....................3-7
Catalyzer (for Switzerland and Austria)............3-8
Two-stroke engine oil........................................3-9
Fuel cock..........................................................3-9
Starter (choke) Ò
1Ó.........................................3-10Kick starter......................................................3-11
Steering lock...................................................3-11
Seat................................................................3-12
Helmet holder.................................................3-12
Rear shock absorber adjustment....................3-13
Rear carrier.....................................................3-14
Note on handling of the Yamaha Energy
Induction System (Y.E.I.S.).............................3-14
Y.P.V.S.
(Yamaha Power Valve System)......................3-15
Sidestand........................................................3-15
Sidestand switch operation check..................3-16
PRE-OPERATION CHECKS...............................4-1
Pre-operation check list....................................4-1
OPERATION AND IMPORTANT RIDING
POINTS................................................................5-1
Starting the engine............................................5-1
Starting a warm engine.....................................5-3
Shifting..............................................................5-4
Recommended shift points
(for Switzerland only)........................................5-4
Tips for reducing fuel consumption...................5-5
Engine break-in.................................................5-5
Parking..............................................................5-6
123
45
3MB-9-E7 12/27/00 2:52 PM Page 5
Page 7 of 91

PERIODIC MAINTENANCE AND MINOR
REPAIR................................................................6-1
Tool kit..............................................................6-1
Periodic maintenance and lubrication chart......6-3
Cowling removal and installation......................6-6
Cowling A..........................................................6-6
Cowling B..........................................................6-7
Cowling C.........................................................6-8
Panel removal and installation..........................6-8
Panel D.............................................................6-9
Panel E.............................................................6-9
Spark plug.......................................................6-10
Transmission oil..............................................6-11
Cooling system...............................................6-12
Changing the coolant......................................6-13
Air filter............................................................6-15
Carburetor adjustment....................................6-16
Idle speed adjustment.....................................6-17
Throttle cable free play adjustment.................6-17
Tires................................................................6-18
Wheels............................................................6-20
Clutch lever free play adjustment...................6-21
Front brake lever free play adjustment...........6-21
Rear brake pedal height adjustment...............6-22
Brake light switch adjustment.........................6-23
Checking the front and rear brake pads.........6-23Inspecting the brake fluid level.......................6-24
Brake fluid replacement..................................6-25
Drive chain slack check..................................6-25
Drive chain slack adjustment..........................6-26
Drive chain lubrication....................................6-26
Cable inspection and lubrication.....................6-27
Throttle cable and grip lubrication...................6-27
Autolube pump adjustment.............................6-28
Brake and shift pedal lubrication.....................6-28
Brake and clutch lever lubrication...................6-28
Sidestand lubrication......................................6-29
Front fork inspection.......................................6-29
Steering inspection.........................................6-30
Wheel bearings...............................................6-30
Battery............................................................6-31
Fuse replacement...........................................6-33
Headlight bulb replacement............................6-33
Turn signal light bulb replacement..................6-35
Tail/brake light bulb replacement....................6-35
Supporting the motorcycle..............................6-36
Front wheel removal.......................................6-36
Front wheel installation...................................6-37
Rear wheel removal........................................6-38
Rear wheel installation....................................6-39
Troubleshooting..............................................6-39
Troubleshooting chart.....................................6-40
TABLE OF CONTENTS
1
2
3
4
5
6
7
8
9
6
3MB-9-E7 12/27/00 2:52 PM Page 6
Page 12 of 91
DESCRIPTION
12
3
4
5
6
7
8
9
2-2
111213
14 15
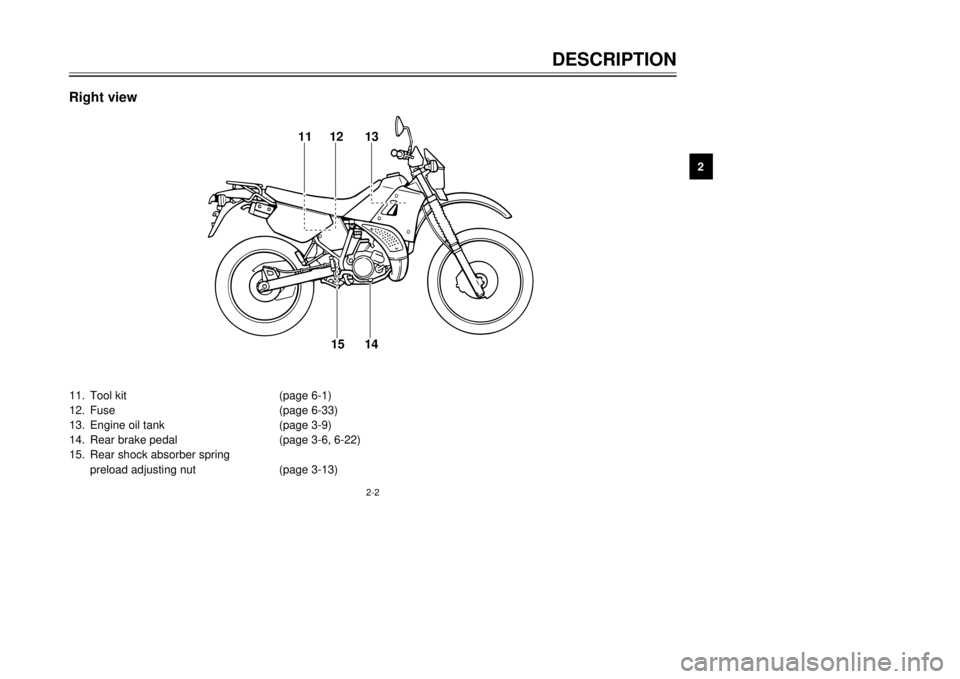
Right view11.Tool kit (page 6-1)
12.Fuse (page 6-33)
13.Engine oil tank (page 3-9)
14.Rear brake pedal (page 3-6, 6-22)
15.Rear shock absorber spring
preload adjusting nut (page 3-13)
3MB-9-E7 12/27/00 2:52 PM Page 11
Page 14 of 91
3-1
ON
OFF
EAU00028
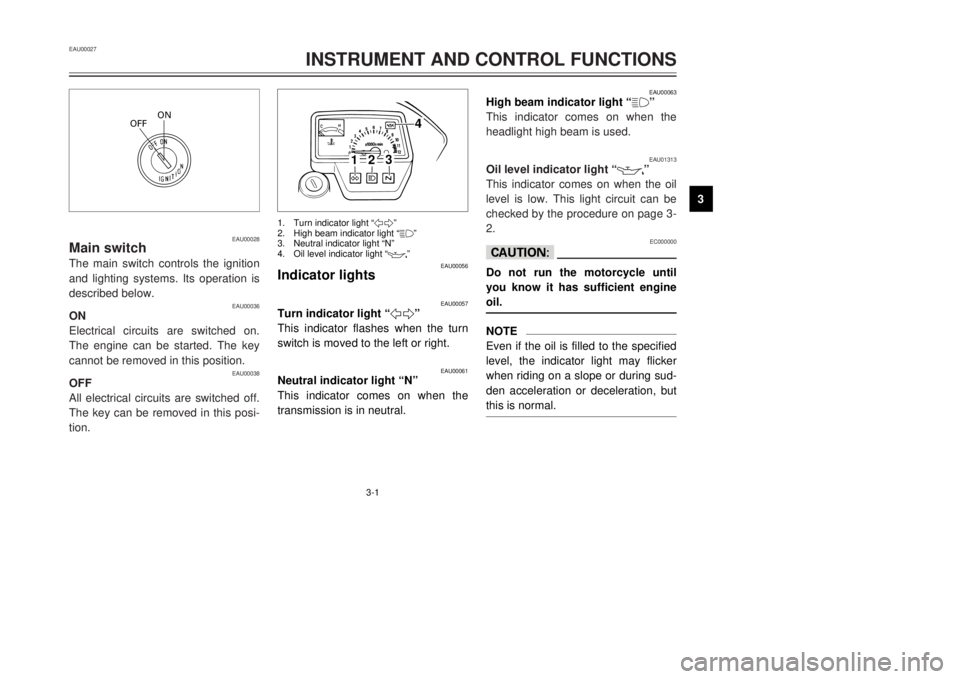
Main switchThe main switch controls the ignition
and lighting systems. Its operation is
described below.
EAU00036
ON
Electrical circuits are switched on.
The engine can be started. The key
cannot be removed in this position.
EAU00038
OFF
All electrical circuits are switched off.
The key can be removed in this posi-
tion.EAU00027
INSTRUMENT AND CONTROL FUNCTIONS
1
23
4
5
6
7
8
9
EAU00063
High beam indicator light Ò
&Ó
This indicator comes on when the
headlight high beam is used.
EAU01313
Oil level indicator light Ò
7
Ó
This indicator comes on when the oil
level is low. This light circuit can be
checked by the procedure on page 3-
2.EC000000
cCDo not run the motorcycle until
you know it has sufficient engine
oil.NOTE
Even if the oil is filled to the specified
level, the indicator light may flicker
when riding on a slope or during sud-
den acceleration or deceleration, but
this is normal.
1
2
3
4
EAU00056
Indicator lights
EAU00057
Turn indicator light Ò5Ó
This indicator flashes when the turn
switch is moved to the left or right.
EAU00061
Neutral indicator light ÒNÓ
This indicator comes on when the
transmission is in neutral.1.Turn indicator light Ò5Ó
2.High beam indicator light Ò&Ó
3.Neutral indicator light ÒNÓ
4.Oil level indicator light Ò
7
Ó
3MB-9-E7 12/27/00 2:52 PM Page 13
Page 15 of 91
EAU00075
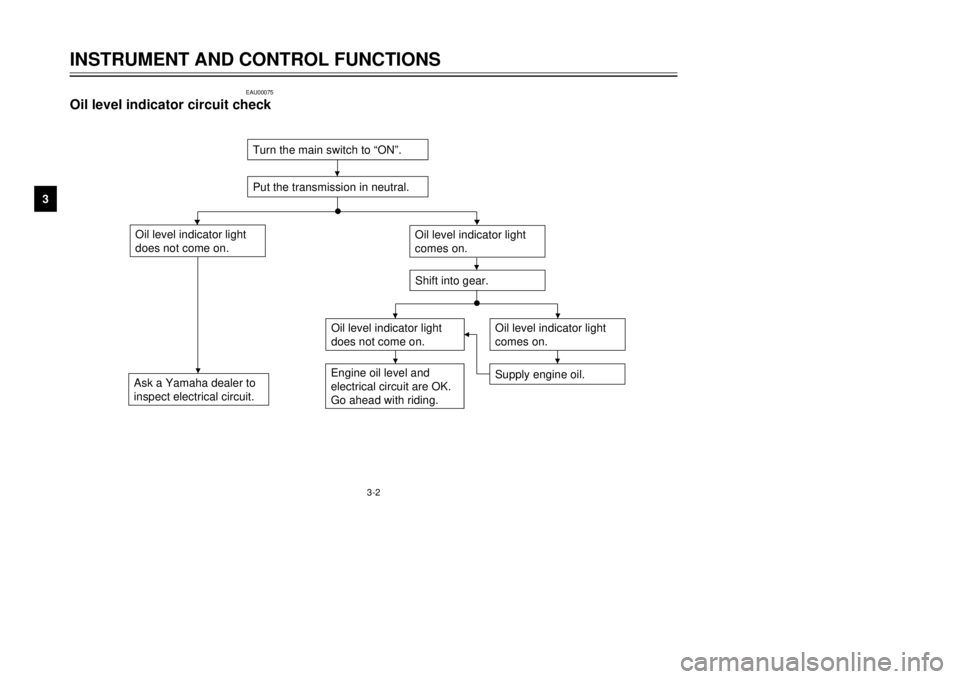
Oil level indicator circuit check
3-2
INSTRUMENT AND CONTROL FUNCTIONS
1
23
4
5
6
7
8
9Turn the main switch to ÒONÓ.
Put the transmission in neutral.
Oil level indicator light
does not come on.Ask a Yamaha dealer to
inspect electrical circuit.
Oil level indicator light
comes on.
Oil level indicator light
does not come on.
Supply engine oil.
Shift into gear.
Engine oil level and
electrical circuit are OK.
Go ahead with riding.
Oil level indicator light
comes on.
3MB-9-E7 12/27/00 2:52 PM Page 14
Page 22 of 91
3-9
INSTRUMENT AND CONTROL FUNCTIONS
1
23
4
5
6
7
8
9
EC000114
cCThe following must be observed to
prevent a fire hazard or other dam-
ages.
8 8
Use only unleaded gasoline.
Use of leaded gasoline will
cause unrepairable damage to
the catalytic converter.
8 8
Never park this motorcycle in
an area that would cause a fire
hazard such as grass or other
materials that may easily burn.
8 8
Do not allow the engine to idle
for very long.
EAU03050
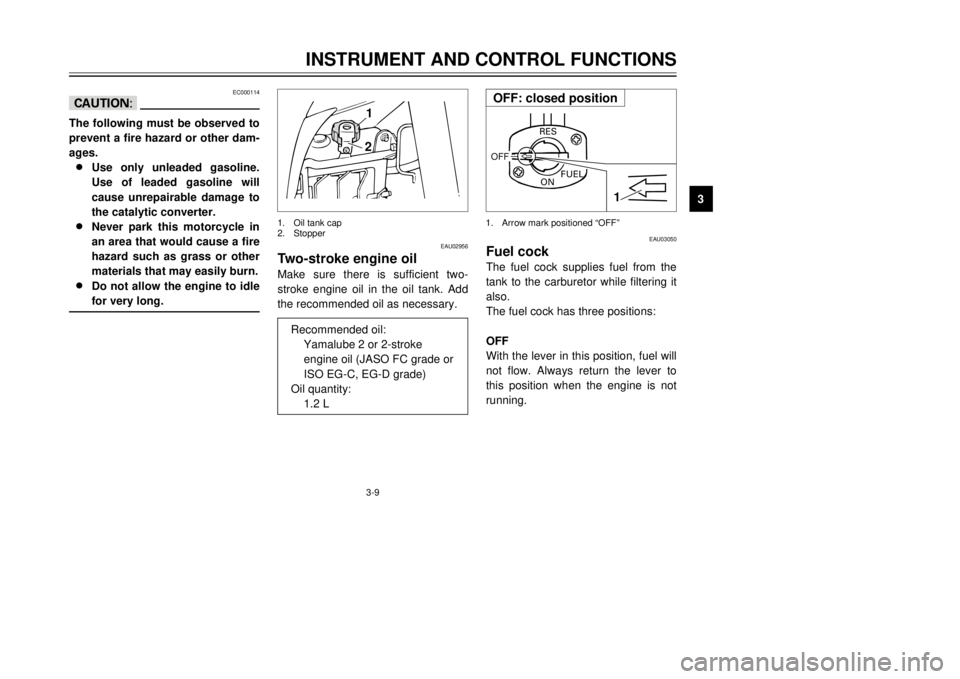
Fuel cockThe fuel cock supplies fuel from the
tank to the carburetor while filtering it
also.
The fuel cock has three positions:
OFF
With the lever in this position, fuel will
not flow. Always return the lever to
this position when the engine is not
running.
RES
ONFUEL
OFF
1
1.Arrow mark positioned ÒOFFÓ
EAU02956
Two-stroke engine oilMake sure there is sufficient two-
stroke engine oil in the oil tank. Add
the recommended oil as necessary.
21
1.Oil tank cap
2.Stopper
Recommended oil:
Yamalube 2 or 2-stroke
engine oil (JASO FC grade or
ISO EG-C, EG-D grade)
Oil quantity:
1.2 L
OFF: closed position
3MB-9-E7 12/27/00 2:52 PM Page 21
Page 30 of 91

4-1
EAU01114
PRE-OPERATION CHECKS
1
2
34
5
6
7
8
9 Owners are personally responsible for their vehicleÕs condition. Your motorcycleÕs vital functions can start to deteriorate
quickly and unexpectedly, even if it remains unused (for instance, if it is exposed to the elements). Any damage, fluid
leak or loss of tire pressure could have serious consequences. Therefore, it is very important that, in addition to a thor-
ough visual inspection, you check the following points before each ride.
EAU00340
PRE-OPERATION CHECK LIST
ITEMCHECKSPAGE
Front brake9Check operation, free play, fluid level and vehicle for fluid leakage.
9Fill with DOT 4 (or DOT 3) brake fluid if necessary.
3-6, 6-21 ~ 6-25
Rear brake9Check operation, free play, fluid level and vehicle for fluid leakage.
9Fill with DOT 4 (or DOT 3) brake fluid if necessary.
Clutch9Check operation, condition and free play.
3-5, 6-21
9Adjust if necessary.
9Check for smooth operation.
Throttle grip and housing9Lubricate.6-17, 6-27
9Adjust throttle cable free play if necessary.
Engine oil9Check oil level.
3-9
9Fill with oil if necessary.
Transmission oil9Check oil level.
6-11 ~ 6-12
9Fill with oil if necessary.
Coolant9Check coolant level.
6-12
9Fill with coolant if necessary.
Drive chain9Check chain slack and condition.
6-26 ~ 6-27
9Adjust if necessary.
Wheels and tires9Check tire pressure, wear, damage and spoke tightness.
6-18 ~ 6-20
9Tighten spokes if necessary.
Control and meter cable9Check for smooth operation.
6-27
9Lubricate if necessary.
3MB-9-E7 12/27/00 2:52 PM Page 29
Page 36 of 91
5-5
OPERATION AND IMPORTANT RIDING POINTS
1
2
3
45
6
7
8
9
EAU00424
Tips for reducing fuel
consumptionYour motorcycleÕs fuel consumption
depends to a large extent on your rid-
ing style. The following tips can help
reduce fuel consumption:
8Warm up the engine before rid-
ing.
8Turn off the starter (choke) as
soon as possible.
8Shift up swiftly and avoid high
engine speeds during accelera-
tion.
8Do not double-clutch or rev the
engine while shifting down and
avoid high engine speeds with
no load on the engine.
8Turn off the engine instead of let-
ting it idle for an extended length
of time, i.e. in traffic jams, at traf-
fic lights or railroad crossings.
EAU00436
Engine break-inThere is never a more important peri-
od in the life of your motorcycle than
the period between zero and 1,000
km. For this reason we ask that you
carefully read the following material.
Because the engine is brand new,
you must not put an excessive load
on it for the first 1,000 km. The vari-
ous parts in the engine wear and pol-
ish themselves to the correct operat-
ing clearances. During this period,
prolonged full throttle operation, or
any condition which might result in
excessive heating of the engine,
must be avoided.
EAU00453
0 ~ 500 km
Avoid operation above 6,000 r/min.
Stop the engine and let it cool for 5 to
10 minutes after every hour of opera-
tion. Vary the speed of the motorcy-
cle from time to time. Do not operate
it at one set throttle position.
500 ~ 1,000 km
Avoid prolonged operation above
7,000 r/min. Rev the motorcycle
freely through the gears, but do not
use full throttle at any time.
EC000060
cCAfter 1,000 km of operation, be
sure to replace the transmission
oil.
3MB-9-E7 12/27/00 2:52 PM Page 35
Page 41 of 91

6-4
PERIODIC MAINTENANCE AND MINOR REPAIR
1
2
3
4
56
7
8
9
9
*Wheels¥Check runout, spoke tightness and for damage.
¥Tighten spokes if necessary.ÖÖÖÖ
10*Tires¥Check tread depth and for damage.
¥Replace if necessary.
¥Check air pressure.
¥Correct if necessary.ÖÖÖÖ
11*Wheel bearings¥Check bearing for looseness or damage.ÖÖÖÖ
12*Swingarm¥Check operation and for excessive play.ÖÖÖÖ
13Drive chain¥Check chain slack.
¥Make sure that the rear wheel is properly aligned.
¥Clean and lubricate.Every 500 km and after washing
the motorcycle or riding in the rain.
14*Steering bearings¥Check bearing play and steering for roughness.ÖÖÖÖÖ
¥Lubricate with lithium-soap-based grease.Every 24,000 km
15*Chassis fasteners¥Make sure that all nuts, bolts and screws are properly tightened.ÖÖÖÖÖ
16Sidestand¥Check operation.
¥Lubricate.ÖÖÖÖÖ
17*Sidestand switch¥Check operation.ÖÖÖÖÖÖ
18*Front fork¥Check operation and for oil leakage.ÖÖÖÖ
19*Shock absorber
assembly¥Check operation and shock absorber for oil leakage.ÖÖÖÖ
20*Rear suspension relay
arm and connecting arm
pivoting points¥Check operation.ÖÖÖÖ NO.ITEMCHECK OR MAINTENANCE JOBODOMETER READING (´ 1,000 km)
ANNUAL
CHECK
16121824
3MB-9-E7 12/27/00 2:52 PM Page 40
Page 42 of 91

6-5
PERIODIC MAINTENANCE AND MINOR REPAIR
1
2
3
4
56
7
8
9
EAU03884
NOTE:
8The air filter needs more frequent service if you are riding in unusually wet or dusty areas.
8Hydraulic brake service
9Regularly check and, if necessary, correct the brake fluid level.
9Every two years replace the internal components of the brake master cylinders and calipers, and change the
brake fluid.
9Replace the brake hoses every four years and if cracked or damaged.21
*Carburetor¥Check starter (choke) operation.
¥Adjust engine idling speed.ÖÖÖÖÖÖ
22*Autolube pump¥Check operation.
¥Bleed if necessary.ÖÖÖÖ
23Transmission oil¥Check oil level.ÖÖÖÖÖÖ
¥Change.ÖÖ
24*Cooling system¥Check coolant level and vehicle for coolant leakage.ÖÖÖÖÖ
¥Change.Every 3 years
25*Front and rear brake
switches¥Check operation.ÖÖÖÖÖÖ
26Moving parts and cables¥Lubricate.ÖÖÖÖÖ
27*Lights, signals and
switches¥Check operation.
¥Adjust headlight beam.ÖÖÖÖÖÖ NO.ITEMCHECK OR MAINTENANCE JOBODOMETER READING (´ 1,000 km)
ANNUAL
CHECK
16121824
3MB-9-E7 12/27/00 2:52 PM Page 41