key battery YAMAHA EC-03 2011 Owners Manual
[x] Cancel search | Manufacturer: YAMAHA, Model Year: 2011, Model line: EC-03, Model: YAMAHA EC-03 2011Pages: 78, PDF Size: 2.04 MB
Page 15 of 78
3-1
234
5
6
7
8
9
EC-03 FEATURES
EAU50470
Features The features of the EC-03 are follow-
ing:
The driving power source is only
electricity and there is no need for
fuel supply or engine oil change.
High performance motor with
greatly reduced noise and vibra-
tion providing a pleasant ride.
Charging the vehicle can be done
via a grounded electrical outlet
with residual-current device (RCD)
protection.
EAU50322
Standard mode/power mode The motor driving power can be select-
ed according to riding conditions, road
conditions, etc.
The standard mode is suitable for nor-
mal riding, while the power mode pro-
vides more comfortable riding when
ascending hills.
Switching the mode
Pushing button 1 “POWER” switches
between the standard mode and the
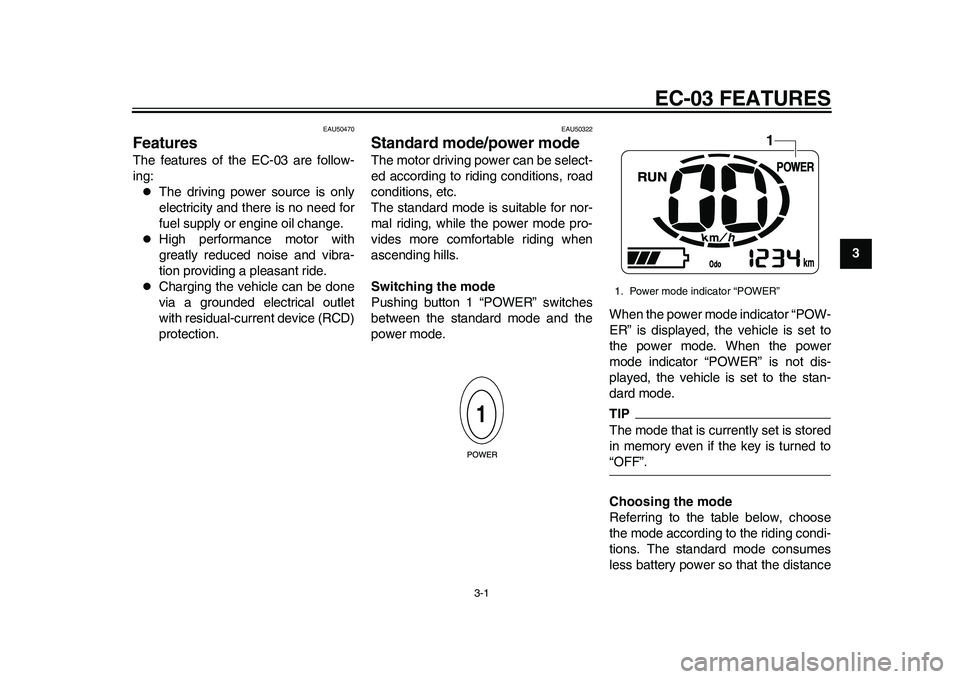
power mode.When the power mode indicator “POW-
ER” is displayed, the vehicle is set to
the power mode. When the power
mode indicator “POWER” is not dis-
played, the vehicle is set to the stan-
dard mode.
TIPThe mode that is currently set is stored
in memory even if the key is turned to“OFF”.
Choosing the mode
Referring to the table below, choose
the mode according to the riding condi-
tions. The standard mode consumes
less battery power so that the distance1. Power mode indicator “POWER”
1
1CB-9-E0.book 1 ページ 2010年10月15日 金曜日 午前10時19分
Page 18 of 78
EC-03 FEATURES
3-4
1
23
4
5
6
7
8
9
EAU50351
Battery level TIPBe sure to check the battery level be-fore each ride.
Checking the battery level
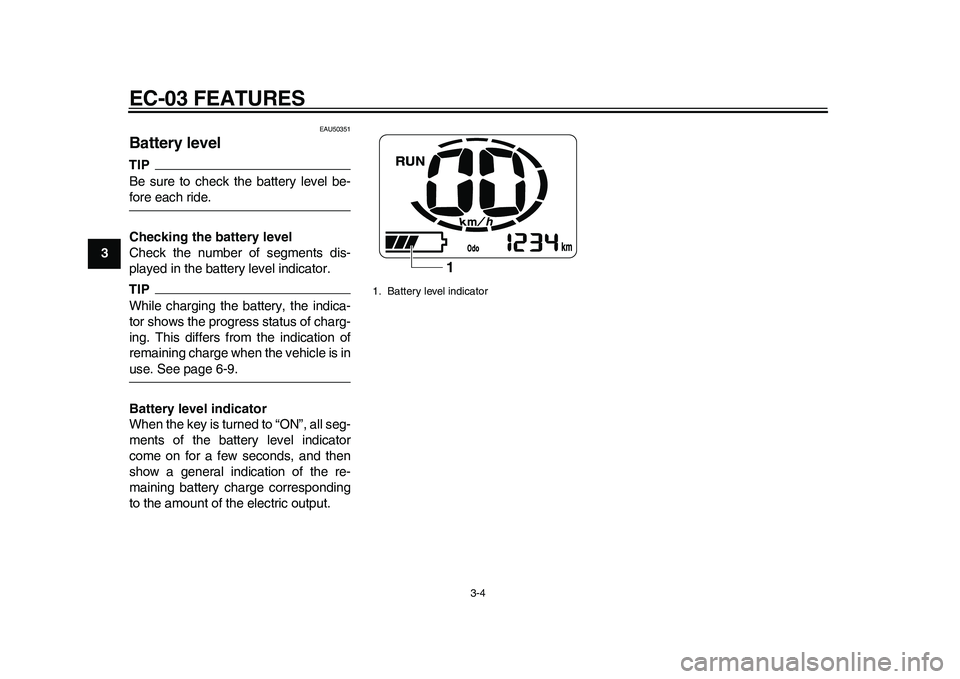
Check the number of segments dis-
played in the battery level indicator.TIPWhile charging the battery, the indica-
tor shows the progress status of charg-
ing. This differs from the indication of
remaining charge when the vehicle is inuse. See page 6-9.
Battery level indicator
When the key is turned to “ON”, all seg-
ments of the battery level indicator
come on for a few seconds, and then
show a general indication of the re-
maining battery charge corresponding
to the amount of the electric output.
1. Battery level indicator
1
1CB-9-E0.book 4 ページ 2010年10月15日 金曜日 午前10時19分
Page 20 of 78
4-1
1
2
34
5
6
7
8
9
INSTRUMENT AND CONTROL FUNCTIONS
EAU49982
Beeper The EC-03 informs you of the following
operations and status of the vehicle us-
ing the beeper.
Key in “ON” position
Standby mode (See page 7-2.)
A control button is pushed
Security lock unlocked
Security lock unlock failed
Enters the riding mode (see
page 4-6).
Turn signals in use
Battery level is approx. 10% (See
page 3-5.)
Battery charging started
EAU10460
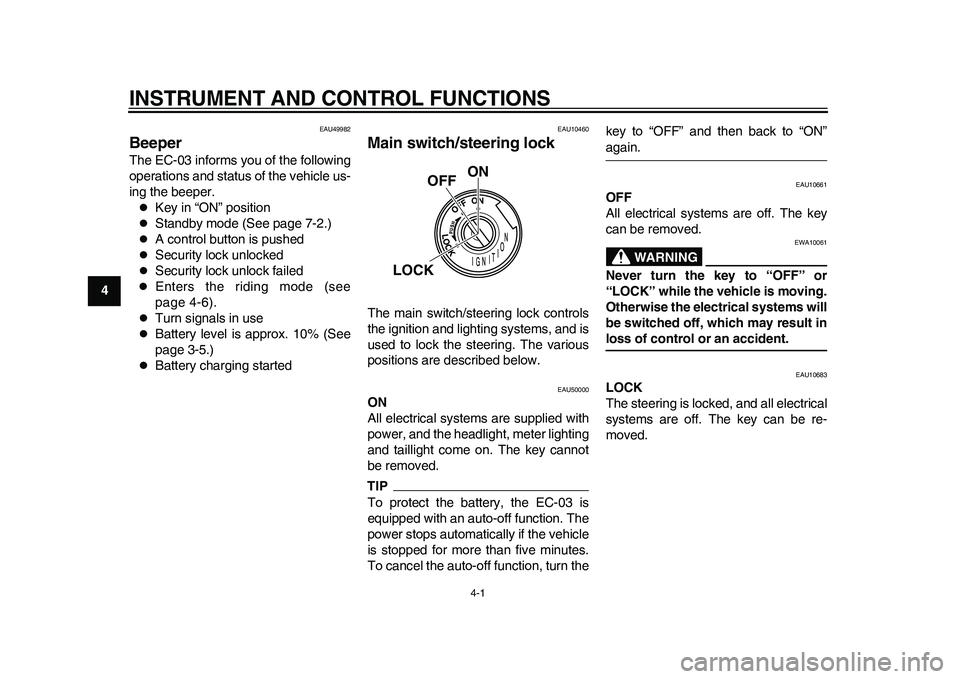
Main switch/steering lock The main switch/steering lock controls
the ignition and lighting systems, and is
used to lock the steering. The various
positions are described below.
EAU50000
ON
All electrical systems are supplied with
power, and the headlight, meter lighting
and taillight come on. The key cannot
be removed.TIPTo protect the battery, the EC-03 is
equipped with an auto-off function. The
power stops automatically if the vehicle
is stopped for more than five minutes.
To cancel the auto-off function, turn thekey to “OFF” and then back to “ON”
again.
EAU10661
OFF
All electrical systems are off. The key
can be removed.
WARNING
EWA10061
Never turn the key to “OFF” or
“LOCK” while the vehicle is moving.
Otherwise the electrical systems will
be switched off, which may result inloss of control or an accident.
EAU10683
LOCK
The steering is locked, and all electrical
systems are off. The key can be re-
moved.
ON
OFF
LOCK
1CB-9-E0.book 1 ページ 2010年10月15日 金曜日 午前10時19分
Page 22 of 78
INSTRUMENT AND CONTROL FUNCTIONS
4-3
1
2
34
5
6
7
8
9
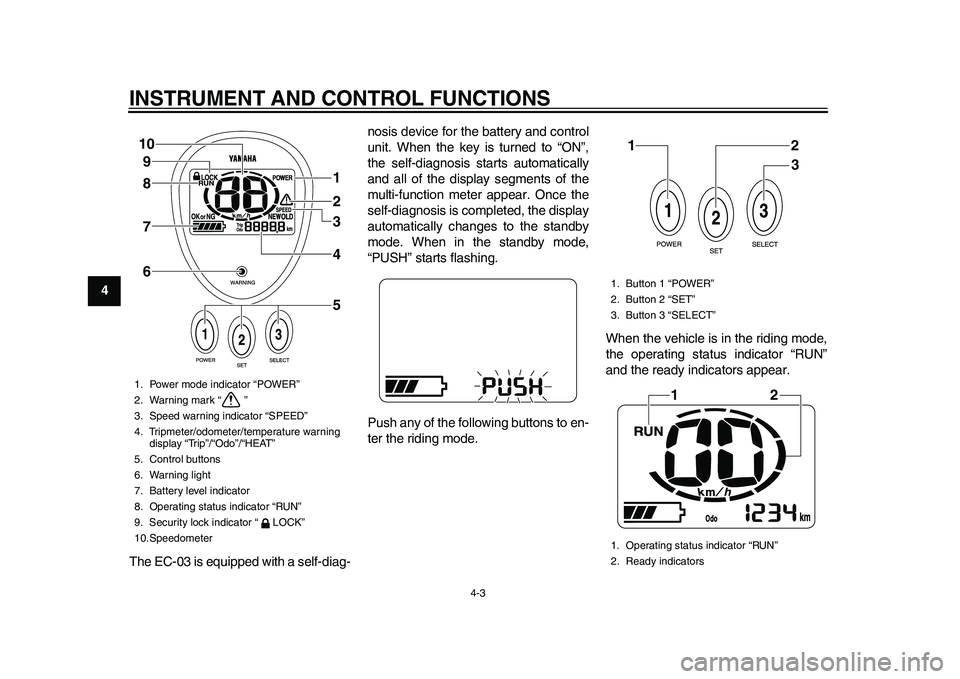
The EC-03 is equipped with a self-diag-nosis device for the battery and control
unit. When the key is turned to “ON”,
the self-diagnosis starts automatically
and all of the display segments of the
multi-function meter appear. Once the
self-diagnosis is completed, the display
automatically changes to the standby
mode. When in the standby mode,
“PUSH” starts flashing.
Push any of the following buttons to en-
ter the riding mode.When the vehicle is in the riding mode,
the operating status indicator “RUN”
and the ready indicators appear.
1. Power mode indicator “POWER”
2. Warning mark “ ”
3. Speed warning indicator “SPEED”
4. Tripmeter/odometer/temperature warning
display “Trip”/“Odo”/“HEAT”
5. Control buttons
6. Warning light
7. Battery level indicator
8. Operating status indicator “RUN”
9. Security lock indicator “ LOCK”
10.Speedometer
1
2
3
4
5 6 7 8 9 10
1. Button 1 “POWER”
2. Button 2 “SET”
3. Button 3 “SELECT”
1. Operating status indicator “RUN”
2. Ready indicators
12
3
12
1CB-9-E0.book 3 ページ 2010年10月15日 金曜日 午前10時19分
Page 24 of 78
INSTRUMENT AND CONTROL FUNCTIONS
4-5
1
2
34
5
6
7
8
9may flash and the riding speed
may be reduced.
When the battery level indicator
shows less than two segments, if
the vehicle is exposed to higher
temperatures, “COOL” may flash
and the riding speed may be re-
duced.
When riding on a long uphill
stretch, “HEAT” may flash and the
riding speed may be reduced.
When riding on a long uphill
stretch, the temperature of the
control unit may rise and “HEAT”
may flash. If you ride continually,
the operating status indicator
“RUN” goes off to protect the con-
trol unit and further riding may be
impossible, but this is not a mal-function.
The vehicle can be ridden when the op-
erating status indicator “RUN” appears
in the display, however riding speed
may be reduced. This is due to reduced
electric output from the battery be-
cause of high battery temperature.If the battery level indicator shows less
than two segments, or the electric out-
put from the battery is limited because
of the battery temperature, the riding
power is substantially reduced, but this
is not a malfunction.
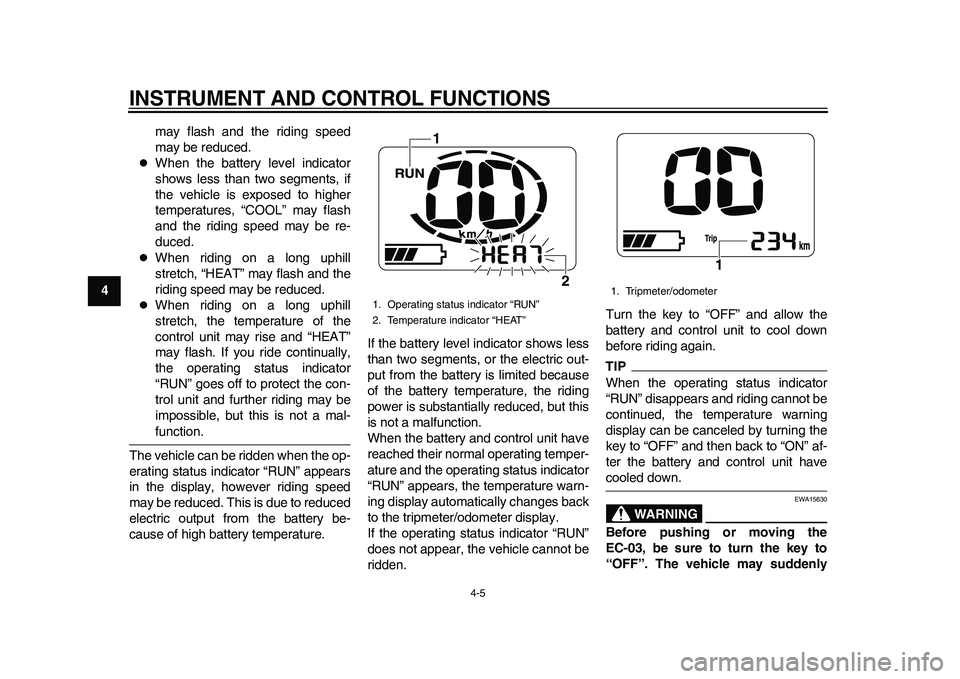
When the battery and control unit have
reached their normal operating temper-
ature and the operating status indicator
“RUN” appears, the temperature warn-
ing display automatically changes back
to the tripmeter/odometer display.
If the operating status indicator “RUN”
does not appear, the vehicle cannot be
ridden.Turn the key to “OFF” and allow the
battery and control unit to cool down
before riding again.
TIPWhen the operating status indicator
“RUN” disappears and riding cannot be
continued, the temperature warning
display can be canceled by turning the
key to “OFF” and then back to “ON” af-
ter the battery and control unit havecooled down.
WARNING
EWA15630
Before pushing or moving the
EC-03, be sure to turn the key to
“OFF”. The vehicle may suddenly
1. Operating status indicator “RUN”
2. Temperature indicator “HEAT”
1
2
1. Tripmeter/odometer
1
1CB-9-E0.book 5 ページ 2010年10月15日 金曜日 午前10時19分
Page 25 of 78
INSTRUMENT AND CONTROL FUNCTIONS
4-6
2
345
6
7
8
9 start to move if the accelerator grip
is turned while the key is turned to
“ON”.
Speed warning indicator “SPEED”
If the vehicle speed exceeds 45 km/h,
the speed warning indicator appears
and the warning light flashes.
Operating status indicator “RUN”
This indicator appears when the vehi-
cle can be ridden.
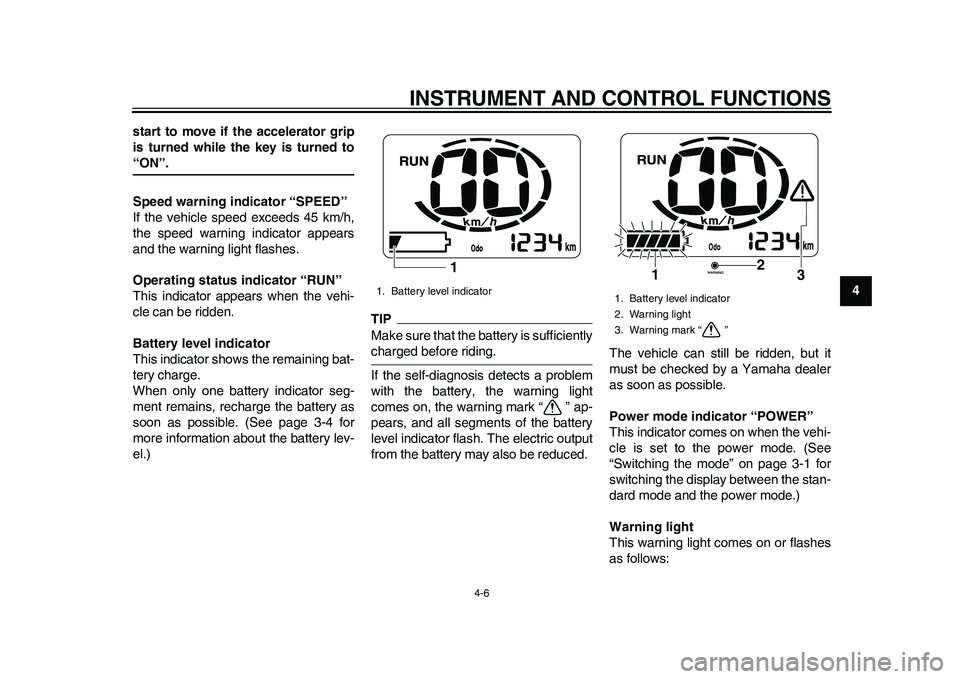
Battery level indicator
This indicator shows the remaining bat-
tery charge.
When only one battery indicator seg-
ment remains, recharge the battery as
soon as possible. (See page 3-4 for
more information about the battery lev-
el.)
TIPMake sure that the battery is sufficientlycharged before riding.
If the self-diagnosis detects a problem
with the battery, the warning light
comes on, the warning mark “ ” ap-
pears, and all segments of the battery
level indicator flash. The electric output
from the battery may also be reduced.The vehicle can still be ridden, but it
must be checked by a Yamaha dealer
as soon as possible.
Power mode indicator “POWER”
This indicator comes on when the vehi-
cle is set to the power mode. (See
“Switching the mode” on page 3-1 for
switching the display between the stan-
dard mode and the power mode.)
Warning light
This warning light comes on or flashes
as follows:1. Battery level indicator
1
1. Battery level indicator
2. Warning light
3. Warning mark “ ”
2
1
3
1CB-9-E0.book 6 ページ 2010年10月15日 金曜日 午前10時19分
Page 38 of 78
CHARGING THE BATTERY
6-4
1
2
3
4
56
7
8
9dow.
Do not pull or apply excessive
force to the charging cord.
Do not drop the charging cord
or charging plug or expose it to
strong impact.
Do not secure the charging cord
or charging plug in a place with
sharp objects such as a nail.
Do not step on the charging
cord or charging plug or place
any object on them.
Do not leave the charging cord
or charging plug near a heater
or other source of heat.
Do not modify the charging cord
or charging plug.
Park the vehicle carefully so the
charging cord cannot be
pinched, stepped on, or pulled
accidentally. Also be sure the
vehicle cannot be knocked over
which could stretch or damage
the charging cord or charging
plug.
Do not pull the charging cord to
unplug the charging plug from
the electrical outlet. Pull only
the charging plug.
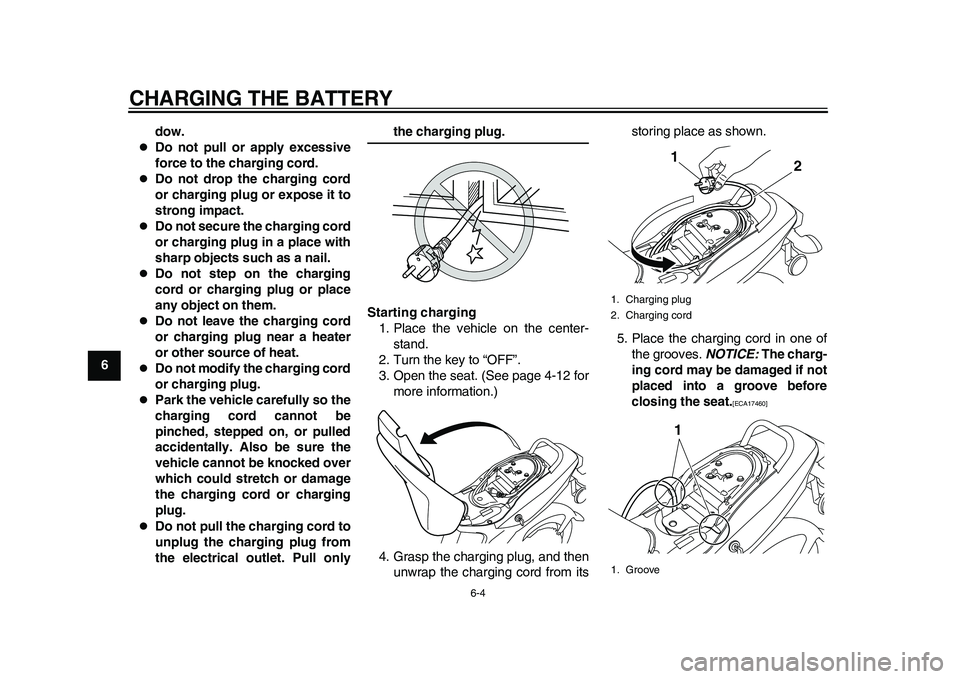
Starting charging
1. Place the vehicle on the center-
stand.
2. Turn the key to “OFF”.
3. Open the seat. (See page 4-12 for
more information.)
4. Grasp the charging plug, and then
unwrap the charging cord from itsstoring place as shown.
5. Place the charging cord in one of
the grooves. NOTICE: The charg-
ing cord may be damaged if not
placed into a groove before
closing the seat.
[ECA17460]
1. Charging plug
2. Charging cord
1. Groove
1
21
1CB-9-E0.book 4 ページ 2010年10月15日 金曜日 午前10時19分
Page 39 of 78
CHARGING THE BATTERY
6-5
2
3
4
567
8
9 6. Close the seat and push down on
the back to lock it in position.
TIPBefore closing the seat, make sure thatnothing is left under it.
7. Remove the key. To help prevent
theft, be sure to lock the steering,
and then remove the key when
charging the battery.
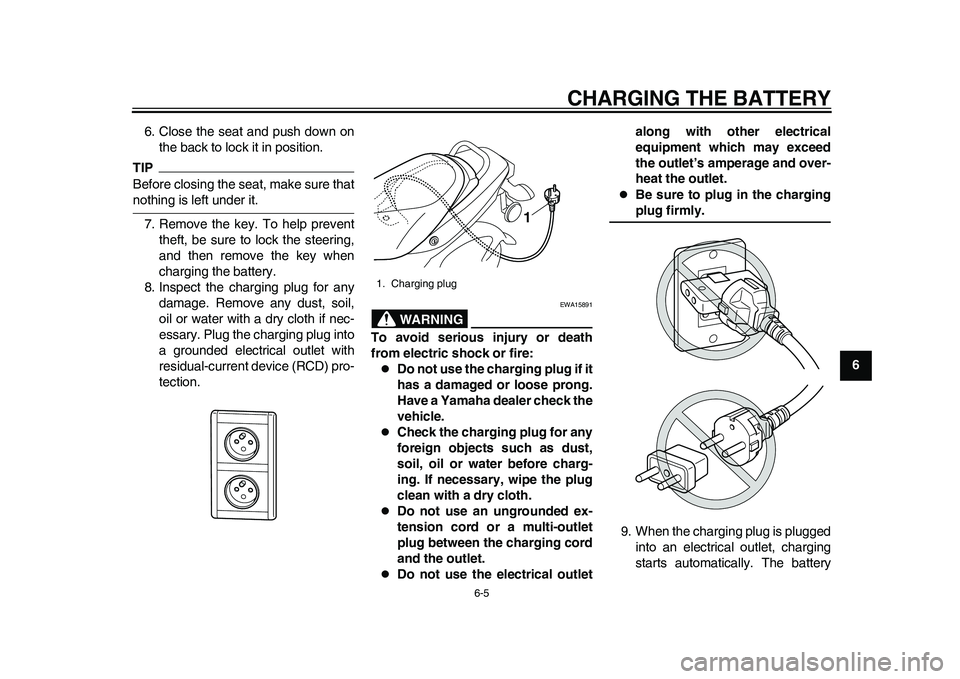
8. Inspect the charging plug for any
damage. Remove any dust, soil,
oil or water with a dry cloth if nec-
essary. Plug the charging plug into
a grounded electrical outlet with
residual-current device (RCD) pro-
tection.
WARNING
EWA15891
To avoid serious injury or death
from electric shock or fire:
Do not use the charging plug if it
has a damaged or loose prong.
Have a Yamaha dealer check the
vehicle.
Check the charging plug for any
foreign objects such as dust,
soil, oil or water before charg-
ing. If necessary, wipe the plug
clean with a dry cloth.
Do not use an ungrounded ex-
tension cord or a multi-outlet
plug between the charging cord
and the outlet.
Do not use the electrical outletalong with other electrical
equipment which may exceed
the outlet’s amperage and over-
heat the outlet.
Be sure to plug in the chargingplug firmly.
9. When the charging plug is plugged
into an electrical outlet, charging
starts automatically. The battery
1. Charging plug
1
1CB-9-E0.book 5 ページ 2010年10月15日 金曜日 午前10時19分
Page 41 of 78
CHARGING THE BATTERY
6-7
2
3
4
567
8
9 pears in the display during charg-
ing. The display goes off if the
charging plug is unplugged during
charging.
Even if the key is turned to “ON”,
the vehicle does not enter thestandby mode during charging.
Completing charging
When the battery is fully charged, the
display goes off automatically after a
few minutes.
1. Grasp the charging plug, and then
unplug it from the electrical outlet.
NOTICE: Do not pull the charg-
ing cord to unplug the charging
plug from the electrical outlet.
This could damage the charging
cord.
[ECA17470]
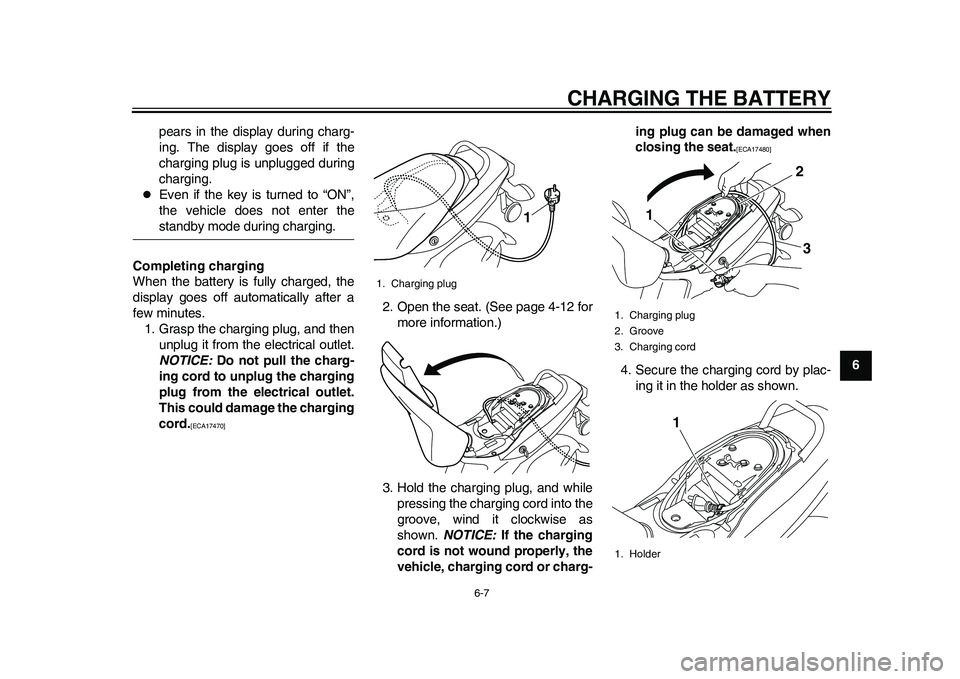
2. Open the seat. (See page 4-12 for
more information.)
3. Hold the charging plug, and while
pressing the charging cord into the
groove, wind it clockwise as
shown. NOTICE: If the charging
cord is not wound properly, the
vehicle, charging cord or charg-ing plug can be damaged when
closing the seat.
[ECA17480]
4. Secure the charging cord by plac-
ing it in the holder as shown.
1. Charging plug
1
1. Charging plug
2. Groove
3. Charging cord
1. Holder
12
3
1
1CB-9-E0.book 7 ページ 2010年10月15日 金曜日 午前10時19分
Page 42 of 78
CHARGING THE BATTERY
6-8
1
2
3
4
56
7
8
95. Close the seat, and push down on
the back to lock it in position.
TIP
Before closing the seat, make sure
that nothing is left under the seat.
Make sure that the seat is securelylocked before riding.
6. Remove the key.WARNING
EWA15900
When not in use, do not leave the
charging plug plugged into an out-
let. Dust or foreign objects could
build up and cause a fire. Be sure to
unplug the charging plug from theoutlet after use.
EAU50402
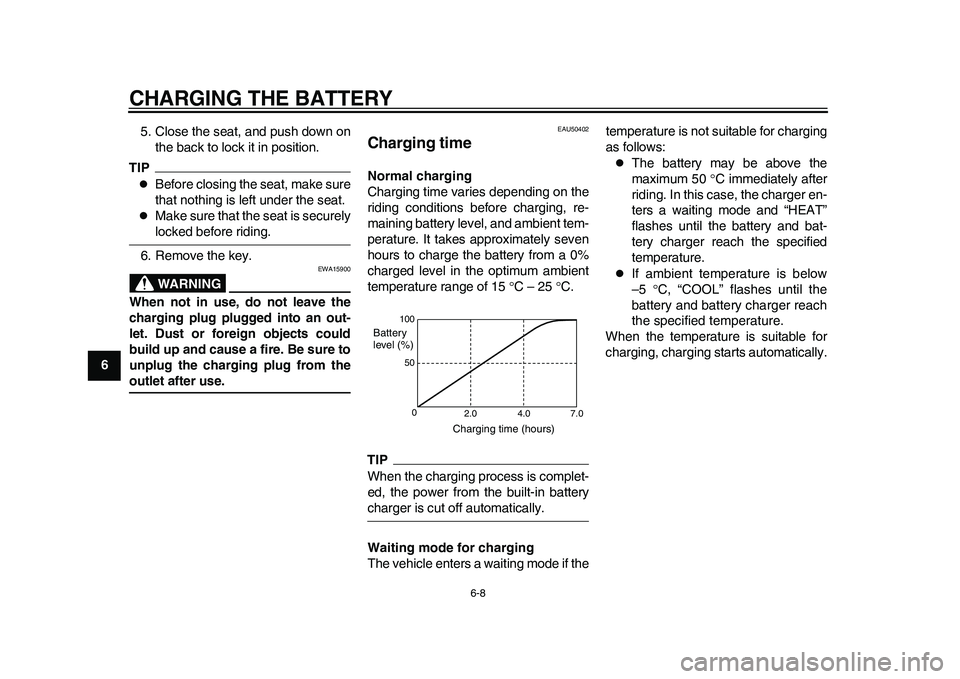
Charging time Normal charging
Charging time varies depending on the
riding conditions before charging, re-
maining battery level, and ambient tem-
perature. It takes approximately seven
hours to charge the battery from a 0%
charged level in the optimum ambient
temperature range of 15 C – 25 C.TIPWhen the charging process is complet-
ed, the power from the built-in batterycharger is cut off automatically.
Waiting mode for charging
The vehicle enters a waiting mode if thetemperature is not suitable for charging
as follows:
The battery may be above the
maximum 50 C immediately after
riding. In this case, the charger en-
ters a waiting mode and “HEAT”
flashes until the battery and bat-
tery charger reach the specified
temperature.
If ambient temperature is below
–5 C, “COOL” flashes until the
battery and battery charger reach
the specified temperature.
When the temperature is suitable for
charging, charging starts automatically.
100
50
0
2.0 4.0 7.0
Charging time (hours) Battery
level (%)
1CB-9-E0.book 8 ページ 2010年10月15日 金曜日 午前10時19分