lock YAMAHA MT07 TRACER 2018 User Guide
[x] Cancel search | Manufacturer: YAMAHA, Model Year: 2018, Model line: MT07 TRACER, Model: YAMAHA MT07 TRACER 2018Pages: 102, PDF Size: 5.6 MB
Page 30 of 102
Instrument and control functions
3-16
3
EAU63040
ABS
The Yamaha ABS (Anti-lock Brake
System) features a dual electronic con-
trol system, which acts on the front and
rear brakes independently.
Operate the brakes with ABS as you
would conventional brakes. If the ABS
is activated, a pulsating sensation may
be felt at the brake lever or brake ped-
al. In this situation, continue to apply
the brakes and let the ABS work; do
not “pump” the brakes as this will re-
duce braking effectiveness.
WARNING
EWA16051
Always keep a sufficient distance
from the vehicle ahead to match the
riding speed even with ABS.
The ABS performs best with
long braking distances.
On certain surfaces, such as
rough or gravel roads, the brak-
ing distance may be longer with
the ABS than without.
The ABS is monitored by an ECU,
which will revert the system to conven-
tional braking if a malfunction occurs.
TIP
The ABS performs a self-diagno-
sis test each time the vehicle first
starts off after the key is turned to
“ON” and the vehicle has traveled
at a speed of 10 km/h (6 mi/h) or
higher. During this test, a “click-
ing” noise can be heard from the
hydraulic control unit, and if the
brake lever or brake pedal is even
slightly applied, a vibration can be
felt at the lever and pedal, but
these do not indicate a malfunc-
tion.This ABS has a test mode which
allows the owner to experience
the pulsation at the brake lever or
brake pedal when the ABS is op-
erating. However, special tools are
required, so please consult your
Yamaha dealer.
NOTICE
ECA20100
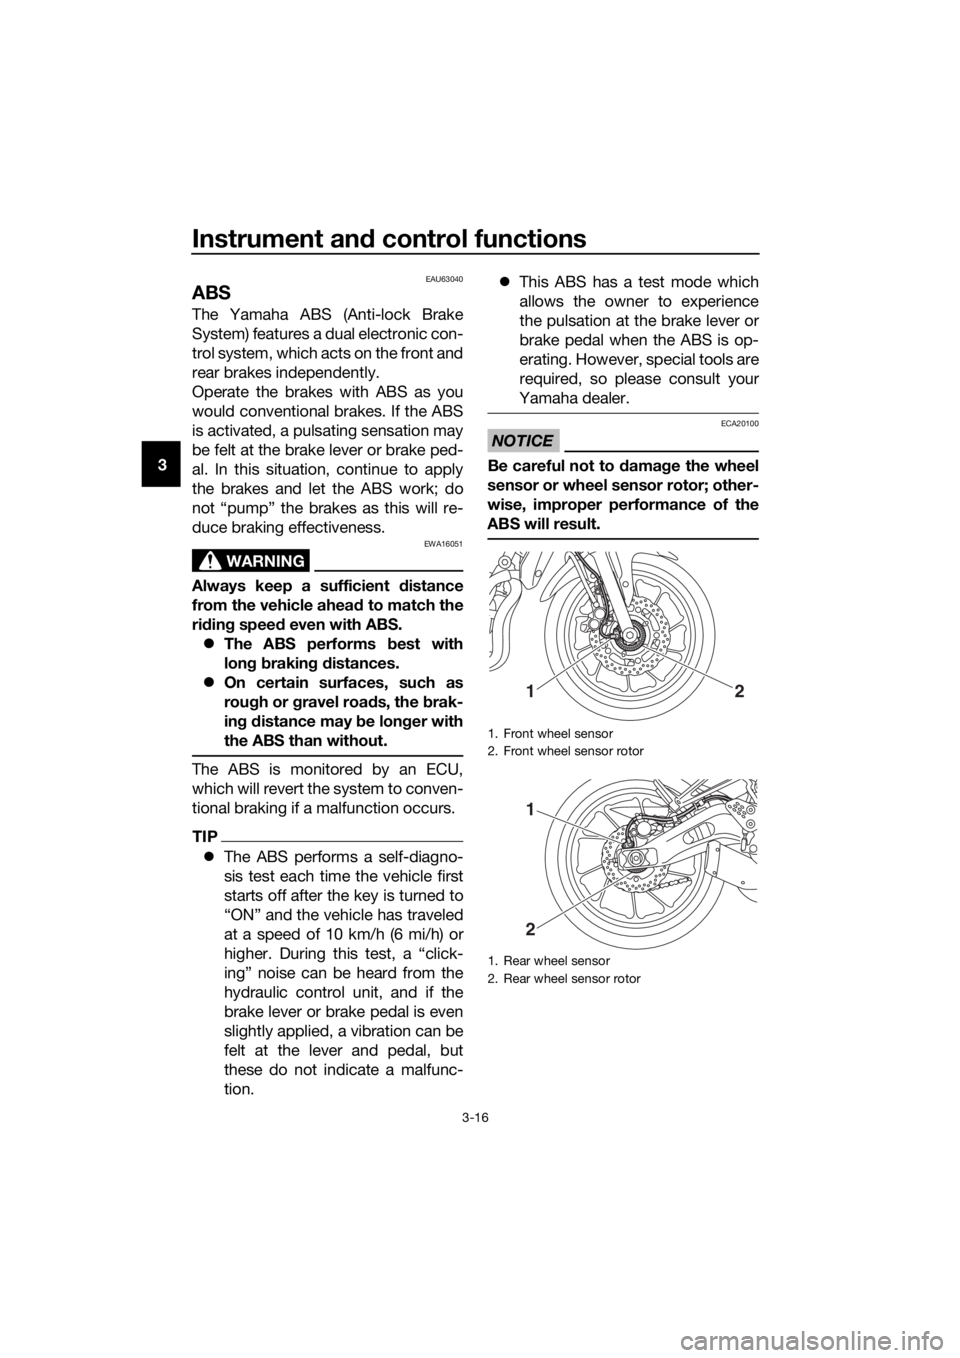
Be careful not to damage the wheel
sensor or wheel sensor rotor; other-
wise, improper performance of the
ABS will result.
1. Front wheel sensor
2. Front wheel sensor rotor
1. Rear wheel sensor
2. Rear wheel sensor rotor
12
1
2
UBC6E2E0.book Page 16 Tuesday, July 10, 2018 6:26 PM
Page 31 of 102
Instrument and control functions
3-17
3
EAU13075
Fuel tank cap
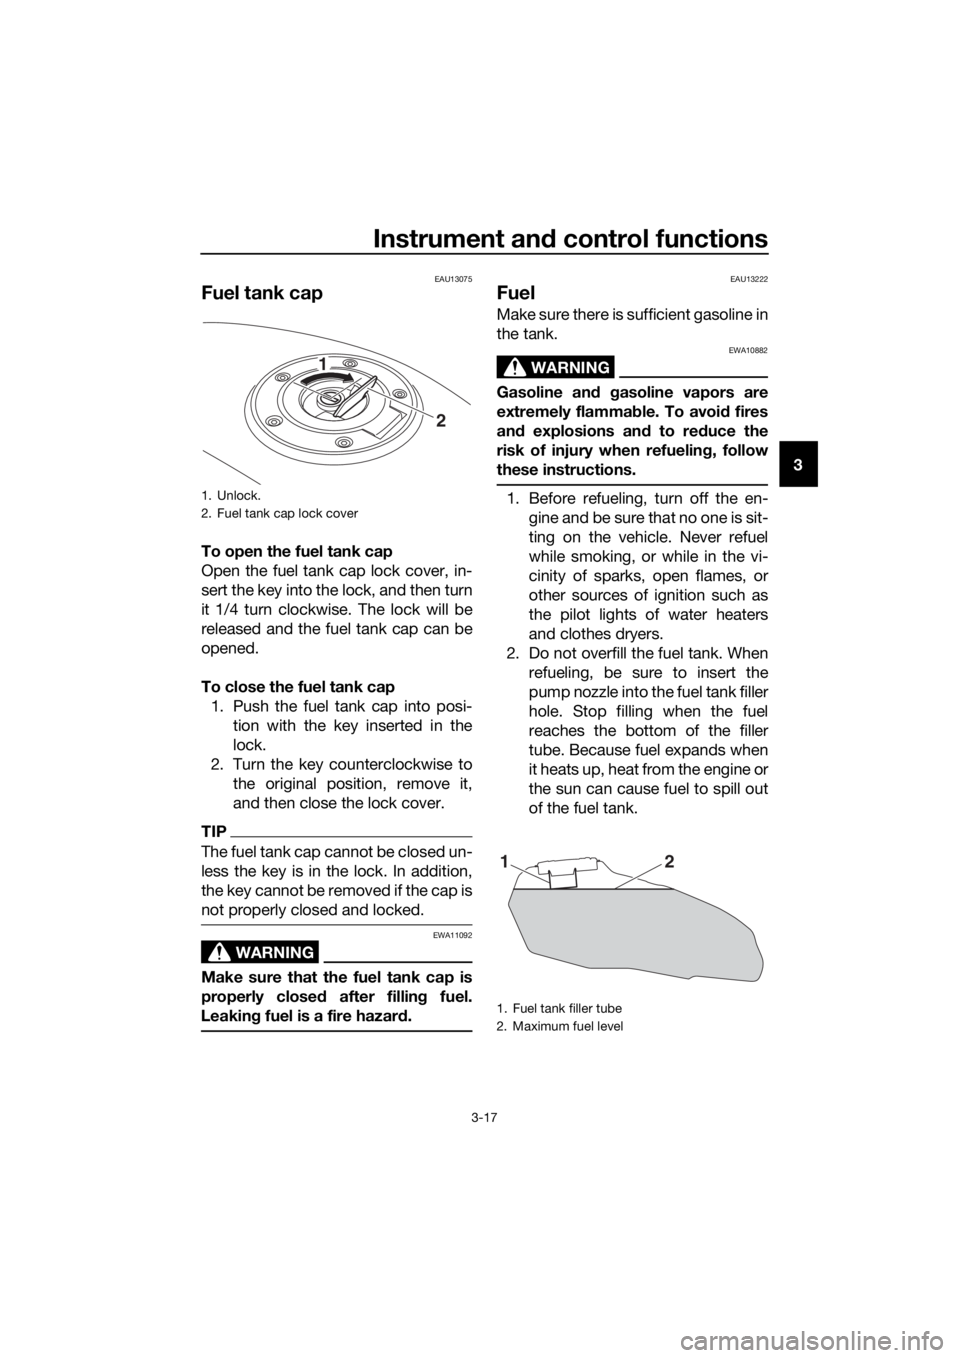
To open the fuel tank cap
Open the fuel tank cap lock cover, in-
sert the key into the lock, and then turn
it 1/4 turn clockwise. The lock will be
released and the fuel tank cap can be
opened.
To close the fuel tank cap
1. Push the fuel tank cap into posi-
tion with the key inserted in the
lock.
2. Turn the key counterclockwise to
the original position, remove it,
and then close the lock cover.
TIP
The fuel tank cap cannot be closed un-
less the key is in the lock. In addition,
the key cannot be removed if the cap is
not properly closed and locked.
WARNING
EWA11092
Make sure that the fuel tank cap is
properly closed after filling fuel.
Leaking fuel is a fire hazard.
EAU13222
Fuel
Make sure there is sufficient gasoline in
the tank.
WARNING
EWA10882
Gasoline and gasoline vapors are
extremely flammable. To avoid fires
and explosions and to reduce the
risk of injury when refueling, follow
these instructions.
1. Before refueling, turn off the en-
gine and be sure that no one is sit-
ting on the vehicle. Never refuel
while smoking, or while in the vi-
cinity of sparks, open flames, or
other sources of ignition such as
the pilot lights of water heaters
and clothes dryers.
2. Do not overfill the fuel tank. When
refueling, be sure to insert the
pump nozzle into the fuel tank filler
hole. Stop filling when the fuel
reaches the bottom of the filler
tube. Because fuel expands when
it heats up, heat from the engine or
the sun can cause fuel to spill out
of the fuel tank.1. Unlock.
2. Fuel tank cap lock cover
2 1
1. Fuel tank filler tube
2. Maximum fuel level
21
UBC6E2E0.book Page 17 Tuesday, July 10, 2018 6:26 PM
Page 33 of 102
Instrument and control functions
3-19
3
EAU55512
Fuel tank breather hose and
overflow hose
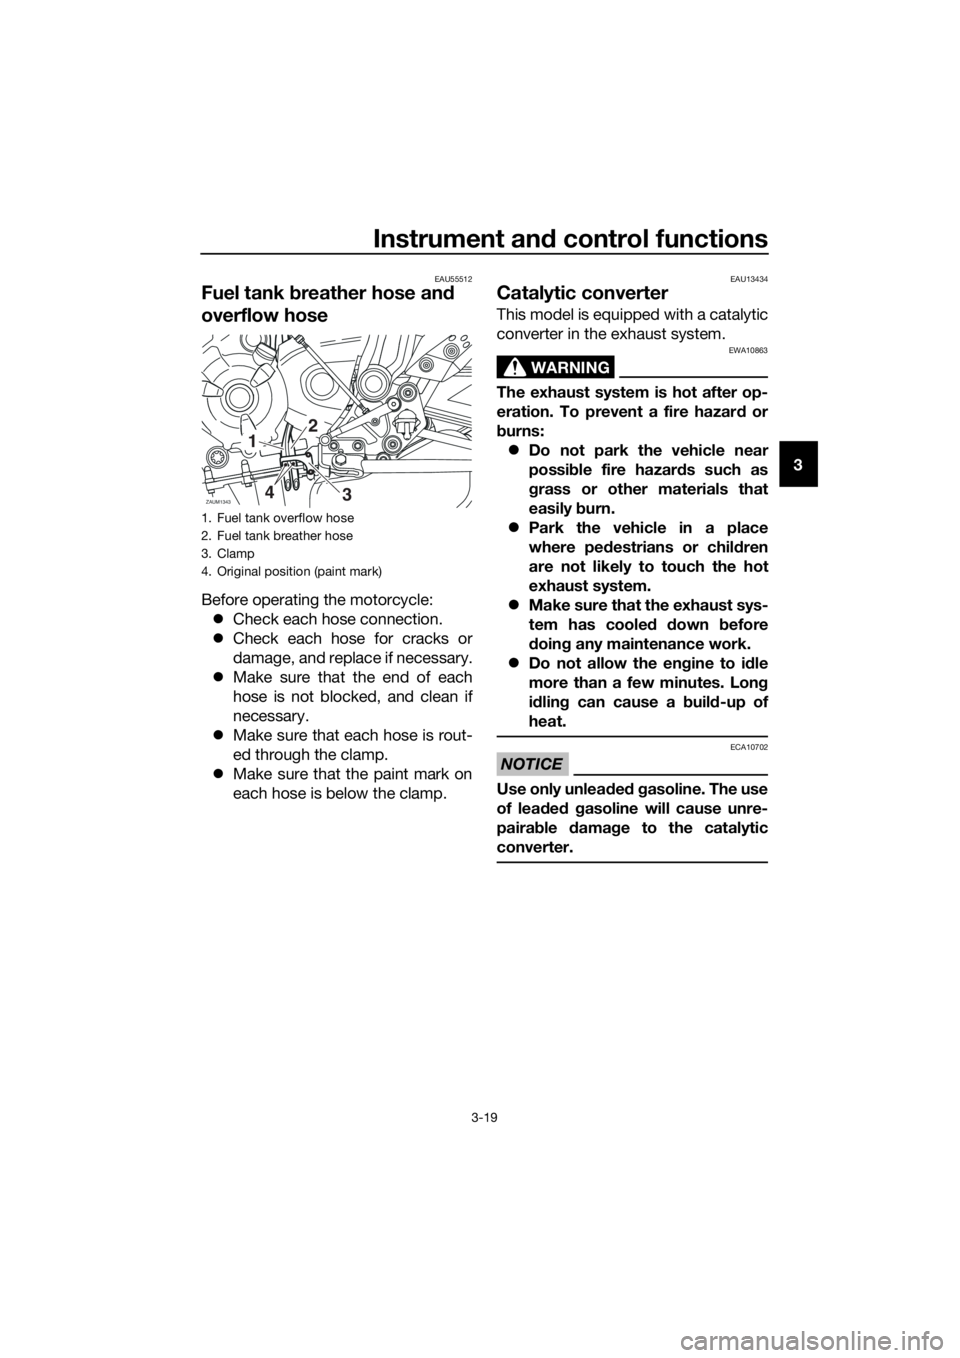
Before operating the motorcycle:
Check each hose connection.
Check each hose for cracks or
damage, and replace if necessary.
Make sure that the end of each
hose is not blocked, and clean if
necessary.
Make sure that each hose is rout-
ed through the clamp.
Make sure that the paint mark on
each hose is below the clamp.
EAU13434
Catalytic converter
This model is equipped with a catalytic
converter in the exhaust system.
WARNING
EWA10863
The exhaust system is hot after op-
eration. To prevent a fire hazard or
burns:
Do not park the vehicle near
possible fire hazards such as
grass or other materials that
easily burn.
Park the vehicle in a place
where pedestrians or children
are not likely to touch the hot
exhaust system.
Make sure that the exhaust sys-
tem has cooled down before
doing any maintenance work.
Do not allow the engine to idle
more than a few minutes. Long
idling can cause a build-up of
heat.
NOTICE
ECA10702
Use only unleaded gasoline. The use
of leaded gasoline will cause unre-
pairable damage to the catalytic
converter.
1. Fuel tank overflow hose
2. Fuel tank breather hose
3. Clamp
4. Original position (paint mark)
ZAUM1343
12
34
UBC6E2E0.book Page 19 Tuesday, July 10, 2018 6:26 PM
Page 34 of 102
Instrument and control functions
3-20
3
EAUM3740
Seat
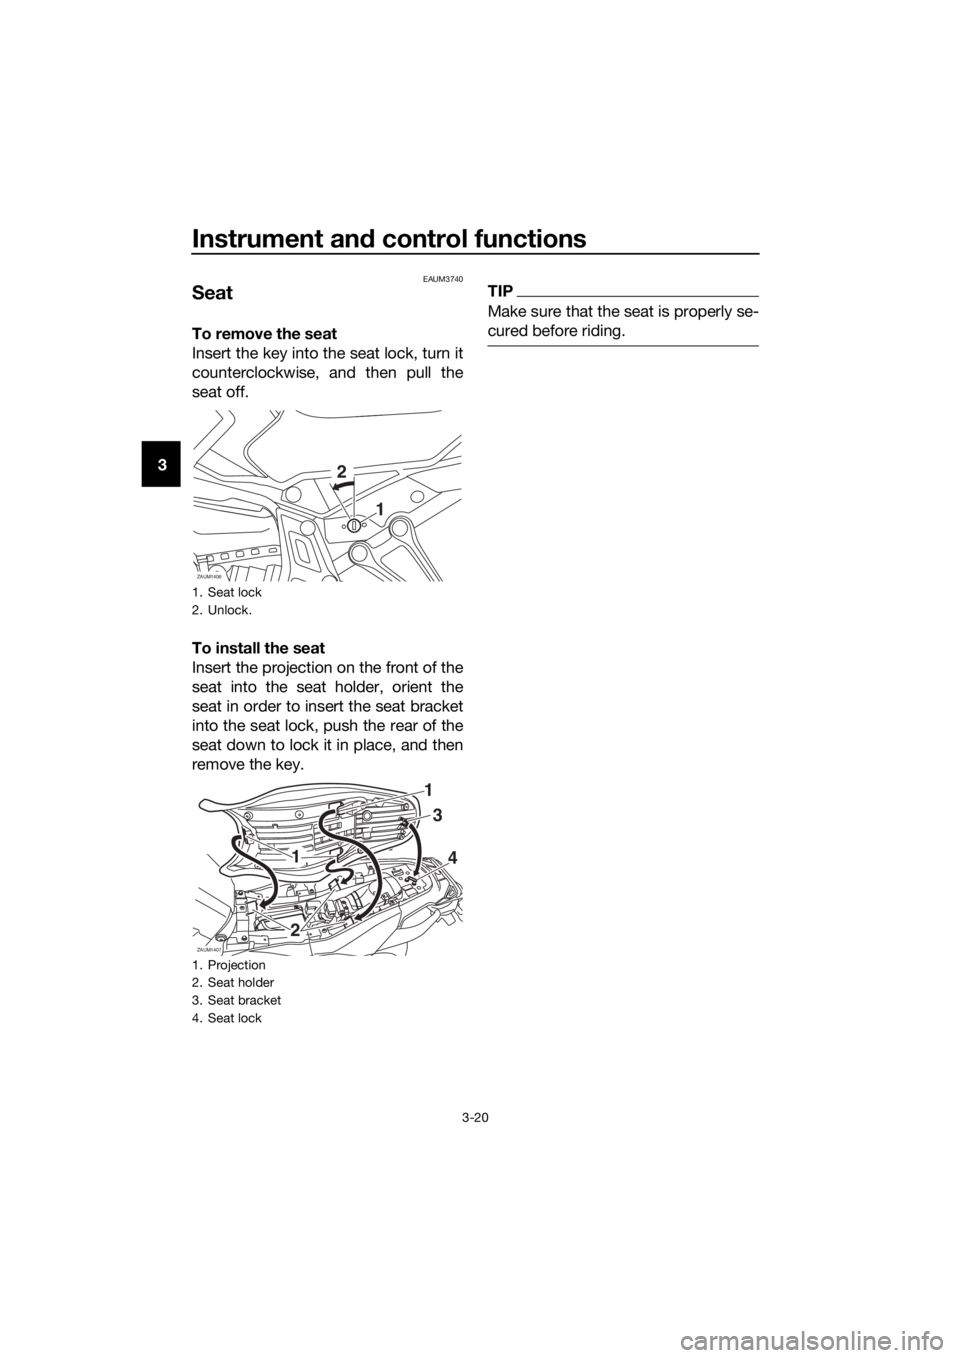
To remove the seat
Insert the key into the seat lock, turn it
counterclockwise, and then pull the
seat off.
To install the seat
Insert the projection on the front of the
seat into the seat holder, orient the
seat in order to insert the seat bracket
into the seat lock, push the rear of the
seat down to lock it in place, and then
remove the key.
TIP
Make sure that the seat is properly se-
cured before riding.
1. Seat lock
2. Unlock.
1. Projection
2. Seat holder
3. Seat bracket
4. Seat lock
1
2
ZAUM1406
ZAUM1407
1
1
2
4
3
UBC6E2E0.book Page 20 Tuesday, July 10, 2018 6:26 PM
Page 57 of 102
Periodic maintenance and adjustment
6-9
6
EAU36112
Canister
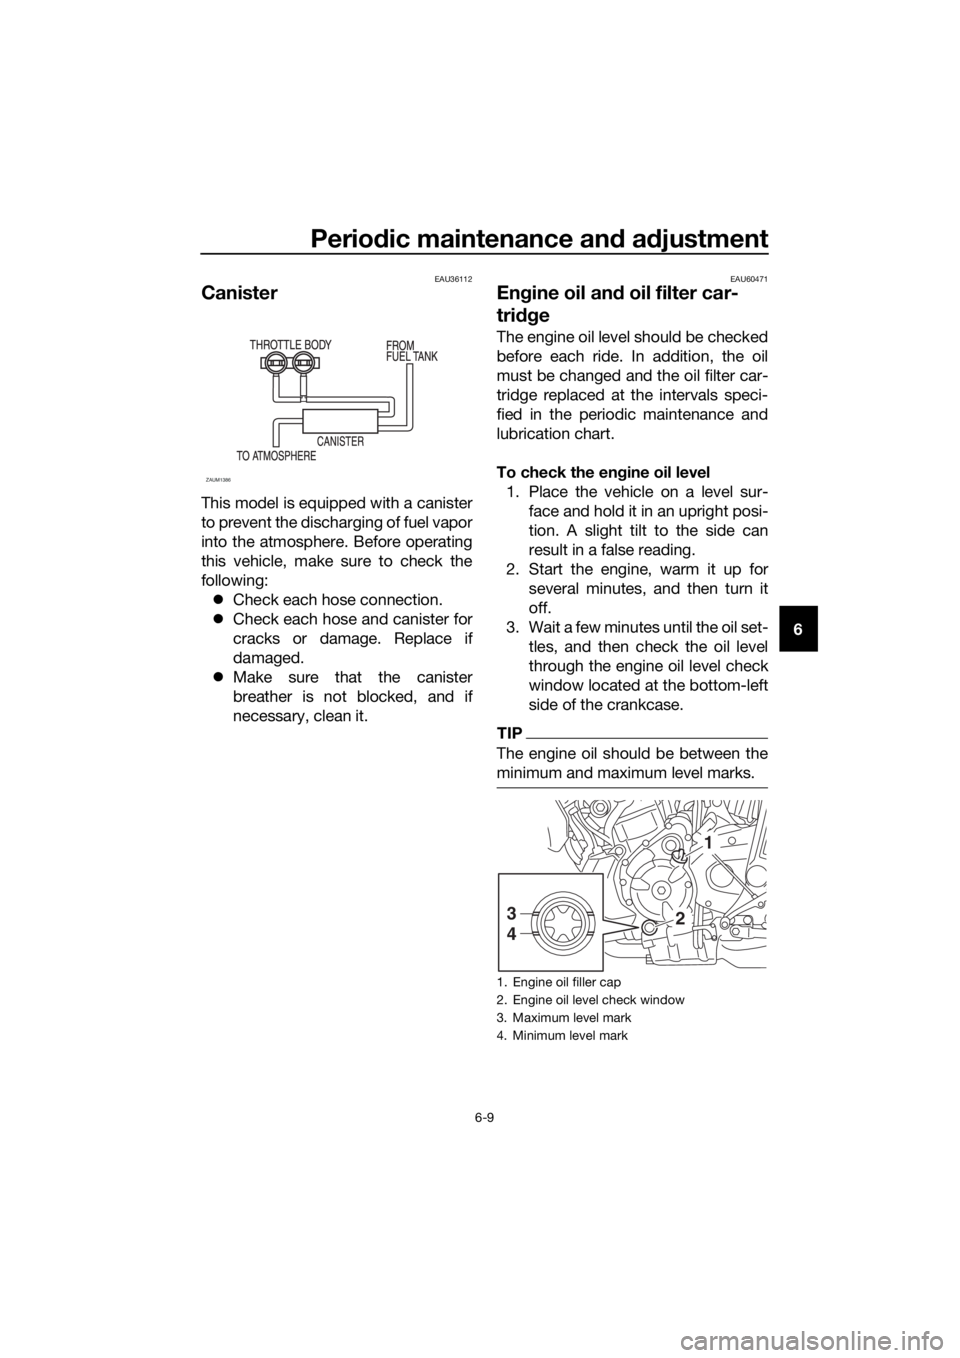
This model is equipped with a canister
to prevent the discharging of fuel vapor
into the atmosphere. Before operating
this vehicle, make sure to check the
following:
Check each hose connection.
Check each hose and canister for
cracks or damage. Replace if
damaged.
Make sure that the canister
breather is not blocked, and if
necessary, clean it.
EAU60471
Engine oil and oil filter car-
tridge
The engine oil level should be checked
before each ride. In addition, the oil
must be changed and the oil filter car-
tridge replaced at the intervals speci-
fied in the periodic maintenance and
lubrication chart.
To check the engine oil level
1. Place the vehicle on a level sur-
face and hold it in an upright posi-
tion. A slight tilt to the side can
result in a false reading.
2. Start the engine, warm it up for
several minutes, and then turn it
off.
3. Wait a few minutes until the oil set-
tles, and then check the oil level
through the engine oil level check
window located at the bottom-left
side of the crankcase.
TIP
The engine oil should be between the
minimum and maximum level marks.
ZAUM1386
1. Engine oil filler cap
2. Engine oil level check window
3. Maximum level mark
4. Minimum level mark
1
2 3
4
UBC6E2E0.book Page 9 Tuesday, July 10, 2018 6:26 PM
Page 67 of 102
Periodic maintenance and adjustment
6-19
6
EAU21963
Cast wheels
To maximize the performance, durabil-
ity, and safe operation of your vehicle,
note the following points regarding the
specified wheels.
The wheel rims should be
checked for cracks, bends, warp-
age or other damage before each
ride. If any damage is found, have
a Yamaha dealer replace the
wheel. Do not attempt even the
smallest repair to the wheel. A de-
formed or cracked wheel must be
replaced.
The wheel should be balanced
whenever either the tire or wheel
has been changed or replaced. An
unbalanced wheel can result in
poor performance, adverse han-
dling characteristics, and a short-
ened tire life.
EAU33892
Adjusting the clutch lever free
play
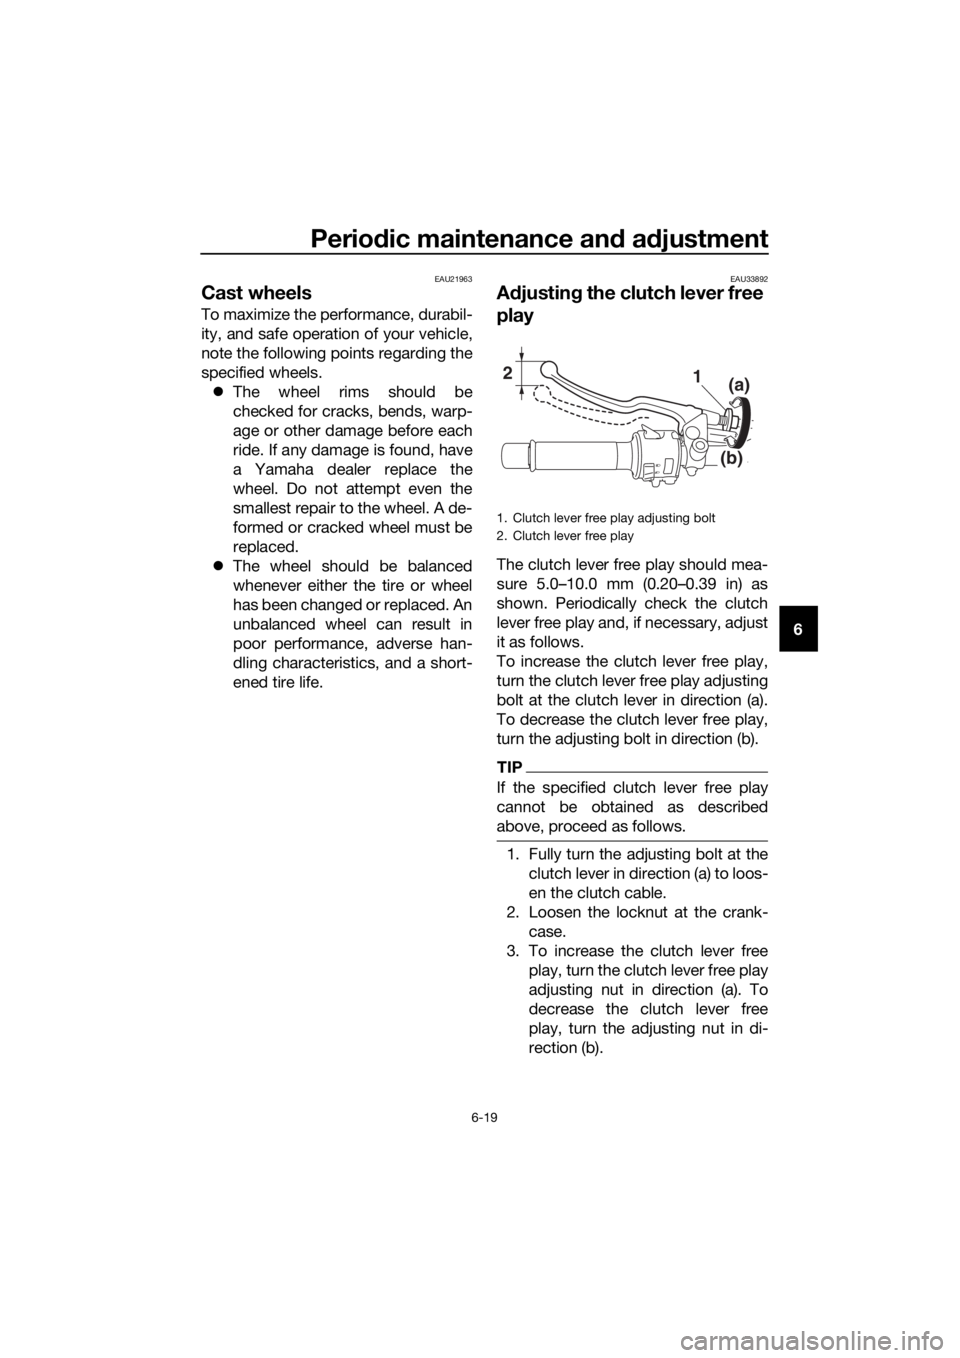
The clutch lever free play should mea-
sure 5.0–10.0 mm (0.20–0.39 in) as
shown. Periodically check the clutch
lever free play and, if necessary, adjust
it as follows.
To increase the clutch lever free play,
turn the clutch lever free play adjusting
bolt at the clutch lever in direction (a).
To decrease the clutch lever free play,
turn the adjusting bolt in direction (b).
TIP
If the specified clutch lever free play
cannot be obtained as described
above, proceed as follows.
1. Fully turn the adjusting bolt at the
clutch lever in direction (a) to loos-
en the clutch cable.
2. Loosen the locknut at the crank-
case.
3. To increase the clutch lever free
play, turn the clutch lever free play
adjusting nut in direction (a). To
decrease the clutch lever free
play, turn the adjusting nut in di-
rection (b).
1. Clutch lever free play adjusting bolt
2. Clutch lever free play
21
(b)(a)
UBC6E2E0.book Page 19 Tuesday, July 10, 2018 6:26 PM
Page 68 of 102
Periodic maintenance and adjustment
6-20
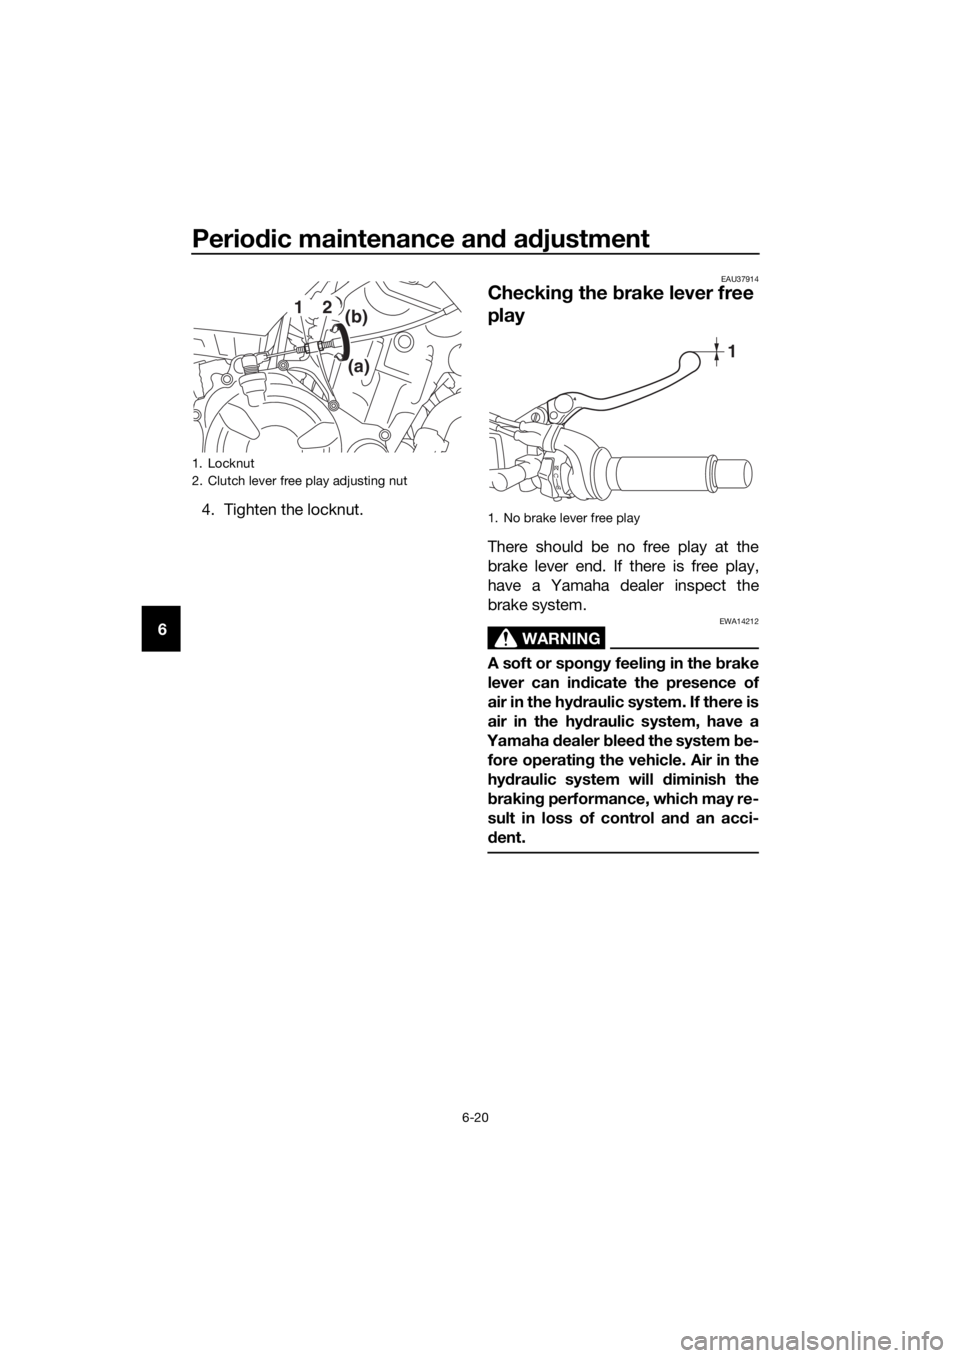
64. Tighten the locknut.
EAU37914
Checking the brake lever free
play
There should be no free play at the
brake lever end. If there is free play,
have a Yamaha dealer inspect the
brake system.
WARNING
EWA14212
A soft or spongy feeling in the brake
lever can indicate the presence of
air in the hydraulic system. If there is
air in the hydraulic system, have a
Yamaha dealer bleed the system be-
fore operating the vehicle. Air in the
hydraulic system will diminish the
braking performance, which may re-
sult in loss of control and an acci-
dent.
1. Locknut
2. Clutch lever free play adjusting nut
12
(a)
(b)
1. No brake lever free play
1
UBC6E2E0.book Page 20 Tuesday, July 10, 2018 6:26 PM
Page 71 of 102
Periodic maintenance and adjustment
6-23
6 Clean the filler cap before re-
moving. Use only DOT 4 brake
fluid from a sealed container.
Use only the specified brake flu-
id; otherwise, the rubber seals
may deteriorate, causing leak-
age.
Refill with the same type of
brake fluid. Adding a brake fluid
other than DOT 4 may result in a
harmful chemical reaction.
Be careful that water or dust
does not enter the brake fluid
reservoir when refilling. Water
will significantly lower the boil-
ing point of the fluid and may re-
sult in vapor lock, and dirt may
clog the ABS hydraulic unit
valves.
NOTICE
ECA17641
Brake fluid may damage painted
surfaces or plastic parts. Always
clean up spilled fluid immediately.
As the brake pads wear, it is normal for
the brake fluid level to gradually go
down. A low brake fluid level may indi-
cate worn brake pads and/or brake
system leakage; therefore, be sure to
check the brake pads for wear and the
brake system for leakage. If the brake
fluid level goes down suddenly, have a
Yamaha dealer check the cause before
further riding.
EAU22733
Changing the brake fluid
Have a Yamaha dealer change the
brake fluid at the intervals specified in
the periodic maintenance and lubrica-
tion chart. In addition, have the oil seals
of the master cylinders and calipers as
well as the brake hoses replaced at the
intervals listed below or whenever they
are damaged or leaking.
Oil seals: Replace every two
years.
Brake hoses: Replace every four
years.
UBC6E2E0.book Page 23 Tuesday, July 10, 2018 6:26 PM
Page 72 of 102
Periodic maintenance and adjustment
6-24
6
EAU22762
Drive chain slack
The drive chain slack should be
checked before each ride and adjusted
if necessary.
EAU60046To check the drive chain slack
1. Place the motorcycle on the side-
stand.
TIP
When checking and adjusting the drive
chain slack, there should be no weight
on the motorcycle.
2. Shift the transmission into the
neutral position.
3. Push down on the drive chain un-
der the end of the drive chain
guard.
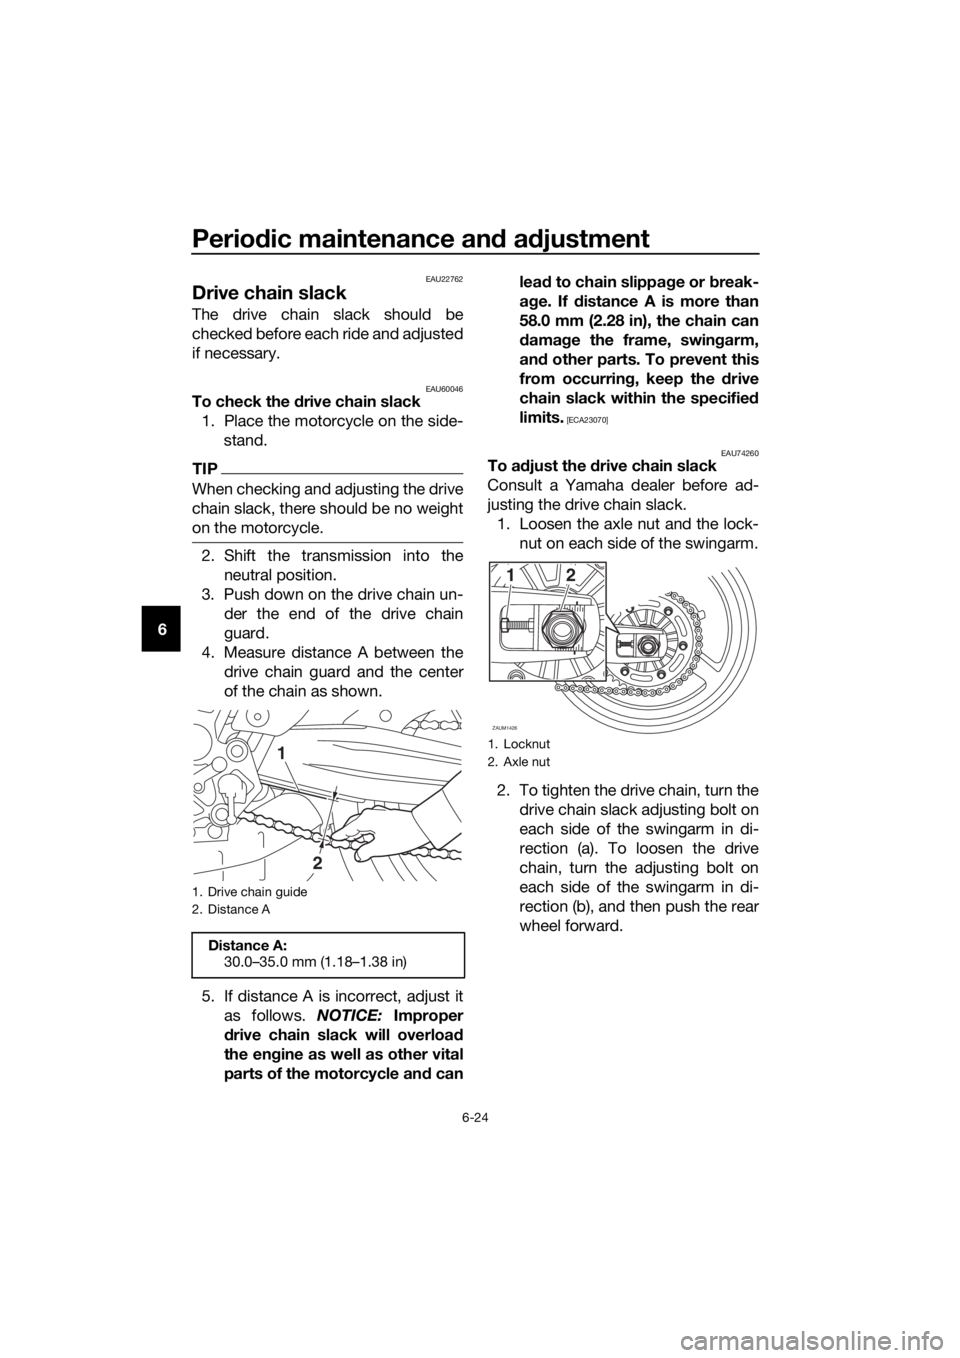
4. Measure distance A between the
drive chain guard and the center
of the chain as shown.
5. If distance A is incorrect, adjust it
as follows. NOTICE: Improper
drive chain slack will overload
the engine as well as other vital
parts of the motorcycle and canlead to chain slippage or break-
age. If distance A is more than
58.0 mm (2.28 in), the chain can
damage the frame, swingarm,
and other parts. To prevent this
from occurring, keep the drive
chain slack within the specified
limits.
[ECA23070]
EAU74260
To adjust the drive chain slack
Consult a Yamaha dealer before ad-
justing the drive chain slack.
1. Loosen the axle nut and the lock-
nut on each side of the swingarm.
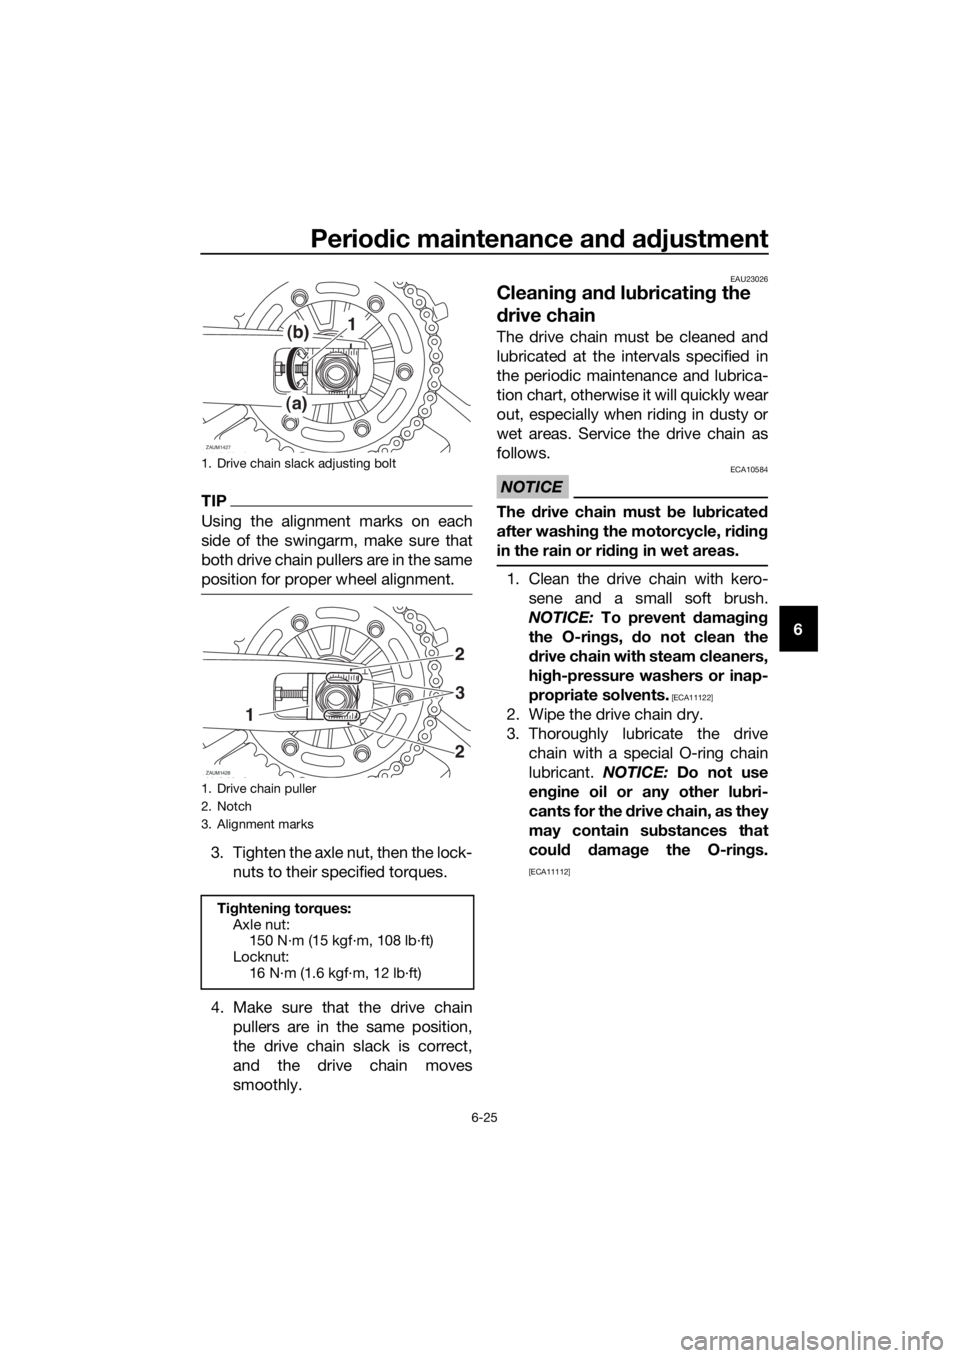
2. To tighten the drive chain, turn the
drive chain slack adjusting bolt on
each side of the swingarm in di-
rection (a). To loosen the drive
chain, turn the adjusting bolt on
each side of the swingarm in di-
rection (b), and then push the rear
wheel forward.
1. Drive chain guide
2. Distance A
Distance A:
30.0–35.0 mm (1.18–1.38 in)
2
11. Locknut
2. Axle nut
ZAUM1426
12
UBC6E2E0.book Page 24 Tuesday, July 10, 2018 6:26 PM
Page 73 of 102
Periodic maintenance and adjustment
6-25
6
TIP
Using the alignment marks on each
side of the swingarm, make sure that
both drive chain pullers are in the same
position for proper wheel alignment.
3. Tighten the axle nut, then the lock-
nuts to their specified torques.
4. Make sure that the drive chain
pullers are in the same position,
the drive chain slack is correct,
and the drive chain moves
smoothly.
EAU23026
Cleaning and lubricating the
drive chain
The drive chain must be cleaned and
lubricated at the intervals specified in
the periodic maintenance and lubrica-
tion chart, otherwise it will quickly wear
out, especially when riding in dusty or
wet areas. Service the drive chain as
follows.
NOTICE
ECA10584
The drive chain must be lubricated
after washing the motorcycle, riding
in the rain or riding in wet areas.
1. Clean the drive chain with kero-
sene and a small soft brush.
NOTICE: To prevent damaging
the O-rings, do not clean the
drive chain with steam cleaners,
high-pressure washers or inap-
propriate solvents.
[ECA11122]
2. Wipe the drive chain dry.
3. Thoroughly lubricate the drive
chain with a special O-ring chain
lubricant. NOTICE: Do not use
engine oil or any other lubri-
cants for the drive chain, as they
may contain substances that
could damage the O-rings.
[ECA11112]
1. Drive chain slack adjusting bolt
1. Drive chain puller
2. Notch
3. Alignment marks
Tightening torques:
Axle nut:
150 N·m (15 kgf·m, 108 lb·ft)
Locknut:
16 N·m (1.6 kgf·m, 12 lb·ft)
ZAUM1427
(a)
(b)1
1
3
2
2
ZAUM1428
UBC6E2E0.book Page 25 Tuesday, July 10, 2018 6:26 PM