battery YAMAHA SUPERJET 2022 Owners Manual
[x] Cancel search | Manufacturer: YAMAHA, Model Year: 2022, Model line: SUPERJET, Model: YAMAHA SUPERJET 2022Pages: 84, PDF Size: 3.76 MB
Page 7 of 84

Table of contents
Leaving the watercraft...................... 49
Operating the watercraft .................. 49
Turning the watercraft ...................... 50
Stopping the watercraft ................... 51
Starting off........................................ 52
Capsized watercraft ......................... 54
Beaching the watercraft ................... 55
Operating in weeded areas .............. 55
After removing the watercraft from the water ....................................... 56
Care and storage............................. 57Post-operation care ...................... 57
Flushing the cooling water
passages....................................... 57
Cleaning the watercraft .................... 58
Battery care ...................................... 58
Long-term storage ........................ 60
Cleaning ........................................... 60
Lubrication ....................................... 60
Rustproofing..................................... 61
Maintenance .................................... 63 Maintenance.................................. 63
Adjusting the steering friction .......... 63
Adjusting the jet thrust nozzle
angle ............................................. 64
Adjusting the handlebar position ..... 65
Periodic maintenance chart ............. 66
Engine oil and oil filter ...................... 68
Specifications .................................. 69 Specifications................................ 69
Trouble recovery ............................. 70 Troubleshooting ............................ 70
Troubleshooting chart ...................... 70
Emergency procedures ................. 72
Cleaning the jet intake and
impeller ......................................... 72
Jumping the battery ......................... 73
Towing the watercraft ...................... 73
Submerged watercraft ..................... 74
Index................................................. 75
UF4R71E0.book Page 2 Monday, May 10, 2021 1:14 PM
Page 26 of 84
Description
19
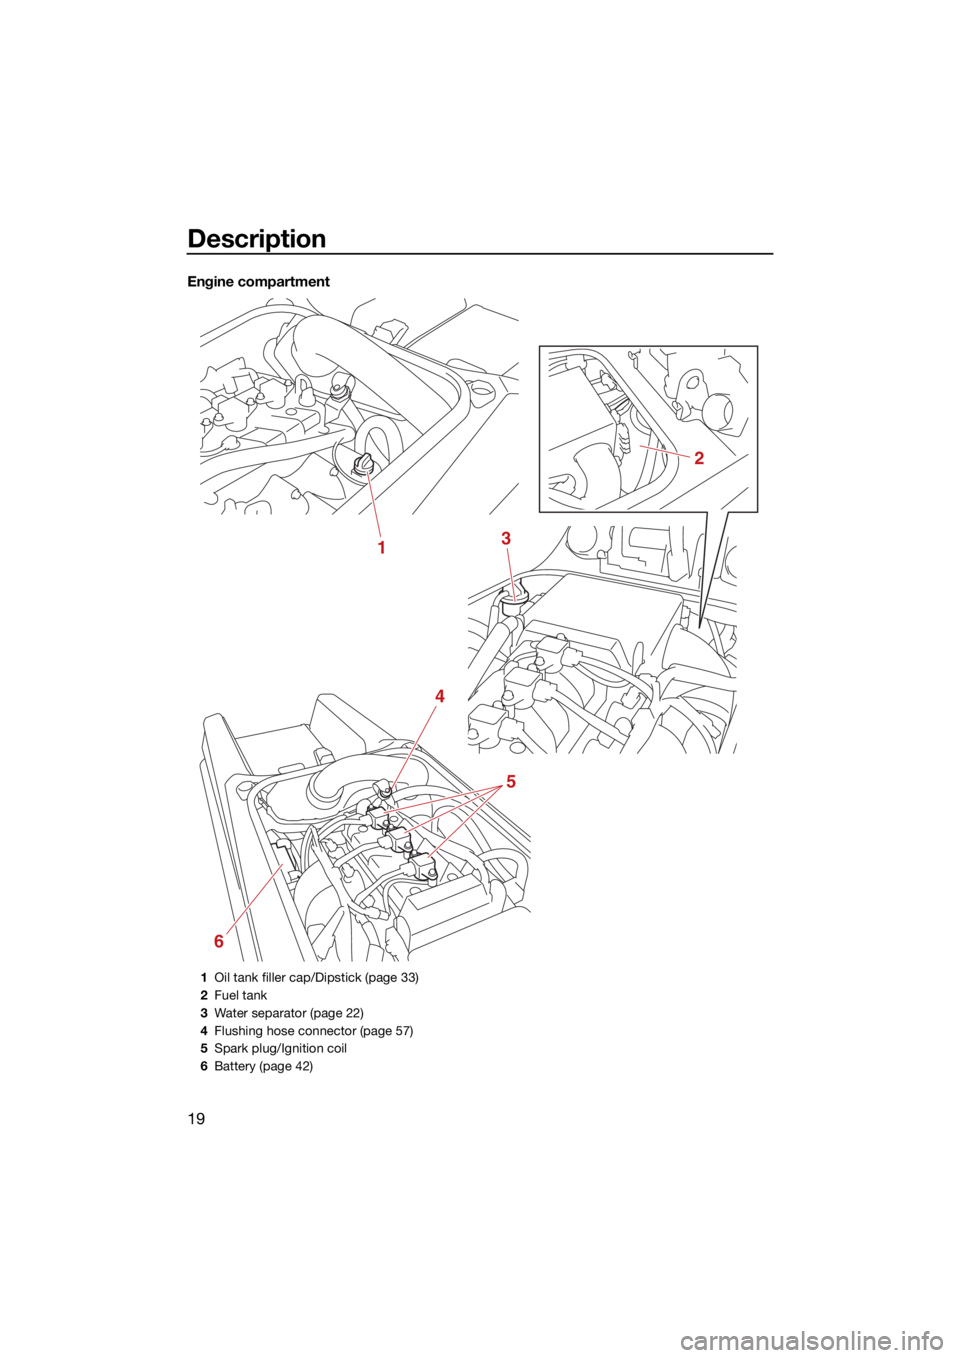
Engine compartment
1
2
3
4
5
6
1Oil tank filler cap/Dipstick (page 33)
2 Fuel tank
3 Water separator (page 22)
4 Flushing hose connector (page 57)
5 Spark plug/Ignition coil
6 Battery (page 42)
UF4R71E0.book Page 19 Monday, May 10, 2021 1:14 PM
Page 27 of 84

Control function operation
20
EJU31027
Watercraft control functionsEJU45552Engine stop/“L-MODE” switch “ ”
The engine stop/“L-MODE” switch (red but-
ton) stops the engine when the switch is
pushed. You can also activate L-MODE.
EJU31164Engine shut-off switch “ ”
The engine shut-off switch automatically
stops the engine when the clip, on the end of
the engine shut-off cord (lanyard), is removed
from the switch, such as if the operator falls
off the watercraft.
Insert the clip under the engine shut-off
switch before starting the engine.
When the engine is not running, remove the
clip from the engine shut-off switch to pre-vent accidental starting or unauthorized op-
eration by children or others.
EJU45561Start switch “ ”ECJ01361
Do not run the engine for more than 15
seconds on land without supplying water,
otherwise the engine could overheat.
The start switch (green button) starts the en-
gine when the switch is pushed.
Release the start switch as soon as the en-
gine starts to run. If the engine does not start
in 5 seconds, release the start switch, wait 15
seconds, and then try again.
NOTICE: Never
push the start switch while the engine is
running. Do not operate the start switch
for more than 5 seconds, otherwise the
battery will be discharged and the engine
1 Engine stop/“L-MODE” switch
1 Clip
2 Engine shut-off switch
3 Engine shut-off cord (lanyard)
1
1
2
3
UF4R71E0.book Page 20 Monday, May 10, 2021 1:14 PM
Page 46 of 84
Pre-operation checks
39
EJU31984
EWJ00413
Failure to inspect or maintain the watercraft properly increases the possibility of an ac-
cident or damage to the watercraft. Do not operate the watercraft if you find any prob-
lem. If a problem cannot be corrected by the procedures provided in this manual, have
the watercraft inspected by a Yamaha dealer.
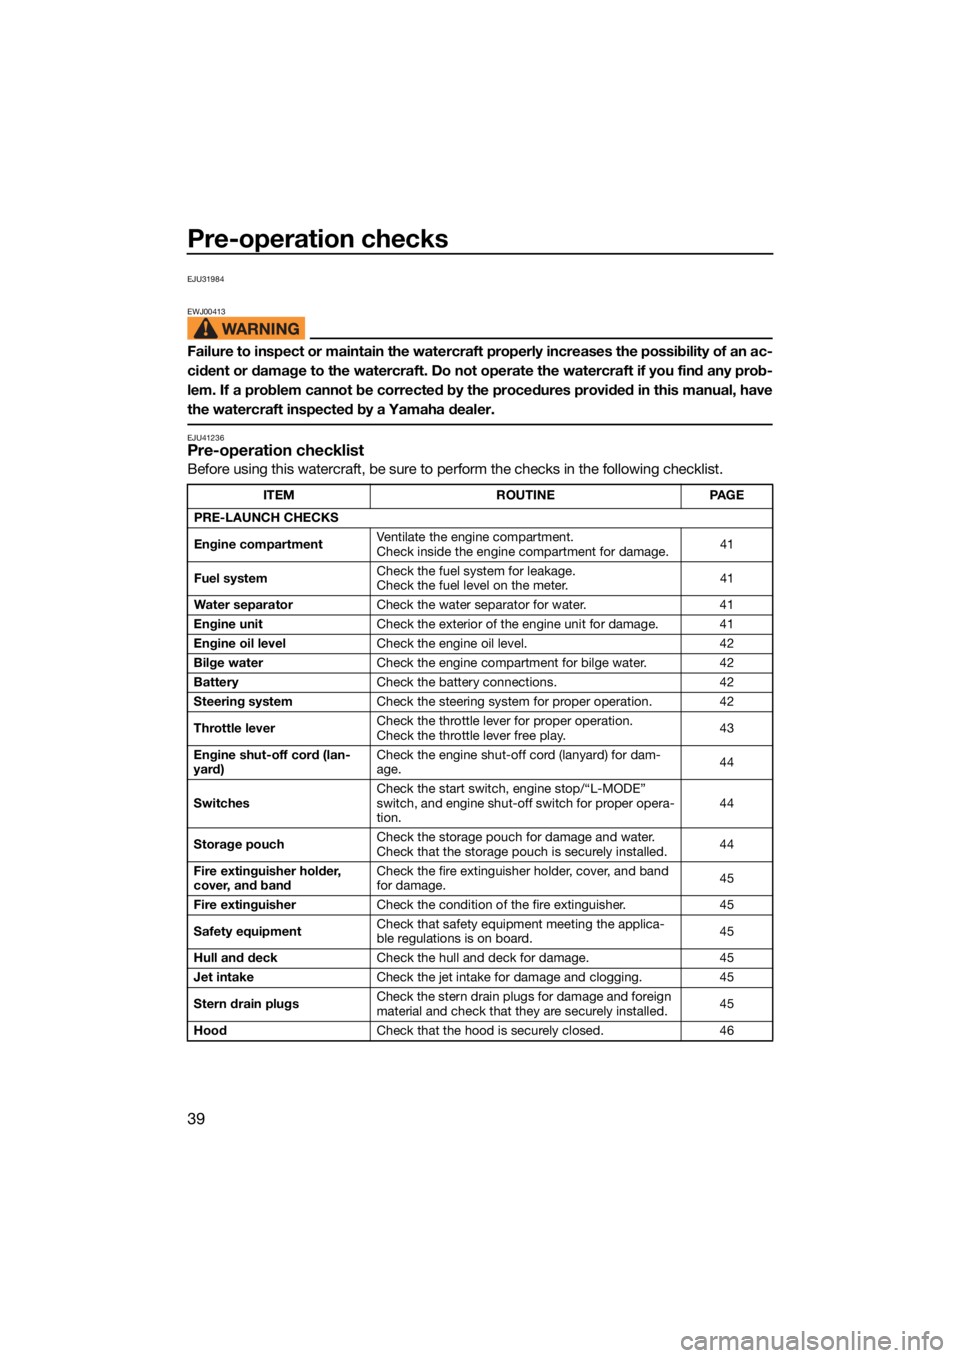
EJU41236Pre-operation checklist
Before using this watercraft, be sure to perform the checks in the following checklist.
ITEMROUTINEPAGE
PRE-LAUNCH CHECKS
Engine compartment Ventilate the engine compartment.
Check inside the engine compartment for damage.
41
Fuel system Check the fuel system for leakage.
Check the fuel level on the meter.
41
Water separator Check the water separator for water. 41
Engine unit Check the exterior of the engine unit for damage. 41
Engine oil level Check the engine oil level. 42
Bilge water Check the engine compartment for bilge water. 42
Battery Check the battery connections. 42
Steering system Check the steering system for proper operation. 42
Throttle lever Check the throttle lever for proper operation.
Check the throttle lever free play.
43
Engine shut-off cord (lan-
yard) Check the engine shut-off cord (lanyard) for dam-
age.
44
Switches Check the start switch, engine stop/“L-MODE”
switch, and engine shut-off switch for proper opera-
tion. 44
Storage pouch Check the storage pouch for damage and water.
Check that the storage pouch is securely installed.
44
Fire extinguisher holder,
cover, and band Check the fire extinguisher holder, cover, and band
for damage.
45
Fire extinguisher Check the condition of the fire extinguisher. 45
Safety equipment Check that safety equipment meeting the applica-
ble regulations is on board.
45
Hull and deck Check the hull and deck for damage. 45
Jet intake Check the jet intake for damage and clogging. 45
Stern drain plugs Check the stern drain plugs for damage and foreign
material and check that they are securely installed.
45
Hood Check that the hood is securely closed. 46
UF4R71E0.book Page 39 Monday, May 10, 2021 1:14 PM
Page 49 of 84
Pre-operation checks
42
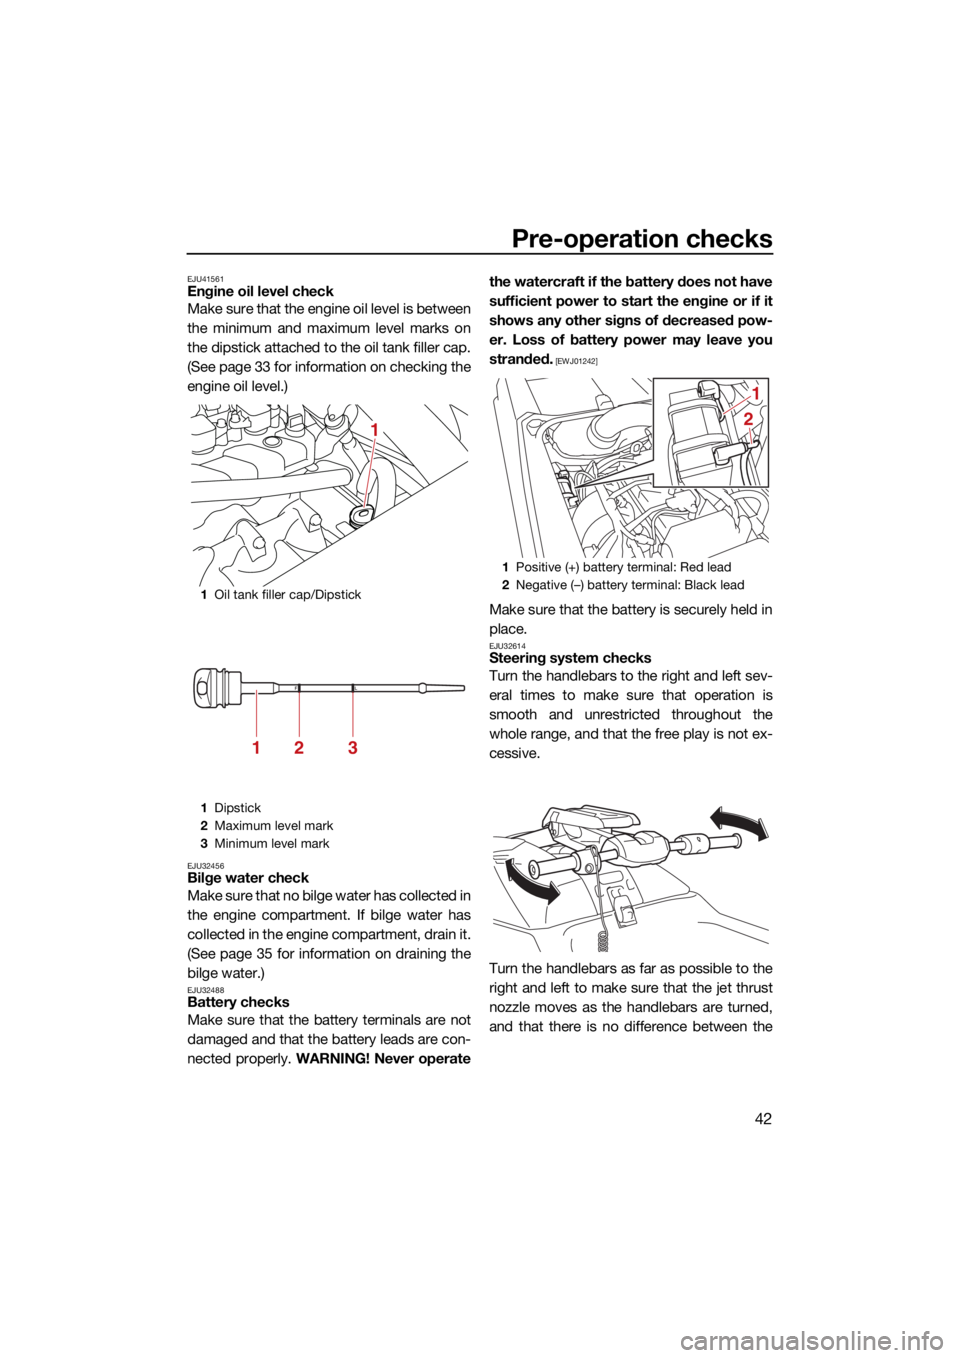
EJU41561Engine oil level check
Make sure that the engine oil level is between
the minimum and maximum level marks on
the dipstick attached to the oil tank filler cap.
(See page 33 for information on checking the
engine oil level.)
EJU32456Bilge water check
Make sure that no bilge water has collected in
the engine compartment. If bilge water has
collected in the engine compartment, drain it.
(See page 35 for information on draining the
bilge water.)
EJU32488Battery checks
Make sure that the battery terminals are not
damaged and that the battery leads are con-
nected properly. WARNING! Never operate the watercraft if the battery does not have
sufficient power to start the engine or if it
shows any other signs of decreased pow-
er. Loss of battery power may leave you
stranded.
[EWJ01242]
Make sure that the battery is securely held in
place.
EJU32614Steering system checks
Turn the handlebars to the right and left sev-
eral times to make sure that operation is
smooth and unrestricted throughout the
whole range, and that the free play is not ex-
cessive.
Turn the handlebars as far as possible to the
right and left to make sure that the jet thrust
nozzle moves as the handlebars are turned,
and that there is no difference between the
1
Oil tank filler cap/Dipstick
1 Dipstick
2 Maximum level mark
3 Minimum level mark
1
213
1Positive (+) battery terminal: Red lead
2 Negative (–) battery terminal: Black lead
1
2
UF4R71E0.book Page 42 Monday, May 10, 2021 1:14 PM
Page 65 of 84
Care and storage
58
water flows out continually from the
cooling water pilot outlet.
(7) Run the engine at idling speed for about 3 minutes watching the engine condition.
If the engine stops while flushing, turn
the water supply off immediately and
perform the procedure again from step 6.
NOTICE: Do not supply water to the
cooling water passages when the en-
gine is not running. The water could
flow back through the muffler into the
engine, causing severe engine dam-
age.
[ECJ00123]
(8) Turn the water supply off.
(9) Discharge the remaining water out of the cooling water passages by alternately
squeezing and releasing the throttle lever
quickly for 10 to 15 seconds.
(10) Stop the engine.
(11) Remove the garden hose adapter, and then securely install the flushing hose
connector cap by tightening it until it
stops.
(12) Securely install the hood in its original position.
EJU40746Cleaning the watercraft
(1) Remove the hood. (See page 26 for hoodremoval and installation procedures.)
(2) If the watercraft will be stored for a week or more, rustproof the internal engine
components to help prevent corrosion. (See page 61 for information on rust-
proofing the internal engine compo-
nents.)
(3) Rinse the engine and engine compart- ment with a small amount of water.
NOTICE: Do not use high-pressure
water when rinsing the engine or en-
gine compartment as severe engine
damage could result.
[ECJ00572]
(4) Drain the water from the engine com- partment. (See page 35 for information
on draining the bilge water.)
(5) Wipe the engine and engine compart- ment with a dry cloth.
(6) Wash down the hull, deck, and jet pump with fresh water.
(7) Wipe the hull, deck, and jet pump with a dry cloth.
(8) Wipe all vinyl and rubber components, such as the engine compartment seals,
with a vinyl protectant.
(9) To minimize corrosion, spray metallic parts of the hull, deck, and engine with a
rust inhibitor.
(10) Allow the engine compartment to air dry completely before installing the hood.
(11) Securely install the hood in its original position.
EJU3368CBattery care
If the watercraft will not be used for more than
a month, remove the battery from the water-
craft, check it, and then store it in a cool, dry
place.
EWJ00793
Battery electrolyte is poisonous and dan-
gerous, causing severe burns, etc. Elec-
trolyte contains sulfuric acid. Avoid
contact with skin, eyes, or clothing.
Antidotes
External: Flush with water.
UF4R71E0.book Page 58 Monday, May 10, 2021 1:14 PM
Page 66 of 84
Care and storage
59
Internal: Drink large quantities of water or
milk. Follow with milk of magnesia, beaten
egg, or vegetable oil. Call a physician im-
mediately.
Eyes: Flush with water for 15 minutes and
get prompt medical attention.
Batteries produce explosive gases. Keep
sparks, flames, cigarettes, etc., well away.
If using or charging the battery in an en-
closed space, make sure that it is well
ventilated. Always shield your eyes when
working near batteries.
Keep out of the reach of children.
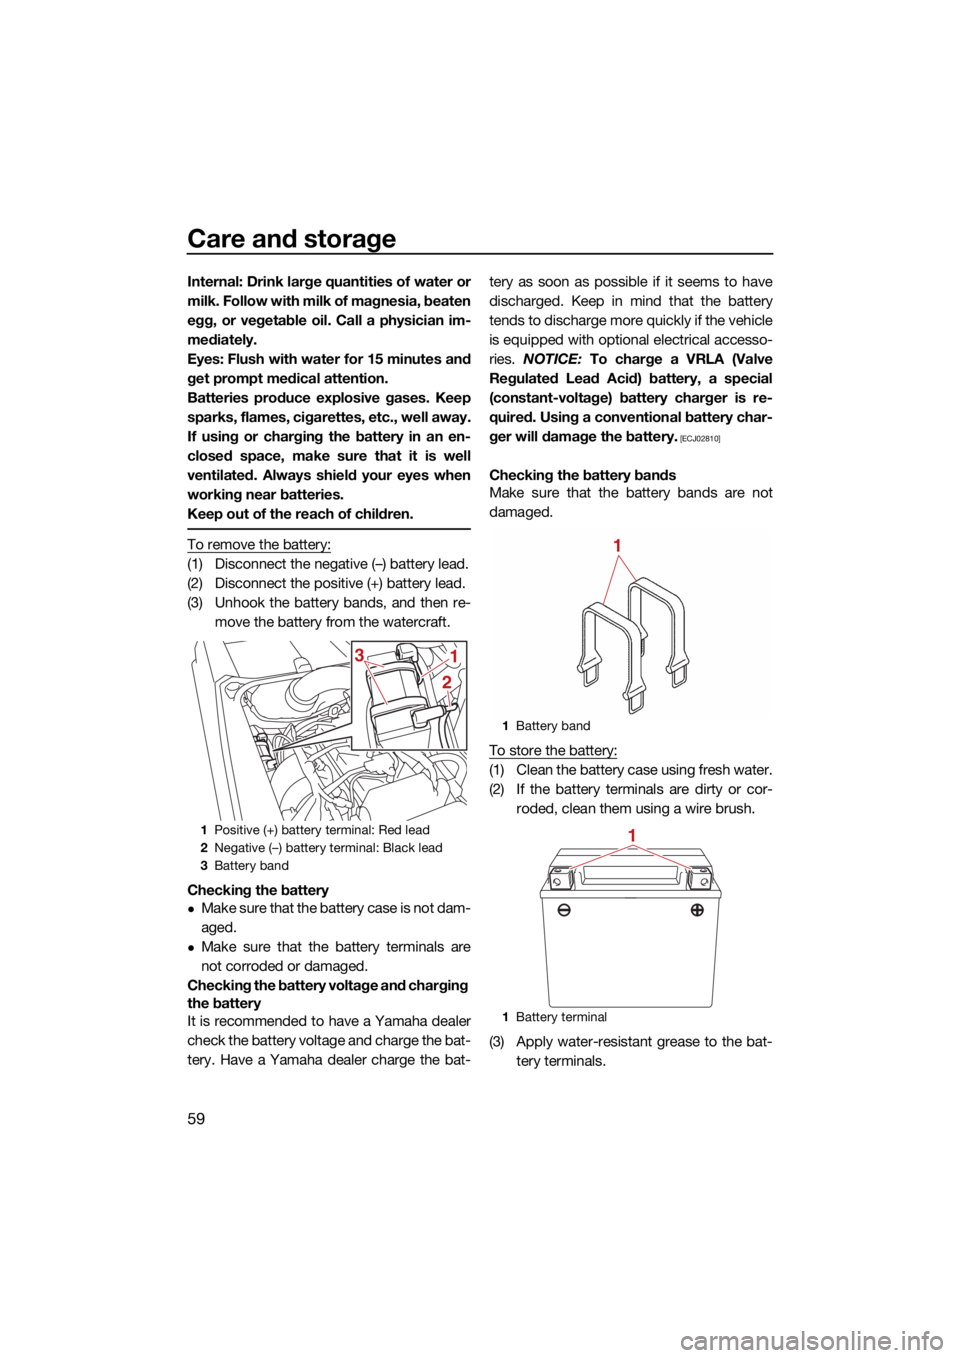
To remove the battery:
(1) Disconnect the negative (–) battery lead.
(2) Disconnect the positive (+) battery lead.
(3) Unhook the battery bands, and then re-move the battery from the watercraft.
Checking the battery
Make sure that the battery case is not dam-
aged.
Make sure that the battery terminals are
not corroded or damaged.
Checking the battery voltage and charging
the battery
It is recommended to have a Yamaha dealer
check the battery voltage and charge the bat-
tery. Have a Yamaha dealer charge the bat- tery as soon as possible if it seems to have
discharged. Keep in mind that the battery
tends to discharge more quickly if the vehicle
is equipped with optional electrical accesso-
ries.
NOTICE: To charge a VRLA (Valve
Regulated Lead Acid) battery, a special
(constant-voltage) battery charger is re-
quired. Using a conventional battery char-
ger will damage the battery.
[ECJ02810]
Checking the battery bands
Make sure that the battery bands are not
damaged.
To store the battery:
(1) Clean the battery case using fresh water.
(2) If the battery terminals are dirty or cor- roded, clean them using a wire brush.
(3) Apply water-resistant grease to the bat- tery terminals.
1Positive (+) battery terminal: Red lead
2 Negative (–) battery terminal: Black lead
3 Battery band
1
2
3
1Battery band
1 Battery terminal
1
1
UF4R71E0.book Page 59 Monday, May 10, 2021 1:14 PM
Page 67 of 84
Care and storage
60
(4) Store the battery in a cool, dry place.NOTICE: Storing the battery in an un-
charged condition can cause perma-
nent battery damage. Check the
battery periodically.
[ECJ00103]
To install the battery:
(1) Place the battery in the battery compart- ment and hook the battery bands onto
the holders.
(2) Connect the positive (+) battery lead (red) to the positive (+) battery terminal.
NOTICE: Reversal of the battery leads
will damage the electrical parts.
[ECJ00262]
(3) Connect the negative (–) battery lead (black) to the negative (–) battery termi-
nal.
(4) Make sure that the battery is securely held in place.
EJU33495
Long-term storageEWJ00332
Always place the watercraft upright in a
horizontal position when storing it, other-
wise fuel could leak out into the engine or
engine compartment, which could create
a fire hazard.
Storage for long periods of time, such as win-
ter storage, requires preventive maintenance
to ensure against deterioration. It is advisable
to have the watercraft serviced by a Yamaha
dealer prior to storage.
However, the following procedures can be
performed easily by the owner.
EJU40763Cleaning
(1) Flush the cooling water passages. (See
page 57 for information on flushing the
cooling water passages.)
TIP:
If you will be storing the watercraft for a pro-
longed period, such as winter storage, top off
the fuel tank with fresh gasoline and add fuel
stabilizer and conditioner to the fuel tank ac-
cording to the manufacturer’s instruction be-
fore starting the engine.
(2) Clean the watercraft. (See page 58 for in-formation on cleaning the watercraft.)
Wax the hull with a non-abrasive wax.
EJU45730Lubrication
Use a suitable marine grease applicator and
spray a rust inhibitor between the inner and
outer cables to lubricate the cables and
purge out any dirt and moisture.
To keep moving parts sliding or rotating
smoothly, lubricate them with water-resistant
grease.
Recommended water-resistant grease:
YAMALUBE MARINE
GREASE/Yamaha Grease A
UF4R71E0.book Page 60 Monday, May 10, 2021 1:14 PM
Page 73 of 84

Maintenance
66
EJU43103Periodic maintenance chart
The periodic maintenance chart gives general guidelines for periodic maintenance. Have a
Yamaha dealer perform the checks in the following chart. However, maintenance may need to be performed more frequently depending on your operating conditions. If you have any
questions, consult a Yamaha dealer.
This “ √” mark indicates items to be checked and serviced by a Yamaha dealer.
Item OperationInitial Thereafter every
Page
10 hours 50 hours
or 12
months *1 100
hours or 12
months *1 200
hours or 24
months *1
Fuel line Check fuel hoses and
clamps
√
—
Fuel filler cap/Wa-
ter separator Check O-rings for cracks
and deformation
√
—
Fuel tank Check installation and
straps
√
—
Water inlet strainer Check for clogs and dam-
age
√
—
Cooling water hos-
es Check for damage and
leakage, and check
clamps
√
—
Engine oil Replace √√ 68
Oil filter Replace √68
Spark plugs Check √√ —
Battery Check state of charge,
terminals and bands
√
—
Battery leads Check terminals √—
Steering master Check and adjust √√ —
Steering cable Check exterior and con-
nections, and lubricate
√
—
Air intake hoses Check for damage, and
check clamps
√
—
Throttle body Lubricate throttle valve √—
Exhaust system Check for exhaust leak-
age, and check hoses and
clamps √
—
Breather hose Check breather hose and
clamps
√
—
Impeller Check for bends, dam-
age, and foreign material
√
—
Drive shaft spline Check for damage and lu-
bricate splines √
—
UF4R71E0.book Page 66 Monday, May 10, 2021 1:14 PM
Page 76 of 84
Specifications
69
EJU45442
Specifications
Watercraft capacity:
Maximum people on board:1 person
Maximum load capacity: 80 kg (176 lb)
Dimensions and weight:
Length:
2.43 m (95.7 in)
Width: 0.76 m (29.9 in)
Height: 0.79 m (31.1 in)
Dry weight: 170 kg (375 lb)
Performance:
Maximum output (according to ISO 8665/SAE
J1228):
74.6 kW at 7300 r/min
Maximum fuel consumption: 29.1 L/h (7.7 US gal/h, 6.4 Imp.gal/h)
Cruising range at full throttle: 0.65 hour
Trolling speed:
1500 ±100 r/min
Engine:
Engine type:
Liquid cooled 4-stroke, DOHC
Number of cylinders:
3
Engine displacement: 1049 cm³
Bore × stroke:
82.0 × 66.2 mm (3.23 × 2.61 in)
Compression ratio:
11.0 : 1
Valve clearance-intake (cold): 0.15–0.22 mm (0.0059–0.0087 in)
Valve clearance-exhaust (cold): 0.26–0.32 mm (0.0102–0.0126 in)
Lubrication system:
Dry sump
Cooling system: Water
Starting system: Electric
Ignition system:
T.C.I. Spark plug (NGK):
CR9EB
Spark plug gap: 0.7–0.8 mm (0.028–0.031 in)
Battery capacity:
12 V, 18 Ah
Battery type: YTX20L-BS
Charging system: Flywheel magneto
Drive unit:
Propulsion system:Jet pump
Jet pump type: Axial flow, single stage
Impeller rotation: Counterclockwise
Jet thrust nozzle angle:
P1: 16.0+16.0°
P2: 19.0+19.0°
Fuel and oil:
Recommended fuel:Regular unleaded gasoline
Minimum octane rating (PON): 86
Minimum octane rating (RON):
90
Recommended engine oil: YAMALUBE 4W or 4-stroke motor oil
Recommended engine oil type SAE: SAE 10W-30, 10W-40, 20W-40, 20W-50
Recommended engine oil grade API:
API SG, SH, SJ, SL
Fuel tank total capacity: 19 L (5.0 US gal, 4.2 Imp.gal)
Engine oil quantity with oil filter replacement: 3.4 L (3.59 US qt, 2.99 Imp.qt)
Engine oil quantity without oil filter replacement:
3.2 L (3.38 US qt, 2.82 Imp.qt)
Engine oil total quantity: 3.7 L (3.91 US qt, 3.26 Imp.qt)
UF4R71E0.book Page 69 Monday, May 10, 2021 1:14 PM