maintenance YAMAHA VIKING VI 2016 Owners Manual
[x] Cancel search | Manufacturer: YAMAHA, Model Year: 2016, Model line: VIKING VI, Model: YAMAHA VIKING VI 2016Pages: 184, PDF Size: 4.39 MB
Page 3 of 184
EBU31040
INTRODUCTION
EBU32920Congratulations on your purchase of the Yamaha YXC70VPXG. It represents the result of many
years of Yamaha experience in the production of fine sporting, touring, and pace-setting racing
vehicles. With the purchase of this Yamaha, yo u can now appreciate the high degree of crafts-
manship and reliability that have made Yamaha a leader in these fields.
This manual will provide you with a good basic understanding of the features and operation of
this vehicle. It also includes basic maintenanc e and inspection procedures. If you have any ques-
tions regarding the operation or maintenance of your vehicle, please consult a Yamaha dealer.
WARNING
EWB03490Please read this manual carefully before operating this vehicle. Do not attempt to operate
this vehicle until you have attained adequate knowledge of its controls and operating fea-
tures. Regular inspections an d careful maintenance, along with good operating techni-
ques, will help ensure that you safely enjoy the capabilities and reliability of this vehicle. UB857AE0.book Page 1 Monday, August 24, 2015 8:59 AM
Page 7 of 184

Differential gear oil................................ 5-6
Accelerator pedal ................................. 5-7
Seat belts ............................................. 5-7
Passenger handhold ............................ 5-7
Steering ................................................ 5-7
Fittings and fasteners ........................... 5-8
Instruments, lights and switches .......... 5-8
Control cables ...................................... 5-8
Tires ...................................................... 5-8
OPERATION ............................................ 6-1 Engine break-in .................................... 6-1
Starting the engine ............................... 6-2
Drive select lever operation and reverse driving .................................... 6-3
On-Command drive knob..................... 6-5
Parking ................................................. 6-7
Loading................................................. 6-7
BASIC GUIDE FOR SAFE USE .............. 7-1 KNOW YOUR VEHICLE........................ 7-1
LEARNING TO OPERATE YOUR
VEHICLE ........................................... 7-13 PERIODIC MAINTENANCE AND
ADJUSTMENT .........................................8-1
Owner’s manual and tool kit .................8-2
Periodic maintenance chart for the emission control system .....................8-4
General maintenance and lubrication chart ....................................................8-6
Hood ...................................................8-10
Right rear panel ..................................8-11
Engine oil and oil filter cartridge .........8-12
Final gear oil .......................................8-16
Differential gear oil ..............................8-18
Coolant ...............................................8-20
Axle boots ...........................................8-25
Spark plug inspection .........................8-26
Cleaning the air filter element .............8-28
Cleaning the air filter case/duct
check hose........................................8-33
V-belt case drain plug.........................8-34
Cleaning the spark arrester ................8-34
Valve clearance...................................8-36
Brakes.................................................8-36
UB857AE0.book Page 2 Monday, August 24, 2015 8:59 AM
Page 68 of 184
5-1
5
EBU31572
FOR YOUR SAFETY – PRE-OPERATION CHECKS
EBU31581Inspect your vehicle each time you use it to make sure the vehicle is in safe operating condition.
Always follow the inspection and maintenance procedures and schedules described in the Own-
er’s Manual.
WARNING
EWB00482Failure to inspect or maintain the vehicle properly increases the possibility of an accident
or equipment damage. Do not operate the vehicle if you find any problem. If a problem can-
not be corrected by the procedures provided in this manual, have the vehicle inspected by
a Yamaha dealer. Before using this vehicle, check the following points:
ITEM ROUTINE PAGE
Brakes • Check operation, free play, fluid level, and fluid leakage.
• Fill with DOT 4 brake fluid if necessary. 5-3, 8-36, 8-41
Parking brake • Check for proper operation, condition, and free play. 8-39
Fuel • Check fuel level.
• Fill with the recommended fuel if necessary. 5-3
Engine oil • Check oil level.
• Fill with oil to proper level if necessary. 5-5, 8-12
UB857AE0.book Page 1 Monday, August 24, 2015 8:59 AM
Page 110 of 184
8-1
8
EBU32001PERIODIC MAINTENANCE AND ADJUSTMENTEBU32010Periodic inspection, adjustment, and lubrica-
tion will keep your vehicle in the safest and
most efficient condition possible. Safety is an
obligation of the vehicle owner/operator. The
most important points of vehicle inspection,
adjustment, and lubrication are explained on
the following pages.
WARNING
EWB01842Failure to properly maintain the vehicle or
performing maintenance activities incor-
rectly may increase your risk of injury or
death during service or while using the ve-
hicle. If you are not familiar with vehicle
service, have a Yamaha dealer perform the
service.
WARNING
EWB02563Turn off the engine when performing main-
tenance unless otherwise specified.
A running engine has moving parts that
can catch on body parts or clothing and
electrical parts that can cause shocks or
fires.
Running the engine while servicing can
lead to eye injury, burns, fire, or carbon
monoxide poisoning - possibly leading
to death. See page 2-5 for more informa-
tion about carbon monoxide.
WARNING
EWB02691Brake discs, calipers, drums, and linings
can become very hot during use. To avoid
possible burns, let brake components cool
before touching them.
UB857AE0.book Page 1 Monday, August 24, 2015 8:59 AM
Page 111 of 184
8-2
8
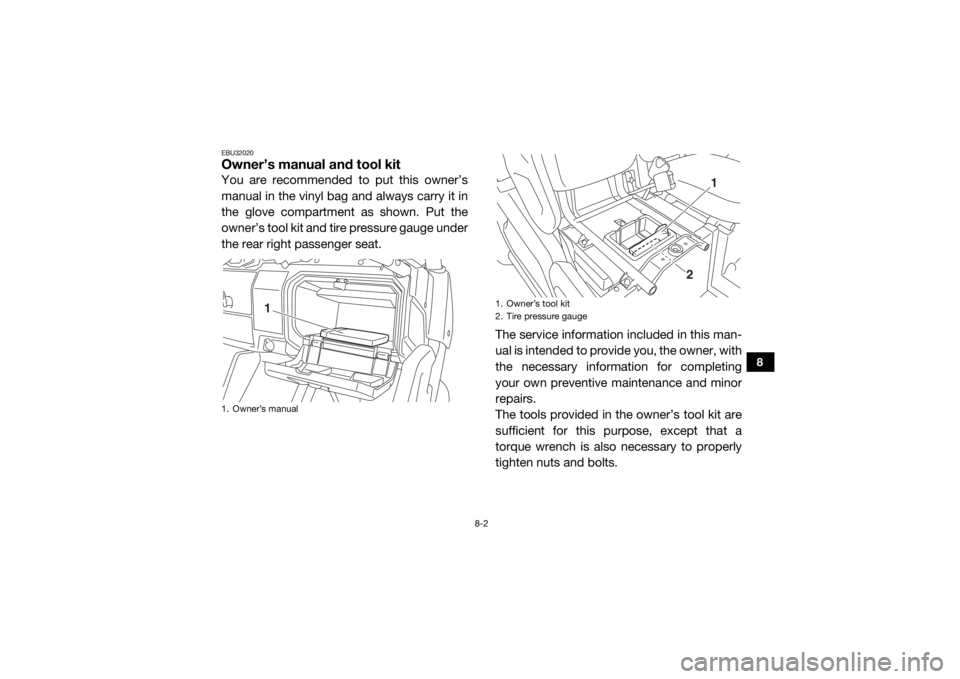
EBU32020Owner’s manual and tool kitYou are recommended to put this owner’s
manual in the vinyl bag and always carry it in
the glove compartment as shown. Put the
owner’s tool kit and tire pressure gauge under
the rear right passenger seat.The service information included in this man-
ual is intended to provide you, the owner, with
the necessary information for completing
your own preventive maintenance and minor
repairs.
The tools provided in the owner’s tool kit are
sufficient for this purpose, except that a
torque wrench is also necessary to properly
tighten nuts and bolts.1. Owner’s manual
1
1. Owner’s tool kit
2. Tire pressure gauge
1
2
UB857AE0.book Page 2 Monday, August 24, 2015 8:59 AM
Page 113 of 184

8-4
8
EBU32030Periodic maintenance chart for the emission control systemFor vehicles not equipped with an odometer or hour meter, follow the month maintenance in-
tervals.
For vehicles equipped with an odometer or an ho ur meter, follow the km (mi) or hours mainte-
nance intervals. However, keep in mind that if the vehicle isn’t used for a long period of time,
the month maintenance intervals should still be followed.
Items marked with an asterisk should be perfor med by a Yamaha dealer as they require special
tools, data and technical skills.NO. ITEM ROUTINE INITIAL
EVERY
Whichev- er comes first month 1 3 6 6 12
km
(mi) 320
(200) 1200
(750) 2400
(1500) 2400
(1500) 4800
(3000)
hours 20 75 150 150 300
1 *Fuel line • Check fuel hose for cracks or damage.
• Replace if necessary. √√√
2 *Va l v e s • Check valve clearance.
• Adjust if necessary. √√√√
3 Spark plug • Check condition.
• Adjust gap and clean.
• Replace if necessary. √√√√√
4 *Crankcase
breather system • Check breather hose for cracks or damage.
• Replace if necessary.
√√√
UB857AE0.book Page 4 Monday, August 24, 2015 8:59 AM
Page 115 of 184

8-6
8
EBU32112General maintenance and lubrication chartNO. ITEMROUTINE INITIAL
EVERY
Whichev- er comes
first month 1 3 6 6 12
km
(mi) 320
(200) 1200
(750) 2400
(1500) 2400
(1500) 4800
(3000)
hours 20 75 150 150 300
1 *Cooling system • Check coolant leakage.
• Repair if necessary.
√√√√√
• Replace coolant. Every 2 years
2 Air filter element •Clean.
• Replace if necessary. Every 20–40 hours (more often in
wet or dusty areas)
3Engine oil • Replace (warm engine before draining). √√√√
4 Engine oil filter
cartridge • Replace.
√√√
5 Final gear oil/Dif-
ferential gear oil • Check oil level/oil leakage.
• Replace.
√√
6 *Front brake • Check operation/brake pad wear/fluid leak-
age/see page 8-8.
• Correct if necessary. Replace pads if worn to the limit. √√√√√
7 *Rear brake • Check operation/brake pad wear/fluid leak-
age/see page 8-8.
• Correct if necessary. Replace pads if worn to the limit. √√√√√
UB857AE0.book Page 6 Monday, August 24, 2015 8:59 AM
Page 117 of 184
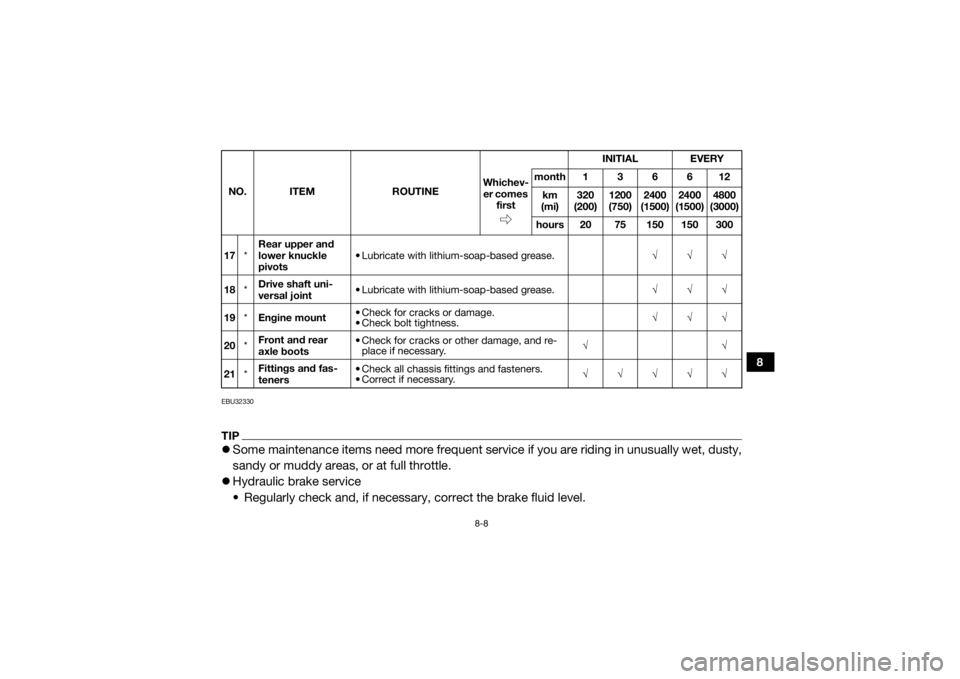
8-8
8
EBU32330TIPSome maintenance items need more frequent serv ice if you are riding in unusually wet, dusty,
sandy or muddy areas, or at full throttle.
Hydraulic brake service
• Regularly check and, if necessary, correct the brake fluid level.17 *Rear upper and
lower knuckle
pivots • Lubricate with lithium-soap-based grease.
√√√
18 *Drive shaft uni-
versal joint • Lubricate with lithium-soap-based grease.
√√√
19 *Engine mount • Check for cracks or damage.
• Check bolt tightness. √√√
20 *Front and rear
axle boots • Check for cracks or other damage, and re-
place if necessary. √√
21 *Fittings and fas-
teners • Check all chassis fittings and fasteners.
• Correct if necessary.
√√√√√
NO. ITEM
ROUTINE INITIAL
EVERY
Whichev- er comes first month 1 3 6 6 12
km
(mi) 320
(200) 1200
(750) 2400
(1500) 2400
(1500) 4800
(3000)
hours 20 75 150 150 300UB857AE0.book Page 8 Monday, August 24, 2015 8:59 AM
Page 121 of 184
8-12
8
To install1. Lift the cargo bed up.
2. Place the panel in the original position,
and then install the bolts and the quick
fastener screws.
3. Lower the cargo bed.EBU32360Engine oil and oil filter cartridgeCheck engine oil level before each operation.
In addition, change the oi l and the oil filter car-
tridge at the intervals specified in the periodic
maintenance and lubrication chart.
To check the engine oil level 1. Park the vehicle on a level surface.
2. Check the engine oil level on a cold en- gine.TIPIf the engine was started before checking the
oil level, be sure to warm up the engine suffi-
ciently, and then wait at least 10 minutes until
the oil settles for an accurate reading.
3. Lift the cargo bed up. (See page 4-24 forcargo bed lifting and lowering proce-
dures.)
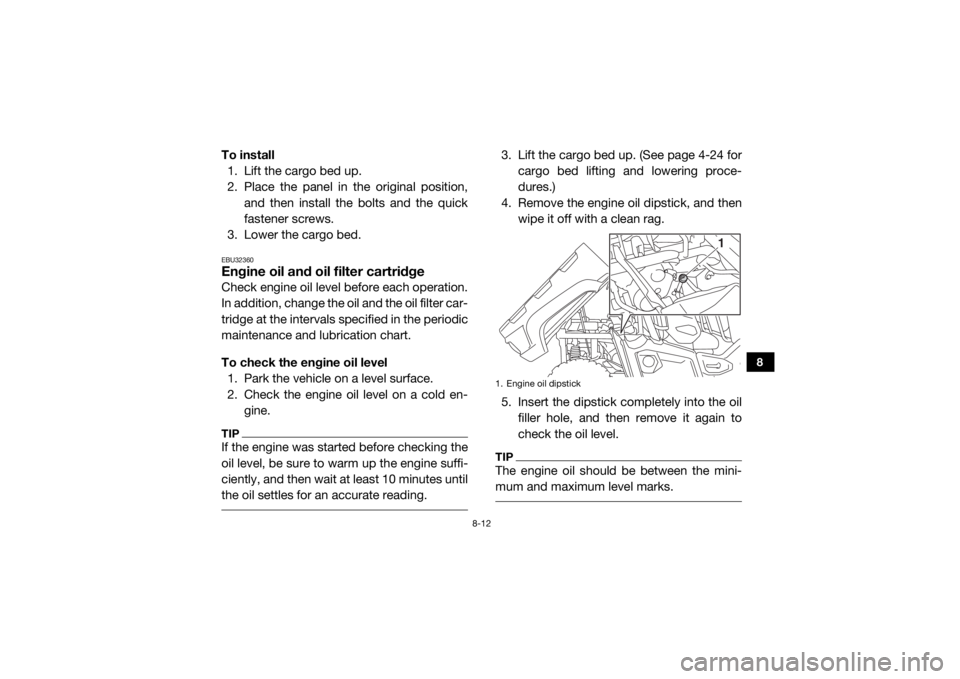
4. Remove the engine oil dipstick, and then wipe it off with a clean rag.
5. Insert the dipstick completely into the oil filler hole, and then remove it again to
check the oil level.TIPThe engine oil should be between the mini-
mum and maximum level marks. 1. Engine oil dipstick
1
UB857AE0.book Page 12 Monday, August 24, 2015 8:59 AM
Page 129 of 184

8-20
8
4. Install the differential gear oil drain boltand its new gasket, and then tighten the
bolt to the specified torque.
5. Refill the differential gear case with the recommended oil. NOTICE: Be sure no
foreign material enters the differential
gear case.
[ECB00412]
6. Check the oil filler bolt gasket for dam- age, and replace it if necessary.
7. Install the differential gear oil filler bolt and its gasket, and then tighten the bolt
to the specified torque. 8. Check for oil leakage. If oil leakage is
found, check for the cause.
EBU32391CoolantThe coolant level should be checked before
each ride. In addition, the coolant must be
changed at the intervals specified in the peri-
odic maintenance and lubrication chart.
Checking the coolant level1. Park the vehicle on a level surface.
2. Check the coolant level in the coolant reservoir when the engine is cold as the
coolant level varies with engine tempera-
ture.TIPThe coolant should be between the minimum
and maximum level marks.
Tightening torque:Differential gear oil drain bolt:9.8 Nm (0.98 m·kgf, 7.1 ft·lbf)
Recommended oil: SAE 80 API GL-4 Hypoid gear oil
Oil quantity: 0.18 L (0.19 US qt, 0.16 Imp.qt)
Tightening torque: Differential gear oil filler bolt:23 Nm (2.3 m·kgf, 17 ft·lbf)
UB857AE0.book Page 20 Monday, August 24, 2015 8:59 AM