check engine YAMAHA XMAX 125 2021 User Guide
[x] Cancel search | Manufacturer: YAMAHA, Model Year: 2021, Model line: XMAX 125, Model: YAMAHA XMAX 125 2021Pages: 114, PDF Size: 13.55 MB
Page 62 of 114
Operation and important rid ing points
7-1
7
EAU15952
Read the Owner’s Manual carefully to
become familiar with all controls. If
there is a control or function you do not
understand, ask your Yamaha dealer.
WARNING
EWA10272
Failure to familiarize yourself with
the controls can lead to loss of con-
trol, which coul d cause an acci dent
or injury.
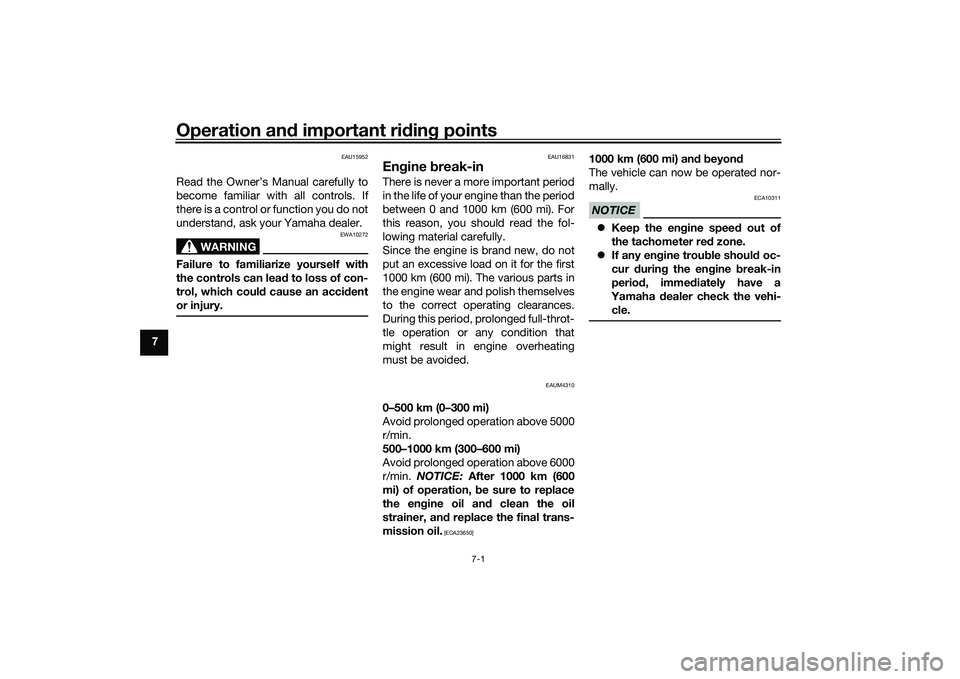
EAU16831
En gine break-inThere is never a more important period
in the life of your engine than the period
between 0 and 1000 km (600 mi). For
this reason, you should read the fol-
lowing material carefully.
Since the engine is brand new, do not
put an excessive load on it for the first
1000 km (600 mi). The various parts in
the engine wear and polish themselves
to the correct operating clearances.
During this period, prolonged full-throt-
tle operation or any condition that
might result in engine overheating
must be avoided.
EAUM4310
0–500 km (0–300 mi)
Avoid prolonged operation above 5000
r/min.
500–1000 km (300–600 mi)
Avoid prolonged operation above 6000
r/min. NOTICE: After 1000 km (600
mi) of operation, be sure to replace
the en gine oil an d clean the oil
strainer, an d replace the final trans-
mission oil.
[ECA23650]
1000 km (600 mi) an d b eyon d
The vehicle can now be operated nor-
mally.NOTICE
ECA10311
Keep the en gine spee d out of
the tachometer red zone.
If any en gine trou ble shoul d oc-
cur during the en gine break-in
period , imme diately have a
Yamaha dealer check the vehi-
cle.
UB9YE0E0.book Page 1 Wednesday, January 6, 2021 3:03 PM
Page 63 of 114

Operation and important ri din g points
7-2
7
EAU86741
Startin g the en gineThe ignition circuit cut-off system will
enable starting only when the side-
stand is up.
To start the engine1. Turn the main switch on.
2. Confirm the indicator and warning light(s) come on for a few sec-
onds, and then go off. (See page
5-1.)TIPDo not start the engine if the en-
gine trouble warning light remains
on.
The ABS warning light should
come on and stay on until the ve-
hicle reaches a speed of 10 km/h
(6 mi/h).NOTICE
ECA24110
If a warnin g or in dicator li ght does
not work as d escribed a bove, have a
Yamaha dealer check the vehicle.3. Close the throttle completely.
4. While applying the front or rear
brake, push the start switch. 5. Release the start switch when the
engine starts, or after 5 seconds.
Wait 10 seconds before pressing
the switch again to allow battery
voltage to restore.
NOTICE
ECA11043
For maximum en gine life, never ac-
celerate har d when the en gine is
col d!
EAUM4280
TIPThis model is equipped with a lean an-
gle sensor to stop the engine in case of
a turnover. In this case, the malfunction
Indicator light will come on but this is
not a malfunction. Turn the vehicle
power off and then back on again to
cancel the Indicator light. Failing to do
so will prevent the engine from starting
even though the engine will crank
when pushing the start switch.
UB9YE0E0.book Page 2 Wednesday, January 6, 2021 3:03 PM
Page 69 of 114
Periodic maintenance an d a djustment
8-3
8
EAU71021
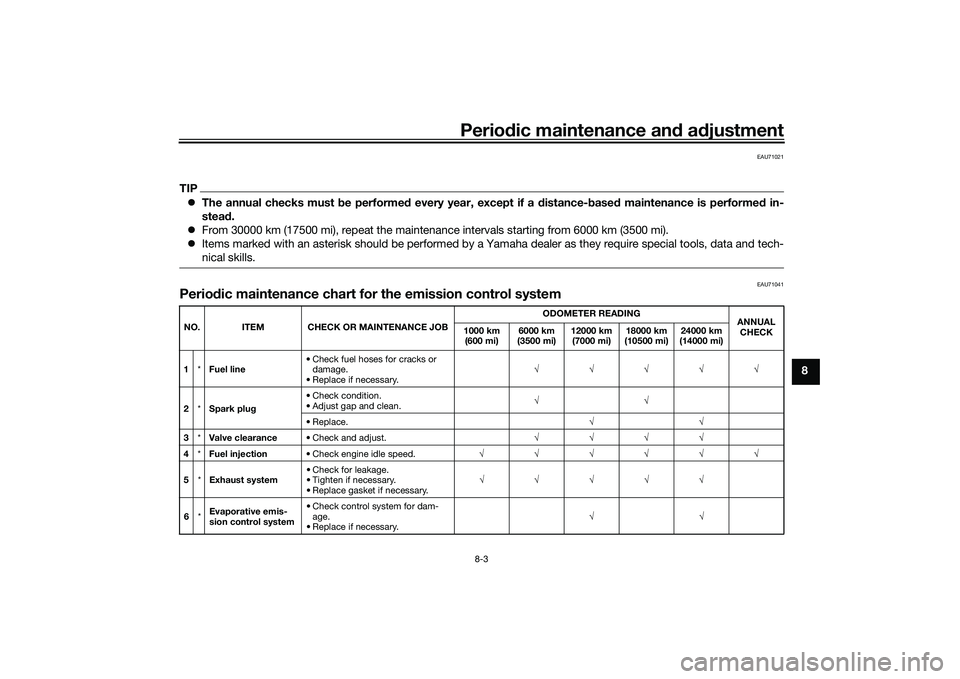
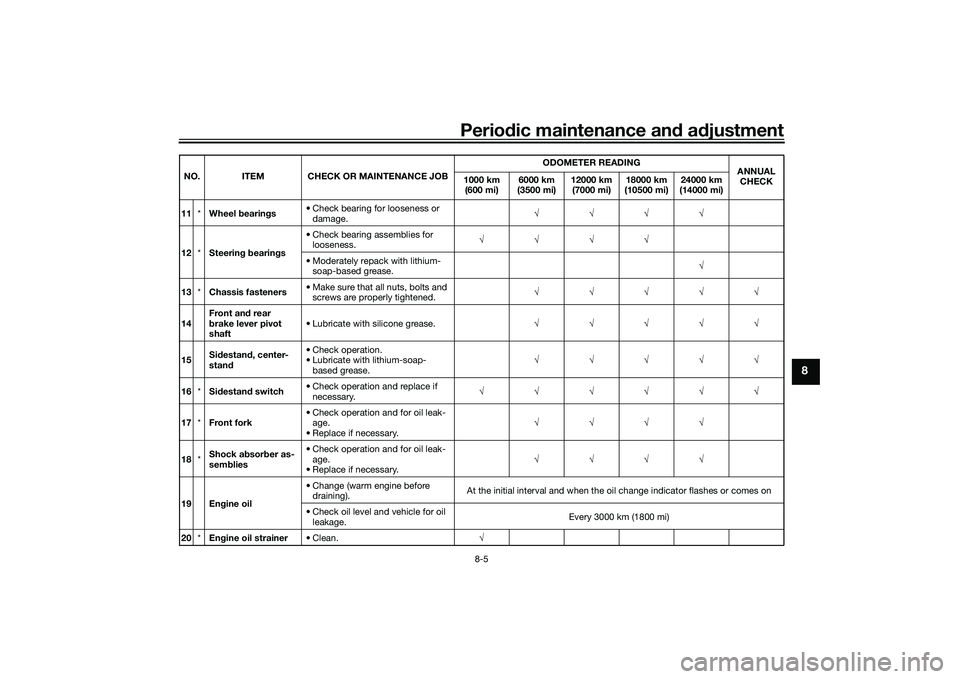
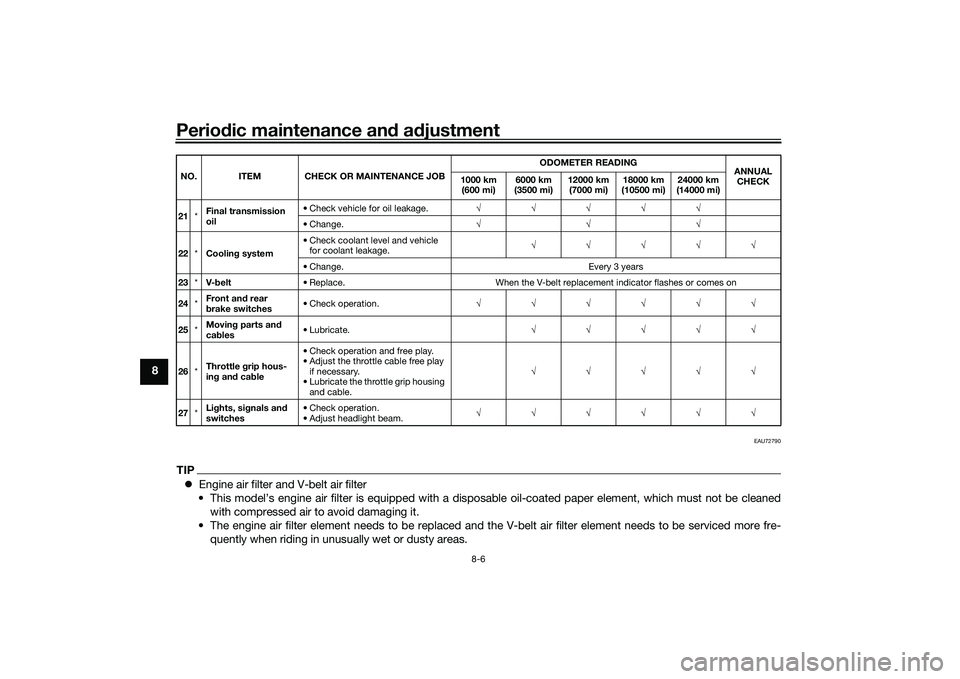
TIP The annual checks must be performe d every year, except if a distance- based maintenance is performe d in-
stea d.
From 30000 km (17500 mi), repeat the maintenance intervals starting from 6000 km (3500 mi).
Items marked with an asterisk should be performed by a Yamaha dealer as they require special tools, data and tech-
nical skills.
EAU71041
Perio dic maintenance chart for the emission control systemNO. ITEM CHECK OR MAINTENANCE JOB ODOMETER READING
ANNUAL
CHECK
1000 km
(600 mi) 6000 km
(3500 mi) 12000 km
(7000 mi) 18000 km
(10500 mi) 24000 km
(14000 mi)
1 *Fuel line • Check fuel hoses for cracks or
damage.
• Replace if necessary. √√√√√
2 *Spark plu g • Check condition.
• Adjust gap and clean.
√√
•Replace. √√
3 *Valve clearance • Check and adjust. √√√√
4 *Fuel injection • Check engine idle speed. √√√√√√
5 *Exhaust system • Check for leakage.
• Tighten if necessary.
• Replace gasket if necessary. √√√√√
6 *Evaporative emis-
sion control system • Check control system for dam-
age.
• Replace if necessary. √√
UB9YE0E0.book Page 3 Wednesday, January 6, 2021 3:03 PM
Page 71 of 114
Periodic maintenance an d a djustment
8-5
8
11 *Wheel bearin gs • Check bearing for looseness or
damage. √√√√
12 *Steerin g b earin gs • Check bearing assemblies for
looseness. √√√√
• Moderately repack with lithium- soap-based grease. √
13 *Chassis fasteners • Make sure that all nuts, bolts and
screws are properly tightened. √√√√√
14 Front an
d rear
b rake lever pivot
shaft • Lubricate with silicone grease.
√√√√√
15 Si
destan d, center-
stan d • Check operation.
• Lubricate with lithium-soap-
based grease. √√√√√
16 *Sidestan d switch • Check operation and replace if
necessary. √√√√√√
17 *Front fork • Check operation and for oil leak-
age.
• Replace if necessary. √√√√
18 *Shock a
bsor ber as-
sem blies • Check operation and for oil leak-
age.
• Replace if necessary. √√√√
19 En gine oil • Change (warm engine before
draining). At the initial interval and when the o
il change indicator flashes or comes on
• Check oil level and vehicle for oil leakage. Every 3000 km (1800 mi)
20 *Engine oil strainer • Clean. √
NO. ITEM CHECK OR MAINTENANCE JOB
ODOMETER READING
AN
NUAL
CHECK
1000 km
(600 mi) 6000 km
(3500 mi) 12000 km
(7000 mi) 18000 km
(10500 mi) 24000 km
(14000 mi)
UB9YE0E0.book Page 5 Wednesday, January 6, 2021 3:03 PM
Page 72 of 114
Periodic maintenance an d a djustment
8-6
8
EAU72790
TIP Engine air filter and V-belt air filter
• This model’s engine air filter is equipped with a disposable oil-coated paper element, which must not be cleaned with compressed air to avoid damaging it.
• The engine air filter element needs to be replaced and the V-belt air filter element needs to be serviced more fre- quently when riding in unusually wet or dusty areas.21 *Final transmission
oil • Check vehicle for oil leakage.
√√√√√
• Change. √√√
22 *Coolin g system • Check coolant level and vehicle
for coolant leakage. √√√√√
• Change. Every 3 years
23 *V-belt • Replace. When the V-belt replacement indicator flashes or comes on
24 *Front an
d rear
b rake switches • Check operation.
√√√√√√
25 *Movin
g parts an d
cab les • Lubricate.
√√√√√
26 *Throttle
grip hous-
in g an d cab le • Check operation and free play.
• Adjust the throttle cable free play
if necessary.
• Lubricate the throttle grip housing and cable. √√√√√
27 *Li
ghts, si gnals an d
switches • Check operation.
• Adjust headlight beam.
√√√√√√
NO. ITEM CHECK OR MAINTENANCE JOB
ODOMETER READING
ANNUAL
CHECK
1000 km
(600 mi) 6000 km
(3500 mi) 12000 km
(7000 mi) 18000 km
(10500 mi) 24000 km
(14000 mi)UB9YE0E0.book Page 6 Wednesday, January 6, 2021 3:03 PM
Page 75 of 114
Periodic maintenance an d a djustment
8-9
8
EAU19623
Checkin g the spark plugThe spark plug is an important engine
component, which should be checked
periodically, preferably by a Yamaha
dealer. Since heat and deposits will
cause any spark plug to slowly erode,
it should be removed and checked in
accordance with the periodic mainte-
nance and lubrication chart. In addi-
tion, the condition of the spark plug
can reveal the condition of the engine.
The porcelain insulator around the
center electrode of the spark plug
should be a medium-to-light tan (the
ideal color when the vehicle is ridden
normally). If the spark plug shows a
distinctly different color, the engine
could be operating improperly. Do not
attempt to diagnose such problems
yourself. Instead, have a Yamaha deal-
er check the vehicle.
If the spark plug shows signs of elec-
trode erosion and excessive carbon or
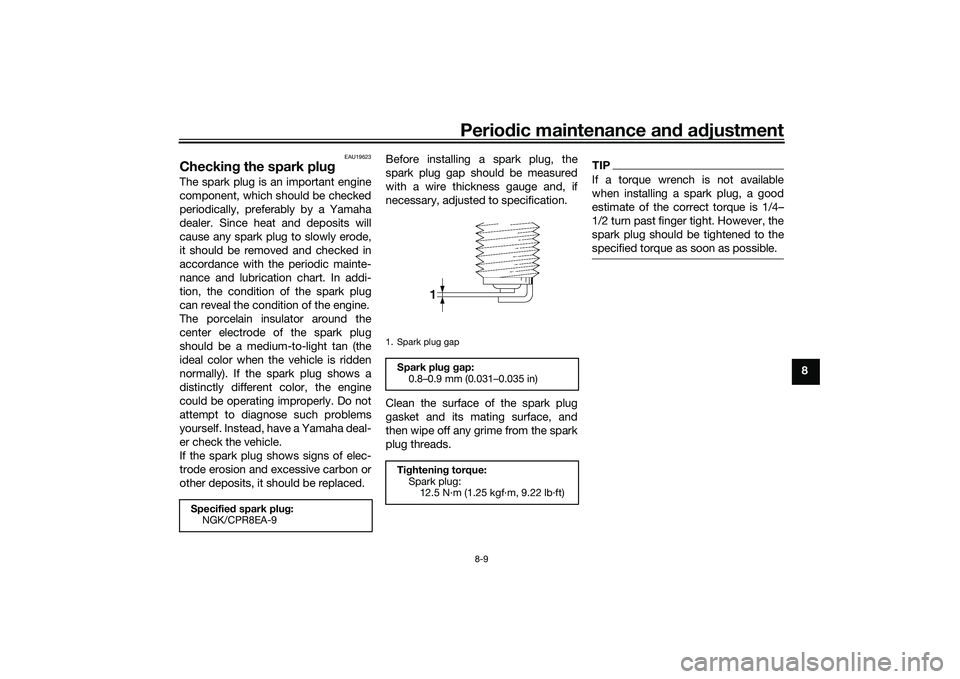
other deposits, it should be replaced. Before installing a spark plug, the
spark plug gap should be measured
with a wire thickness gauge and, if
necessary, adjusted to specification.
Clean the surface of the spark plug
gasket and its mating surface, and
then wipe off any grime from the spark
plug threads.
TIPIf a torque wrench is not available
when installing a spark plug, a good
estimate of the correct torque is 1/4–
1/2 turn past finger tight. However, the
spark plug should be tightened to the
specified torque as soon as possible.
Specifie
d spark plu g:
NGK/CPR8EA-9
1. Spark plug gap
Spark plu g g ap:
0.8–0.9 mm (0.031–0.035 in)
Ti ghtenin g torque:
Spark plug: 12.5 N·m (1.25 kgf·m, 9.22 lb·ft)
UB9YE0E0.book Page 9 Wednesday, January 6, 2021 3:03 PM
Page 76 of 114
Periodic maintenance an d a djustment
8-10
8
EAU36113
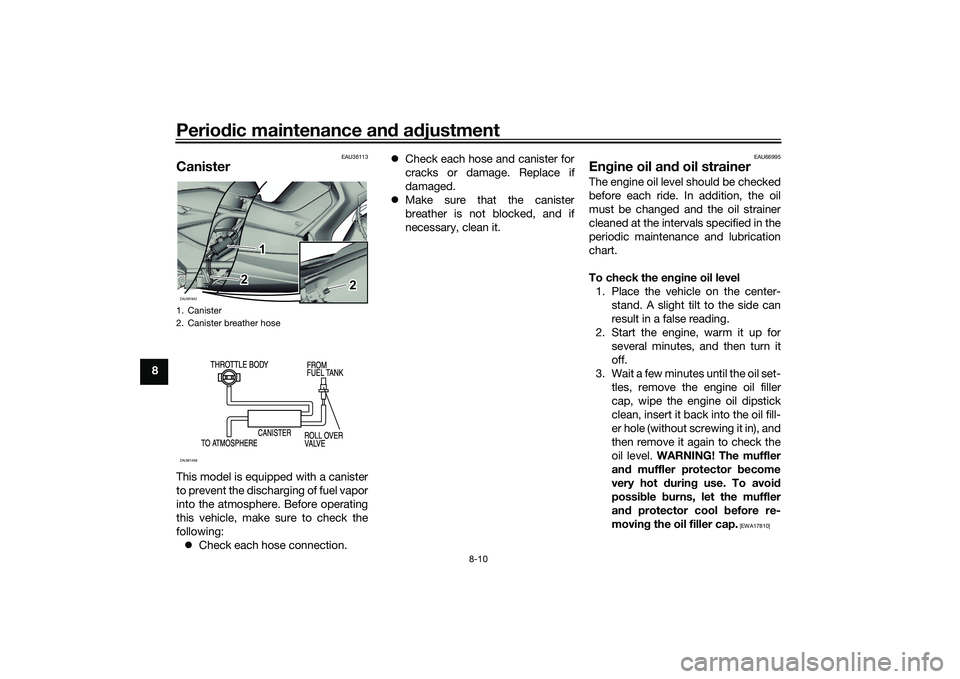
CanisterThis model is equipped with a canister
to prevent the discharging of fuel vapor
into the atmosphere. Before operating
this vehicle, make sure to check the
following:
Check each hose connection.
Check each hose and canister for
cracks or damage. Replace if
damaged.
Make sure that the canister
breather is not blocked, and if
necessary, clean it.
EAU66995
Engine oil an d oil strainerThe engine oil level should be checked
before each ride. In addition, the oil
must be changed and the oil strainer
cleaned at the intervals specified in the
periodic maintenance and lubrication
chart.
To check the en gine oil level
1. Place the vehicle on the center- stand. A slight tilt to the side can
result in a false reading.
2. Start the engine, warm it up for several minutes, and then turn it
off.
3. Wait a few minutes until the oil set- tles, remove the engine oil filler
cap, wipe the engine oil dipstick
clean, insert it back into the oil fill-
er hole (without screwing it in), and
then remove it again to check the
oil level. WARNING! The muffler
an d muffler protector become
very hot d uring use. To avoi d
possi ble burns, let the muffler
an d protector cool before re-
movin g the oil filler cap.
[EWA17810]
1. Canister
2. Canister breather hoseZAUM1942
2 2
1
22
1
2
ZAUM1458
UB9YE0E0.book Page 10 Wednesday, January 6, 2021 3:03 PM
Page 77 of 114
Periodic maintenance an d a djustment
8-11
8
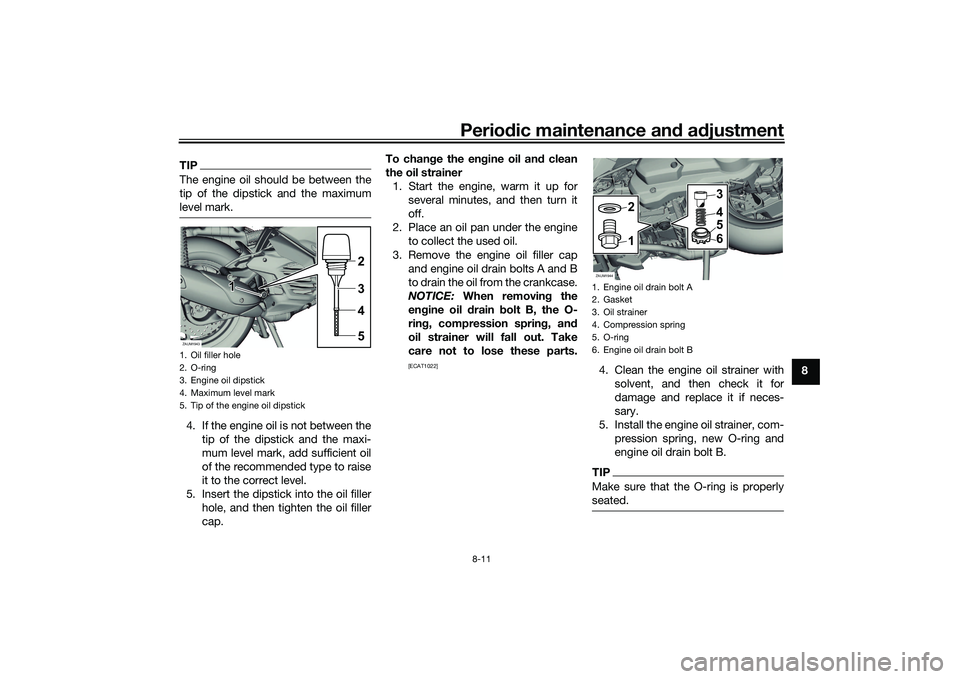
TIPThe engine oil should be between the
tip of the dipstick and the maximum
level mark.4. If the engine oil is not between the
tip of the dipstick and the maxi-
mum level mark, add sufficient oil
of the recommended type to raise
it to the correct level.
5. Insert the dipstick into the oil filler hole, and then tighten the oil filler
cap. To chan
ge the en gine oil an d clean
the oil strainer 1. Start the engine, warm it up for several minutes, and then turn it
off.
2. Place an oil pan under the engine to collect the used oil.
3. Remove the engine oil filler cap and engine oil drain bolts A and B
to drain the oil from the crankcase.
NOTICE: When removin g the
en gine oil d rain bolt B, the O-
rin g, compression sprin g, an d
oil strainer will fall out. Take
care not to lose these parts.
[ECAT1022]
4. Clean the engine oil strainer with solvent, and then check it for
damage and replace it if neces-
sary.
5. Install the engine oil strainer, com- pression spring, new O-ring and
engine oil drain bolt B.TIPMake sure that the O-ring is properly
seated.
1. Oil filler hole
2. O-ring
3. Engine oil dipstick
4. Maximum level mark
5. Tip of the engine oil dipstickZAUM1943
3245
1 1
1
1. Engine oil drain bolt A
2. Gasket
3. Oil strainer
4. Compression spring
5. O-ring
6. Engine oil drain bolt BZAUM1944
2 3
4
5
6
1
UB9YE0E0.book Page 11 Wednesday, January 6, 2021 3:03 PM
Page 78 of 114
Periodic maintenance an d a djustment
8-12
8 6. Install engine oil drain bolt A and
its new gasket, and then tighten
both drain bolts to their specified
torques.
7. Refill with the specified amount of the recommended engine oil, and
then install and tighten the oil filler
cap.
TIPBe sure to wipe off spilled oil on any
parts after the engine and exhaust sys-
tem have cooled down.NOTICE
ECA24060
Make sure that no forei gn material
enters the crankcase.
8. Start the engine, and then let it idle for several minutes while checking
it for oil leakage. If oil is leaking,
immediately turn the engine off
and check for the cause.
9. Turn the engine off, and then check the oil level and correct it if
necessary.
10. Reset the oil change tripmeter and oil change indicator “OIL”. (See
page 5-7 for reset procedures.)
EAU20067
Final transmission oilThe final transmission case must be
checked for oil leakage before each
ride. If any leakage is found, have a
Yamaha dealer check and repair the scooter. In addition, the final transmis-
sion oil must be changed as follows at
the intervals specified in the periodic
maintenance and lubrication chart. 1. Start the engine, warm up the final transmission oil by riding the
scooter for several minutes, and
then stop the engine.
2. Place the scooter on the center- stand.
3. Place an oil pan under the final transmission case to collect the
used oil.
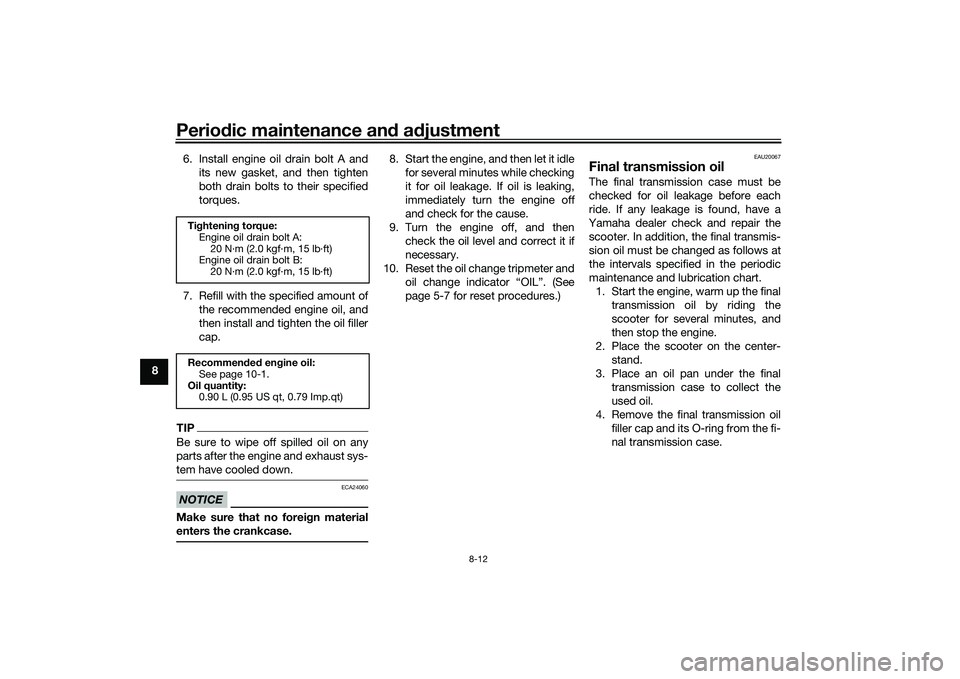
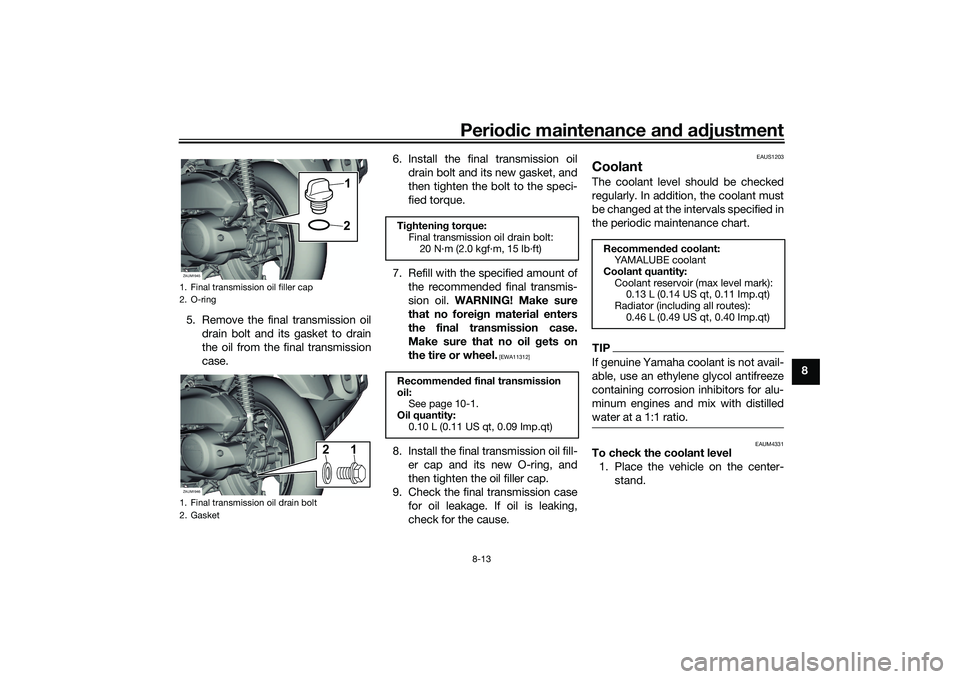
4. Remove the final transmission oil filler cap and its O-ring from the fi-
nal transmission case.
Tightenin g torque:
Engine oil drain bolt A: 20 N·m (2.0 kgf·m, 15 lb·ft)
Engine oil drain bolt B:
20 N·m (2.0 kgf·m, 15 lb·ft)
Recommen ded en gine oil:
See page 10-1.
Oil quantity: 0.90 L (0.95 US qt, 0.79 Imp.qt)
UB9YE0E0.book Page 12 Wednesday, January 6, 2021 3:03 PM
Page 79 of 114
Periodic maintenance an d a djustment
8-13
8
5. Remove the final transmission oil
drain bolt and its gasket to drain
the oil from the final transmission
case. 6. Install the final transmission oil
drain bolt and its new gasket, and
then tighten the bolt to the speci-
fied torque.
7. Refill with the specified amount of the recommended final transmis-
sion oil. WARNING! Make sure
that no forei gn material enters
the final transmission case.
Make sure that no oil gets on
the tire or wheel.
[EWA11312]
8. Install the final transmission oil fill- er cap and its new O-ring, and
then tighten the oil filler cap.
9. Check the final transmission case for oil leakage. If oil is leaking,
check for the cause.
EAUS1203
CoolantThe coolant level should be checked
regularly. In addition, the coolant must
be changed at the intervals specified in
the periodic maintenance chart.TIPIf genuine Yamaha coolant is not avail-
able, use an ethylene glycol antifreeze
containing corrosion inhibitors for alu-
minum engines and mix with distilled
water at a 1:1 ratio.
EAUM4331
To check the coolant level1. Place the vehicle on the center- stand.
1. Final transmission oil filler cap
2. O-ring
1. Final transmission oil drain bolt
2. GasketZAUM1945
1
2
ZAUM1946
12
Ti ghtenin g torque:
Final transmission oil drain bolt: 20 N·m (2.0 kgf·m, 15 lb·ft)
Recommen ded final transmission
oil: See page 10-1.
Oil quantity: 0.10 L (0.11 US qt, 0.09 Imp.qt)
Recommen ded coolant:
YAMALUBE coolant
Coolant quantity: Coolant reservoir (max level mark): 0.13 L (0.14 US qt, 0.11 Imp.qt)
Radiator (including all routes): 0.46 L (0.49 US qt, 0.40 Imp.qt)
UB9YE0E0.book Page 13 Wednesday, January 6, 2021 3:03 PM