ignition YAMAHA XSR 700 2019 Owners Manual
[x] Cancel search | Manufacturer: YAMAHA, Model Year: 2019, Model line: XSR 700, Model: YAMAHA XSR 700 2019Pages: 98, PDF Size: 7.67 MB
Page 6 of 98

Table of contentsSafety information............................ 1-1
Description....................................... 2-1
Left view ......................................... 2-1
Right view ....................................... 2-2
Controls and instruments ............... 2-3
Instrument and control functions... 3-1
Immobilizer system......................... 3-1
Main switch/steering lock............... 3-2
Indicator lights and warning
lights............................................ 3-3
Multi-function meter unit ................ 3-5
Handlebar switches ...................... 3-11
Clutch lever .................................. 3-12
Shift pedal .................................... 3-13
Brake lever.................................... 3-13
Brake pedal .................................. 3-13
ABS .............................................. 3-14
Fuel tank cap ................................ 3-15
Fuel ............................................... 3-15
Fuel tank breather hose and
overflow hose ............................ 3-17
Catalytic converter ....................... 3-17
Seat .............................................. 3-18
Helmet holding cable.................... 3-18
Adjusting the shock absorber
assembly ................................... 3-20
Auxiliary DC connector ................. 3-21
Sidestand ..................................... 3-21
Ignition circuit cut-off system ....... 3-22For your safety – pre-operation
checks............................................... 4-1
Operation and important riding
points................................................. 5-1
Starting the engine .......................... 5-1
Shifting ............................................ 5-2
Tips for reducing fuel
consumption ................................ 5-3
Engine break-in ............................... 5-4
Parking ............................................ 5-4
Periodic maintenance and
adjustment........................................ 6-1
Tool kit ............................................ 6-2
Periodic maintenance charts .......... 6-3
Periodic maintenance chart for the
emission control system .............. 6-3
General maintenance and
lubrication chart ........................... 6-5
Checking the spark plugs ............... 6-9
Canister ......................................... 6-10
Engine oil and oil filter cartridge.... 6-10
Why Yamalube .............................. 6-13
Coolant.......................................... 6-13
Replacing the air filter element
and cleaning the check hose..... 6-15
Checking the throttle grip free
play ............................................ 6-15
Valve clearance ............................. 6-16
Tires .............................................. 6-16Cast wheels .................................. 6-18
Adjusting the clutch lever free
play ............................................ 6-19
Checking the brake lever free
play ............................................ 6-19
Brake light switches ..................... 6-20
Checking the front and rear brake
pads .......................................... 6-20
Checking the brake fluid level ...... 6-21
Changing the brake fluid .............. 6-22
Drive chain slack........................... 6-23
Cleaning and lubricating the drive
chain.......................................... 6-24
Checking and lubricating the
cables ........................................ 6-25
Checking and lubricating the
throttle grip and cable ............... 6-25
Checking and lubricating the
brake and shift pedals............... 6-26
Checking and lubricating the
brake and clutch levers ............. 6-26
Checking and lubricating the
sidestand................................... 6-27
Lubricating the rear suspension ... 6-27
Lubricating the swingarm
pivots......................................... 6-28
Checking the front fork ................. 6-28
Checking the steering................... 6-29
Checking the wheel bearings ....... 6-29
Battery .......................................... 6-29
Replacing the fuses ...................... 6-31UBCNE0E0.book Page 1 Monday, February 4, 2019 10:04 AM
Page 17 of 98
Instrument and control functions
3-2
3
EAU10474
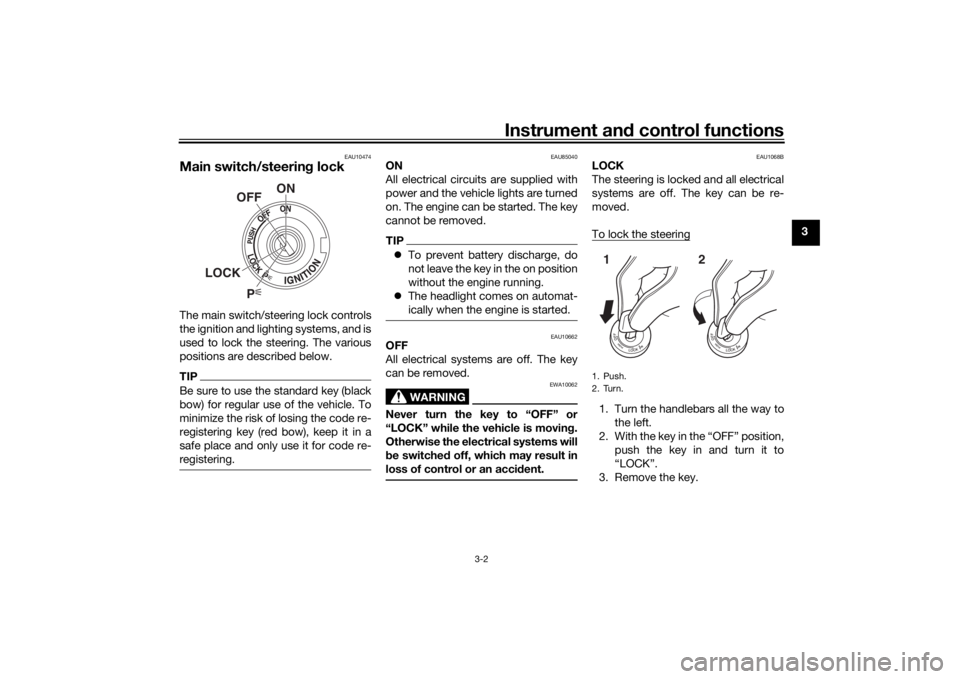
Main switch/steering lockThe main switch/steering lock controls
the ignition and lighting systems, and is
used to lock the steering. The various
positions are described below.TIPBe sure to use the standard key (black
bow) for regular use of the vehicle. To
minimize the risk of losing the code re-
registering key (red bow), keep it in a
safe place and only use it for code re-
registering.
EAU85040
ON
All electrical circuits are supplied with
power and the vehicle lights are turned
on. The engine can be started. The key
cannot be removed.TIPTo prevent battery discharge, do
not leave the key in the on position
without the engine running.
The headlight comes on automat-
ically when the engine is started.
EAU10662
OFF
All electrical systems are off. The key
can be removed.
WARNING
EWA10062
Never turn the key to “OFF” or
“LOCK” while the vehicle is moving.
Otherwise the electrical systems will
be switched off, which may result in
loss of control or an accident.
EAU1068B
LOCK
The steering is locked and all electrical
systems are off. The key can be re-
moved.
To lock the steering1. Turn the handlebars all the way to
the left.
2. With the key in the “OFF” position,
push the key in and turn it to
“LOCK”.
3. Remove the key.
P
ON
OFF
LOCK
1. Push.
2. Turn.12
UBCNE0E0.book Page 2 Monday, February 4, 2019 10:04 AM
Page 30 of 98
Instrument and control functions
3-15
3
EAU13076
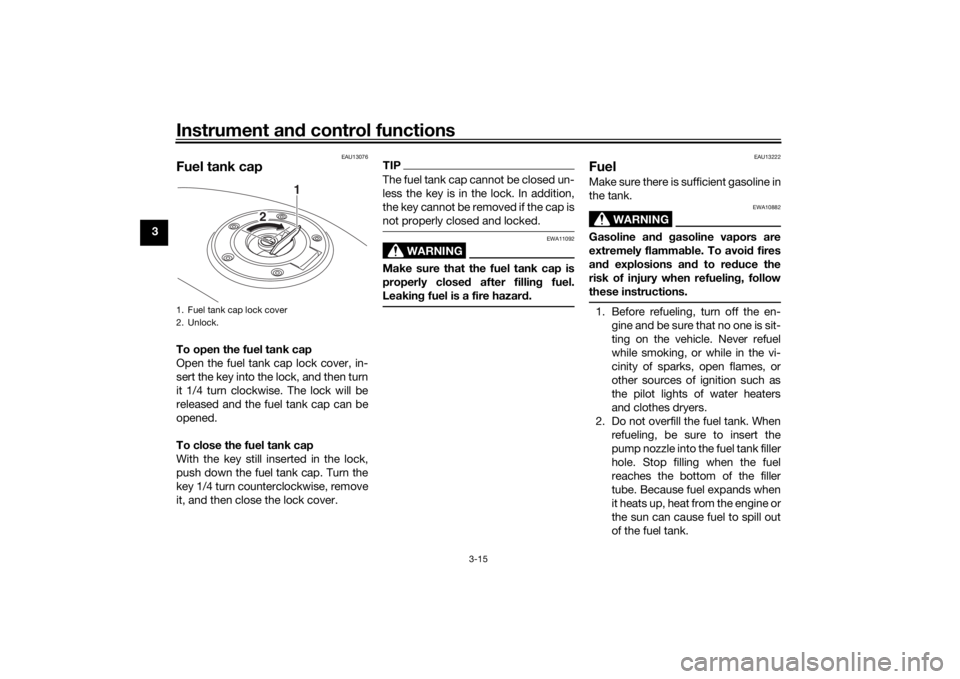
Fuel tank capTo open the fuel tank cap
Open the fuel tank cap lock cover, in-
sert the key into the lock, and then turn
it 1/4 turn clockwise. The lock will be
released and the fuel tank cap can be
opened.
To close the fuel tank cap
With the key still inserted in the lock,
push down the fuel tank cap. Turn the
key 1/4 turn counterclockwise, remove
it, and then close the lock cover.
TIPThe fuel tank cap cannot be closed un-
less the key is in the lock. In addition,
the key cannot be removed if the cap is
not properly closed and locked.
WARNING
EWA11092
Make sure that the fuel tank cap is
properly closed after filling fuel.
Leaking fuel is a fire hazard.
EAU13222
FuelMake sure there is sufficient gasoline in
the tank.
WARNING
EWA10882
Gasoline and gasoline vapors are
extremely flammable. To avoid fires
and explosions and to reduce the
risk of injury when refueling, follow
these instructions.1. Before refueling, turn off the en-
gine and be sure that no one is sit-
ting on the vehicle. Never refuel
while smoking, or while in the vi-
cinity of sparks, open flames, or
other sources of ignition such as
the pilot lights of water heaters
and clothes dryers.
2. Do not overfill the fuel tank. When
refueling, be sure to insert the
pump nozzle into the fuel tank filler
hole. Stop filling when the fuel
reaches the bottom of the filler
tube. Because fuel expands when
it heats up, heat from the engine or
the sun can cause fuel to spill out
of the fuel tank.
1. Fuel tank cap lock cover
2. Unlock.
1
2
UBCNE0E0.book Page 15 Monday, February 4, 2019 10:04 AM
Page 36 of 98
Instrument and control functions
3-21
3
EAU70641
Auxiliary DC connectorThis vehicle is equipped with an auxil-
iary DC connector. Consult your
Yamaha dealer before installing any
accessories.
EAU15306
SidestandThe sidestand is located on the left
side of the frame. Raise the sidestand
or lower it with your foot while holding
the vehicle upright.TIPThe built-in sidestand switch is part of
the ignition circuit cut-off system,
which cuts the ignition in certain situa-
tions. (See the following section for an
explanation of the ignition circuit cut-
off system.)
WARNING
EWA10242
The vehicle must not be ridden with
the sidestand down, or if the side-
stand cannot be properly moved up
(or does not stay up), otherwise the
sidestand could contact the ground
and distract the operator, resulting
in a possible loss of control.
Yamaha’s ignition circuit cut-off
system has been designed to assist
the operator in fulfilling the respon-
sibility of raising the sidestand be-
fore starting off. Therefore, checkthis system regularly and have a
Yamaha dealer repair it if it does not
function properly.
UBCNE0E0.book Page 21 Monday, February 4, 2019 10:04 AM
Page 37 of 98

Instrument and control functions
3-22
3
EAU44895
Ignition circuit cut-off systemThis system prevents in-gear engine
starts unless the clutch lever is pulled
and the sidestand is up. Also, it will
stop the running engine should the
sidestand be lowered while the trans-
mission is in gear.
Periodically check the system via the
following procedure.TIPThis check is most reliable if per-
formed with a warmed-up engine.
See pages 3-2 and 3-11 for switch
operation information.
UBCNE0E0.book Page 22 Monday, February 4, 2019 10:04 AM
Page 41 of 98

For your safety – pre-operation checks
4-3
4
Chassis fasteners• Make sure that all nuts, bolts and screws are properly tightened.
• Tighten if necessary.—
Instruments, lights, signals
and switches• Check operation.
• Correct if necessary.—
Sidestand switch • Check operation of ignition circuit cut-off system.
• If system is not working correctly, have Yamaha dealer check vehicle.3-21 ITEM CHECKS PAGE
UBCNE0E0.book Page 3 Monday, February 4, 2019 10:04 AM
Page 54 of 98
Periodic maintenance and adjustment
6-9
6
EAU19653
Checking the spark plugsThe spark plugs are important engine
components, which should be
checked periodically, preferably by a
Yamaha dealer. Since heat and depos-
its will cause any spark plug to slowly
erode, they should be removed and
checked in accordance with the peri-
odic maintenance and lubrication
chart. In addition, the condition of the
spark plugs can reveal the condition of
the engine.
The porcelain insulator around the
center electrode of each spark plug
should be a medium-to-light tan (the
ideal color when the vehicle is ridden
normally), and all spark plugs installed
in the engine should have the same
color. If any spark plug shows a dis-
tinctly different color, the engine could
be operating improperly. Do not at-
tempt to diagnose such problems
yourself. Instead, have a Yamaha deal-
er check the vehicle.
If a spark plug shows signs of elec-
trode erosion and excessive carbon or
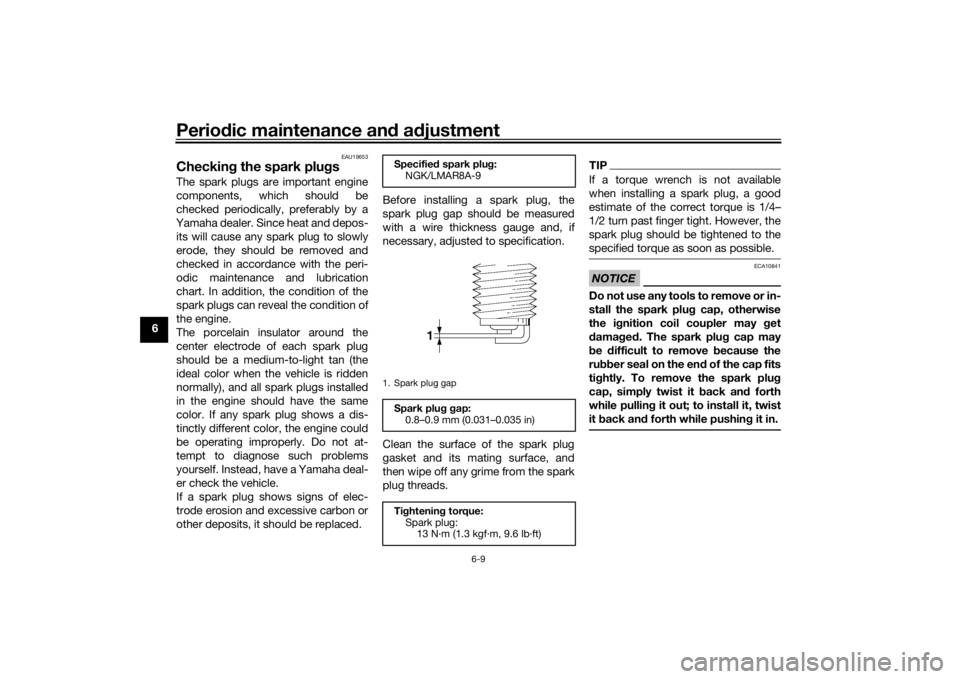
other deposits, it should be replaced.Before installing a spark plug, the
spark plug gap should be measured
with a wire thickness gauge and, if
necessary, adjusted to specification.
Clean the surface of the spark plug
gasket and its mating surface, and
then wipe off any grime from the spark
plug threads.
TIPIf a torque wrench is not available
when installing a spark plug, a good
estimate of the correct torque is 1/4…
1/2 turn past finger tight. However, the
spark plug should be tightened to the
specified torque as soon as possible.NOTICE
ECA10841
Do not use any tools to remove or in-
stall the spark plug cap, otherwise
the ignition coil coupler may get
damaged. The spark plug cap may
be difficult to remove because the
rubber seal on the end of the cap fits
tightly. To remove the spark plug
cap, simply twist it back and forth
while pulling it out; to install it, twist
it back and forth while pushing it in.
Specified spark plug:
NGK/LMAR8A-91. Spark plug gapSpark plug gap:
0.8–0.9 mm (0.031–0.035 in)
Tightening torque:
Spark plug:
13 N·m (1.3 kgf·m, 9.6 lb·ft)
UBCNE0E0.book Page 9 Monday, February 4, 2019 10:04 AM
Page 77 of 98
Periodic maintenance and adjustment
6-32
6
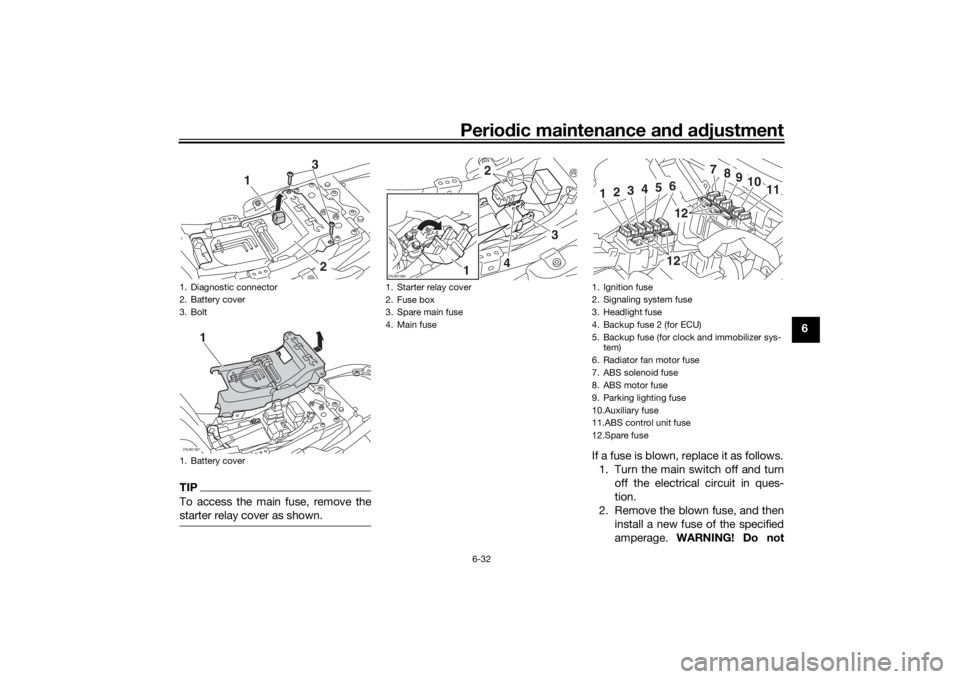
TIPTo access the main fuse, remove the
starter relay cover as shown.
If a fuse is blown, replace it as follows.
1. Turn the main switch off and turn
off the electrical circuit in ques-
tion.
2. Remove the blown fuse, and then
install a new fuse of the specified
amperage. WARNING! Do not
1. Diagnostic connector
2. Battery cover
3. Bolt
1. Battery cover
3
12
ZAUM1387
1
1. Starter relay cover
2. Fuse box
3. Spare main fuse
4. Main fuseZAUM1380
2
3
4
1
1. Ignition fuse
2. Signaling system fuse
3. Headlight fuse
4. Backup fuse 2 (for ECU)
5. Backup fuse (for clock and immobilizer sys-
tem)
6. Radiator fan motor fuse
7. ABS solenoid fuse
8. ABS motor fuse
9. Parking lighting fuse
10.Auxiliary fuse
11.ABS control unit fuse
12.Spare fuse
7
8
9
10
11
1
2
3
4
5
61212
UBCNE0E0.book Page 32 Monday, February 4, 2019 10:04 AM
Page 78 of 98
![YAMAHA XSR 700 2019 Owners Manual Periodic maintenance and adjustment
6-33
6use a fuse of a higher amperage
rating than recommended to
avoid causing extensive dam-
age to the electrical system and
possibly a fire.
[EWA15132]
3. Turn YAMAHA XSR 700 2019 Owners Manual Periodic maintenance and adjustment
6-33
6use a fuse of a higher amperage
rating than recommended to
avoid causing extensive dam-
age to the electrical system and
possibly a fire.
[EWA15132]
3. Turn](/img/51/53024/w960_53024-77.png)
Periodic maintenance and adjustment
6-33
6use a fuse of a higher amperage
rating than recommended to
avoid causing extensive dam-
age to the electrical system and
possibly a fire.
[EWA15132]
3. Turn the main switch on and turn
on the electrical circuit in question
to check if the device operates.
4. If the fuse immediately blows
again, have a Yamaha dealer
check the electrical system.
5. After the fuse is changed, place
the battery cover in the original
position, and then install the bolts.
6. Install the diagnostic connector by
pushing it downward.
7. Install the seat holder by installing
the bolts, and then tighten the
bolts to the specified torque.
8. Install the seat.
EAU34387
Replacing the headlight bulbThis model is equipped with a halogen
bulb headlight. If the headlight bulb
burns out, replace it as follows.NOTICE
ECA26690
Do not touch the glass part of
the headlight bulb. Otherwise
the luminosity and the life of the
bulb may be adversely affected.
Thoroughly clean off any dirt,
oil, or fingerprints from the bulb
using a cloth moistened with al-
cohol or thinner.
Do not use a headlight bulb of a
wattage higher than specified.
Do not affix any type of tinted
film or stickers to the headlight
lens.
Specified fuses:
Main fuse:
30.0 A
Auxiliary fuse:
2.0 A
Headlight fuse:
15.0 A
Signaling system fuse:
10.0 A
Ignition fuse:
10.0 A
Parking lighting fuse:
7.5 A
Radiator fan motor fuse:
10.0 A
ABS motor fuse:
30.0 A
ABS solenoid fuse:
20.0 A
Fuel injection system fuse:
10.0 A
ABS control unit fuse:
7.5 A
Backup fuse:
7.5 A
Backup fuse 2:
10.0 A
Tightening torque:
Seat holder bolts:
7 N·m (0.7 kgf·m, 5.2 lb·ft)
UBCNE0E0.book Page 33 Monday, February 4, 2019 10:04 AM
Page 82 of 98
Periodic maintenance and adjustment
6-37
6
EAU67131
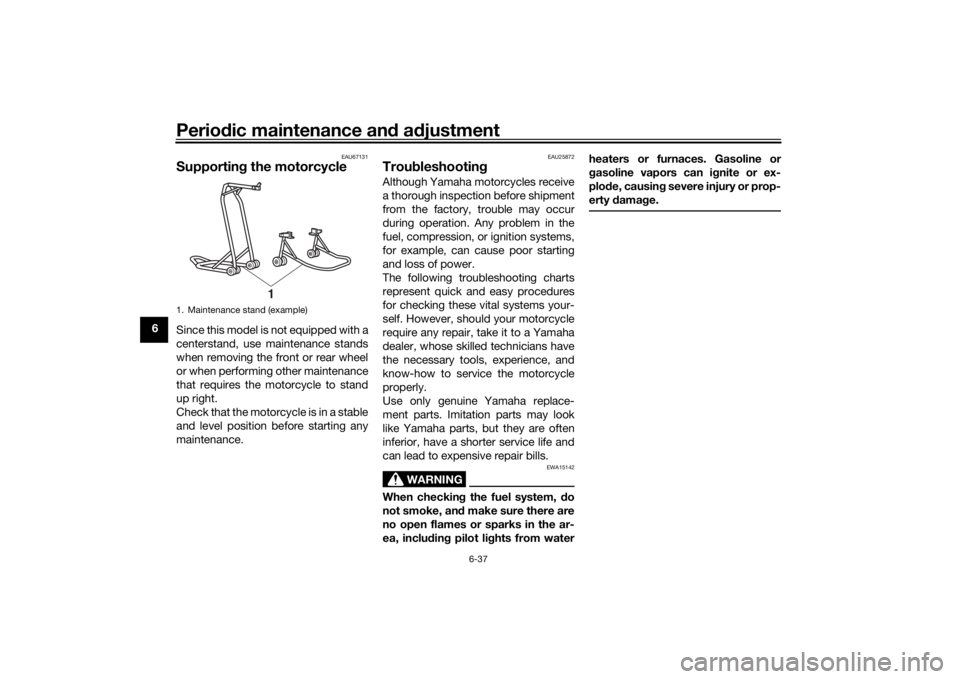
Supporting the motorcycleSince this model is not equipped with a
centerstand, use maintenance stands
when removing the front or rear wheel
or when performing other maintenance
that requires the motorcycle to stand
up right.
Check that the motorcycle is in a stable
and level position before starting any
maintenance.
EAU25872
TroubleshootingAlthough Yamaha motorcycles receive
a thorough inspection before shipment
from the factory, trouble may occur
during operation. Any problem in the
fuel, compression, or ignition systems,
for example, can cause poor starting
and loss of power.
The following troubleshooting charts
represent quick and easy procedures
for checking these vital systems your-
self. However, should your motorcycle
require any repair, take it to a Yamaha
dealer, whose skilled technicians have
the necessary tools, experience, and
know-how to service the motorcycle
properly.
Use only genuine Yamaha replace-
ment parts. Imitation parts may look
like Yamaha parts, but they are often
inferior, have a shorter service life and
can lead to expensive repair bills.
WARNING
EWA15142
When checking the fuel system, do
not smoke, and make sure there are
no open flames or sparks in the ar-
ea, including pilot lights from waterheaters or furnaces. Gasoline or
gasoline vapors can ignite or ex-
plode, causing severe injury or prop-
erty damage.
1. Maintenance stand (example)
1
UBCNE0E0.book Page 37 Monday, February 4, 2019 10:04 AM