maintenance YAMAHA YFZ450 2006 Owners Manual
[x] Cancel search | Manufacturer: YAMAHA, Model Year: 2006, Model line: YFZ450, Model: YAMAHA YFZ450 2006Pages: 444, PDF Size: 5.69 MB
Page 4 of 444
EBU12031
INTRODUCTION
Congratulations on your purchase of the
Yamaha YFZ450V. It represents the result of
many years of Yamaha experience in the pro-
duction of fine sporting, touring, and pacesetting
racing machines. With the purchase of this
Yamaha, you can now appreciate the high
degree of craftsmanship and reliability that have
made Yamaha a leader in these fields.
This manual will provide you with a good basic
understanding of the features and operation of
this ATV.
This manual includes important safety infor-
mation. It provides information about special
techniques and skills necessary to ride your
ATV.
It also includes basic maintenance and inspec-
tion procedures. If you have any questions
regarding the operation or maintenance of your
ATV, please consult a Yamaha dealer.
5TG-9-62 1-3 5/13/05 10:06 AM Page 2
Page 15 of 444
Lights ................................................ 5-29
Switches ........................................... 5-29
OPERATION ........................................ 6-1
Starting a cold engine ......................... 6-3
Starting a warm engine ...................... 6-9
Warming up ........................................ 6-9
Shifting ............................................. 6-11
To start out and accelerate ............... 6-13
To decelerate ................................... 6-17
Engine break-in ................................ 6-19
Parking ............................................. 6-23
Parking on a slope ............................ 6-25
Accessories and loading .................. 6-29
RIDING YOUR ATV .............................. 7-1
GETTING TO KNOW YOUR ATV ...... 7-3
RIDE WITH CARE AND GOOD
JUDGEMENT ................................... 7-5
BE CAREFUL WHERE YOU RIDE ... 7-27
TURNING YOUR ATV ...................... 7-41CLIMBING UPHILL .......................... 7-47
RIDING DOWNHILL ......................... 7-57
CROSSING A SLOPE .......................7-61
CROSSING THROUGH SHALLOW
WATER .......................................... 7-65
RIDING OVER ROUGH TERRAIN ....7-69
SLIDING AND SKIDDING .................7-71
WHAT TO DO IF ... ...........................7-75
WHAT TO DO ... .............................. 7-75
PERIODIC MAINTENANCE AND
ADJUSTMENT ................................... 8-1
Owner’s manual and tool kit ............... 8-3
PERIODIC MAINTENANCE/
LUBRICATION .................................. 8-7
Panel removal and installation ......... 8-19
Engine oil and oil filter element ........ 8-25
Cooling system ................................. 8-43
Changing the coolant ....................... 8-47
Spark plug inspection ....................... 8-55
Air filter element cleaning ................. 8-67
6
7
8
5TG-9-62 1-3 5/13/05 10:06 AM Page 13
Page 16 of 444
Carburetor adjustment ...................... 8-75
Idle speed adjustment ...................... 8-77
Valve clearance adjustment ............. 8-77
Throttle lever adjustment .................. 8-79
Front brake pad inspection ............... 8-81
Rear brake pad inspection ............... 8-83
Brake fluid level inspection ............... 8-85
Brake fluid replacement .................... 8-91
Front brake lever free play ............... 8-93
Brake pedal height adjustment ......... 8-95
Parking brake adjustment ................. 8-97
Adjusting the rear brake light switch.... 8-101
Clutch lever free play adjustment .... 8-103
Drive chain slack check .................. 8-105
Adjusting the drive chain slack ....... 8-107
Lubricating the drive chain ............. 8-111
Cable inspection and lubrication .... 8-115
Brake pedal, brake lever and
clutch lever lubrication .................. 8-117
Front upper and lower arm pivot
lubrication ..................................... 8-121Rear arm pivot lubrication .............. 8-123
Wheel removal ............................... 8-125
Wheel installation ........................... 8-127
Battery ............................................ 8-129
Battery maintenance ...................... 8-133
Fuse replacement ........................... 8-135
Replacing a headlight bulb ............. 8-137
Headlight beam adjustment ............ 8-143
Tail/brake light ................................ 8-143
Troubleshooting .............................. 8-145
Troubleshooting chart ..................... 8-149
CLEANING AND STORAGE ................ 9-1
A. CLEANING ..................................... 9-1
B. STORAGE ..................................... 9-7
SPECIFICATIONS .............................. 10-1
Conversion table ................................. 11-1
9
10
11
5TG-9-62 1-3 5/13/05 10:06 AM Page 14
Page 36 of 444
2-5
8Never operate at speeds too fast for your
skills or the conditions. Always go at a speed
that is proper for the terrain, visibility, operat-
ing conditions, and your experience.
8Never attempt wheelies, jumps, or other
stunts.
8Always inspect your ATV each time you use it
to make sure it is in safe operating condition.
Always follow the inspection and maintenance
procedures and schedules described in this
manual.
8Always keep both hands on the handlebars
and both feet on the footrests of the ATV dur-
ing operation.
8Always go slowly and be extra careful when
operating on unfamiliar terrain. Always be
alert to changing terrain conditions when
operating the ATV.
5TG-9-62 1-3 5/13/05 10:06 AM Page 2-5
Page 117 of 444
5-6
w
Always inspect your ATV each time you use it to make sure the ATV is in safe operating condi-
tion.
Always follow the inspection and maintenance procedures and schedules described in the
Owner’s Manual. Failure to inspect increases the possibility of an accident or equipment dam-
age.
XG
Toujours effectuer ces contrôles avant chaque départ afin de s’assurer que le VTT peut être utili-
sé en toute sécurité.
Toujours respecter les procédés et intervalles de contrôle et d’entretien repris dans ce manuel.
Omettre ces contrôles accroît les risques d’accident ou d’endommagement du véhicule.
XR
Inspeccionar siempre el ATV cada vez que vaya a utilizarse, para asegurarse de que está en
condiciones de funcionar sin peligro.
Seguir siempre los procedimientos y programas de inspecciĂłn y mantenimiento descritos en
el Manual del Propietario. Si no se inspecciona la máquina, aumenta el riesgo de accidente o
averĂa.
5TG-9-62 5-6 5/13/05 1:45 PM Page 5-6
Page 190 of 444
7-13
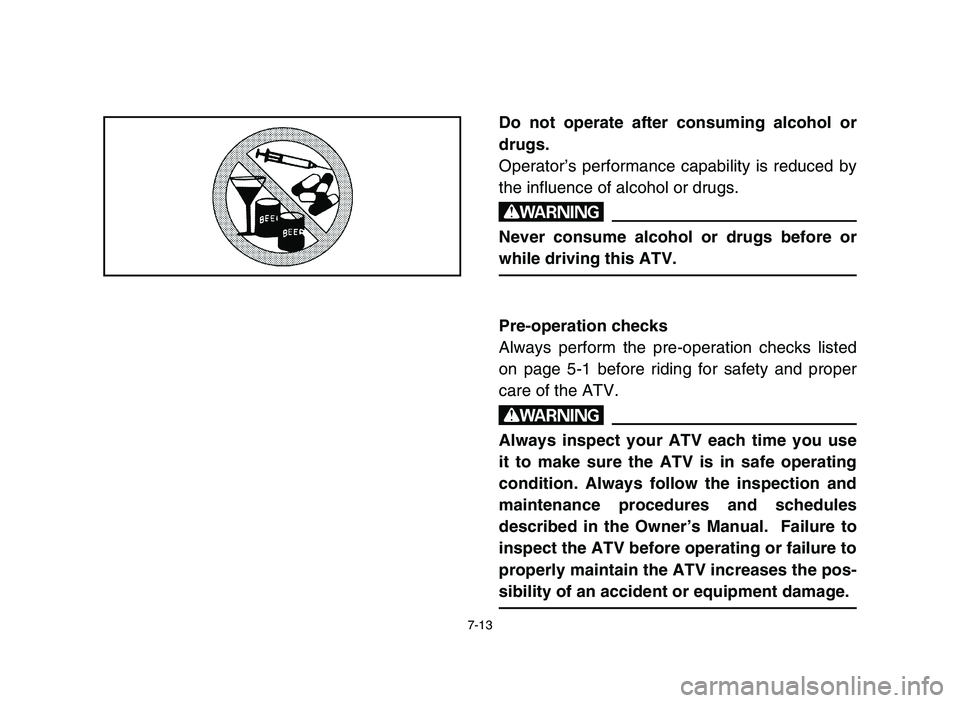
Do not operate after consuming alcohol or
drugs.
Operator’s performance capability is reduced by
the influence of alcohol or drugs.
w
Never consume alcohol or drugs before or
while driving this ATV.
Pre-operation checks
Always perform the pre-operation checks listed
on page 5-1 before riding for safety and proper
care of the ATV.
w
Always inspect your ATV each time you use
it to make sure the ATV is in safe operating
condition. Always follow the inspection and
maintenance procedures and schedules
described in the Owner’s Manual. Failure to
inspect the ATV before operating or failure to
properly maintain the ATV increases the pos-
sibility of an accident or equipment damage.
5TG-9-62 7 5/12/05 4:28 PM Page 156
Page 258 of 444
8-1
EBU05160
PERIODIC MAINTENANCE AND
ADJUSTMENT
Periodic inspection, adjustment and lubrication
will keep your machine in the safest and most
efficient condition possible. Safety is an obliga-
tion of the machine owner. The most important
points of machine inspection, adjustment and
lubrication are explained on the following pages.
w
Never service an engine while it is running.
Moving parts can catch clothing or parts of
the body, causing injury. Electrical compo-
nents can cause shocks or can start fires.
Turn off the engine when performing mainte-
nance unless otherwise specified. Have a
Yamaha dealer perform service if you are not
familiar with machine service.
5TG-9-62 7 5/12/05 4:29 PM Page 224
Page 260 of 444
8-3
EBU12220
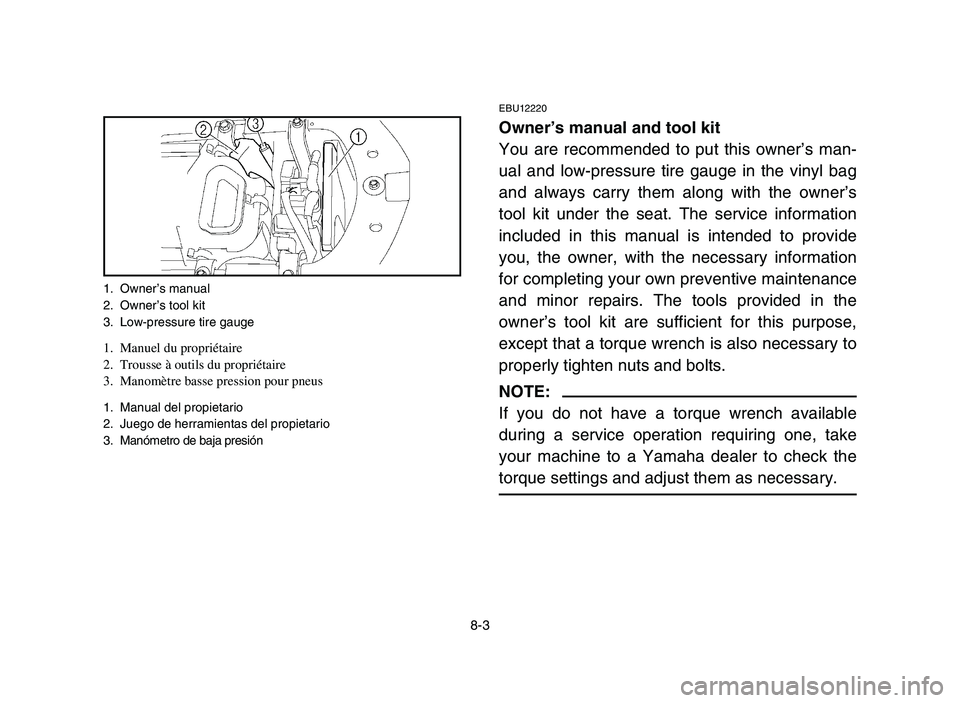
Owner’s manual and tool kit
You are recommended to put this owner’s man-
ual and low-pressure tire gauge in the vinyl bag
and always carry them along with the owner’s
tool kit under the seat. The service information
included in this manual is intended to provide
you, the owner, with the necessary information
for completing your own preventive maintenance
and minor repairs. The tools provided in the
owner’s tool kit are sufficient for this purpose,
except that a torque wrench is also necessary to
properly tighten nuts and bolts.
NOTE:
If you do not have a torque wrench available
during a service operation requiring one, take
your machine to a Yamaha dealer to check the
torque settings and adjust them as necessary.
1. Owner’s manual
2. Owner’s tool kit
3. Low-pressure tire gauge
1. Manuel du propriétaire
2. Trousse à outils du propriétaire
3. Manomètre basse pression pour pneus
1. Manual del propietario
2. Juego de herramientas del propietario
3. ManĂłmetro de baja presiĂłn
5TG-9-62 8 5/13/05 1:48 PM Page 8-3
Page 264 of 444
8-7
EBU02622
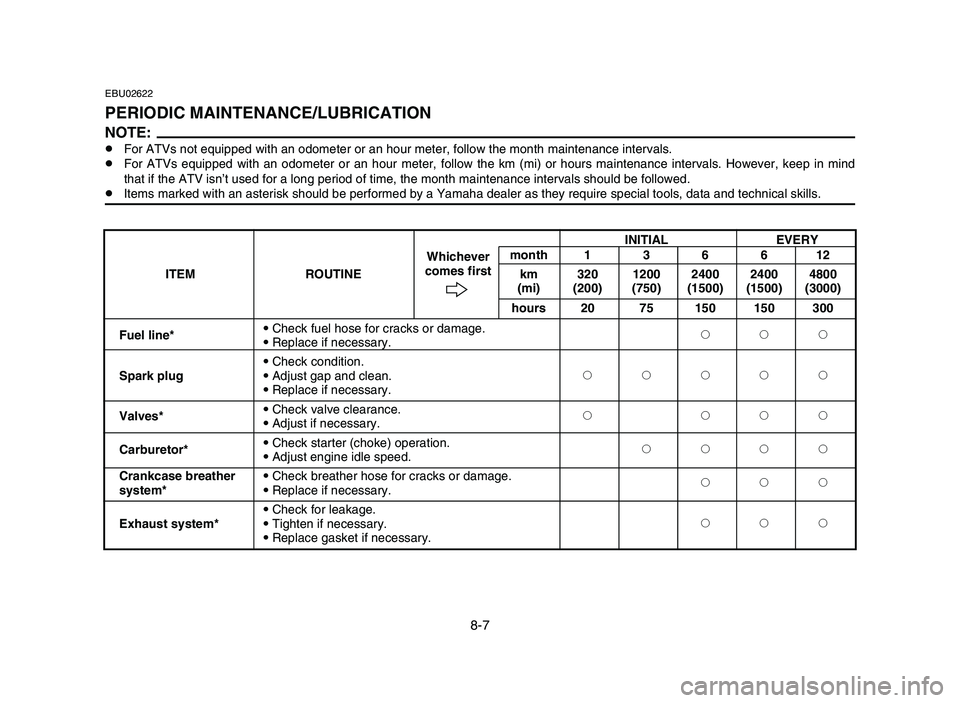
PERIODIC MAINTENANCE/LUBRICATION
NOTE:8For ATVs not equipped with an odometer or an hour meter, follow the month maintenance intervals.
8For ATVs equipped with an odometer or an hour meter, follow the km (mi) or hours maintenance intervals. However, keep in mind
that if the ATV isn’t used for a long period of time, the month maintenance intervals should be followed.
8Items marked with an asterisk should be performed by a Yamaha dealer as they require special tools, data and technical skills.
INITIAL EVERY
month 1 3 6 6 12
ITEM ROUTINEWhichever
km 320 1200 2400 2400 4800 comes first
(mi) (200) (750) (1500) (1500) (3000)
hours 20 75 150 150 300
Fuel line*9Check fuel hose for cracks or damage.
222
9Replace if necessary.
9Check condition.
Spark plug9Adjust gap and clean.22222
9Replace if necessary.
Valves*9Check valve clearance.
2 222
9Adjust if necessary.
Carburetor*9Check starter (choke) operation.
2222
9Adjust engine idle speed.
Crankcase breather9Check breather hose for cracks or damage.
222
system*9Replace if necessary.
9Check for leakage.
Exhaust system*9Tighten if necessary.222
9Replace gasket if necessary.
5TG-9-62 8 5/13/05 1:48 PM Page 8-7
Page 276 of 444
8-19
EBU08070
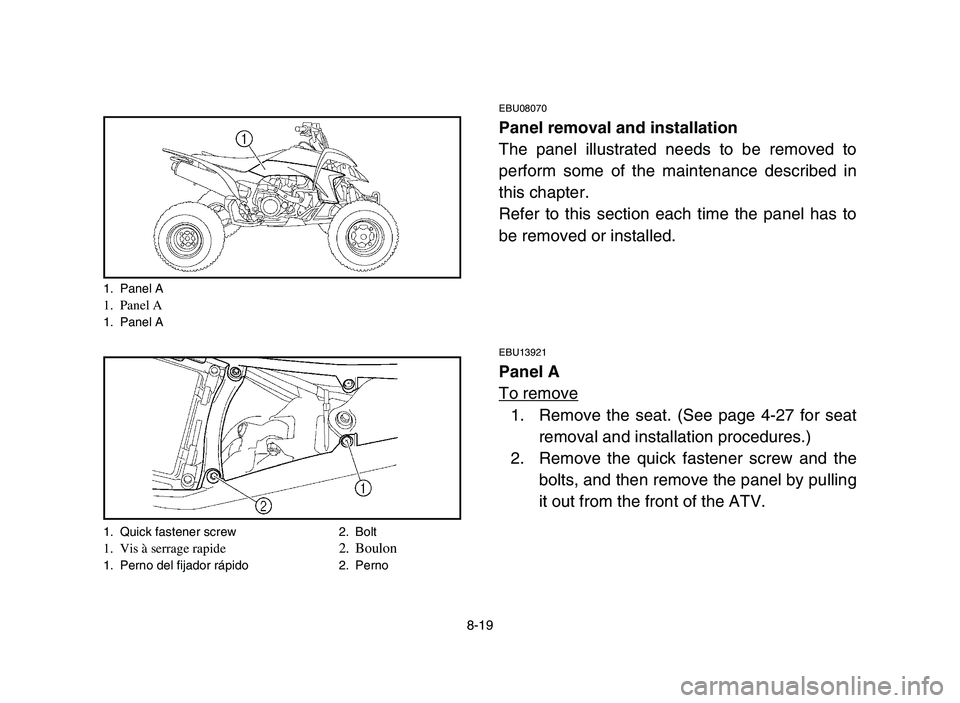
Panel removal and installation
The panel illustrated needs to be removed to
perform some of the maintenance described in
this chapter.
Refer to this section each time the panel has to
be removed or installed.
EBU13921
Panel A
To remove
1. Remove the seat. (See page 4-27 for seat
removal and installation procedures.)
2. Remove the quick fastener screw and the
bolts, and then remove the panel by pulling
it out from the front of the ATV.
1. Panel A1. Panel A1. Panel A
1. Quick fastener screw 2. Bolt
1. Vis à serrage rapide2. Boulon1. Perno del fijador rápido 2. Perno
5TG-9-62 8 5/13/05 1:48 PM Page 8-19