clock Abarth 124 Spider 2020 Owner handbook (in English)
[x] Cancel search | Manufacturer: ABARTH, Model Year: 2020, Model line: 124 Spider, Model: Abarth 124 Spider 2020Pages: 224, PDF Size: 3.9 MB
Page 35 of 224
CONTROL SWITCHES
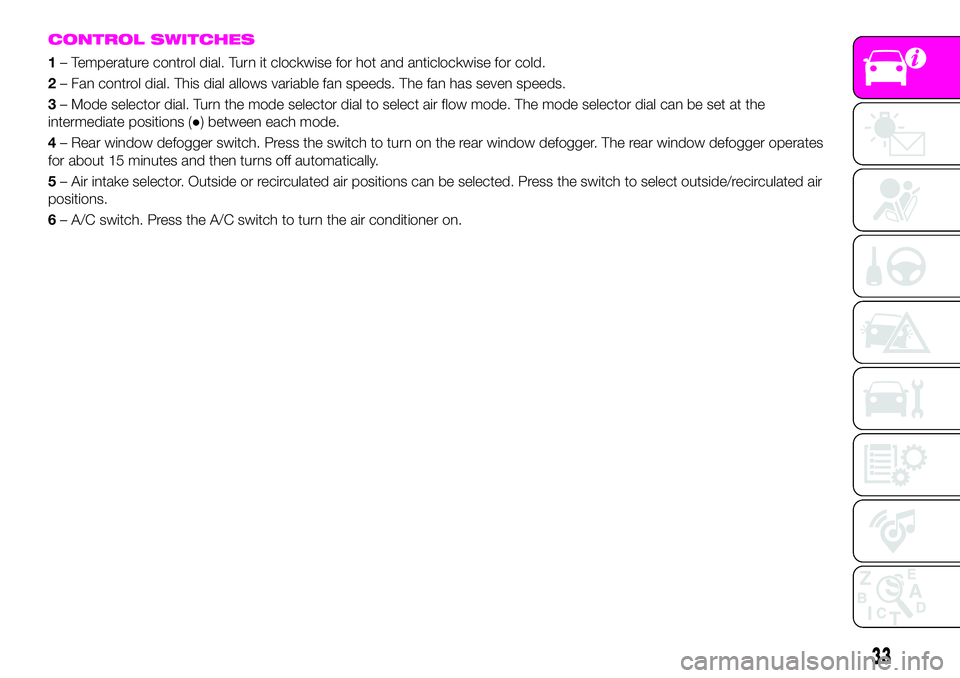
1– Temperature control dial. Turn it clockwise for hot and anticlockwise for cold.
2– Fan control dial. This dial allows variable fan speeds. The fan has seven speeds.
3– Mode selector dial. Turn the mode selector dial to select air flow mode. The mode selector dial can be set at the
intermediate positions (●) between each mode.
4– Rear window defogger switch. Press the switch to turn on the rear window defogger. The rear window defogger operates
for about 15 minutes and then turns off automatically.
5– Air intake selector. Outside or recirculated air positions can be selected. Press the switch to select outside/recirculated air
positions.
6– A/C switch. Press the A/C switch to turn the air conditioner on.
33
Page 133 of 224
REFUELLING THE
VEHICLE
157) 158) 159) 160) 161) 162)
Always stop the engine before
refuelling.
FUEL REQUIREMENTS
Only use premium unleaded fuel
(conforming to EN 228 specification
within E10) with a number of octanes
not lower than 95.
IMPORTANT USE ONLY UNLEADED
FUEL. Leaded fuel is harmful to the
catalytic converter and oxygen sensors
and will lead to deterioration of the
emission control system and or failures.
IMPORTANT The use of E10 fuel with
10% ethanol in Europe is safe for your
vehicle. Damage to your vehicle may
occur when ethanol exceeds this
recommendation.
IMPORTANT Never add fuel system
additives, otherwise the emission
control system could be damaged.
Contact an Abarth Dealership for
details.
REFUELLING
PROCEDURE
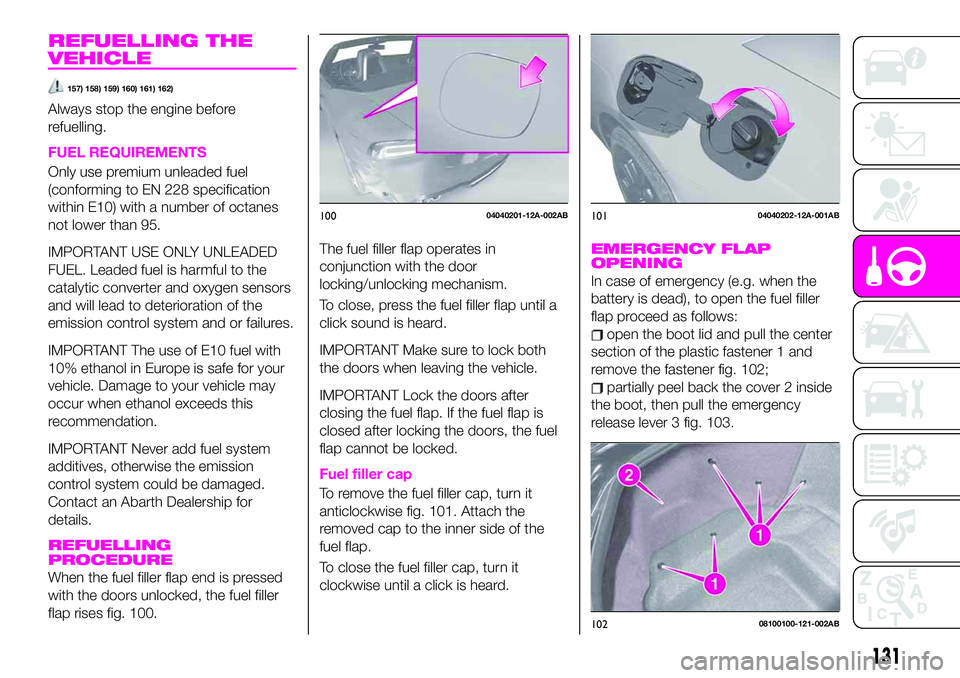
When the fuel filler flap end is pressed
with the doors unlocked, the fuel filler
flap rises fig. 100.The fuel filler flap operates in
conjunction with the door
locking/unlocking mechanism.
To close, press the fuel filler flap until a
click sound is heard.
IMPORTANT Make sure to lock both
the doors when leaving the vehicle.
IMPORTANT Lock the doors after
closing the fuel flap. If the fuel flap is
closed after locking the doors, the fuel
flap cannot be locked.
Fuel filler cap
To remove the fuel filler cap, turn it
anticlockwise fig. 101. Attach the
removed cap to the inner side of the
fuel flap.
To close the fuel filler cap, turn it
clockwise until a click is heard.
EMERGENCY FLAP
OPENING
In case of emergency (e.g. when the
battery is dead), to open the fuel filler
flap proceed as follows:
open the boot lid and pull the center
section of the plastic fastener 1 and
remove the fastener fig. 102;
partially peel back the cover 2 inside
the boot, then pull the emergency
release lever 3 fig. 103.
10004040201-12A-002AB10104040202-12A-001AB
10208100100-121-002AB
131
Page 144 of 224
REPLACING EXTERIOR
LIGHT BULBS
Headlights (low beam)(versions with halogen bulb)
Proceed as follows:
if you are changing the right bulb,
start the engine, turn the steering wheel
all the way to the right, and turn off
engine. If you are changing the left bulb,
turn the steering wheel to the left;
make sure the headlight switch is off;
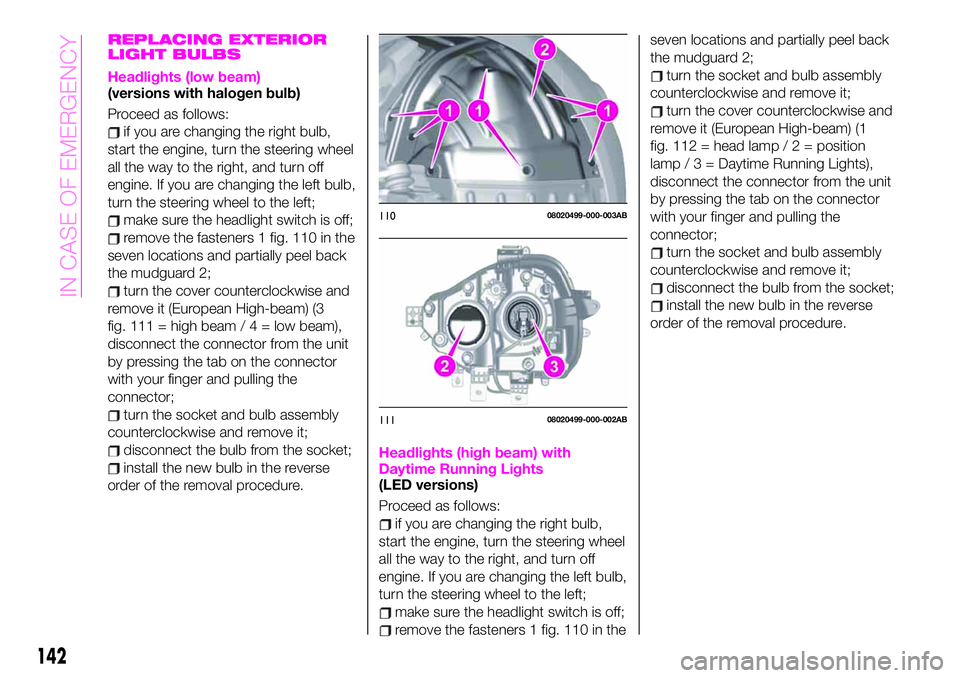
remove the fasteners 1 fig. 110 in the
seven locations and partially peel back
the mudguard 2;
turn the cover counterclockwise and
remove it (European High-beam) (3
fig. 111 = high beam/4=lowbeam),
disconnect the connector from the unit
by pressing the tab on the connector
with your finger and pulling the
connector;
turn the socket and bulb assembly
counterclockwise and remove it;
disconnect the bulb from the socket;
install the new bulb in the reverse
order of the removal procedure.Headlights (high beam) with
Daytime Running Lights
(LED versions)
Proceed as follows:
if you are changing the right bulb,
start the engine, turn the steering wheel
all the way to the right, and turn off
engine. If you are changing the left bulb,
turn the steering wheel to the left;
make sure the headlight switch is off;
remove the fasteners 1 fig. 110 in theseven locations and partially peel back
the mudguard 2;
turn the socket and bulb assembly
counterclockwise and remove it;
turn the cover counterclockwise and
remove it (European High-beam) (1
fig. 112 = head lamp/2=position
lamp / 3 = Daytime Running Lights),
disconnect the connector from the unit
by pressing the tab on the connector
with your finger and pulling the
connector;
turn the socket and bulb assembly
counterclockwise and remove it;
disconnect the bulb from the socket;
install the new bulb in the reverse
order of the removal procedure.
11008020499-000-003AB
11108020499-000-002AB
142
IN CASE OF EMERGENCY
Page 145 of 224
Front direction indicator lights
Proceed as follows:
if you are changing the right bulb,
start the engine, turn the steering wheel
all the way to the right, and turn off
engine. If you are changing the left bulb,
turn the steering wheel to the left.
make sure the ignition is switched
off, and the headlight switch is off;
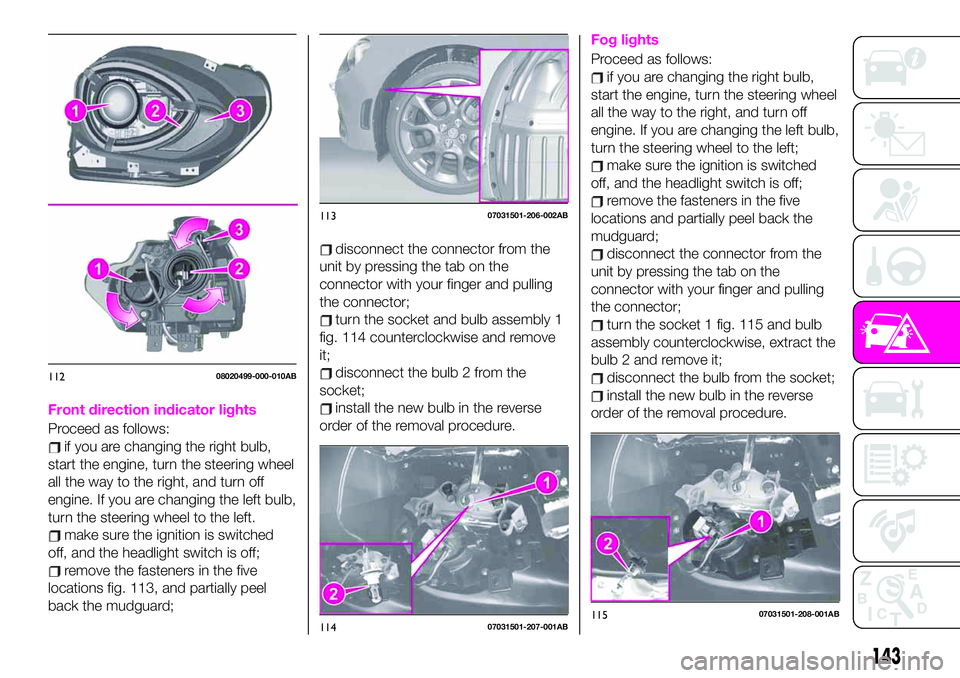
remove the fasteners in the five
locations fig. 113, and partially peel
back the mudguard;
disconnect the connector from the
unit by pressing the tab on the
connector with your finger and pulling
the connector;
turn the socket and bulb assembly 1
fig. 114 counterclockwise and remove
it;
disconnect the bulb 2 from the
socket;
install the new bulb in the reverse
order of the removal procedure.
Fog lights
Proceed as follows:
if you are changing the right bulb,
start the engine, turn the steering wheel
all the way to the right, and turn off
engine. If you are changing the left bulb,
turn the steering wheel to the left;
make sure the ignition is switched
off, and the headlight switch is off;
remove the fasteners in the five
locations and partially peel back the
mudguard;
disconnect the connector from the
unit by pressing the tab on the
connector with your finger and pulling
the connector;
turn the socket 1 fig. 115 and bulb
assembly counterclockwise, extract the
bulb 2 and remove it;
disconnect the bulb from the socket;
install the new bulb in the reverse
order of the removal procedure.
11208020499-000-010AB
11307031501-206-002AB
11407031501-207-001AB11507031501-208-001AB
143
Page 147 of 224
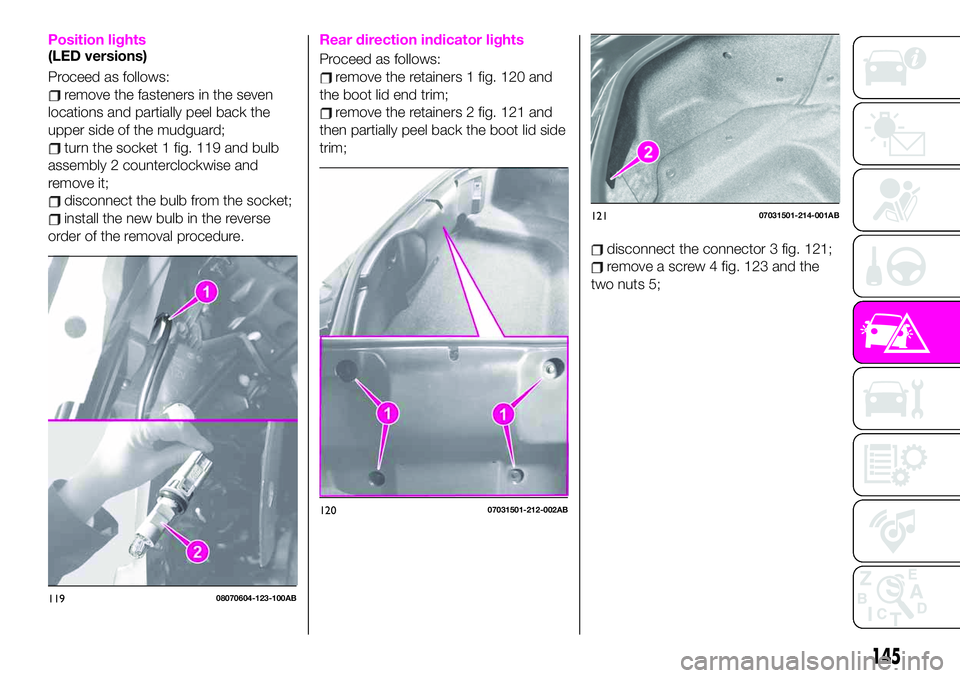
Position lights(LED versions)
Proceed as follows:
remove the fasteners in the seven
locations and partially peel back the
upper side of the mudguard;
turn the socket 1 fig. 119 and bulb
assembly 2 counterclockwise and
remove it;
disconnect the bulb from the socket;
install the new bulb in the reverse
order of the removal procedure.
Rear direction indicator lights
Proceed as follows:
remove the retainers 1 fig. 120 and
the boot lid end trim;
remove the retainers 2 fig. 121 and
then partially peel back the boot lid side
trim;
disconnect the connector 3 fig. 121;
remove a screw 4 fig. 123 and the
two nuts 5;
11908070604-123-100AB
12007031501-212-002AB
12107031501-214-001AB
145
Page 148 of 224
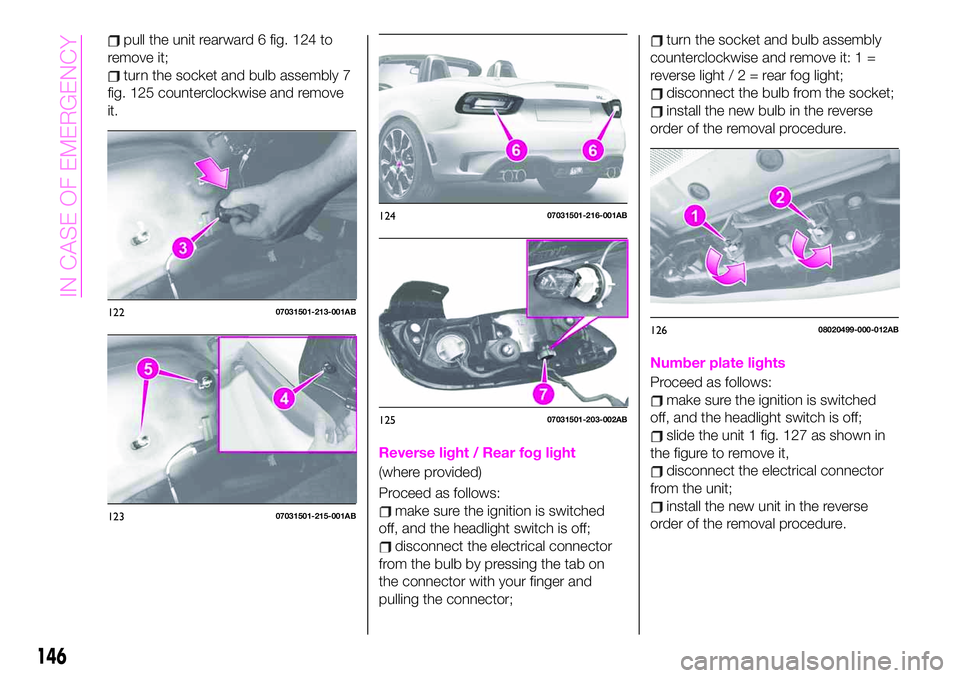
pull the unit rearward 6 fig. 124 to
remove it;
turn the socket and bulb assembly 7
fig. 125 counterclockwise and remove
it.
Reverse light / Rear fog light
(where provided)
Proceed as follows:
make sure the ignition is switched
off, and the headlight switch is off;
disconnect the electrical connector
from the bulb by pressing the tab on
the connector with your finger and
pulling the connector;
turn the socket and bulb assembly
counterclockwise and remove it: 1 =
reverse light/2=rearfoglight;
disconnect the bulb from the socket;
install the new bulb in the reverse
order of the removal procedure.
Number plate lights
Proceed as follows:
make sure the ignition is switched
off, and the headlight switch is off;
slide the unit 1 fig. 127 as shown in
the figure to remove it,
disconnect the electrical connector
from the unit;
install the new unit in the reverse
order of the removal procedure.
12207031501-213-001AB
12307031501-215-001AB
12407031501-216-001AB
12507031501-203-002AB
12608020499-000-012AB
146
IN CASE OF EMERGENCY
Page 158 of 224

IMPORTANT If there is air remaining in
the tire when the valve core is removed,
the valve core could fly out. Remove
the valve core carefully.
turn the valve core 7 counter
clockwise with the valve core tool 8 and
remove the valve core fig. 137;
IMPORTANT Store the valve core in a
place where it will not get dirty.
insert the injection hose 9fig. 138 into the valve 10;
hold the bottom of the bottle upright
11 fig. 139, squeeze the bottle with
your hands, and inject the entire
amount of tire sealant into the tire;
pull out the injection hose from the
valve fig. 140;
reinsert the valve core 12 into the
valve 13 and turn it clockwise to install.
NOTE The tire sealant cannot be
reused. Purchase a new tire sealant kit
at an Abarth Dealership.
NOTE Do not throw away the empty
tire sealant bottle after use. Return the
empty tire sealant bottle to an Abarth
Dealership when replacing the tire. The
empty tire sealant bottle will need to be
used to extract and dispose of the used
sealant from the tire.
after that, install the injection hose to
the tab 14 fig. 141 of the bottle to
prevent leakage of any remaining
sealant;
adhere the speed restriction sticker
to an area where it can be viewed easily
by the driver;
pull out the air compressor hose and
the air compressor plug from the air
compressor 15 fig. 142;
install the air compressor hose 16 to
13608020202-03A-004AB
13708020202-03A-005AB
13808020202-03A-006AB
13908020202-03A-008AB
14008020202-03A-007AB
156
IN CASE OF EMERGENCY
Page 200 of 224
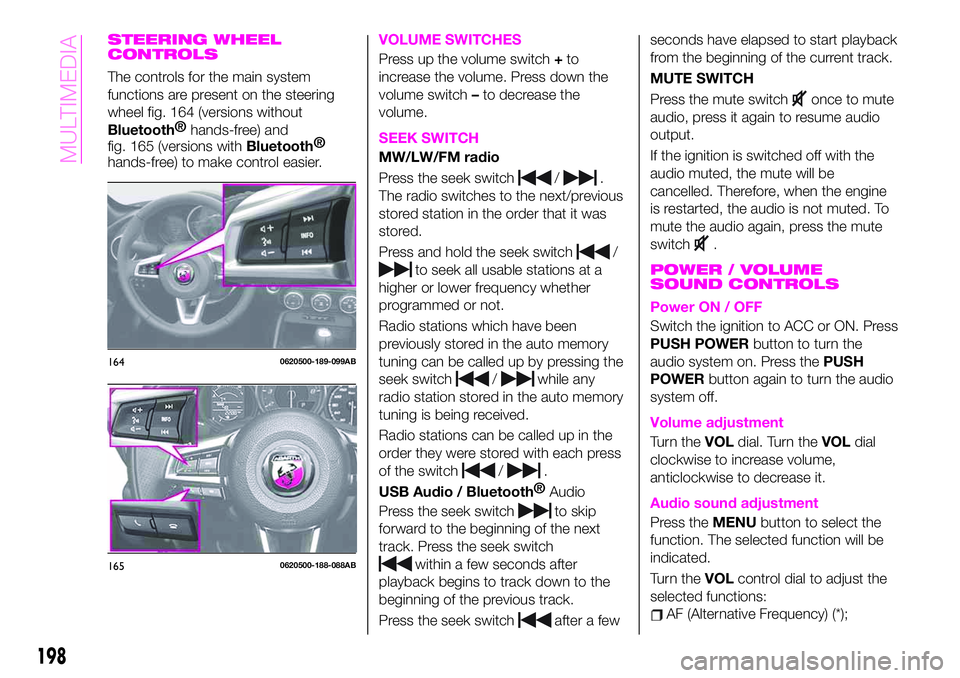
STEERING WHEEL
CONTROLS
The controls for the main system
functions are present on the steering
wheel fig. 164 (versions without
Bluetooth®
hands-free) and
fig. 165 (versions with
Bluetooth®
hands-free) to make control easier.
VOLUME SWITCHES
Press up the volume switch+to
increase the volume. Press down the
volume switch–to decrease the
volume.
SEEK SWITCH
MW/LW/FM radio
Press the seek switch
/.
The radio switches to the next/previous
stored station in the order that it was
stored.
Press and hold the seek switch
/
to seek all usable stations at a
higher or lower frequency whether
programmed or not.
Radio stations which have been
previously stored in the auto memory
tuning can be called up by pressing the
seek switch
/while any
radio station stored in the auto memory
tuning is being received.
Radio stations can be called up in the
order they were stored with each press
of the switch
/.
USB Audio /
Bluetooth®
Audio
Press the seek switch
to skip
forward to the beginning of the next
track. Press the seek switch
within a few seconds after
playback begins to track down to the
beginning of the previous track.
Press the seek switch
after a fewseconds have elapsed to start playback
from the beginning of the current track.
MUTE SWITCH
Press the mute switch
once to mute
audio, press it again to resume audio
output.
If the ignition is switched off with the
audio muted, the mute will be
cancelled. Therefore, when the engine
is restarted, the audio is not muted. To
mute the audio again, press the mute
switch
.
POWER / VOLUME
SOUND CONTROLS
Power ON / OFF
Switch the ignition to ACC or ON. Press
PUSH POWERbutton to turn the
audio system on. Press thePUSH
POWERbutton again to turn the audio
system off.
Volume adjustment
Turn theVOLdial. Turn theVOLdial
clockwise to increase volume,
anticlockwise to decrease it.
Audio sound adjustment
Press theMENUbutton to select the
function. The selected function will be
indicated.
Turn theVOLcontrol dial to adjust the
selected functions:
AF (Alternative Frequency) (*);
1640620500-189-099AB
1650620500-188-088AB
198
MULTIMEDIA
Page 201 of 224
REG (Regional Programme) (*);
ALC (Automatic volume adjustment);
BASS (Low pitch sound);
TREB (Treble sound);
FADE (Front/back volume balance);
BAL (Left/right volume balance);
BEEP (Audio operation sound);
BT SETUP (**);
12Hr < > 24Hr (12 Hr/24 Hr time
adjustment).
(*) With Radio Data System (RDS)
(where provided).
(**) Depending on the model, this
function may not be available.
CLOCK
Setting the time
The clock can be set at any time when
the ignition is switched to ACC or ON.
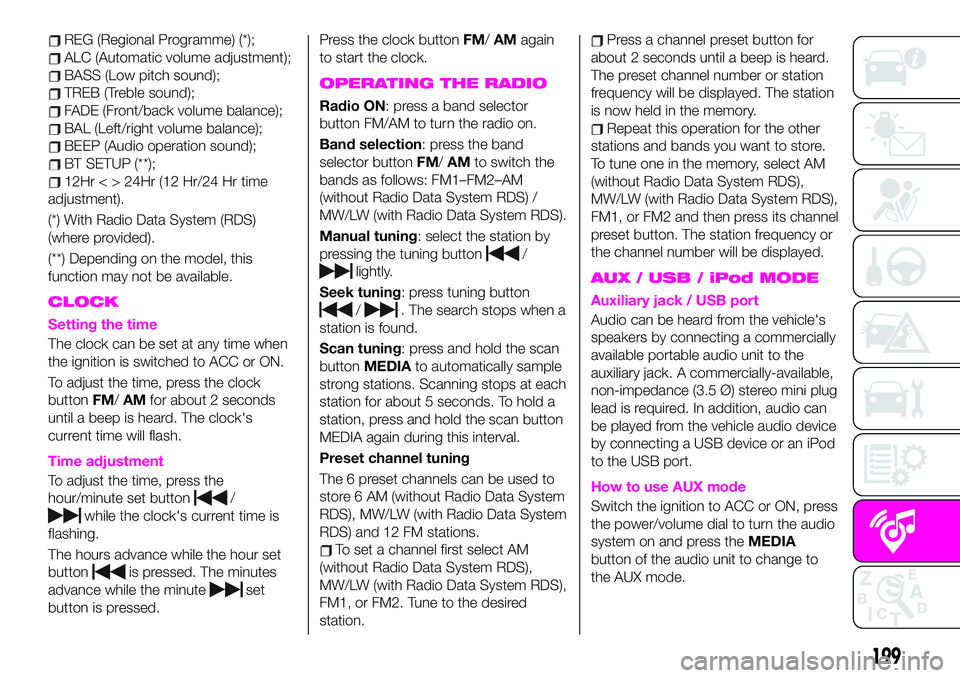
To adjust the time, press the clock
buttonFM/AMfor about 2 seconds
until a beep is heard. The clock's
current time will flash.
Time adjustment
To adjust the time, press the
hour/minute set button
/
while the clock's current time is
flashing.
The hours advance while the hour set
button
is pressed. The minutes
advance while the minute
set
button is pressed.Press the clock buttonFM/AMagain
to start the clock.
OPERATING THE RADIO
Radio ON: press a band selector
button FM/AM to turn the radio on.
Band selection: press the band
selector buttonFM/AMto switch the
bands as follows: FM1–FM2–AM
(without Radio Data System RDS) /
MW/LW (with Radio Data System RDS).
Manual tuning: select the station by
pressing the tuning button
/
lightly.
Seek tuning: press tuning button
/. The search stops when a
station is found.
Scan tuning: press and hold the scan
buttonMEDIAto automatically sample
strong stations. Scanning stops at each
station for about 5 seconds. To hold a
station, press and hold the scan button
MEDIA again during this interval.
Preset channel tuning
The 6 preset channels can be used to
store 6 AM (without Radio Data System
RDS), MW/LW (with Radio Data System
RDS) and 12 FM stations.
To set a channel first select AM
(without Radio Data System RDS),
MW/LW (with Radio Data System RDS),
FM1, or FM2. Tune to the desired
station.
Press a channel preset button for
about 2 seconds until a beep is heard.
The preset channel number or station
frequency will be displayed. The station
is now held in the memory.
Repeat this operation for the other
stations and bands you want to store.
To tune one in the memory, select AM
(without Radio Data System RDS),
MW/LW (with Radio Data System RDS),
FM1, or FM2 and then press its channel
preset button. The station frequency or
the channel number will be displayed.
AUX / USB / iPod MODE
Auxiliary jack / USB port
Audio can be heard from the vehicle's
speakers by connecting a commercially
available portable audio unit to the
auxiliary jack. A commercially-available,
non-impedance (3.5 Ø) stereo mini plug
lead is required. In addition, audio can
be played from the vehicle audio device
by connecting a USB device or an iPod
to the USB port.
How to use AUX mode
Switch the ignition to ACC or ON, press
the power/volume dial to turn the audio
system on and press theMEDIA
button of the audio unit to change to
the AUX mode.
199
Page 205 of 224
displays the Entertainment
screen.
NAVdisplays the Navigation screen
(only navigation-equipped
vehicles). If the SD card for the
navigation system is not inserted,
the compass indicating the
direction in which the vehicle is
moving is displayed.
displays the Favourites screen.
Long-press to store particular
items in “Favourites” (radio,
phonebook and destination of
the navigation system can be
programmed).
returns to previous screen.
Volume dial operation
Press theVOLdial to switch the audio
MUTE on and off.
Turn the volume dial to adjust the
volume. The volume increases by
turning the dial clockwise, and
decreases by turning it anticlockwise.
Selection of icons on screen
Tilt or turn the commander knob and
move the cursor to the desired icon.
Press the commander knob and select
the icon.
NOTE Long-press operation of the
commander knob is also possible for
some functions.
Touch panel operation
Touch & Tap: touch or tap on the item
indicated on the screen. The operation
is launched and the next item is
displayed.
Slide: touch the setting item displaying
a slider bar. Touch the slider with your
finger and move to the desired level.
Swipe: touch the screen with your
finger and move up or down. Items
which were not displayed can be
displayed.
IMPORTANT Do not press the screen
strongly or press it with a sharp-pointed
object. Otherwise, the screen could be
damaged.
NOTE For safety reasons, touch panel
operation is disabled while the vehicle is
moving.
AUDIO SOUND
ADJUSTMENT
Select theicon on the home screen
to display the Settings screen.
Select theSoundto select the item you
would like to change:
Bass(Low pitch sound): + Side low
pitch enhancement/– Side: low pitch
reduction;
Treble(Treble sound): + Side: treble
enhancement/– Side: treble reduction;
Fade(Front/rear volume balance):
Front (front speaker volumeenhancement)/Rear (rear speaker
volume enhancement);
Balance(Left/right volume balance):
Left (left speaker volume
enhancement)/Right (right speaker
volume enhancement);
ALC(Automatic volume adjustment)
(standard audio): Off-Adjustment at
seven levels;
Bose®
AudioPilot(Automatic
volume adjustment) (Bose®
Sound
System, where provided): On/Off;
Beep(Audio operation sound):
On/Off.
HOME SCREEN
Icons visualized on home screen are:
Applications: information such
as average fuel economy,
maintenance, and warnings can
be verified. Depending on the
grade and specification, the
screen display may differ.
Entertainment: operates audio
such as the radio. The audio
source most recently used is
displayed. An audio source
which cannot be used at that
time is skipped and the previous
audio source is displayed. To
change the audio source, select
the icon displayed at the bottom
of the screen.
203