change language Abarth 124 Spider 2021 Owner handbook (in English)
[x] Cancel search | Manufacturer: ABARTH, Model Year: 2021, Model line: 124 Spider, Model: Abarth 124 Spider 2021Pages: 224, PDF Size: 3.9 MB
Page 202 of 224

How to use USB mode
This unit does not support a USB
3.0 device. In addition, other devices
may not be supported depending on
the model or OS version.
Playback
Switch the ignition to ACC or ON, press
the power/volume dial to turn the audio
system on and press theMEDIA
button to switch to the USB mode and
start playback.
Track search
Press the track up buttononce to
skip forward to the beginning of the
next track.
Press the track down button
within a few seconds after
playback begins to track down to the
beginning of the previous track.
Press the track down button
after
a few seconds have elapsed to start
playback from the beginning of the
current track.
How to use iPod mode
An iPod may not be compatible
depending on the model or OS version.
In this case, an error message is
displayed.
NOTE The iPod functions on the iPod
cannot be operated while it is
connected to the unit because the unit
controls the iPod functions.
Track search
Press the track up buttononce to
skip forward to the beginning of the
next track.
Press the track down button
within a few seconds (depends
on iPod software version) after playback
begins to track down to the beginning
of the previous track.
Press the track down button
after
a few seconds (depends on iPod
software version) have elapsed to start
playback from the beginning of the
current track.
Category search: press the category
down button5to select the previous
category and press the category up
button6to select the next category.
The types of categories include Playlist,
Artist, Album, Song, Podcast, Genre,
Composer, and Audio book.
List search: press the list down button
to select the previous list and press
the list up button
to select the next
list. When the selected category is
Song or Audio book, there is no list.
Bluetooth® HANDS FREE
Device pairing
To useBluetooth®
audio and
Hands-Free, the device equipped with
Bluetooth®
has to be paired to the
unit using the following procedure. A
maximum of seven devices including
Bluetooth®
audio devices and
hands-free mobile phones can be
paired.
NOTE The
Bluetooth®
system may
not operate for 1 or 2 minutes after the
ignition is switched to ACC or ON.
However, this does not indicate a
problem. If the
Bluetooth®
system
does not connect automatically after
1 or 2 minutes have elapsed, make
sure that the
Bluetooth®
setting on
the device is normal and attempt to
reconnect the
Bluetooth®
device from
the vehicle side.
Pairing code setting
The 4-digit pairing code setting for
registration of your cell phone (pairing)
can be set beforehand. The initial
setting value is “0000”.
Proceed as follows:
1: press the pick-up button or talk
button with a short press;
2Say: [Beep] “Setup”
3Prompt: “Select one of the
following: Pairing options, confirmation
prompts, language, passcode, select
phone or select music player.”
4Say: [Beep] “Pairing options”
5Prompt: “Select one of the
following: Pair, Edit, Delete, List, or Set
Pairing Code.”
6Say: [Beep] “Set pairing code”
7Prompt: “Your current pairing code
is XXXX. Do you want to change it to a
200
MULTIMEDIA
Page 206 of 224

Communication:Bluetooth®
related functions are available.
Navigation: Navigation screen
(where provided) is displayed. If
the SD card for the navigation
system is not inserted, the
compass indicating the direction
in which the vehicle is moving is
displayed. The compass may
not indicate the correct bearing
when the vehicle is stopped or
travelling at a slow speed.
Settings: overall setting menu
(such as display, sound,
Bluetooth®
and Language).
Depending on the grade and
specification, the screen display
may differ.
OPERATING THE RADIO
Select the iconon the home screen
to display the “Entertainment” screen.
When selecting the desired radio, the
following icons are indicated in the
lower part of the display:
displays the “Entertainment”
menu. Use to switch to a
different audio source;
displays the list of receivable RDS
radio stations (FM only) (with
Radio Data System RDS);
displays the station list (AM only)
(not displayed when listening to
FM radio on vehicles with Radio
Data System RDS). Select
“Update Station List”to
display the frequencies of up to
ten radio stations on the auto
memory preset list Select the
desired frequency.
displays the Favourites list.
Long-press to store radio station
currently being aired.
you can search for receivable
radio stations. Scanning stops at
each station for about five
seconds. Select again to
continue receiving the radio
station.
you can change the radio
frequency manually. Rotate the
commander knob, slide the
screen, or touch the radio
frequency. Press
orto
change the radio frequency one
step at a time. When
oris
long-pressed, the radio frequency
changes continually. It stops when
you remove your hand from the
icon or the commander knob.
switches the TA mode on and off
(with Radio Data System RDS).
/Automatic radio station
selection. When
long-pressed, the radio
frequency changes
continually. It stops when
you remove your hand from
the icon or the commander
knob.
Displays the FM settings screen
(FM only) (with Radio Data System
RDS). On/Off of Alternative
frequency and Region lock can be
set.
Displays sound settings to adjust
audio quality level.
NOTE When theoricon is
selected while FM is selected, each
programme is selected.
Digital Audio Broadcasting (DAB)
Radio
(where provided)
Select the icon
on the home screen
to display the “Entertainment” screen.
SelectDABthe following icons are
displayed at the bottom of the screen:
Displays the “Entertainment”
menu. Use to switch to a
different audio source.
204
MULTIMEDIA
Page 207 of 224

Displays the station list (ensemble
and station). Select “Update List”
to update the station list. Select
“Select Ensemble” to select the
ensemble you want to display.
Displays the favorites list. Press
and hold to store the currently
tuned station to the favorites list.
Searches your desired station
from the station list. Tunes to
each station in the station list for
10 seconds. Select again when
your desired station is tuned. If
the station list is not available, it
switches to the station list update
screen. Perform the station list
updating.
Switches the TA mode on and
off.
/Returns to the
previous/goes to the next
station. Touch and hold to
return to the top station in
the previous/next ensemble.
Displays the DAB radio setting
screen.
Displays sound settings to adjust
audio quality level.
SETTINGS
NOTE Depending on the grade and
specification, the screen display may
differ.
Select the
icon on the home screen
to display the Settings screen. Switch
the tab and select the setting item you
want to change.
You can customize settings in the setup
display as follows:
“Display”: refer to “Volume/Display/
Sound controls” paragraph in Radio 7”
supplement;
“Sound”: refer to “Volume/Display/
Sound controls” paragraph in Radio 7”
supplement;
“Clock”: “Adjust Time”, “GPS Sync”,
“Time Format”, “Time Zone Select”,
“Daylight Savings Time”;
“Vehicle”: rain sensing Wiper/Door
Lock/Other;
“Devices”: selectBluetooth®
or
“Network Management”;
“System”: “Tool Tips”, “Language”,
“Temperature”, “Distance”, “Music
Database Update”, “Factory Reset”,
“About (agreements and disclaimers)”,
“About (version Information)”
AUX / USB / iPod MODE
Audio can be heard from the vehicle's
speakers by connecting a commercially
available portable audio unit to the
auxiliary jack. A commercially-available,non-impedance (3.5 Ø) stereo mini plug
lead is required.
In addition, audio can be played from
the vehicle audio device by connecting
a USB device or an iPod to the USB
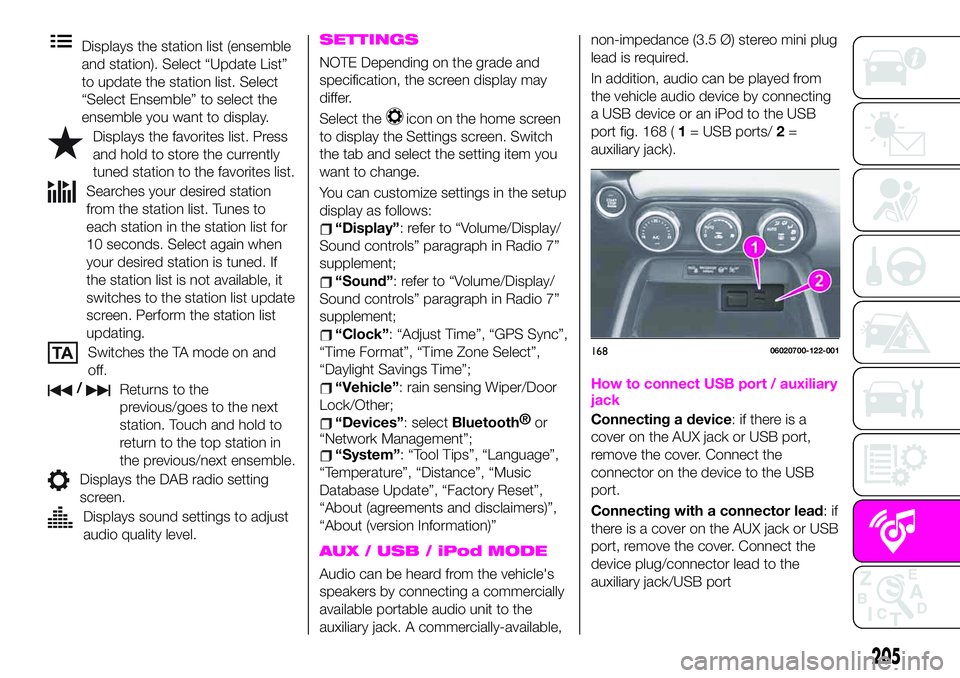
port fig. 168 (1= USB ports/2=
auxiliary jack).
How to connect USB port / auxiliary
jack
Connecting a device: if there is a
cover on the AUX jack or USB port,
remove the cover. Connect the
connector on the device to the USB
port.
Connecting with a connector lead:if
there is a cover on the AUX jack or USB
port, remove the cover. Connect the
device plug/connector lead to the
auxiliary jack/USB port
16806020700-122-001
205