instrument cluster Abarth 124 Spider 2021 Owner handbook (in English)
[x] Cancel search | Manufacturer: ABARTH, Model Year: 2021, Model line: 124 Spider, Model: Abarth 124 Spider 2021Pages: 224, PDF Size: 3.9 MB
Page 11 of 224
KEYS
KEYS
1)
A code number is stamped on the plate
attached to the key set; detach this
plate and store it in a safe place (not in
the vehicle) for use if you need to make
a replacement key (auxiliary key).
Also write down the code number and
keep it in a separate safe and
convenient place, but not in the vehicle.
If your key (auxiliary key) is lost, consult
Abarth Dealership and have your code
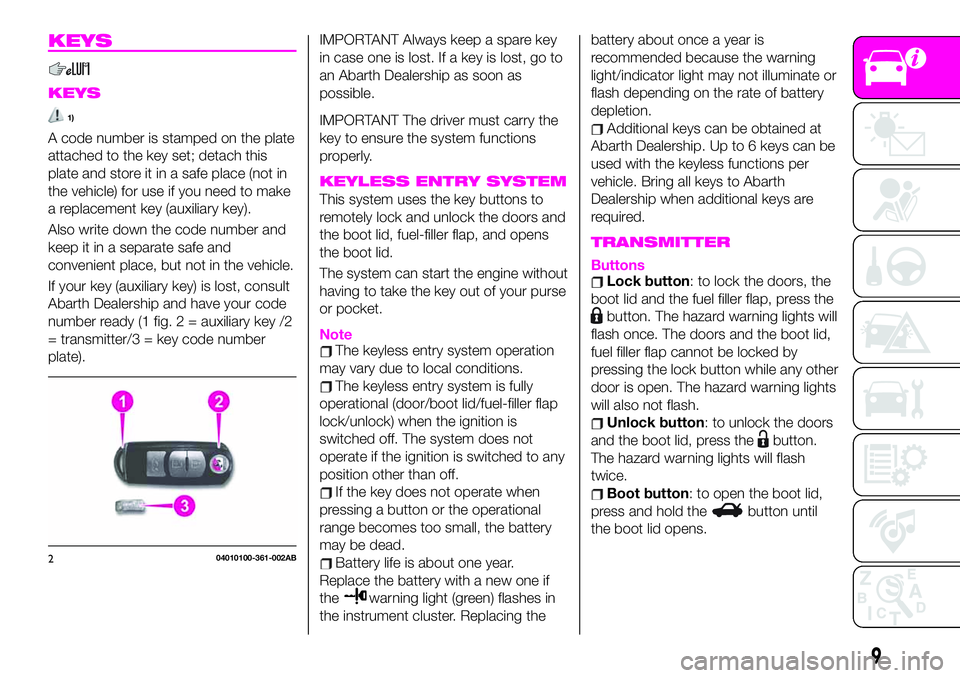
number ready (1 fig. 2 = auxiliary key /2
= transmitter/3 = key code number
plate).
IMPORTANT Always keep a spare key
in case one is lost. If a key is lost, go to
an Abarth Dealership as soon as
possible.
IMPORTANT The driver must carry the
key to ensure the system functions
properly.
KEYLESS ENTRY SYSTEM
This system uses the key buttons to
remotely lock and unlock the doors and
the boot lid, fuel-filler flap, and opens
the boot lid.
The system can start the engine without
having to take the key out of your purse
or pocket.
NoteThe keyless entry system operation
may vary due to local conditions.
The keyless entry system is fully
operational (door/boot lid/fuel-filler flap
lock/unlock) when the ignition is
switched off. The system does not
operate if the ignition is switched to any
position other than off.
If the key does not operate when
pressing a button or the operational
range becomes too small, the battery
may be dead.
Battery life is about one year.
Replace the battery with a new one if
the
warning light (green) flashes in
the instrument cluster. Replacing thebattery about once a year is
recommended because the warning
light/indicator light may not illuminate or
flash depending on the rate of battery
depletion.
Additional keys can be obtained at
Abarth Dealership. Up to 6 keys can be
used with the keyless functions per
vehicle. Bring all keys to Abarth
Dealership when additional keys are
required.
TRANSMITTER
ButtonsLock button: to lock the doors, the
boot lid and the fuel filler flap, press the
button. The hazard warning lights will
flash once. The doors and the boot lid,
fuel filler flap cannot be locked by
pressing the lock button while any other
door is open. The hazard warning lights
will also not flash.
Unlock button: to unlock the doors
and the boot lid, press the
button.
The hazard warning lights will flash
twice.
Boot button: to open the boot lid,
press and hold the
button until
the boot lid opens.
204010100-361-002AB
9
Page 12 of 224
KEY SUSPEND
FUNCTION
If a key is left in the vehicle, the
functions of the key left in the vehicle
are temporarily suspended to prevent
theft of the vehicle.
To restore the functions, press the
unlock button on the functions-
suspended key in the vehicle.
KEY BATTERY
REPLACEMENT
2)
1) 2) 3) 4) 5)
1)
If the buttons on the transmitter are
inoperable and the operation indicator
light does not flash, the battery may be
dead.
Replace with a new battery
(CR2025 type) before the transmitter
becomes unusable.
The following conditions indicate that
the battery power is low:
indicator light (green) flashes in
the instrument cluster for about
30 seconds after the engine is turned
off;
the system does not operate and the
operation indicator light on the
transmitter does not flash when the
buttons are pressed;
the system's operational range is
reduced.
NOTE Replacing the battery at an
Abarth Dealership is recommended to
prevent damage to the key. If replacing
the battery by yourself, follow the
instruction below.
WARNING
1)Do not leave the key in your vehicle with
children and keep them in a place where
your children will not find or play with them:
leaving children in a vehicle with the key is
dangerous. This could result in someone
being badly injured or even killed. Children
may find these keys to be an interesting toy
to play with and could cause the power
windows or other controls to operate, or
even make the vehicle move.
2)There is the danger of explosion if the
battery is not correctly replaced.
IMPORTANT
1)The electronic components inside the
key may be damaged if the key is subjected
to strong shocks. In order to ensure
complete efficiency of the electronic
devices inside the key, it should never be
exposed to direct sunlight.
2)Make sure the battery is installed
correctly. Battery leakage could occur if it is
not installed correctly.3)When replacing the battery, be careful
not to touch any of the internal circuitry and
electrical terminals, bend the electrical
terminals, or get dirt in the transmitter as
the transmitter could be damaged.
4)Dispose of used batteries according to
the following instructions: insulate the plus
and minus terminals of the battery using
cellophane or equivalent tape. Never
disassemble. Never throw the battery into
fire or water. Never deform or crush.
5)Replace only with the same type battery
(CR2025 or equivalent).
IMPORTANT
1)Used batteries may be harmful to the
environment if not disposed of correctly.
They must be disposed of as specified by
law in the special containers or taken to an
Abarth Dealership, which will take care of
their disposal.
10
GETTING TO KNOW YOUR VEHICLE
Page 13 of 224
IGNITION SWITCH
PUSH BUTTON START
POSITIONS
The system operates only when the key
is within operational range.
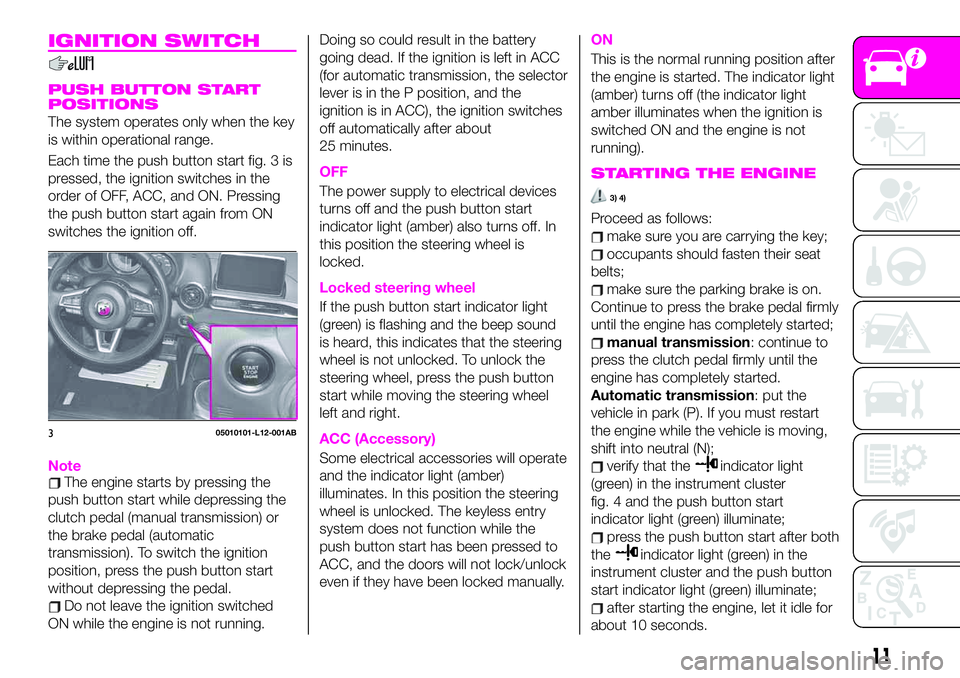
Each time the push button start fig. 3 is
pressed, the ignition switches in the
order of OFF, ACC, and ON. Pressing
the push button start again from ON
switches the ignition off.
NoteThe engine starts by pressing the
push button start while depressing the
clutch pedal (manual transmission) or
the brake pedal (automatic
transmission). To switch the ignition
position, press the push button start
without depressing the pedal.
Do not leave the ignition switched
ON while the engine is not running.Doing so could result in the battery
going dead. If the ignition is left in ACC
(for automatic transmission, the selector
lever is in the P position, and the
ignition is in ACC), the ignition switches
off automatically after about
25 minutes.
OFF
The power supply to electrical devices
turns off and the push button start
indicator light (amber) also turns off. In
this position the steering wheel is
locked.
Locked steering wheel
If the push button start indicator light
(green) is flashing and the beep sound
is heard, this indicates that the steering
wheel is not unlocked. To unlock the
steering wheel, press the push button
start while moving the steering wheel
left and right.
ACC (Accessory)
Some electrical accessories will operate
and the indicator light (amber)
illuminates. In this position the steering
wheel is unlocked. The keyless entry
system does not function while the
push button start has been pressed to
ACC, and the doors will not lock/unlock
even if they have been locked manually.
ON
This is the normal running position after
the engine is started. The indicator light
(amber) turns off (the indicator light
amber illuminates when the ignition is
switched ON and the engine is not
running).
STARTING THE ENGINE
3) 4)
Proceed as follows:
make sure you are carrying the key;
occupants should fasten their seat
belts;
make sure the parking brake is on.
Continue to press the brake pedal firmly
until the engine has completely started;
manual transmission: continue to
press the clutch pedal firmly until the
engine has completely started.
Automatic transmission: put the
vehicle in park (P). If you must restart
the engine while the vehicle is moving,
shift into neutral (N);
verify that theindicator light
(green) in the instrument cluster
fig. 4 and the push button start
indicator light (green) illuminate;
press the push button start after both
the
indicator light (green) in the
instrument cluster and the push button
start indicator light (green) illuminate;
after starting the engine, let it idle for
about 10 seconds.
305010101-L12-001AB
11
Page 16 of 224
ADVANCED
KEYLESS ENTRY
SYSTEM
(where provided)
6)
The advanced keyless function allows
you to lock/unlock the door and the
boot lid, fuel filler flap, or open the boot
lid while carrying the key.
IMPORTANT Radio waves from the key
may affect medical devices such as
pacemakers: before using the key near
people who use medical devices, ask
the medical device manufacturer or
your physician if radio waves from the
key will affect the device.
IMPORTANT The advanced keyless
entry system functions can be
deactivated to prevent any possible
adverse effect on a user wearing a
pacemaker or other medical device. If
the system is deactivated, you will be
unable to start the engine by carrying
the key. Contact Abarth Dealership for
details. If the advanced keyless entry
system has been deactivated, you can
start the engine by following the
procedure indicated when the key
battery goes dead.
IMPORTANT
6)The operation of the recognition system
depends on various factors, such as, for
example, any electromagnetic wave
interference from external sources (e.g.
mobile phones), the charge of the battery in
the electronic key and the presence of
metal objects near the key or the vehicle. In
these cases it is still possible to unlock the
doors by using the metal insert in the
electronic key (see description on the
following pages).
VEHICLE SECURITY
ALARM
(where provided)
MODIFICATIONS AND
ADD-ON EQUIPMENT
FCA cannot guarantee the immobilizer
and the theft-deterrent systems'
operation if the system has been
modified or if any add-on equipment
has been installed.
IMPORTANT To avoid damage to the
vehicle, do not modify the system or
install any add-on equipment to the
immobilizer and the theft-deterrent
systems or the vehicle.
IMMOBILIZER SYSTEM
The immobilizer system allows the
engine to start only with a key the
system recognises. If you have a
problem with the immobilizer system or
the key, contact an Abarth Dealership.
Arming the system: the system is
armed when the ignition is switched
from ON to OFF. The
warning light
in the instrument cluster flashes every
2 seconds until the system is disarmed.
Disarming the system: the system is
disarmed when the ignition is switched
ON with the correct programmed key.
The
warning light illuminates for
about 3 seconds and then turns off.
14
GETTING TO KNOW YOUR VEHICLE
Page 26 of 224
EXTERIOR LIGHTS
HEADLIGHTS
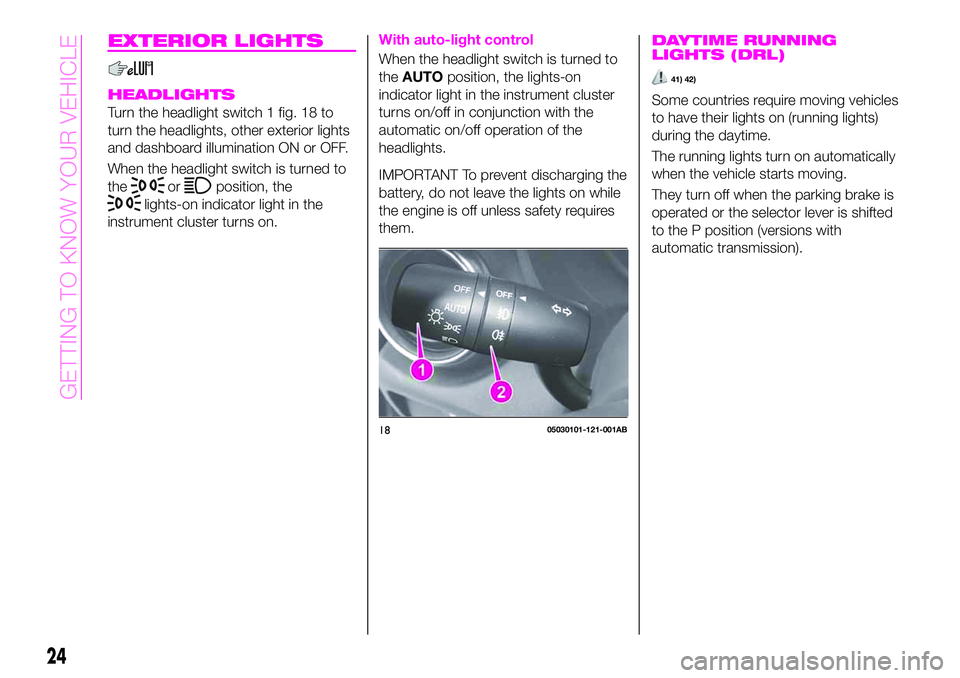
Turn the headlight switch 1 fig. 18 to
turn the headlights, other exterior lights
and dashboard illumination ON or OFF.
When the headlight switch is turned to
the
orposition, the
lights-on indicator light in the
instrument cluster turns on.
With auto-light control
When the headlight switch is turned to
theAUTOposition, the lights-on
indicator light in the instrument cluster
turns on/off in conjunction with the
automatic on/off operation of the
headlights.
IMPORTANT To prevent discharging the
battery, do not leave the lights on while
the engine is off unless safety requires
them.
1805030101-121-001AB
24
GETTING TO KNOW YOUR VEHICLE
DAYTIME RUNNING
LIGHTS (DRL)
41) 42)
Some countries require moving vehicles
to have their lights on (running lights)
during the daytime.
The running lights turn on automatically
when the vehicle starts moving.
They turn off when the parking brake is
operated or the selector lever is shifted
to the P position (versions with
automatic transmission).
Page 27 of 224
HIGH BEAMS
The headlights switch between high
and low beams by moving the lever
forward or backward.
When the headlight high-beams are on,
the
warning light is turned on.
FLASH TO PASS
Can be used when the ignition is
switched ON.
To flash the headlights, pull the lever
fully towards you (the headlight switch
does not need to be on).
The
warning light in the instrument
cluster illuminates simultaneously.
The lever will return to the normal
position when released.
AUTOMATIC LIGHTING(where provided)
Light sensor
When the headlight switch is in the
AUTOposition and the ignition is
switched ON, the light sensor senses
the surrounding lightness or darkness
and automatically turns the headlights,
other exterior lights and dashboard
illumination on or off.
IMPORTANT The light sensor also
works as a rain sensor for the
auto-wiper control. Keep hands and
scrapers clear of the windscreen when
the wiper lever is in the AUTO position
and the ignition is switched ON as
fingers could be pinched or the wipers
and wiper blades damaged when the
wipers activate automatically. If you are
going to clean the windscreen, be sure
the wipers are turned off completely
(this is particularly important when
clearing ice and snow) when it is
particularly tempting to leave the engine
running.
COMING HOME LIGHT
SYSTEM
The coming me home light system
turns on the headlights (low beams)
when the lever is operated.
System activation
When the lever is pulled with the ignition
switched to ACC or OFF, the low beam
headlights turn on.
The headlights turn off after a certain
period of time has elapsed after the
doors are closed.
The time until the headlights turn off
after all of the doors are closed can be
changed. If no operations are done for
3 minutes after the lever is pulled, the
headlights turn off.
The headlights turn off if the lever is
pulled again while the headlights are on.
FRONT FOG LIGHTS
(where provided)
The front fog light can be used when
the ignition is switched to ON.
Use this switch to turn on the front fog
lights. The front fog lights will improve
visibility at night and during foggy
conditions.
Activation
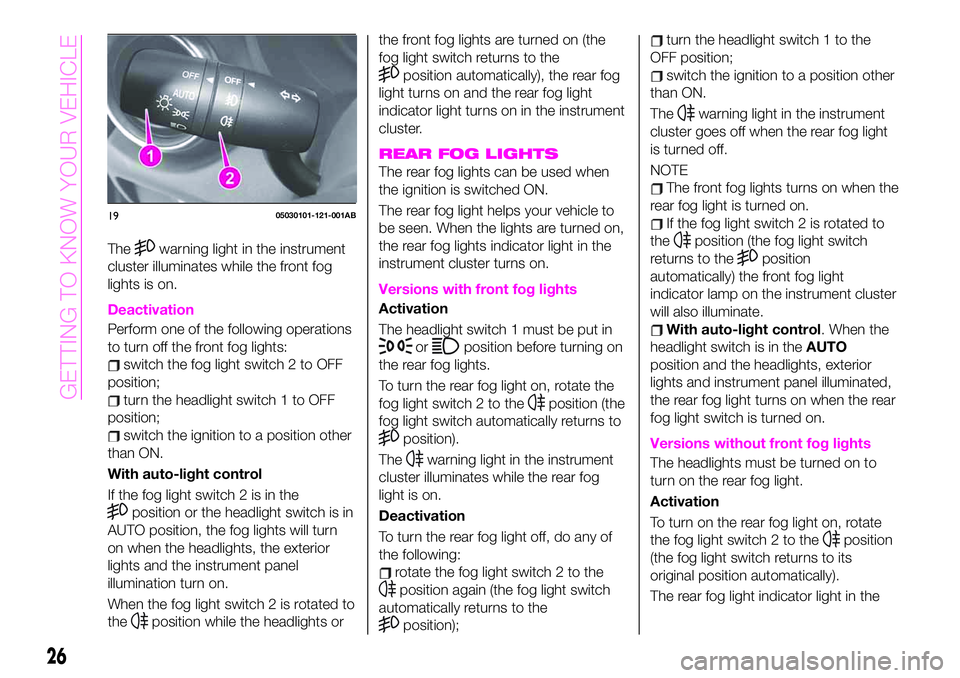
Turn the headlight switch 1 fig. 19 in
orposition before activate
front fog lights.
Rotate the fog light switch 2 to
or
position (switch automatically turns
in
position).
25
Page 28 of 224
Thewarning light in the instrument
cluster illuminates while the front fog
lights is on.
Deactivation
Perform one of the following operations
to turn off the front fog lights:
switch the fog light switch 2 to OFF
position;
turn the headlight switch 1 to OFF
position;
switch the ignition to a position other
than ON.
With auto-light control
If the fog light switch 2 is in the
position or the headlight switch is in
AUTO position, the fog lights will turn
on when the headlights, the exterior
lights and the instrument panel
illumination turn on.
When the fog light switch 2 is rotated to
the
position while the headlights orthe front fog lights are turned on (the
fog light switch returns to the
position automatically), the rear fog
light turns on and the rear fog light
indicator light turns on in the instrument
cluster.
REAR FOG LIGHTS
The rear fog lights can be used when
the ignition is switched ON.
The rear fog light helps your vehicle to
be seen. When the lights are turned on,
the rear fog lights indicator light in the
instrument cluster turns on.
Versions with front fog lights
Activation
The headlight switch 1 must be put in
orposition before turning on
the rear fog lights.
To turn the rear fog light on, rotate the
fog light switch 2 to the
position (the
fog light switch automatically returns to
position).
The
warning light in the instrument
cluster illuminates while the rear fog
light is on.
Deactivation
To turn the rear fog light off, do any of
the following:
rotate the fog light switch 2 to the
position again (the fog light switch
automatically returns to the
position);
turn the headlight switch 1 to the
OFF position;
switch the ignition to a position other
than ON.
The
warning light in the instrument
cluster goes off when the rear fog light
is turned off.
NOTE
The front fog lights turns on when the
rear fog light is turned on.
If the fog light switch 2 is rotated to
the
position (the fog light switch
returns to the
position
automatically) the front fog light
indicator lamp on the instrument cluster
will also illuminate.
With auto-light control. When the
headlight switch is in theAUTO
position and the headlights, exterior
lights and instrument panel illuminated,
the rear fog light turns on when the rear
fog light switch is turned on.
Versions without front fog lights
The headlights must be turned on to
turn on the rear fog light.
Activation
To turn on the rear fog light on, rotate
the fog light switch 2 to the
position
(the fog light switch returns to its
original position automatically).
The rear fog light indicator light in the
1905030101-121-001AB
26
GETTING TO KNOW YOUR VEHICLE
Page 29 of 224
instrument cluster illuminates while the
rear fog light is on.
Deactivation
To turn the rear fog light off, do any of
the following:
rotate the fog light switch 2 to the
position again (the fog light switch
automatically returns to the
position);
rotate the fog light switch 2 to the
OFF position;
turn the headlight switch 1 to the
OFF position.
The rear fog light indicator light in the
instrument cluster goes off when the
rear fog light is turned off.
TURN SIGNALS
The ignition must be switched ON to
use the turn and lane-change signals.
Direction indicators
Move the signal lever down (for a left
turn) or up (for a right turn) to the stop
position. The signal will self-cancel after
the turn is completed.
If the indicator light continues to flash
after a turn, manually return the lever to
its original position.
The turn signal indicators (green)
in the instrument cluster flash
according to the operation of the turn
signal lever to show which signal is
working.
NOTE If an indicator light stays on
without flashing or if it flashes
abnormally, one of the turn signal bulbs
may be burned out.
LANE CHANGE SIGNALS
Move the lever halfway toward the
direction of the lane change (until the
indicator flashes) and hold it there. It will
return to the off position when released.
Three-flash turn signal
After releasing the turn signal lever, the
turn signal indicator flashes three times.
The operation can be cancelled by
moving the lever in the direction
opposite to which it was operated.
Adaptive Front Lighting
System (AFS)
(where provided)
The adaptive front lighting system (AFS)
automatically adjusts the headlight
beams to the left or right in conjunction
with the operation of the steering wheel
after the headlights have been turned
on.
A system malfunction or operation
conditions are indicated by a warning.
Refer to “Warning lights on instrument
panel” paragraph in “Knowing the
instrument panel” chapter.
NOTE
Headlights are equipped which do
not blind drivers approaching in theopposite direction no matter what side
of the road you must drive your vehicle
(left-hand or right-hand traffic).
Therefore, it is not necessary to adjust
the optical axis of the headlights when
switching temporarily to driving on the
opposite side of the road (left-hand or
right-hand traffic).
The Adaptive Front Lighting System
(AFS) function can be switched to
operable/ inoperable using the
personalisation function. Refer to
“Personalisation features” paragraph in
“Knowing the instrument panel”
chapter.
LEAVING HOME LIGHT
SYSTEM
The leaving home light system turns on
the lights when the transmitter unlock
button is pressed while away from the
vehicle.
Activation
When the ignition switch and the
headlight switch are as indicated below,
the headlights will illuminate when the
transmitter unlock button is pressed
and the vehicle receives the transmitter
signal.
The headlights turn off after a certain
period of time has elapsed
(30 seconds).
Ignition switch:off.
27
Page 52 of 224
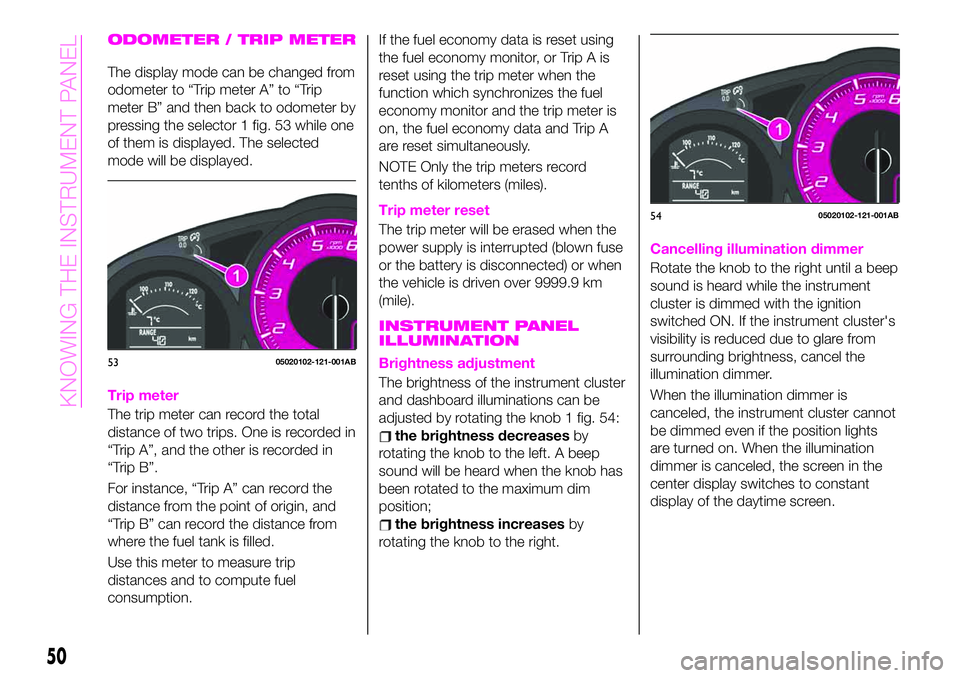
ODOMETER / TRIP METER
The display mode can be changed from
odometer to “Trip meter A” to “Trip
meter B” and then back to odometer by
pressing the selector 1 fig. 53 while one
of them is displayed. The selected
mode will be displayed.
Trip meter
The trip meter can record the total
distance of two trips. One is recorded in
“Trip A”, and the other is recorded in
“Trip B”.
For instance, “Trip A” can record the
distance from the point of origin, and
“Trip B” can record the distance from
where the fuel tank is filled.
Use this meter to measure trip
distances and to compute fuel
consumption.If the fuel economy data is reset using
the fuel economy monitor, or Trip A is
reset using the trip meter when the
function which synchronizes the fuel
economy monitor and the trip meter is
on, the fuel economy data and Trip A
are reset simultaneously.
NOTE Only the trip meters record
tenths of kilometers (miles).
Trip meter reset
The trip meter will be erased when the
power supply is interrupted (blown fuse
or the battery is disconnected) or when
the vehicle is driven over 9999.9 km
(mile).
INSTRUMENT PANEL
ILLUMINATION
Brightness adjustment
The brightness of the instrument cluster
and dashboard illuminations can be
adjusted by rotating the knob 1 fig. 54:
the brightness decreasesby
rotating the knob to the left. A beep
sound will be heard when the knob has
been rotated to the maximum dim
position;
the brightness increasesby
rotating the knob to the right.
Cancelling illumination dimmer
Rotate the knob to the right until a beep
sound is heard while the instrument
cluster is dimmed with the ignition
switched ON. If the instrument cluster's
visibility is reduced due to glare from
surrounding brightness, cancel the
illumination dimmer.
When the illumination dimmer is
canceled, the instrument cluster cannot
be dimmed even if the position lights
are turned on. When the illumination
dimmer is canceled, the screen in the
center display switches to constant
display of the daytime screen.
5305020102-121-001AB
5405020102-121-001AB
50
KNOWING THE INSTRUMENT PANEL
Page 54 of 224
press the INFO switch and set the
two lower digits (tenths and ones place)
to the desired vehicle speed. The
numerical value changes each time the
INFO switch is pressed;
press the INFO switch continuously
until a beep sound is heard. The set
vehicle speed is displayed on the
vehicle speed alarm screen.
GEAR SHIFT INDICATOR
(where provided)
The gear shift indicator supports you to
obtain optimum fuel economy and
smooth driving.
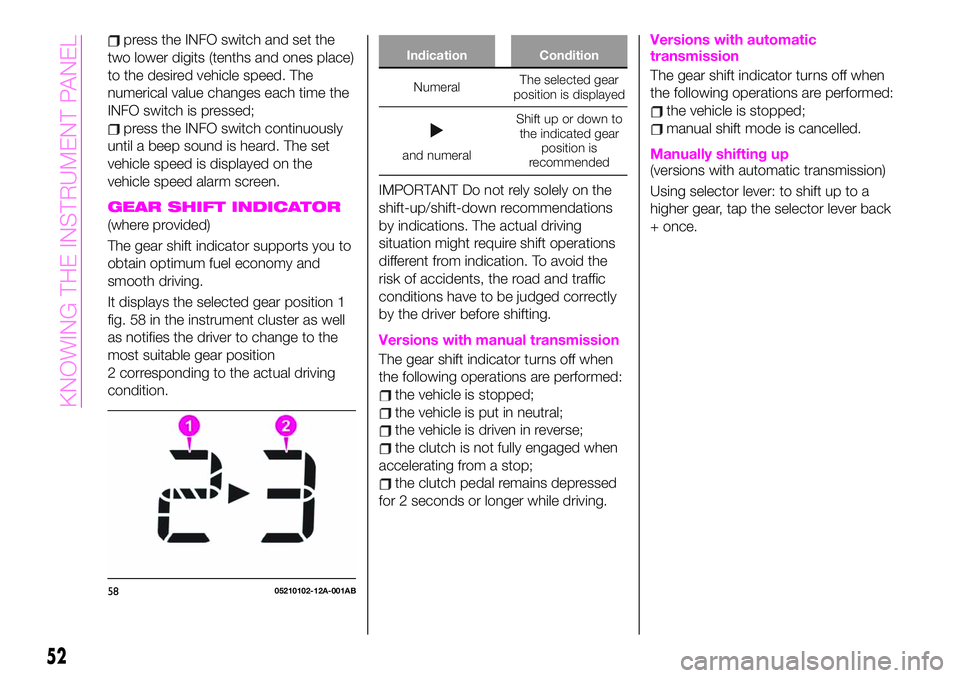
It displays the selected gear position 1
fig. 58 in the instrument cluster as well
as notifies the driver to change to the
most suitable gear position
2 corresponding to the actual driving
condition.
Indication Condition
NumeralThe selected gear
position is displayed
and numeralShift up or down to
the indicated gear
position is
recommended
IMPORTANT Do not rely solely on the
shift-up/shift-down recommendations
by indications. The actual driving
situation might require shift operations
different from indication. To avoid the
risk of accidents, the road and traffic
conditions have to be judged correctly
by the driver before shifting.
Versions with manual transmission
The gear shift indicator turns off when
the following operations are performed:
the vehicle is stopped;
the vehicle is put in neutral;
the vehicle is driven in reverse;
the clutch is not fully engaged when
accelerating from a stop;
the clutch pedal remains depressed
for 2 seconds or longer while driving.
Versions with automatic
transmission
The gear shift indicator turns off when
the following operations are performed:
the vehicle is stopped;
manual shift mode is cancelled.
Manually shifting up(versions with automatic transmission)
Using selector lever: to shift up to a
higher gear, tap the selector lever back
+ once.
5805210102-12A-001AB
52
KNOWING THE INSTRUMENT PANEL