set time Abarth 500 2016 Owner handbook (in English)
[x] Cancel search | Manufacturer: ABARTH, Model Year: 2016, Model line: 500, Model: Abarth 500 2016Pages: 215, PDF Size: 19.08 MB
Page 75 of 215
❒press buttons+or–(with single
presses) to select the new setting for
this submenu option;
❒briefly press the MENU button
to
store the new setting and to go back
to the same submenu option
selected previously.
MENU ITEMS
Menu
This option allows you to access the
Setup menu.
Press the+or–button to select the
various Menu items.
Hold down the MENU button
to
return to the standard screen.
Lighting (Car interior
lighting adjustment)
On some versions, the instrument panel
is provided with a light sensor capable
of detecting environmental light
conditions and adjusting the brightness
of the panel accordingly.
The brightness of the instrument panel
may therefore change while travelling
following an event causing a switch
from "day" to "night" conditions (or vice
versa) in the passenger compartment
(e.g. in a tunnel, on avenues in
shadows, under flyovers, etc.). The
lighting can be adjusted in night mode
only with dipped headlights on. If the
headlights are not on, it can be
adjusted in day mode.This function is available, with the
dipped headlights on and in night-time
conditions, to adjust the brightness
of the instrument panel, control
buttons, radio and automatic climate
control displays.
On some versions, during the daytime
and with dipped headlights on, the
instrument panel, control buttons, radio
and automatic climate control displays
are set to maximum brightness.
To adjust the brightness, proceed as
follows:
❒press the MENU button
briefly to
make the display flash the previously
stored level;
❒press button+or–to adjust the
brightness level;
❒press the MENU button
briefly to
return to the menu screen or hold the
button down to return to the
standard screen without storing.
71
Page 76 of 215
Speed warning (Speed
limit)
With this function it is possible to set
the car speed limit (km/h or mph); when
this limit is exceeded the driver is
alerted.
To set the desired speed limit, proceed
as follows:
❒briefly press the MENU button
:
the display will show the words
(Speed Buzzer);
❒press button+or–to select speed
limit activation ("On") or deactivation
("Off");
❒if the function is on, press+or–to
select the required speed limit and
then press MENU
to confirm.
NoteSetting is possible between 30
and 200 km/h, or 20 and 125 mph,
according to the previously set unit.
See the "Units of measurement
adjustment (Units of measurement)"
paragraph described below. The setting
will increase/decrease by five units
each time button+/–is pressed. Hold
down the button+/–to increase/
decrease the setting rapidly. Complete
the adjustment with single presses of
the button when you approach the
desired value.Press the MENU button
briefly to
return to the menu screen or hold
the button down to return to the
standard screen without storing.
To cancel the setting, proceed as
follows:
❒press the MENU button
briefly:
("On") will flash on the display;
❒press button–: ("Off") will flash on
the display;
❒press the MENU button
briefly to
return to the menu screen or hold the
button down to return to the
standard screen without storing.Headlight sensor
(Automatic
headlight/dusk sensor
sensitivity adjustment)
(for versions/markets, where provided)
This function is used to turn the
headlights on or off according to
external lighting conditions.
The dusk sensor sensitivity can be
adjusted according to 3 levels (level 1=
minimum sensitivity, level 2= average
sensitivity, level 3 = maximum
sensitivity); the greater the sensitivity
set, the lower the variation in outside
light required to activate the lights (e.g.
with setting at level 3, the headlights
switch on earlier at sunset compared to
levels 1 and 2).
Proceed as follows to set:
❒press the MENU button
briefly.
The level set previously flashes on
the display;
❒press+or–to set the value;
❒press the MENU button
briefly to
return to the menu screen or hold the
button down to return to the
standard screen without storing.
72
KNOWING THE INSTRUMENT PANEL
Page 77 of 215

Trip B activation
This function may be used to activate
("On") or deactivate ("Off") the Trip B
(partial trip) display.
For further information see "Trip
Computer" in this chapter.
Proceed as follows to switch the
function on/off:
❒press the MENU button
briefly,
the display will flash "On" or "Off"
depending on the previous setting;
❒press button+or–to select;
❒press the MENU button
briefly to
return to the menu screen or hold the
button down to return to the
standard screen without storing.
Set Time (Setting the
clock)
This function enables the clock to be
set through two submenus: "Time" and
"Format".
To adjust, proceed as follows:
❒briefly press the MENU button
:
the display will show the two
submenus "Time" and "Format";
❒press button+or–to switch
between the two submenus;
❒once you have selected a submenu,
press the MENU button
briefly;❒when you select the "Time"
submenu, pressing the button
briefly the display shows
the
❒press+or–to set the value;
❒briefly press the MENU button
:
"minutes" will appear on the display;
❒press+or–to set the value.
NoteThe setting will increase or
decrease by one unit each time the
button+or–is pressed. Hold down
the button to increase/decrease the
setting rapidly and automatically.
Complete the adjustment with single
presses of the button when you
approach the desired value.
❒When you select the "Format"
submenu, pressing the MENU button
briefly the mode is displayed;
❒press button+or–to select "24h" or
"12h" mode. When you have made
the adjustment, press SAVE to return
to the submenu screen or hold the
button down to return to the main
menu screen without storing.
❒hold the MENU button
down
again to return to the standard
screen or to the main menu
according to where you are in the
menu.Set Date (Setting the
date)
This function may be used to update
the date (year/month/day).
To adjust, proceed as follows:
❒briefly press the MENU button
:
"year" will be displayed;
❒press+or–to set the value;
❒briefly press the MENU button
:
"month" is displayed;
❒press+or–to set the value;
❒briefly press the MENU button
:
"day" is displayed
❒press+or–to set the value;
NoteThe setting will increase or
decrease by one unit each time the
button+or–is pressed. Hold down
the button to increase/decrease the
setting rapidly and automatically.
Complete the adjustment with single
presses of the button when you
approach the desired value.
Press SAVE to return to the menu
screen or hold the button down to
return to the standard screen without
storing.
73
MENU
"hours";
Page 80 of 215
Service (Scheduled
servicing)
Using this function you can display
information about the mileage intervals
for vehicle servicing.
To consult this information, proceed as
follows:
❒press the
button: the display
shows when servicing is due in
km/mi or days (where provided)
according to the previous setting (see
paragraph "Units of measurement");
❒press the
button to return to the
menu screen; press the button again
to return to the standard screen.
IMPORTANT The "Scheduled Servicing
Plan" includes car maintenance at
fixed intervals (refer to the "Maintenance
and care" chapter).This is displayed automatically, with
ignition key at MAR, 2000 km (or
equivalent value in miles) before
servicing or, where provided, 30 days
before servicing. It is also displayed
each time the key is turned to MAR or,
for versions/markets, where provided,
every 200 km (or equivalent value in
miles). Below this threshold servicing
indications are more frequent.
The display will be in km or miles
according to the unit of measurement
set. When the next scheduled servicing
is approaching, the word "Service"
will appear on the display, followed by
the number of kilometres/miles or
days (where provided) left, when the
ignition key is turned to MAR. Go to an
Abarth Dealership, where the
operations of the "Scheduled Servicing
Plan" will be performed and the
message will be reset.
When the service interval is reached
and for about 1000 km/600 mi or
30 days, a service due message is
displayed.Passenger airbag (front
passenger side airbag
and side bag for pelvis,
chest and shoulder
protection - Side bag -
activation/deactivation)
This function is used to activate/
deactivate the front passenger's airbag.
Proceed as follows:
❒press the MENU button
and
then, after displaying the message
("Bag pass: Off") (to deactivate)
or ("Bag pass: On") (to activate) by
means of buttons+and–press the
MENU button
again;
❒a confirmation request message will
appear on the display;
❒press buttons+or–to select (Yes)
(confirming activation/deactivation)
or (No) (to abort);
❒press the MENU button
briefly, a
message confirming the selection will
be displayed and you will return to
the menu screen or hold the button
down to return to the standard
screen without storing.
76
KNOWING THE INSTRUMENT PANEL
Page 81 of 215

Daytime running lights
(DRL)
(for versions/markets, where provided)
With this function it is possible to turn
the daytime running lights on and off.
Proceed as follows to activate or
deactivate this function:
❒press the MENU button
briefly to
display a submenu;
❒press the MENU button
briefly,
the display will flash "On" or "Off"
depending on the previous setting;
❒press button+or–to select;
❒press the MENU button
briefly to
return to the submenu screen or hold
the button down to return to the
main menu screen without saving;
❒hold the MENU button
down
again to return to the standard
screen or to the main menu
according to where you are in the
menu.Tyre reset (iTPMS reset)
(For versions/markets, where provided)
With this function it is possible to reset
the iTPMS (see paragraph “iTPMS”).
To carry out the Reset procedure
proceed as follows:
❒briefly press the MENU
button:
the display will show Reset;
❒press the+or–button to select
(“Yes” or “No”);
❒briefly press the MENU
button:
the display will show “Confirm”;
❒press the+or–button to select
("Yes" to reset or "No" to exit the
video page);
❒hold the MENU button
down
again to return to the standard
screen or to the main menu
according to where you are in the
menu.Exit Menu
This is the last function that closes the
cycle of settings listed in the menu
screen.
Pressing the MENU button
briefly
will return the display to the standard
screen without storing.
Press the–button to go back to the
first menu option ("Speed warning").
77
Page 84 of 215

INSTRUMENT PANEL
LIGHTING ADJUSTMENT
(Brightness sensor)
Versions with colour display are
equipped with a brightness sensor
(fitted inside the instrument panel)
capable of detecting ambient
light conditions and adjusting the
brightness of the instrument panel
accordingly.
The behaviour of the instrument is as
follow:
❒"daytime" mode: the display can be
set to 8 levels;
❒"nighttime" mode: the display can be
set to 8 levels. The brightness of the
radio and automatic dual zone
climate control display is also
adjusted.
For adjusting, see paragraph "Menu
items" in this chapter.TRIP COMPUTER
IN BRIEF
The Trip Computer can be used to
display information on car operation
when the key is turned to MAR-ON.
This function is characterised by
two separate memories, called "Trip
A" and "Trip B", where the car's
"complete missions" (journeys) are
recorded in a reciprocally
independent manner, as well as, for
versions where provided, "Instant
info" and "Best average
consumption".
Both memories can be reset: i.e. start
of a new journey.
"Trip A" can be used to display the
values relating to:
❒Range (for versions/markets, where
provided)
❒Distance travelled A
❒Average consumption A
❒Instant consumption (for versions/
markets, where provided)
❒Average speed A
❒Trip time A (driving time)❒Reset Trip A.
"Trip B" can be used to display the
values relating to:
❒Distance travelled B
❒Average consumption B
❒Average speed B
❒Trip time B (driving time)
❒Reset Trip B.
The "Trip B" function may be disabled
(see "Activating Trip B"). "Range" and
"Instant consumption" values cannot be
reset.
"Instant info" displays the following
values (when they are not displayed in
the main screen, depending on
versions/markets):
❒Range
❒Instant consumption
"Best average consumption" displays a
screen summarising the best average
consumption (for versions/markets,
where provided). This information can
be reset.
80
KNOWING THE INSTRUMENT PANEL
Page 85 of 215

VALUES DISPLAYED
Range (for versions/markets, where
provided)
This indicates the distance that can still
be travelled with the fuel in the tank,
assuming that driving style remains
unvaried. The display will show the
reading "----"when the following
events take place:
❒range value lower than 50 km (or 30
mi)
❒car parked with engine running for a
long period.
IMPORTANT The range can be affected
by several factors: driving style (see
"Driving style" paragraph in the
"Starting and driving" chapter), type of
route (motorway, towns and cities,
mountain roads, etc.), conditions of use
(load, tyre pressure, etc.). Trip planning
must therefore take the above into
account.
Distance travelled
This value shows the distance covered
from the start of the new journey.Average consumption
This value shows the approximate
average fuel consumption from the start
of the new journey.
Instant consumption (for versions/
markets, where provided)
This value shows the fuel consumption.
The value is constantly updated. The
display will show "----"ifthecar
is parked with the engine running.
Average speed
This value shows the car's average
speed based on the overall time
elapsed since the start of the new
journey.
Trip time
Time elapsed since the start of the new
journey.TRIP BUTTON
The TRIP button is located on the
right-hand stalk fig. 74. With the ignition
key turned to MAR-ON, this button
allows you to view the previously
described values and also zero them to
begin a new mission:
❒brief pressto access the various
value displays;
❒long pressto reset and then start a
new mission.
TRIPTRIP
74AB0A0140
81
Page 86 of 215
New mission
This begins after a reset:
❒"manual" resetting by the user, by
pressing the relevant button;
❒"automatic" resetting, when the
"Distance travelled" reaches 99999.9
km or when the "Trip time" reaches
999:59 (999 hours and 59 minutes);
❒after disconnection/reconnection of
the battery.IMPORTANT The reset operation when
"Trip A" or "Trip B" details are being
displayed only resets the values
associated with the function displayed.
Start of journey
procedure
With the ignition key in the MAR-ON
position, reset by pressing the TRIP
button and keeping it pressed for more
than 2 seconds.Trip Exit
You can automatically exit the TRIP
function once all the values have been
displayed or by holding the MENU
button
down for more than 1
second.
82
KNOWING THE INSTRUMENT PANEL
Page 106 of 215

SEAT BELTS
USING THE SEAT BELTS
The belt should be worn keeping the
torso straight and rested against the
backrest.
To fasten the seat belts, hold the
tongue A fig. 75 and insert it into the
buckle B fig. 75, until it clicks into
place.
On removal, if the seat belt jams, let it
rewind for a short stretch, then pull
it out again without jerking.
Press button C fig. 75 to release the
belt.
Guide the belt while it is rewinding to
prevent it from twisting. Through the
retractor, the belt automatically adapts
to the body of the passenger wearing it,
allowing freedom of movement.The retractor may lock when the car is
parked on a steep slope: this is
perfectly normal. Furthermore, the
retractor mechanism locks the belt if it
is pulled sharply or in the event of
sudden braking, collisions or
high-speed bends.
65) 66)
The rear seat is fitted with inertia seat
belts with three anchor points and a
retractor.
WARNING
65) Do not press button C when
travelling.
66) Remember that in the event of
an accident, the rear seat
passengers not wearing seat belts
are exposed to a very serious
risk and also represent a serious
danger for the front seat
occupants.
SBR (Seat Belt
Reminder) SYSTEM
IN BRIEF
This system comprises an acoustic
warning which, in conjunction with
the
warning light flashing on the
instrument panel, advises the driver if
their seat belt has not been fastened.
For long-term deactivation of the
SBR system, contact an Abarth
Dealership.
The acoustic warning can be
reactivated at any time through the
Setup menu (see "Menu items"
paragraph in "Knowing the
instrument panel" chapter).
The system warns the driver and the
front passenger if their seat belt is
not fastened, as follows:
❒warning light
switched on
constantly and continuous acoustic
signal for the first 6 seconds;
❒warning light
flashing and
intermittent acoustic signal for the
first next 96 seconds.
75AB0A0059
102
SAFETY
Page 128 of 215
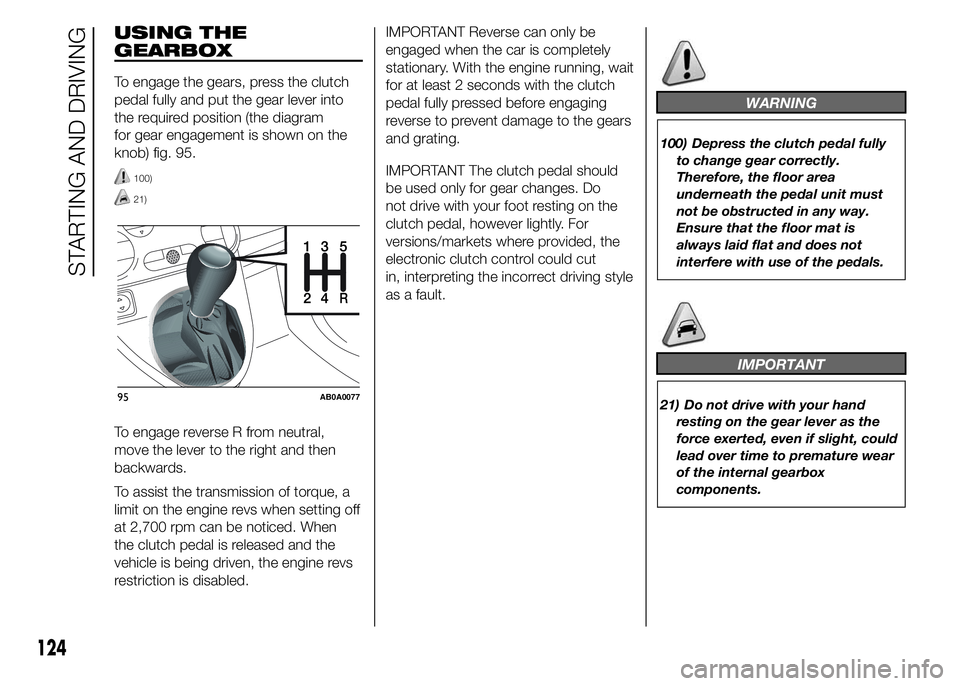
USING THE
GEARBOX
To engage the gears, press the clutch
pedal fully and put the gear lever into
the required position (the diagram
for gear engagement is shown on the
knob) fig. 95.
100)
21)
To engage reverse R from neutral,
move the lever to the right and then
backwards.
To assist the transmission of torque, a
limit on the engine revs when setting off
at 2,700 rpm can be noticed. When
the clutch pedal is released and the
vehicle is being driven, the engine revs
restriction is disabled.IMPORTANT Reverse can only be
engaged when the car is completely
stationary. With the engine running, wait
for at least 2 seconds with the clutch
pedal fully pressed before engaging
reverse to prevent damage to the gears
and grating.
IMPORTANT The clutch pedal should
be used only for gear changes. Do
not drive with your foot resting on the
clutch pedal, however lightly. For
versions/markets where provided, the
electronic clutch control could cut
in, interpreting the incorrect driving style
as a fault.
WARNING
100) Depress the clutch pedal fully
to change gear correctly.
Therefore, the floor area
underneath the pedal unit must
not be obstructed in any way.
Ensure that the floor mat is
always laid flat and does not
interfere with use of the pedals.
IMPORTANT
21) Do not drive with your hand
resting on the gear lever as the
force exerted, even if slight, could
lead over time to premature wear
of the internal gearbox
components.
24R351
95AB0A0077
124
STARTING AND DRIVING