lock Abarth 500 2017 Owner handbook (in English)
[x] Cancel search | Manufacturer: ABARTH, Model Year: 2017, Model line: 500, Model: Abarth 500 2017Pages: 192, PDF Size: 6.46 MB
Page 85 of 192
PARKING THE
VEHICLE
When parking and leaving the car,
proceed as follows:
engage a gear (1st gear if facing
uphill or reverse if facing downhill) and
leave the wheels turned;
stop the engine and engage the
handbrake;
always remove the ignition key.
Block the wheels with a wedge or a
stone if the car is parked on a steep
slope.
On versions equipped with sequential
robotised transmission, wait for letter P
to be displayed before releasing the
brake pedal.
IMPORTANT NEVER leave the car with
the gearbox in neutral (or, on versions
equipped with sequential robotised
transmission, before placing the gear
lever at P).
112)
HANDBRAKE
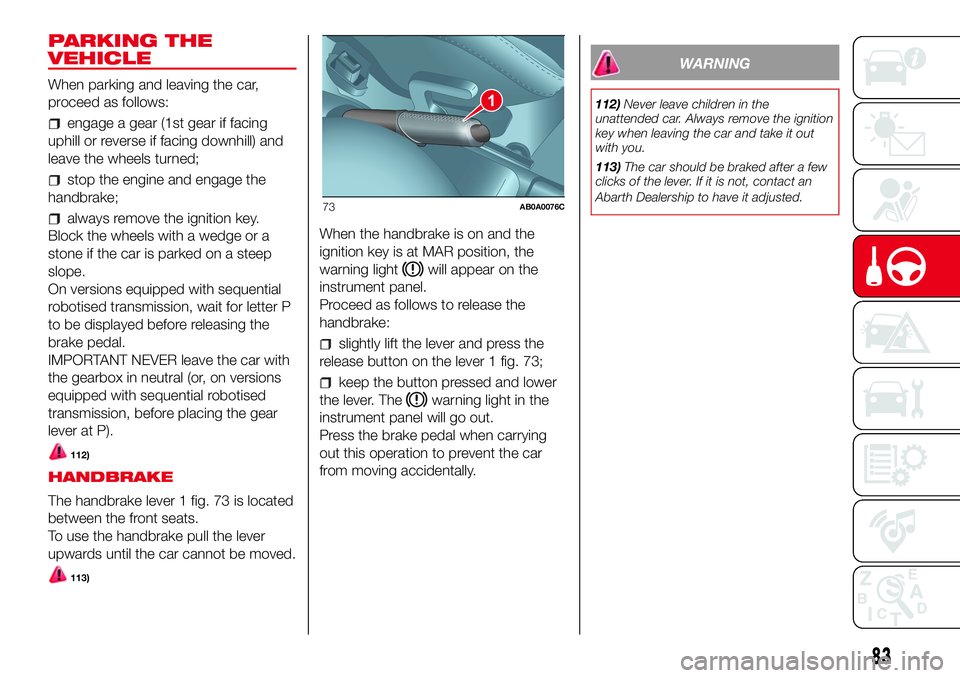
The handbrake lever 1 fig. 73 is located
between the front seats.
To use the handbrake pull the lever
upwards until the car cannot be moved.
113)
When the handbrake is on and the
ignition key is at MAR position, the
warning light
will appear on the
instrument panel.
Proceed as follows to release the
handbrake:
slightly lift the lever and press the
release button on the lever 1 fig. 73;
keep the button pressed and lower
the lever. The
warning light in the
instrument panel will go out.
Press the brake pedal when carrying
out this operation to prevent the car
from moving accidentally.
WARNING
112)Never leave children in the
unattended car. Always remove the ignition
key when leaving the car and take it out
with you.
113)The car should be braked after a few
clicks of the lever. If it is not, contact an
Abarth Dealership to have it adjusted.1
73AB0A0076C
83
Page 95 of 192
TYPES OF BULBS
Various types of bulbs are fitted to your car:
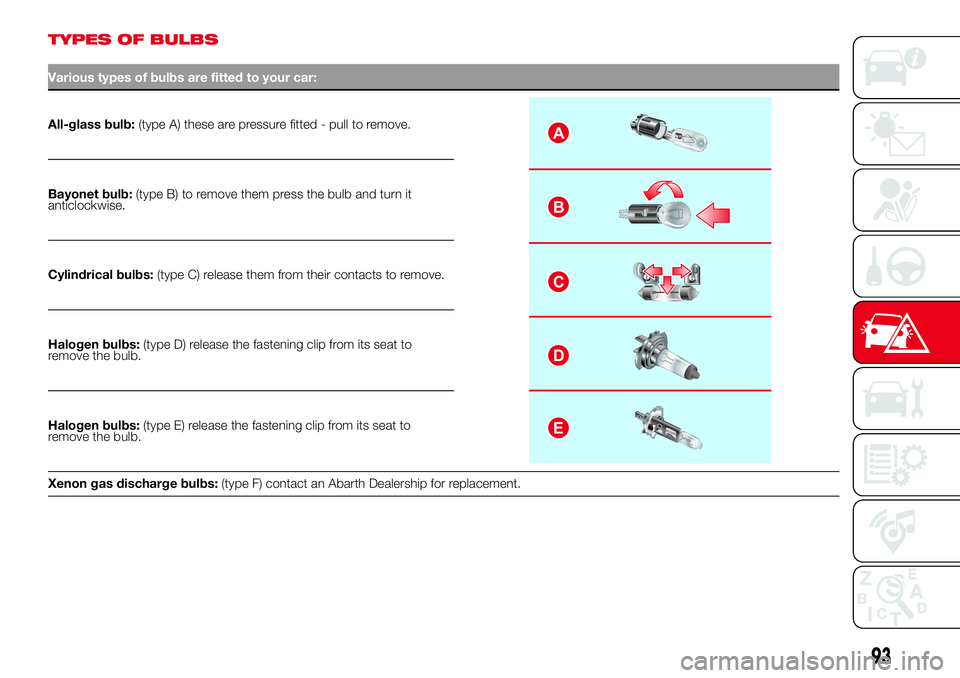
All-glass bulb:(type A) these are pressure fitted - pull to remove.A
B
C
D
E
Bayonet bulb:(type B) to remove them press the bulb and turn it
anticlockwise.
Cylindrical bulbs:(type C) release them from their contacts to remove.
Halogen bulbs:(type D) release the fastening clip from its seat to
remove the bulb.
Halogen bulbs:(type E) release the fastening clip from its seat to
remove the bulb.
Xenon gas discharge bulbs:(type F) contact an Abarth Dealership for replacement.
93
Page 98 of 192
REPLACING AN
EXTERIOR BULB
For the type of bulb and power rating,
see paragraph "Replacing a bulb".
FRONT LIGHT CLUSTERS
The front light clusters contain side
lights, dipped headlights, main beam
headlights and direction indicator bulbs.
Access to the direction indicator
bulbs
Working from the engine compartment,
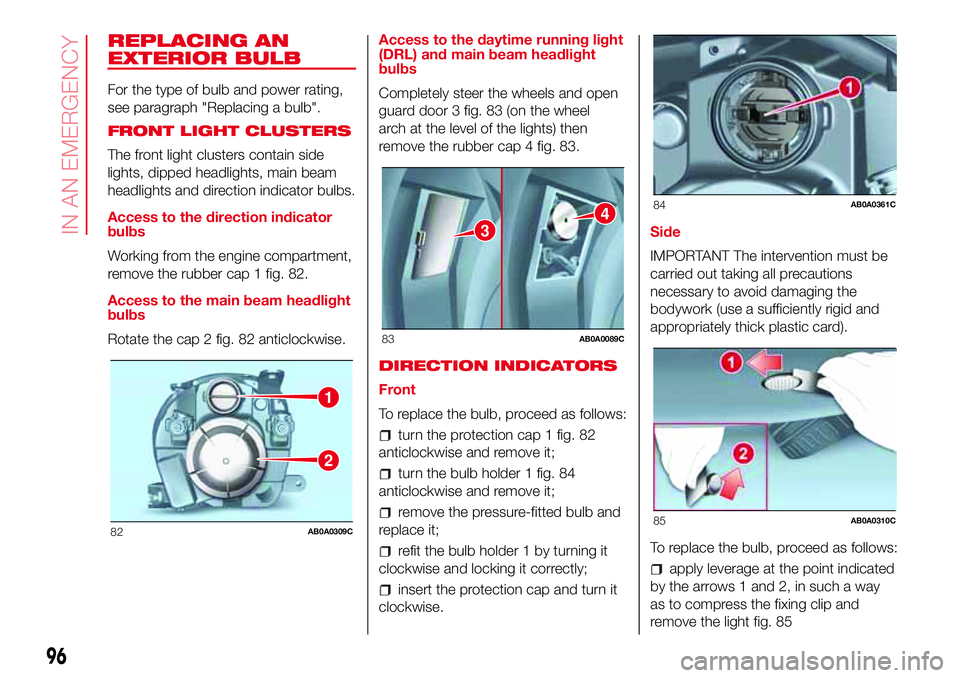
remove the rubber cap 1 fig. 82.
Access to the main beam headlight
bulbs
Rotate the cap 2 fig. 82 anticlockwise.Access to the daytime running light
(DRL) and main beam headlight
bulbs
Completely steer the wheels and open
guard door 3 fig. 83 (on the wheel
arch at the level of the lights) then
remove the rubber cap 4 fig. 83.
DIRECTION INDICATORS
Front
To replace the bulb, proceed as follows:
turn the protection cap 1 fig. 82
anticlockwise and remove it;
turn the bulb holder 1 fig. 84
anticlockwise and remove it;
remove the pressure-fitted bulb and
replace it;
refit the bulb holder 1 by turning it
clockwise and locking it correctly;
insert the protection cap and turn it
clockwise.Side
IMPORTANT The intervention must be
carried out taking all precautions
necessary to avoid damaging the
bodywork (use a sufficiently rigid and
appropriately thick plastic card).
To replace the bulb, proceed as follows:
apply leverage at the point indicated
by the arrows 1 and 2, in such a way
as to compress the fixing clip and
remove the light fig. 85
1
2
82AB0A0309C
3
4
83AB0A0089C
84AB0A0361C
85AB0A0310C
96
IN AN EMERGENCY
Page 99 of 192
turn the bulb holder anticlockwise,
extract the press-fitted bulb and
replace it;
refit the bulb holder in the lens, then
position the light, ensuring that the
fastening clip clicks into place.
DIPPED HEADLIGHTS
To replace the bulb, proceed as follows:
turn the protection cap 2 fig. 82
anticlockwise and remove it;
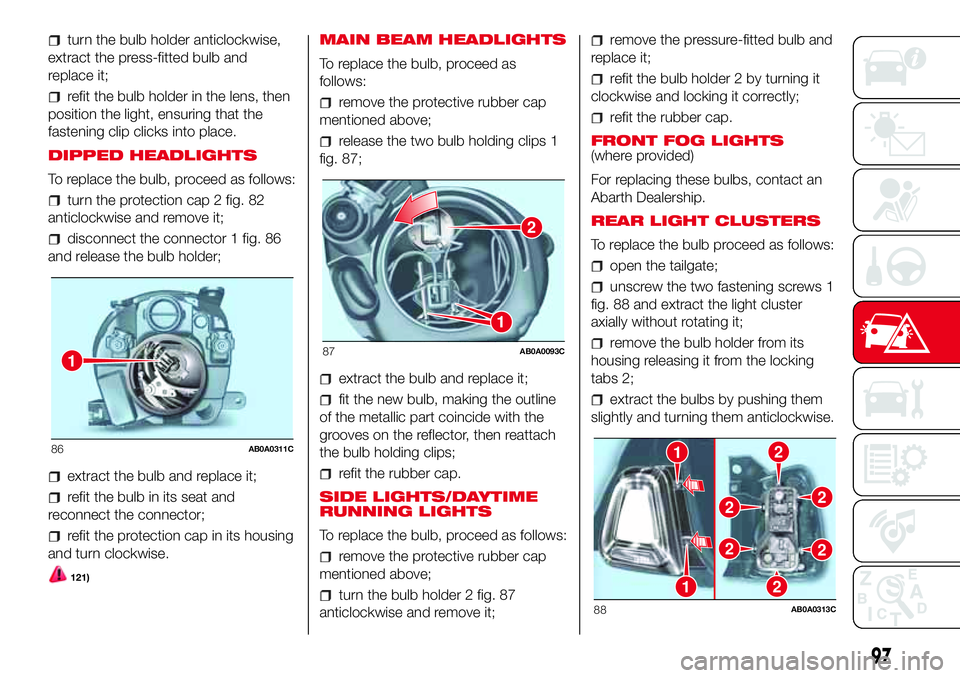
disconnect the connector 1 fig. 86
and release the bulb holder;
extract the bulb and replace it;
refit the bulb in its seat and
reconnect the connector;
refit the protection cap in its housing
and turn clockwise.
121)
MAIN BEAM HEADLIGHTS
To replace the bulb, proceed as
follows:
remove the protective rubber cap
mentioned above;
release the two bulb holding clips 1
fig. 87;
extract the bulb and replace it;
fit the new bulb, making the outline
of the metallic part coincide with the
grooves on the reflector, then reattach
the bulb holding clips;
refit the rubber cap.
SIDE LIGHTS/DAYTIME
RUNNING LIGHTS
To replace the bulb, proceed as follows:
remove the protective rubber cap
mentioned above;
turn the bulb holder 2 fig. 87
anticlockwise and remove it;
remove the pressure-fitted bulb and
replace it;
refit the bulb holder 2 by turning it
clockwise and locking it correctly;
refit the rubber cap.
FRONT FOG LIGHTS
(where provided)
For replacing these bulbs, contact an
Abarth Dealership.
REAR LIGHT CLUSTERS
To replace the bulb proceed as follows:
open the tailgate;
unscrew the two fastening screws 1
fig. 88 and extract the light cluster
axially without rotating it;
remove the bulb holder from its
housing releasing it from the locking
tabs 2;
extract the bulbs by pushing them
slightly and turning them anticlockwise.
1
86AB0A0311C
2
1
87AB0A0093C
21
1
22
22
2
88AB0A0313C
97
Page 100 of 192
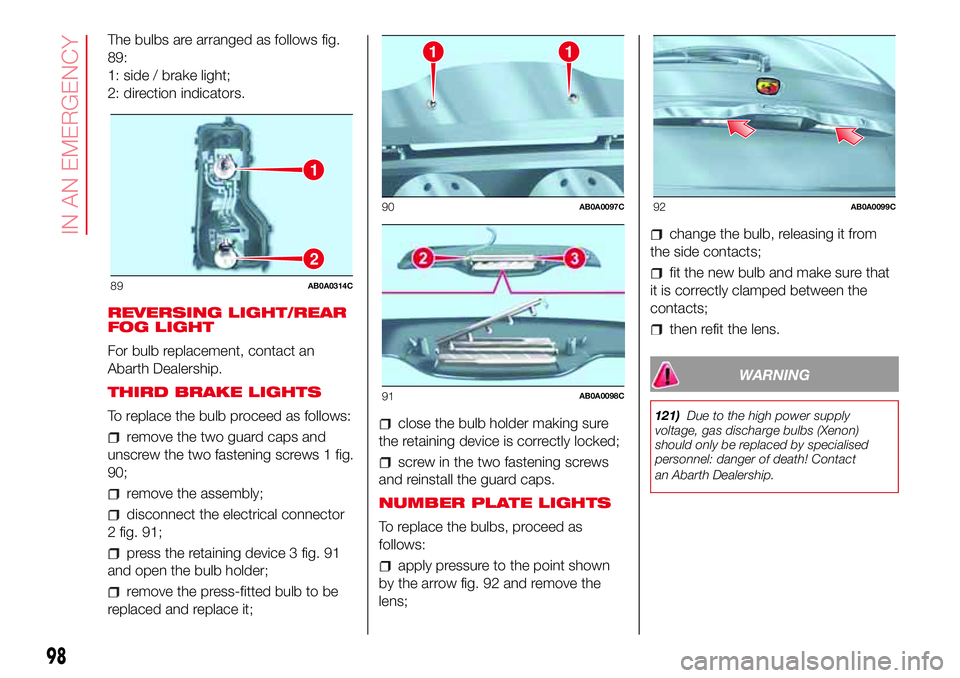
The bulbs are arranged as follows fig.
89:
1: side / brake light;
2: direction indicators.
REVERSING LIGHT/REAR
FOG LIGHT
For bulb replacement, contact an
Abarth Dealership.
THIRD BRAKE LIGHTS
To replace the bulb proceed as follows:
remove the two guard caps and
unscrew the two fastening screws 1 fig.
90;
remove the assembly;
disconnect the electrical connector
2 fig. 91;
press the retaining device 3 fig. 91
and open the bulb holder;
remove the press-fitted bulb to be
replaced and replace it;
close the bulb holder making sure
the retaining device is correctly locked;
screw in the two fastening screws
and reinstall the guard caps.
NUMBER PLATE LIGHTS
To replace the bulbs, proceed as
follows:
apply pressure to the point shown
by the arrow fig. 92 and remove the
lens;
change the bulb, releasing it from
the side contacts;
fit the new bulb and make sure that
it is correctly clamped between the
contacts;
then refit the lens.
WARNING
121)Due to the high power supply
voltage, gas discharge bulbs (Xenon)
should only be replaced by specialised
personnel: danger of death! Contact
an Abarth Dealership.
1
2
89AB0A0314C
11
90AB0A0097C
91AB0A0098C
92AB0A0099C
98
IN AN EMERGENCY
Page 101 of 192
REPLACING FUSES
GENERAL INFORMATION
Fuses protect the electrical system:
they intervene (blow) in the event of a
failure or improper action on the
system.
122) 123) 124) 125) 126) 127)
To facilitate fuse replacement, use the
pliers hooked inside the fuse box lid on
the dashboard left-hand side.
Refer to the tables on the following
pages to identify the protective fuse.
FUSE LOCATION
Dashboard fuse box
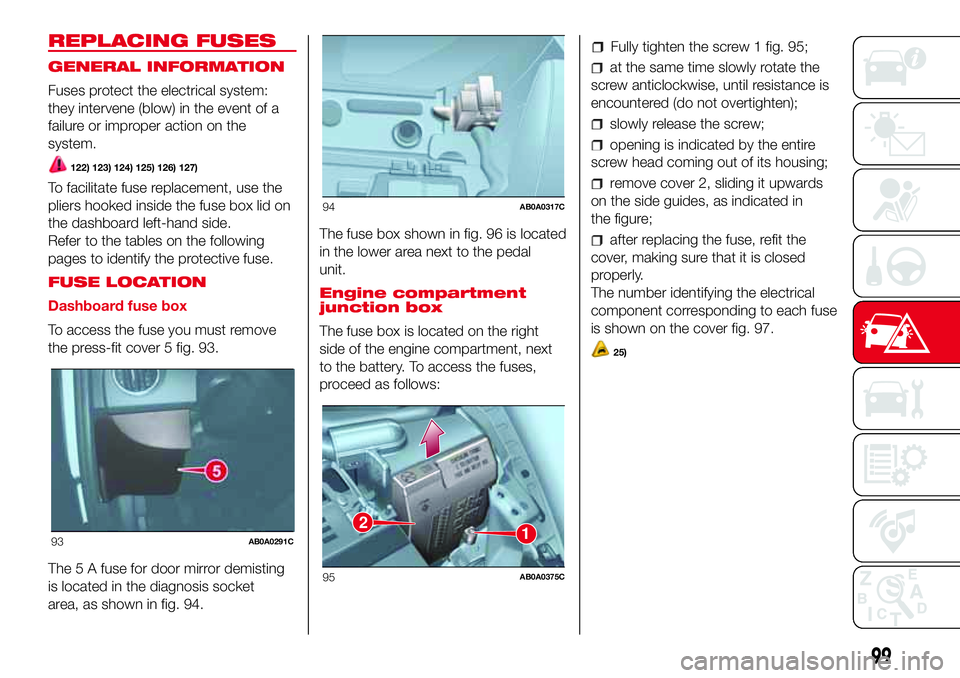
To access the fuse you must remove
the press-fit cover 5 fig. 93.
The 5 A fuse for door mirror demisting
is located in the diagnosis socket
area, as shown in fig. 94.The fuse box shown in fig. 96 is located
in the lower area next to the pedal
unit.
Engine compartment
junction box
The fuse box is located on the right
side of the engine compartment, next
to the battery. To access the fuses,
proceed as follows:
Fully tighten the screw 1 fig. 95;
at the same time slowly rotate the
screw anticlockwise, until resistance is
encountered (do not overtighten);
slowly release the screw;
opening is indicated by the entire
screw head coming out of its housing;
remove cover 2, sliding it upwards
on the side guides, as indicated in
the figure;
after replacing the fuse, refit the
cover, making sure that it is closed
properly.
The number identifying the electrical
component corresponding to each fuse
is shown on the cover fig. 97.
25)
93AB0A0291C
94AB0A0317C
12
95AB0A0375C
99
Page 102 of 192

DASHBOARD FUSE BOX
DEVICE PROTECTED FUSE AMPERE
Headlight alignment corrector F13
5(*)
Diagnosis socket, Uconnect, climate control, EOBD F36 15
Brake light switch, instrument panel node F37 5
Central door locking F38 15
Windscreen/rear window washer pump F43 15
Driver's side electric windows F47 20
(*) (where provided)
96AB0A0106C
100
IN AN EMERGENCY
Page 109 of 192
if the required pressure is reached,
restart driving. Do not exceed 80 km/h.
Avoid sudden acceleration or braking.
After driving for about 8 km / 5 miles,
place the vehicle in a safe and suitable
area, engaging the parking brake.
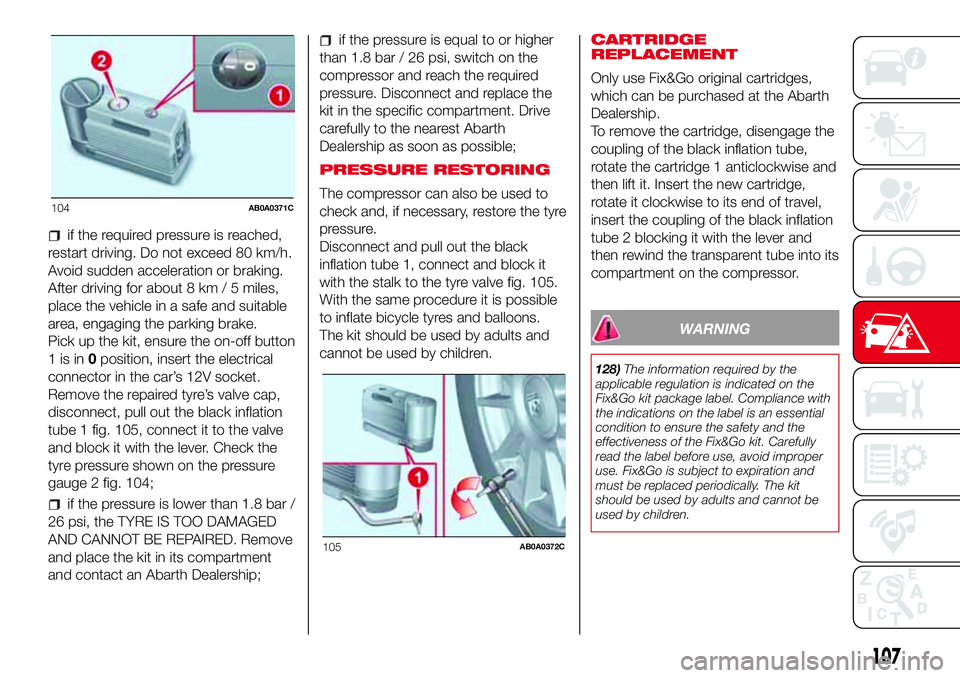
Pick up the kit, ensure the on-off button
1isin0position, insert the electrical
connector in the car’s 12V socket.
Remove the repaired tyre’s valve cap,
disconnect, pull out the black inflation
tube 1 fig. 105, connect it to the valve
and block it with the lever. Check the
tyre pressure shown on the pressure
gauge 2 fig. 104;
if the pressure is lower than 1.8 bar /
26 psi, the TYRE IS TOO DAMAGED
AND CANNOT BE REPAIRED. Remove
and place the kit in its compartment
and contact an Abarth Dealership;
if the pressure is equal to or higher
than 1.8 bar / 26 psi, switch on the
compressor and reach the required
pressure. Disconnect and replace the
kit in the specific compartment. Drive
carefully to the nearest Abarth
Dealership as soon as possible;
PRESSURE RESTORING
The compressor can also be used to
check and, if necessary, restore the tyre
pressure.
Disconnect and pull out the black
inflation tube 1, connect and block it
with the stalk to the tyre valve fig. 105.
With the same procedure it is possible
to inflate bicycle tyres and balloons.
The kit should be used by adults and
cannot be used by children.CARTRIDGE
REPLACEMENT
Only use Fix&Go original cartridges,
which can be purchased at the Abarth
Dealership.
To remove the cartridge, disengage the
coupling of the black inflation tube,
rotate the cartridge 1 anticlockwise and
then lift it. Insert the new cartridge,
rotate it clockwise to its end of travel,
insert the coupling of the black inflation
tube 2 blocking it with the lever and
then rewind the transparent tube into its
compartment on the compressor.
WARNING
128)The information required by the
applicable regulation is indicated on the
Fix&Go kit package label. Compliance with
the indications on the label is an essential
condition to ensure the safety and the
effectiveness of the Fix&Go kit. Carefully
read the label before use, avoid improper
use. Fix&Go is subject to expiration and
must be replaced periodically. The kit
should be used by adults and cannot be
used by children.
104AB0A0371C
105AB0A0372C
107
Page 111 of 192
WARNING
28)Never use a fast battery-charger to
start the engine as this could damage the
electronic systems of your vehicle,
particularly the ignition and engine fuel
supply control units.
WARNING
129)This starting procedure must be
performed by expert personnel because
incorrect actions could cause electrical
discharge of considerable intensity.
Furthermore, battery fluid is poisonous and
corrosive: avoid contact with skin and
eyes. Keep naked flames and lighted
cigarettes away from the battery and do
not cause sparks.
FUEL CUT-OFF
SYSTEM
This intervenes in the case of an impact
causing:
the fuel supply cut-off with the
engine consequently switching off
the automatic unlocking of the doors
turning on the lights inside the
vehicle.
The intervention of the system is
indicated by a message shown on the
display.
IMPORTANT Carefully check the car for
fuel leaks, for instance in the engine
compartment, under the car or near the
tank area.
130)
After a collision, turn the ignition key to
STOP position to prevent the battery
from running down.
To restore the correct operation of the
car, proceed as follows:
turn the ignition key to the MAR-ON
position
activate the right direction indicator
deactivate the right direction
indicator
activate the left direction indicator
deactivate the left direction indicator
activate the right direction indicator
deactivate the right direction
indicator
activate the left direction indicator
deactivate the left direction indicator
turn the ignition key to the STOP
position
turn the ignition key to the MAR-ON
position.
WARNING
130)If, after an impact, you smell fuel or
notice leaks from the fuel system, do
not reactivate the system to avoid the risk
of fire.
109
Page 112 of 192
TOWING THE
VEHICLE
The tow hook, which is supplied with
the vehicle, is housed in the tool box,
under the carpet in the luggage
compartment.
131) 132) 133) 134) 135)
ATTACHING THE TOW
RING
Proceed as follows:
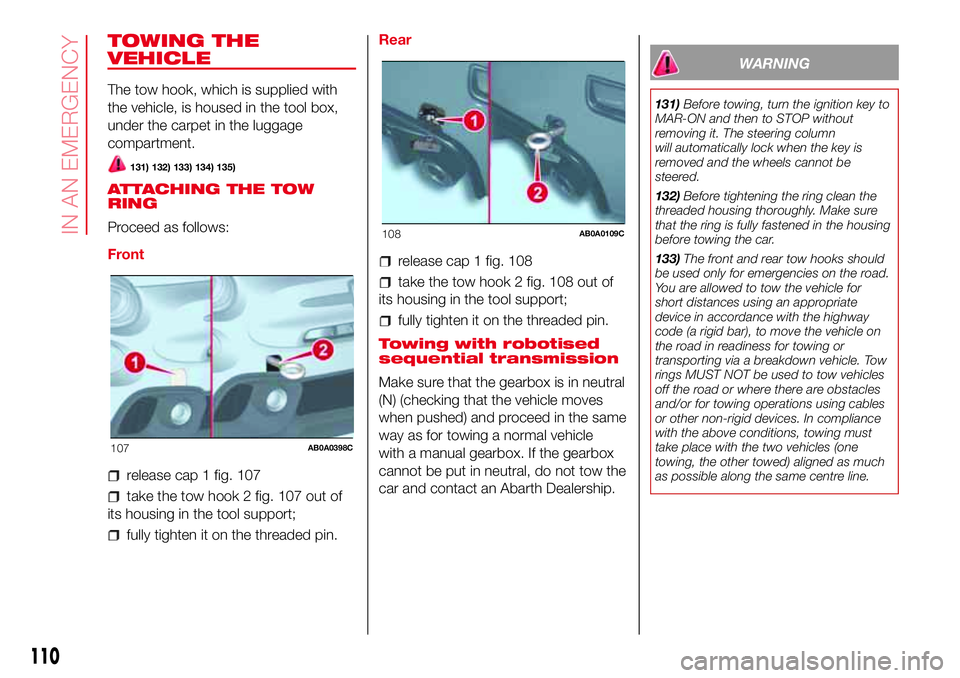
Front
release cap 1 fig. 107
take the tow hook 2 fig. 107 out of
its housing in the tool support;
fully tighten it on the threaded pin.Rear
release cap 1 fig. 108
take the tow hook 2 fig. 108 out of
its housing in the tool support;
fully tighten it on the threaded pin.
Towing with robotised
sequential transmission
Make sure that the gearbox is in neutral
(N) (checking that the vehicle moves
when pushed) and proceed in the same
way as for towing a normal vehicle
with a manual gearbox. If the gearbox
cannot be put in neutral, do not tow the
car and contact an Abarth Dealership.
WARNING
131)Before towing, turn the ignition key to
MAR-ON and then to STOP without
removing it. The steering column
will automatically lock when the key is
removed and the wheels cannot be
steered.
132)Before tightening the ring clean the
threaded housing thoroughly. Make sure
that the ring is fully fastened in the housing
before towing the car.
133)The front and rear tow hooks should
be used only for emergencies on the road.
You are allowed to tow the vehicle for
short distances using an appropriate
device in accordance with the highway
code (a rigid bar), to move the vehicle on
the road in readiness for towing or
transporting via a breakdown vehicle. Tow
rings MUST NOT be used to tow vehicles
off the road or where there are obstacles
and/or for towing operations using cables
or other non-rigid devices. In compliance
with the above conditions, towing must
take place with the two vehicles (one
towing, the other towed) aligned as much
as possible along the same centre line.
107AB0A0398C
108AB0A0109C
110
IN AN EMERGENCY