ignition Abarth 500 2017 Owner handbook (in English)
[x] Cancel search | Manufacturer: ABARTH, Model Year: 2017, Model line: 500, Model: Abarth 500 2017Pages: 192, PDF Size: 6.46 MB
Page 107 of 192

Move the on-off button 1 fig. 100 to
the onIposition to switch on the
compressor. When the pressure gauge
indicates the right pressure for the
car, switch off the compressor by
moving the on-off button1 to the0
position. If the pressure gauge 6 fig. 99
indicates a pressure lower than 1.8
bar / 26 psi 5 minutes after starting the
compressor, switch off the compressor,
disconnect the sealing fluid tube 3
(fig. 99) from the tyre valve, retighten
the valve cap and move the car about
10 meters to distribute the sealing
fluid in the tyre. Stop the car safely and
repeat the operation above until the
required pressure is reached. If after
other 5 min. from the compressor
ignition, the pressure gauge 6
still indicates a pressure lower than 1.8
bar / 26 psi, the TYRE IS TOO
DAMAGED AND CANNOT BE
REPAIRED. Disconnect, put the kit
back in its compartment and call
roadside assistance.If the required pressure is reached,
continue driving. Do not exceed
80 km/h. Avoid sudden acceleration or
braking. After driving for about 8 km /
5 miles, position the vehicle in a safe
and suitable area and engage the
handbrake. Take the kit, ensure that the
on-off button 1 (fig. 100) is in the0
position and insert the electrical
connector in the car’s 12V socket.
Remove the repaired tyre’s valve cap,
take out the black inflation tube and
screw it firmly onto the valve. Check the
tyre pressure shown on the pressure
gauge 6.
If the pressure is lower than 1.8 bar /
26 psi, the TYRE IS TOO DAMAGED
AND CANNOT BE REPAIRED.
Disconnect, put the kit back in its
compartment and call roadside
assistance.
If the pressure is equal to or higher
than 1.8 bar / 26 psi, switch on the
compressor to reach the required
pressure. Disconnect and replace the
kit in the specific compartment. Drive
carefully to a specialist or the
manufacturer’s dealership as soon as
possible.PRESSURE RESTORING
Take out the black inflation tube and
screw it firmly onto the tyre valve.
Follow the instructions given in fig. 98.
Press the button 2 fig. 101 to adjust
any tyre overpressure.
CARTRIDGE
REPLACEMENT
Only use Fix&Go original cartridges,
which can be purchased at the Abarth
Dealership. Press the release button
3 and lift it to remove the cartridge 1 fig.
101. Insert the new cartridge and
press it firmly downwards.
12
3
101AB0A0086C
105
Page 108 of 192

“Fix&Go Automatic” KIT
The kit includes:
one tank 1 fig. 102 containing the
sealing fluid, provided with: filler tube 2
and adhesive label 3 with the writing
"Max. 80 km/h”, to be attached in
a position easily visible to the driver (eg.
on the dashboard) after repairing the
tyre;
compressor 4 complete with
pressure gauge and connectors;
an instruction leaflet, to refer to for
prompt and correct use and that must
be then given to the personnel dealing
with the tyre treated with sealant;
a pair of gloves located in the side
compartment of the compressor;
some adaptors, for inflating different
elements.TYRE REPAIRING AND
PRESSURE RESTORING
PROCEDURE
26) 27)
128)
Proceed as follows:
place the vehicle in a safe and
suitable area, engaging the parking
brake. Take the kit from the specific
compartment. Remove the adhesive
label of speed 3 fig. 102 and apply it in
a visible position. Wear the protective
gloves provided. Remove the cap from
the valve of the punctured tyre and
connect and firmly tighten the
transparent tube of the sealing fluid 1
fig. 103;
ensure that the on-off button 1 fig.
104 is in0(OFF) position. If provided,
open the compressor cover, insert
the electrical connector in the car’s 12V
socket and start the car engine;
activate the compressor moving
on-off 1 button toI(ON) position fig.
104. When the pressure gauge 2
shows the car’s required pressure (see
section “Wheels” under “Technical
data” chapter), switch off the
compressor moving on-off button 1 to
0position. If after 5 minutes from the
compressor ignition, the pressure
gauge 2 indicates a pressure less than
1.8 bar / 26 psi, switch off the
compressor, disconnect the sealing
fluid tube from the tyre valve, re-screw
the valve cap and move the car about
10 meters to allow the distribution of
sealing fluid in the tyre. Stop the car
safely and repeat the operation above
until the required pressure is reached. If
after other 5 min. from the compressor
ignition, the pressure gauge 2 still
indicates a pressure lower than 1.8 bar
/ 26 psi, the TYRE IS TOO DAMAGED
AND CANNOT BE REPAIRED. Remove
and place the kit in its compartment
and contact an Abarth Dealership;
102AB0A0369C
103AB0A0370C
106
IN AN EMERGENCY
Page 111 of 192
WARNING
28)Never use a fast battery-charger to
start the engine as this could damage the
electronic systems of your vehicle,
particularly the ignition and engine fuel
supply control units.
WARNING
129)This starting procedure must be
performed by expert personnel because
incorrect actions could cause electrical
discharge of considerable intensity.
Furthermore, battery fluid is poisonous and
corrosive: avoid contact with skin and
eyes. Keep naked flames and lighted
cigarettes away from the battery and do
not cause sparks.
FUEL CUT-OFF
SYSTEM
This intervenes in the case of an impact
causing:
the fuel supply cut-off with the
engine consequently switching off
the automatic unlocking of the doors
turning on the lights inside the
vehicle.
The intervention of the system is
indicated by a message shown on the
display.
IMPORTANT Carefully check the car for
fuel leaks, for instance in the engine
compartment, under the car or near the
tank area.
130)
After a collision, turn the ignition key to
STOP position to prevent the battery
from running down.
To restore the correct operation of the
car, proceed as follows:
turn the ignition key to the MAR-ON
position
activate the right direction indicator
deactivate the right direction
indicator
activate the left direction indicator
deactivate the left direction indicator
activate the right direction indicator
deactivate the right direction
indicator
activate the left direction indicator
deactivate the left direction indicator
turn the ignition key to the STOP
position
turn the ignition key to the MAR-ON
position.
WARNING
130)If, after an impact, you smell fuel or
notice leaks from the fuel system, do
not reactivate the system to avoid the risk
of fire.
109
Page 112 of 192
TOWING THE
VEHICLE
The tow hook, which is supplied with
the vehicle, is housed in the tool box,
under the carpet in the luggage
compartment.
131) 132) 133) 134) 135)
ATTACHING THE TOW
RING
Proceed as follows:
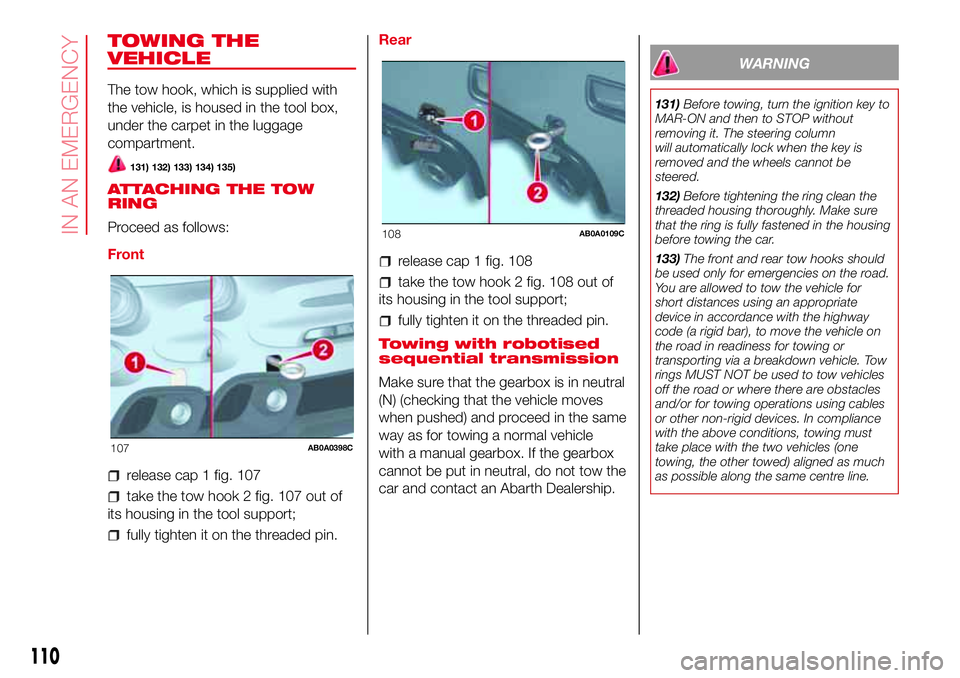
Front
release cap 1 fig. 107
take the tow hook 2 fig. 107 out of
its housing in the tool support;
fully tighten it on the threaded pin.Rear
release cap 1 fig. 108
take the tow hook 2 fig. 108 out of
its housing in the tool support;
fully tighten it on the threaded pin.
Towing with robotised
sequential transmission
Make sure that the gearbox is in neutral
(N) (checking that the vehicle moves
when pushed) and proceed in the same
way as for towing a normal vehicle
with a manual gearbox. If the gearbox
cannot be put in neutral, do not tow the
car and contact an Abarth Dealership.
WARNING
131)Before towing, turn the ignition key to
MAR-ON and then to STOP without
removing it. The steering column
will automatically lock when the key is
removed and the wheels cannot be
steered.
132)Before tightening the ring clean the
threaded housing thoroughly. Make sure
that the ring is fully fastened in the housing
before towing the car.
133)The front and rear tow hooks should
be used only for emergencies on the road.
You are allowed to tow the vehicle for
short distances using an appropriate
device in accordance with the highway
code (a rigid bar), to move the vehicle on
the road in readiness for towing or
transporting via a breakdown vehicle. Tow
rings MUST NOT be used to tow vehicles
off the road or where there are obstacles
and/or for towing operations using cables
or other non-rigid devices. In compliance
with the above conditions, towing must
take place with the two vehicles (one
towing, the other towed) aligned as much
as possible along the same centre line.
107AB0A0398C
108AB0A0109C
110
IN AN EMERGENCY
Page 130 of 192
Do not wash the car after it has been
left in the sun or with the bonnet hot:
this may alter the shine of the
paintwork.
Exterior plastic parts must be cleaned
in the same way as the rest of the
vehicle.
Where possible, do not park under
trees; the resinous substances that
many species release give the paint a
dull appearance and increase the
possibility of triggering rusting
processes.
IMPORTANT Bird droppings must be
washed off immediately and thoroughly
as the acid they contain is particularly
aggressive.
6)
37)
Versions with matt paintwork
These versions have exclusive matt
paintwork which requires special care
for its preservation. The instructions for
good preservation follow below.
37) 38) 39)
Versions with stickers
Cars that are wholly or partially
covered, decorated and/or customised
with stickers, must only be cleaned
by hand.The use of solvents, waxes, detergents
or similar products is not recommended
for the care of the car as they could
damage the stickers or cause them to
detach.
The use of such washing or cleaning
instruments and methods will therefore
invalidate the warranty.
NOTE We recommend using mild
products for cleaning the car.
IMPORTANT In case of stains (water
rings) on the wrapping, remove them by
washing the wrapping again and drying
it with a non-abrasive soft cloth.
37) 38) 39) 40)
Windows
To clean glasses, use specific cleaning
products.
Use clean cloths to avoid scratching
the glass or altering the transparency.
IMPORTANT Wipe the rear window
inside gently with a cloth following the
direction of the filaments to avoid
damaging the heating device.
41)
Front headlights
Use a soft cloth soaked in water and
detergent for washing cars.IMPORTANT Never use aromatic
substances (e.g. petrol) or ketones (e.g.
acetone) for cleaning the plastic lenses
of the headlights.
IMPORTANT When cleaning with a
pressure washer, keep the water jet at
least 20 cm away from the headlights.
Engine compartment
Wash the engine compartment
thoroughly at the end of every winter.
Be careful not to direct the jet of water
onto electronic control units.
Adequately protect the upper air
intakes to prevent damage to the
windscreen wiper motor. Have this
operation performed at a specialised
workshop.
IMPORTANT The washing should take
place with the engine cold and the
ignition key in the STOP position. After
the washing operation, make sure
that the various protections (e.g. rubber
caps and guards) have not been
removed or damaged.
Washing and cleaning the soft top
Use of specific products is
recommended for washing the soft top
cloth.
128
SERVICING AND CARE
Page 157 of 192
Front panel control summary table
Button Functions Mode
Ignition Short button press
Switching off Short button press
Volume adjustment Left/right rotation of knob
Volume activation/deactivation (Mute/Pause) Short button press
Display on/off Short button press
Exit the selection/return to previous screen Short button press
Settings Short button press
BROWSE ENTERScrolling the list or tuning to a radio station Left/right rotation of knob
Confirmation of the option displayed Short button press
APPSAccess to the additional functions, e.g.: Time display, Compass
(where provided), External temperature, Radio Media and
Uconnect™ LIVEShort button press
PHONE Phone data display Short button press
TRIP
(Uconnect™ 5" LIVE
versions)Access to the Trip menu Short button press
NAV
(Uconnect™ 5" Nav
LIVEversions)Access to the Navigation menu Short button press
MEDIA
Source selection: USB/iPod, AUX,
Bluetooth®Short button press
RADIO Access to the Radio mode Short button press
155
services, where present.
Page 164 of 192
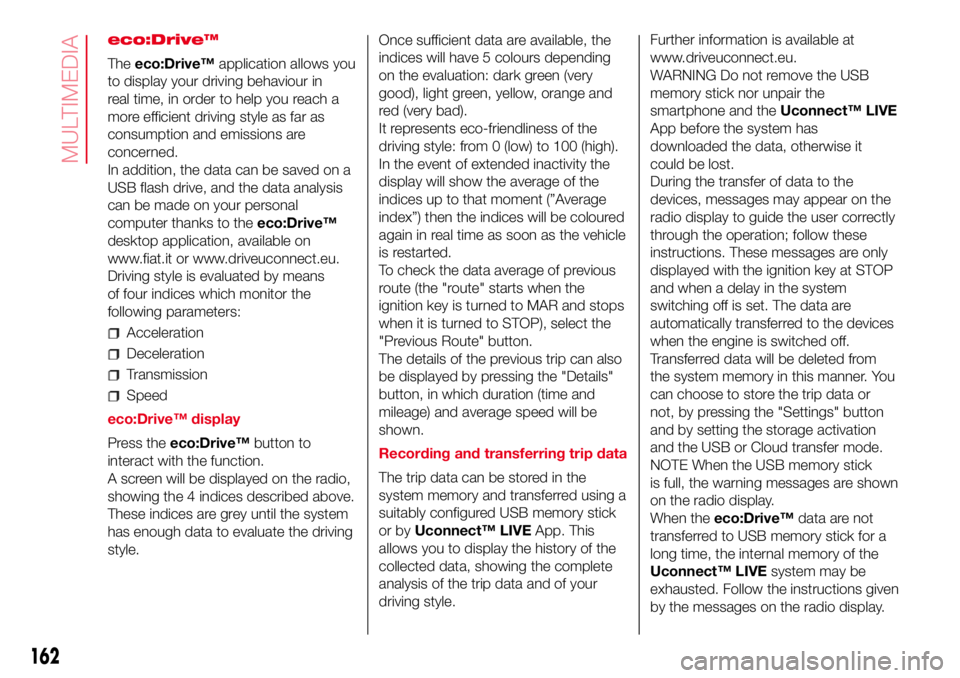
eco:Drive™
Theeco:Drive™application allows you
to display your driving behaviour in
real time, in order to help you reach a
more efficient driving style as far as
consumption and emissions are
concerned.
In addition, the data can be saved on a
USB flash drive, and the data analysis
can be made on your personal
computer thanks to theeco:Drive™
desktop application, available on
www.fiat.it or www.driveuconnect.eu.
Driving style is evaluated by means
of four indices which monitor the
following parameters:
Acceleration
Deceleration
Transmission
Speed
eco:Drive™ display
Press theeco:Drive™button to
interact with the function.
A screen will be displayed on the radio,
showing the 4 indices described above.
These indices are grey until the system
has enough data to evaluate the driving
style.Once sufficient data are available, the
indices will have 5 colours depending
on the evaluation: dark green (very
good), light green, yellow, orange and
red (very bad).
It represents eco-friendliness of the
driving style: from 0 (low) to 100 (high).
In the event of extended inactivity the
display will show the average of the
indices up to that moment (”Average
index”) then the indices will be coloured
again in real time as soon as the vehicle
is restarted.
To check the data average of previous
route (the "route" starts when the
ignition key is turned to MAR and stops
when it is turned to STOP), select the
"Previous Route" button.
The details of the previous trip can also
be displayed by pressing the "Details"
button, in which duration (time and
mileage) and average speed will be
shown.
Recording and transferring trip data
The trip data can be stored in the
system memory and transferred using a
suitably configured USB memory stick
or byUconnect™ LIVEApp. This
allows you to display the history of the
collected data, showing the complete
analysis of the trip data and of your
driving style.Further information is available at
www.driveuconnect.eu.
WARNING Do not remove the USB
memory stick nor unpair the
smartphone and theUconnect™ LIVE
App before the system has
downloaded the data, otherwise it
could be lost.
During the transfer of data to the
devices, messages may appear on the
radio display to guide the user correctly
through the operation; follow these
instructions. These messages are only
displayed with the ignition key at STOP
and when a delay in the system
switching off is set. The data are
automatically transferred to the devices
when the engine is switched off.
Transferred data will be deleted from
the system memory in this manner. You
can choose to store the trip data or
not, by pressing the "Settings" button
and by setting the storage activation
and the USB or Cloud transfer mode.
NOTE When the USB memory stick
is full, the warning messages are shown
on the radio display.
When theeco:Drive™data are not
transferred to USB memory stick for a
long time, the internal memory of the
Uconnect™ LIVEsystem may be
exhausted. Follow the instructions given
by the messages on the radio display.
162
MULTIMEDIA
Page 170 of 192
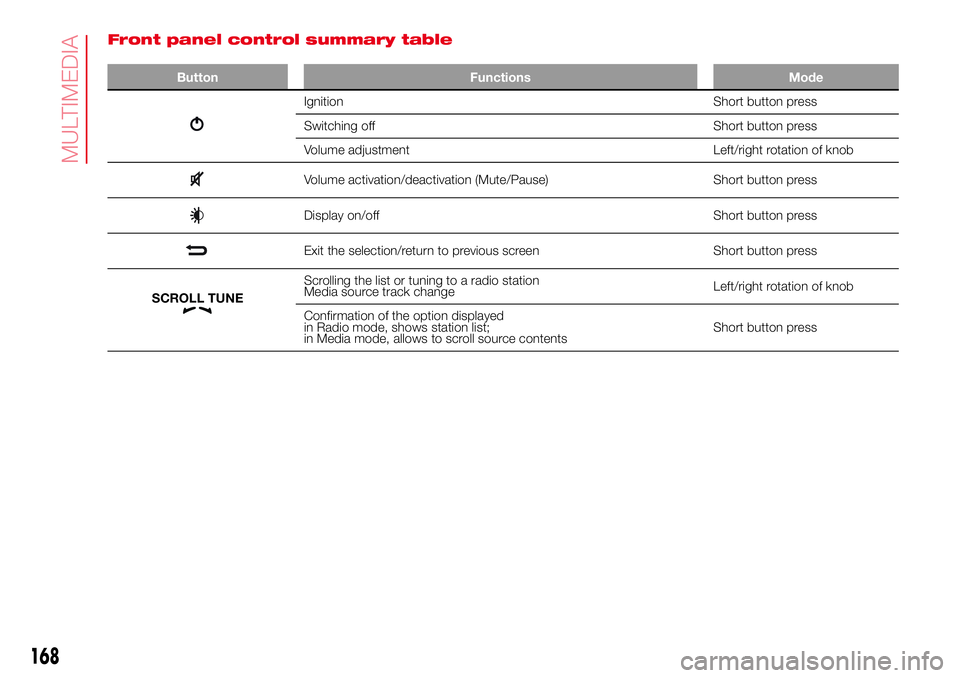
Front panel control summary table
Button Functions Mode
Ignition Short button press
Switching off Short button press
Volume adjustment Left/right rotation of knob
Volume activation/deactivation (Mute/Pause) Short button press
Display on/off Short button press
Exit the selection/return to previous screen Short button press
Scrolling the list or tuning to a radio station
Media source track changeLeft/right rotation of knob
Confirmation of the option displayed
in Radio mode, shows station list;
in Media mode, allows to scroll source contentsShort button press
168
MULTIMEDIA
SCROLL TUNE
Page 187 of 192
INDEX
A
ccessories purchased by the
owner
.......................................... 4
Analogue pressure gauge............... 41
Automatic climate control
system ......................................... 27
Battery
.......................................... 123
– advice for extending its life ........ 123
– inspecting the charge ................ 123
– replacement .............................. 123
Battery (recharging) ........................ 124
Bodywork (cleaning and
maintenance) ............................... 127
Brake fluid ...................................... 121
Checking levels
............................. 119
Child protection systems ................ 67
Cleaning and maintenance
– car interior ................................. 130
– leather parts .............................. 130
– plastic parts .............................. 130
– seats ......................................... 130
CO2 emissions............................... 146
Control panel and on-board
instruments .................................. 39
Courtesy lights ............................... 22
Daytime running lights (DRL)
......... 20
Dimensions .................................... 137
Dipped headlights (bulb
replacement) ................................ 97Dipped headlights/side lights ......... 20
Direction indicators ........................ 20
Direction indicators (bulb
replacement) ................................ 96
Doors ............................................. 14
– Door central
locking/unlocking ...................... 14
– door locking/unlocking .............. 14
– opening/closing with the key ..... 14
Driver side knee bag ...................... 76
Electric windows
........................... 29
Engine............................................ 134
– marking ..................................... 133
Engine bonnet................................ 34
Engine compartment (washing) ...... 128
Engine coolant fluid ........................ 121
Engine oil (consumption) ................ 121
Engine oil (level check) ................... 121
External lights................................. 20
Fiat CODE system
......................... 13
Fitting a child restraint system
with seat belts .............................. 68
Fix&Go (kit)..................................... 104
Flashing the headlights................... 20
Fluids and lubricants ...................... 142
Fog lights (bulb replacement) ......... 97
Fog lights/rear fog light................... 21
Follow Me Home (device) ............... 21
Front airbag driver's side ................ 75Front airbags .................................. 74
Front ceiling light ............................ 22
Front light clusters (bulb
replacement) ................................ 96
Fuel consumption .......................... 145
Fuel cut-off system......................... 109
Fuel tank cap ................................. 89
Fuse boxes (location) ..................... 99
Fuses (replacement) ....................... 99
Gear Shift Indicator (system)
......... 41
Handbrake
.................................... 83
Hazard warning lights..................... 92
Head restraints............................... 18
– Rear head restraints .................. 18
Headlight alignment corrector ........ 21
Headlights (washing) ...................... 128
Heated rear window (activation) ..... 26
Identification data
– bodywork paint plate ................. 133
– chassis marking ........................ 133
– engine marking.......................... 133
– identification data plate.............. 133
Ignition device ................................ 12
Installing an “Isofix” child carseat .... 71
Installing electrical/electronic
devices ........................................ 4
Instrument panel ............................ 10
Interiors (cleaning) .......................... 130
iTPMS ............................................ 61