dashboard Abarth 500 2018 Owner handbook (in English)
[x] Cancel search | Manufacturer: ABARTH, Model Year: 2018, Model line: 500, Model: Abarth 500 2018Pages: 192, PDF Size: 5.86 MB
Page 101 of 192

REPLACING FUSES
GENERAL INFORMATION
Fuses protect the electrical system:
they intervene (blow) in the event of a
failure or improper action on the
system.
118) 119) 120) 121) 122) 123)
To facilitate fuse replacement, use the
pliers hooked inside the fuse box lid on
the dashboard left-hand side.
Refer to the tables on the following
pages to identify the protective fuse.
FUSE LOCATION
Dashboard fuse box
To access the fuse you must remove
the press-fit cover 5 fig. 93.
The 5 A fuse for door mirror demisting
is located in the diagnosis socket
area, as shown in fig. 94.The fuse box shown in fig. 96 is located
in the lower area next to the pedal
unit.
Engine compartment
junction box
The fuse box is located on the right
side of the engine compartment, next
to the battery. To access the fuses,
proceed as follows:
Fully tighten the screw 1 fig. 95;
at the same time slowly rotate the
screw anticlockwise, until resistance is
encountered (do not overtighten);
slowly release the screw;
opening is indicated by the entire
screw head coming out of its housing;
remove cover 2, sliding it upwards
on the side guides, as indicated in
the figure;
after replacing the fuse, refit the
cover, making sure that it is closed
properly.
The number identifying the electrical
component corresponding to each fuse
is shown on the cover fig. 97.
25)
93AB0A0291C
94AB0A0317C
12
95AB0A0375C
99
Page 102 of 192

DASHBOARD FUSE BOX
DEVICE PROTECTED FUSE AMPERE
Headlight alignment corrector F13
5(*)
Diagnosis socket, Uconnect, climate control, EOBD F36 15
Brake light switch, instrument panel node F37 5
Central door locking F38 15
Windscreen/rear window washer pump F43 15
Driver's side electric windows F47 20
(*) (where provided)
96AB0A0106C
100
IN AN EMERGENCY
Page 106 of 192

“Fix&Go” KIT
124) 125)
26)
DESCRIPTION
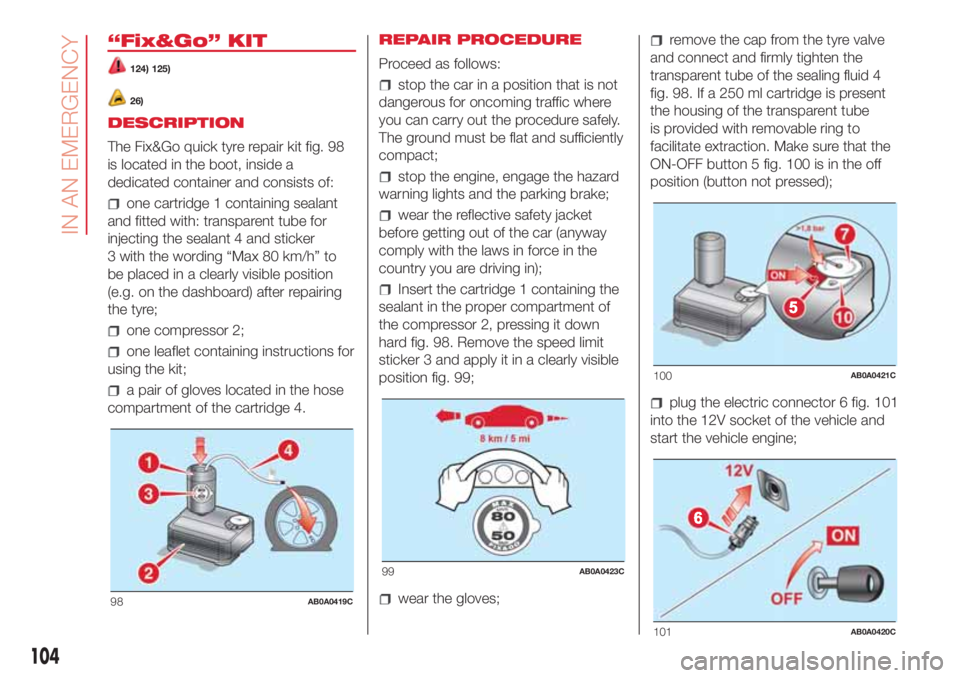
The Fix&Go quick tyre repair kit fig. 98
is located in the boot, inside a
dedicated container and consists of:
one cartridge 1 containing sealant
and fitted with: transparent tube for
injecting the sealant 4 and sticker
3 with the wording “Max 80 km/h” to
be placed in a clearly visible position
(e.g. on the dashboard) after repairing
the tyre;
one compressor 2;
one leaflet containing instructions for
using the kit;
a pair of gloves located in the hose
compartment of the cartridge 4.REPAIR PROCEDURE
Proceed as follows:
stop the car in a position that is not
dangerous for oncoming traffic where
you can carry out the procedure safely.
The ground must be flat and sufficiently
compact;
stop the engine, engage the hazard
warning lights and the parking brake;
wear the reflective safety jacket
before getting out of the car (anyway
comply with the laws in force in the
country you are driving in);
Insert the cartridge 1 containing the
sealant in the proper compartment of
the compressor 2, pressing it down
hard fig. 98. Remove the speed limit
sticker 3 and apply it in a clearly visible
position fig. 99;
wear the gloves;
remove the cap from the tyre valve
and connect and firmly tighten the
transparent tube of the sealing fluid 4
fig. 98. If a 250 ml cartridge is present
the housing of the transparent tube
is provided with removable ring to
facilitate extraction. Make sure that the
ON-OFF button 5 fig. 100 is in the off
position (button not pressed);
plug the electric connector 6 fig. 101
into the 12V socket of the vehicle and
start the vehicle engine;
98AB0A0419C
99AB0A0423C
100AB0A0421C
101AB0A0420C
104
IN AN EMERGENCY
Page 180 of 192

RIGHT HAND DRIVE VERSIONS
DASHBOARD
1. Adjustable air vents 2. Fixed air vents 3. Left stalk: direction indicators, side/tail lights, dipped beam headlights, main beam headlights, Lane
change function 4. Turbo pressure gauge, “SPORT” display 5. Instrument panel 6. Right lever: windscreen wiper/washer, rear window wiper/washer
7.Uconnect™multimedia system 8. “SPORT” mode, hazard lights, fog light/rear fog light 9. Passenger front airbag 10. Glove compartment
11. Climate control system buttons 12. Window raisers 13. Storage compartment 14. Transmission 15. Driver front airbag 16.Uconnect™
multimedia system controls on steering wheel
124AB0A0391C
178