lights Abarth 500 2018 Owner handbook (in English)
[x] Cancel search | Manufacturer: ABARTH, Model Year: 2018, Model line: 500, Model: Abarth 500 2018Pages: 192, PDF Size: 5.86 MB
Page 99 of 192

turn the bulb holder anticlockwise,
extract the press-fitted bulb and
replace it;
refit the bulb holder in the lens, then
position the light, ensuring that the
fastening clip clicks into place.
DIPPED HEADLIGHTS
To replace the bulb, proceed as follows:
turn the protection cap 2 fig. 82
anticlockwise and remove it;
disconnect the connector 1 fig. 86
and release the bulb holder;
extract the bulb and replace it;
refit the bulb in its seat and
reconnect the connector;
refit the protection cap in its housing
and turn clockwise.
117)
MAIN BEAM HEADLIGHTS
To replace the bulb, proceed as
follows:
remove the protective rubber cap
mentioned above;
release the two bulb holding clips 1
fig. 87;
extract the bulb and replace it;
fit the new bulb, making the outline
of the metallic part coincide with the
grooves on the reflector, then reattach
the bulb holding clips;
refit the rubber cap.
SIDE LIGHTS/DAYTIME
RUNNING LIGHTS
To replace the bulb, proceed as follows:
remove the protective rubber cap
mentioned above;
turn the bulb holder 2 fig. 87
anticlockwise and remove it;
remove the pressure-fitted bulb and
replace it;
refit the bulb holder 2 by turning it
clockwise and locking it correctly;
refit the rubber cap.
FRONT FOG LIGHTS
(where provided)
For replacing these bulbs, contact an
Abarth Dealership.
REAR LIGHT CLUSTERS
To replace the bulb proceed as follows:
open the tailgate;
unscrew the two fastening screws 1
fig. 88 and extract the light cluster
axially without rotating it;
remove the bulb holder from its
housing releasing it from the locking
tabs 2;
extract the bulbs by pushing them
slightly and turning them anticlockwise.
1
86AB0A0311C
2
1
87AB0A0093C
21
1
22
22
2
88AB0A0313C
97
Page 100 of 192

The bulbs are arranged as follows fig.
89:
1: side / brake light;
2: direction indicators.
REVERSING LIGHT/REAR
FOG LIGHT
For bulb replacement, contact an
Abarth Dealership.
THIRD BRAKE LIGHTS
To replace the bulb proceed as follows:
remove the two guard caps and
unscrew the two fastening screws 1 fig.
90;
remove the assembly;
disconnect the electrical connector
2 fig. 91;
press the retaining device 3 fig. 91
and open the bulb holder;
remove the press-fitted bulb to be
replaced and replace it;
close the bulb holder making sure
the retaining device is correctly locked;
screw in the two fastening screws
and reinstall the guard caps.
NUMBER PLATE LIGHTS
To replace the bulbs, proceed as
follows:
apply pressure to the point shown
by the arrow fig. 92 and remove the
lens;
change the bulb, releasing it from
the side contacts;
fit the new bulb and make sure that
it is correctly clamped between the
contacts;
then refit the lens.
WARNING
117)Due to the high power supply
voltage, gas discharge bulbs (Xenon)
should only be replaced by specialised
personnel: danger of death! Contact
an Abarth Dealership.
1
2
89AB0A0314C
11
90AB0A0097C
91AB0A0098C
92AB0A0099C
98
IN AN EMERGENCY
Page 103 of 192

DEVICE PROTECTED FUSE AMPERE
Passenger side electric window F48 20
Parking sensor, controls backlighting F49 5
Climate control, brake lights, clutch, electric sunroof, electric
mirrorsF51 7.5
Instrument panel node F53 5
101
Page 104 of 192

ENGINE COMPARTMENT JUNCTION BOX
DEVICE PROTECTEDFUSE AMPERE
HI-FIF02 20
Climate control electric fanF08 30
Headlight washersF09 30
HornsF10 10
Main-beam headlightsF14
10/15
(*)
Electric roof motorF15 20
(*) Only for versions equipped with Xenon gas discharge lamps
97AB0A0319C
102
IN AN EMERGENCY
Page 105 of 192

DEVICE PROTECTEDFUSE AMPERE
Robotised sequential gearbox control unit power supply (+ ignition) F16 7.5
Heated rear windowF20 30
Fog lightsF30 15
Robotised sequential gearbox control unit F84 10
Front power socket (with or without cigar lighter) F85 20
WARNING
118)If the fuse blows again, contact an Abarth Dealership.
119)Never replace a fuse with metal wires or anything else.
120)Never replace a fuse with another with a higher amp rating; DANGER OF FIRE.
121)If a general protection fuse (MEGA-FUSE, MIDI-FUSE, MAXI-FUSE) blows, contact an Abarth Dealership.
122)Before replacing a fuse, make sure that the ignition key has been removed and that all the other services are switched off and/or
disengaged.
123)If a general protection fuse for the safety systems (airbag system, braking system), power unit systems (engine system, gearbox system)
or driving system blows, contact an Abarth Dealership.
WARNING
25)If you need to wash the engine compartment, take care not to directly hit the engine compartment fuse box with the water jet.
103
Page 106 of 192
“Fix&Go” KIT
124) 125)
26)
DESCRIPTION
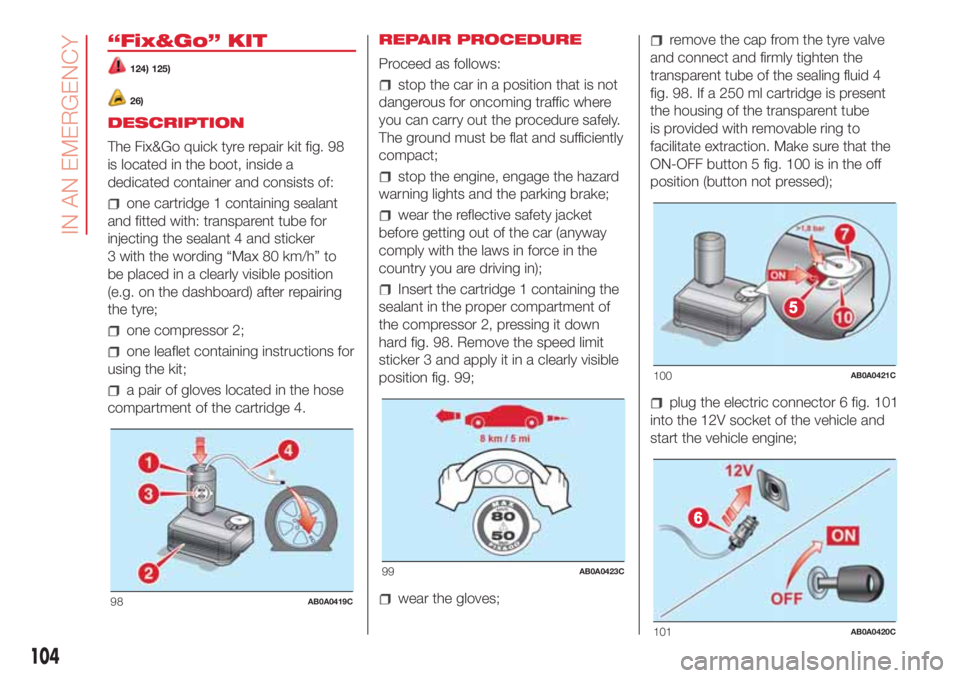
The Fix&Go quick tyre repair kit fig. 98
is located in the boot, inside a
dedicated container and consists of:
one cartridge 1 containing sealant
and fitted with: transparent tube for
injecting the sealant 4 and sticker
3 with the wording “Max 80 km/h” to
be placed in a clearly visible position
(e.g. on the dashboard) after repairing
the tyre;
one compressor 2;
one leaflet containing instructions for
using the kit;
a pair of gloves located in the hose
compartment of the cartridge 4.REPAIR PROCEDURE
Proceed as follows:
stop the car in a position that is not
dangerous for oncoming traffic where
you can carry out the procedure safely.
The ground must be flat and sufficiently
compact;
stop the engine, engage the hazard
warning lights and the parking brake;
wear the reflective safety jacket
before getting out of the car (anyway
comply with the laws in force in the
country you are driving in);
Insert the cartridge 1 containing the
sealant in the proper compartment of
the compressor 2, pressing it down
hard fig. 98. Remove the speed limit
sticker 3 and apply it in a clearly visible
position fig. 99;
wear the gloves;
remove the cap from the tyre valve
and connect and firmly tighten the
transparent tube of the sealing fluid 4
fig. 98. If a 250 ml cartridge is present
the housing of the transparent tube
is provided with removable ring to
facilitate extraction. Make sure that the
ON-OFF button 5 fig. 100 is in the off
position (button not pressed);
plug the electric connector 6 fig. 101
into the 12V socket of the vehicle and
start the vehicle engine;
98AB0A0419C
99AB0A0423C
100AB0A0421C
101AB0A0420C
104
IN AN EMERGENCY
Page 109 of 192

WARNING
27)Never use a fast battery-charger to
start the engine as this could damage the
electronic systems of your vehicle,
particularly the ignition and engine fuel
supply control units.
WARNING
126)This starting procedure must be
performed by expert personnel because
incorrect actions could cause electrical
discharge of considerable intensity.
Furthermore, battery fluid is poisonous and
corrosive: avoid contact with skin and
eyes. Keep naked flames and lighted
cigarettes away from the battery and do
not cause sparks.
FUEL CUT-OFF
SYSTEM
This intervenes in the case of an impact
causing:
the interruption of the fuel supply
with the engine consequently cutting
out
the automatic unlocking of the doors
turning on the lights inside the car.
The intervention of the system is
indicated by a message shown on the
display.
IMPORTANT Carefully check the car for
fuel leaks, for instance in the engine
compartment, under the car or near the
tank area.
127)
After a crash, turn the ignition key to
STOP position to prevent the battery
from running down.
To restore the correct operation of the
car, proceed as follows:
turn the ignition key to the MAR
position
activate the right direction indicator
deactivate the right direction
indicator
activate the left direction indicator
deactivate the left direction indicator
activate the right direction indicator
deactivate the right direction
indicator
activate the left direction indicator
deactivate the left direction indicator
turn the ignition key to the STOP
position
turn the ignition key to the MAR-ON
position.
WARNING
127)If, after an impact, you smell fuel or
notice leaks from the fuel system, do
not reactivate the system to avoid the risk
of fire.
107
Page 114 of 192

SERVICE SCHEDULE
WARNING: Once you have carried out the last intervention in the table, continue with the scheduled servicing, maintaining the
frequency indicated in the plan by marking each operation with a dot or dedicated note.
Warning: simply restarting the maintenance from the start of the plan may cause the allowed interval to be exceeded for some
operations!
Thousands of miles 9 18 27 36 45 54 63 72 81 90
Thousands of kilometres 15 30 45 60 75 90 105 120 135 150
Years 1 2 3 4 5 6 7 8 9 10
Check the tyre condition/wear and, if necessary, adjust the
pressure. Check the "Fix&Go” kit condition/expiry (where
provided)
Check operation of lighting system (headlights, direction
indicators, hazard warning lights, boot, passenger
compartment, glove compartment, instrument panel
warning lights, etc.)
Check and, if necessary, top up fluid levels (1)
Check exhaust emissions
Use the diagnosis socket to check supply/engine
management system operation, emissions and, where
present, engine oil degradation
(1) Always only use the liquids shown in the handbook for topping up after having checked that the system is not damaged.
112
SERVICING AND CARE
Page 118 of 192
PERIODIC CHECKS
Every 1,000 km or before long
journeys, check and, if necessary, top
up the following:
engine coolant level;
brake fluid level;
windscreen washer fluid level;
tyre inflation pressure and condition;
operation of lighting system
(headlights, direction indicators, hazard
warning lights, etc.);
operation of screen washer/wiper
system and positioning/wear of
windscreen/rear window wiper blades.
Every 3,000 km check and top up if
required: engine oil level.
You are advised to use PETRONAS
LUBRICANTS products, which have
been designed and produced
specifically for Abarth cars (see table
"Capacities" in the "Technical
specifications" chapter).
DEMANDING USE OF
THE CAR
If the car is used mainly under one of
the following conditions:
if the car is used under demanding
conditions, e.g. on track;
dusty roads;
short, repeated journeys (less than
7-8 Km) at sub-zero outdoor
temperatures;
engine often idling or driving long
distances at low speeds or long periods
of inactivity;
the following checks must be carried
out more often than indicated in the
Scheduled Servicing Plan:
check front disc brake pad condition
and wear;
check cleanliness of bonnet and
luggage compartment locks,
cleanliness and lubrication of linkage;
visually inspect conditions of:
engine, gearbox, transmission, pipes
and hoses (exhaust/fuel system/brakes)
and rubber elements (gaiters/sleeves/
bushes, etc.);
check battery charge and battery
fluid level (electrolyte);
visually inspect conditions of the
accessory drive belts;
check and, if necessary, change
engine oil and replace oil filter;
check and, if necessary, replace
pollen filter;
check and, if necessary, replace air
cleaner.
116
SERVICING AND CARE
Page 123 of 192
BATTERY
The car is fitted with a low-maintenance
battery: no electrolyte top-ups with
distilled water are needed in standard
conditions of use.
INSPECTING THE
CHARGE AND THE
ELECTROLYTE LEVEL
The operations must be carried out as
described in this Owner Handbook only
by specialised personnel. Any top-up
operations must be carried out by
skilled personnel and by an Abarth
Dealership.
REPLACING THE
BATTERY
139) 140) 141) 142)
33)
5)If required, replace the battery with a
genuine spare part with the same
specifications.
If a battery with different specifications
is fitted, the service intervals given in
the "Scheduled Servicing Plan" will no
longer be valid.
Follow the battery manufacturer's
instructions for maintenance.USEFUL ADVICE FOR
EXTENDING THE LIFE OF
YOUR BATTERY
To avoid draining your battery and
make it last longer, observe the
following instructions:
when you park the car, ensure that
the doors, tailgate and bonnet are
closed properly, to prevent any lights
from remaining on inside the
passenger's compartment;
switch off all roof lights inside the
car: the car is however equipped with a
system which switches all internal
lights off automatically;
do not keep accessories (e.g.
Uconnect™, hazard warning lights,
etc.) switched on for a long time when
the engine is not running;
before performing any operation on
the electrical system, disconnect the
negative battery pole;
completely tighten the battery
terminals.
IMPORTANT If the charge level remains
under 50% for a long time, the battery
is damaged by sulphation, reducing
its capacity and efficiency at start-up.The battery will also be more at risk of
freezing (this can happen as early as
-10°C). Refer to the paragraph "Car
inactivity" in "Starting and driving" if the
car is left parked for a long time.
If after buying the car, you want to
install electrical accessories that require
permanent electrical supply (alarm,
etc.) or accessories that in any case
burden the electrical supply, contact an
Abarth Dealership whose qualified
personnel, in addition to suggesting the
most suitable devices available in
Lineaccessori Abarth, will evaluate the
overall electric consumption, checking
whether the car’s electrical system is
capable of withstanding the load
required, or whether it should
be integrated with a more powerful
battery.
Since some of these devices continue
to consume electricity even when
the engine is off, they gradually run
down the battery.
WARNING
139)Battery fluid is poisonous and
corrosive. Avoid contact with skin and
eyes. Keep naked flames and sources of
sparks away from the battery: risk of
explosion and fire.
121