dashboard Acura ILX 2013 User Guide
[x] Cancel search | Manufacturer: ACURA, Model Year: 2013, Model line: ILX, Model: Acura ILX 2013Pages: 351, PDF Size: 8.21 MB
Page 137 of 351

136Controls
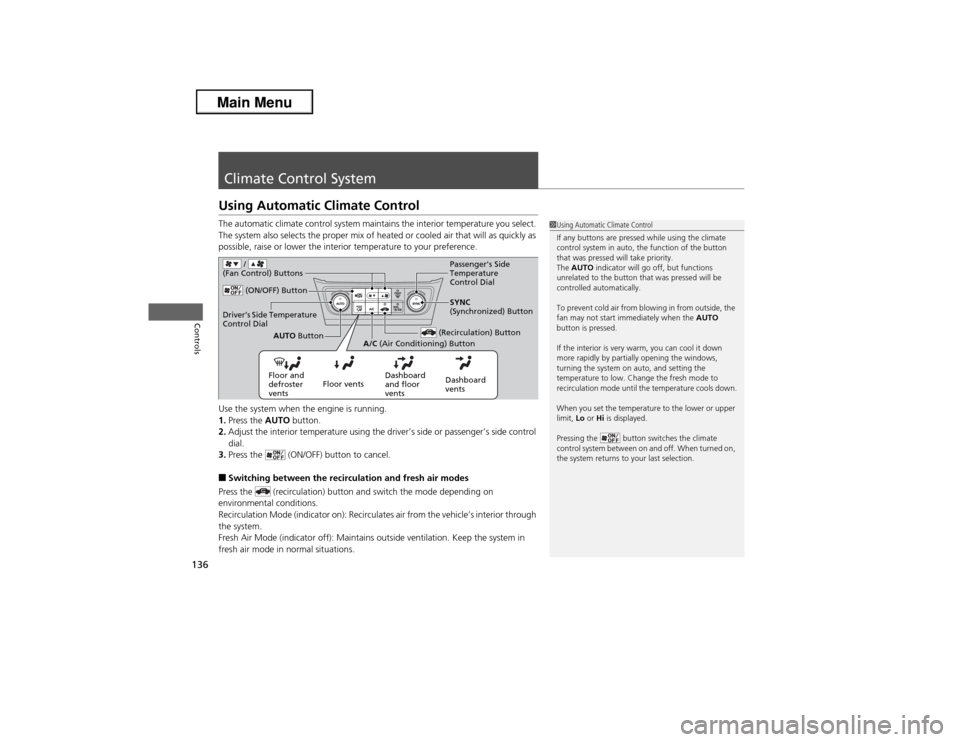
Climate Control SystemUsing Automatic Climate ControlThe automatic climate control system maintains the interior temperature you select.
The system also selects the proper mix of heated or cooled air that will as quickly as
possible, raise or lower the interior temperature to your preference.
Use the system when the engine is running.
1.Press the AUTO button.
2.Adjust the interior temperature using the driver’s side or passenger’s side control
dial.
3.Press the (ON/OFF) button to cancel.■Switching between the recirculation and fresh air modes
Press the (recirculation) button and switch the mode depending on
environmental conditions.
Recirculation Mode (indicator on): Recirculates air from the vehicle’s interior through
the system.
Fresh Air Mode (indicator off): Maintains outside ventilation. Keep the system in
fresh air mode in normal situations.
1Using Automatic Climate Control
If any buttons are pressed while using the climate
control system in auto, the function of the button
that was pressed will take priority.
The AUTO indicator will go off, but functions
unrelated to the button that was pressed will be
controlled automatically.
To prevent cold air from blowing in from outside, the
fan may not start immediately when the AUTO
button is pressed.
If the interior is very warm, you can cool it down
more rapidly by partially opening the windows,
turning the system on auto, and setting the
temperature to low. Change the fresh mode to
recirculation mode until the temperature cools down.
When you set the temperature to the lower or upper
limit, Lo or Hi is displayed.
Pressing the button switches the climate
control system between on and off. When turned on,
the system returns to your last selection.
Floor and
defroster
ventsFloor ventsDashboard
and floor
ventsDashboard
vents
(ON/OFF) Button
(Recirculation) Button
AUTO Button
A/C (Air Conditioning) ButtonSYNC
(Synchronized) Button
/
(Fan Control) Buttons
Driver’s Side Temperature
Control Dial
Passenger's Side
Temperature
Control Dial
Page 259 of 351

258
uuMaintenance Under the HooduOpening the Hood
Maintenance
Opening the Hood
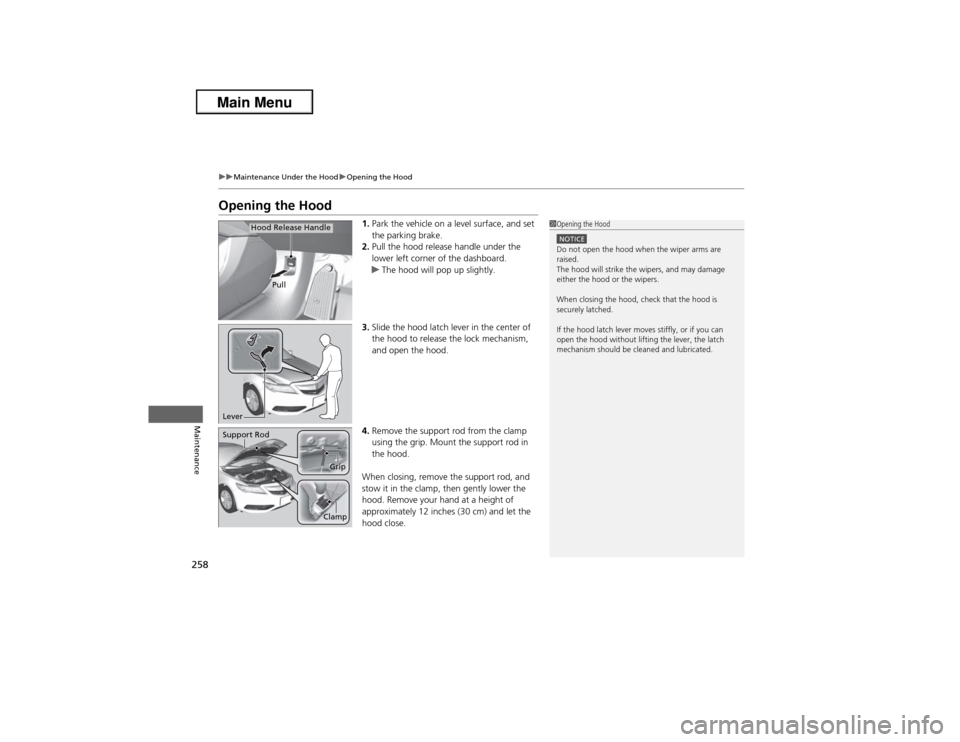
1.Park the vehicle on a level surface, and set
the parking brake.
2.Pull the hood release handle under the
lower left corner of the dashboard.
uThe hood will pop up slightly.
3.Slide the hood latch lever in the center of
the hood to release the lock mechanism,
and open the hood.
4.Remove the support rod from the clamp
using the grip. Mount the support rod in
the hood.
When closing, remove the support rod, and
stow it in the clamp, then gently lower the
hood. Remove your hand at a height of
approximately 12 inches (30 cm) and let the
hood close.
1Opening the HoodNOTICEDo not open the hood when the wiper arms are
raised.
The hood will strike the wipers, and may damage
either the hood or the wipers.
When closing the hood, check that the hood is
securely latched.
If the hood latch lever moves stiffly, or if you can
open the hood without lifting the lever, the latch
mechanism should be cleaned and lubricated.
Pull
Hood Release Handle
LeverSupport Rod
Grip
Clamp
Page 326 of 351

325
uuFusesuFuse Locations
Handling the Unexpected
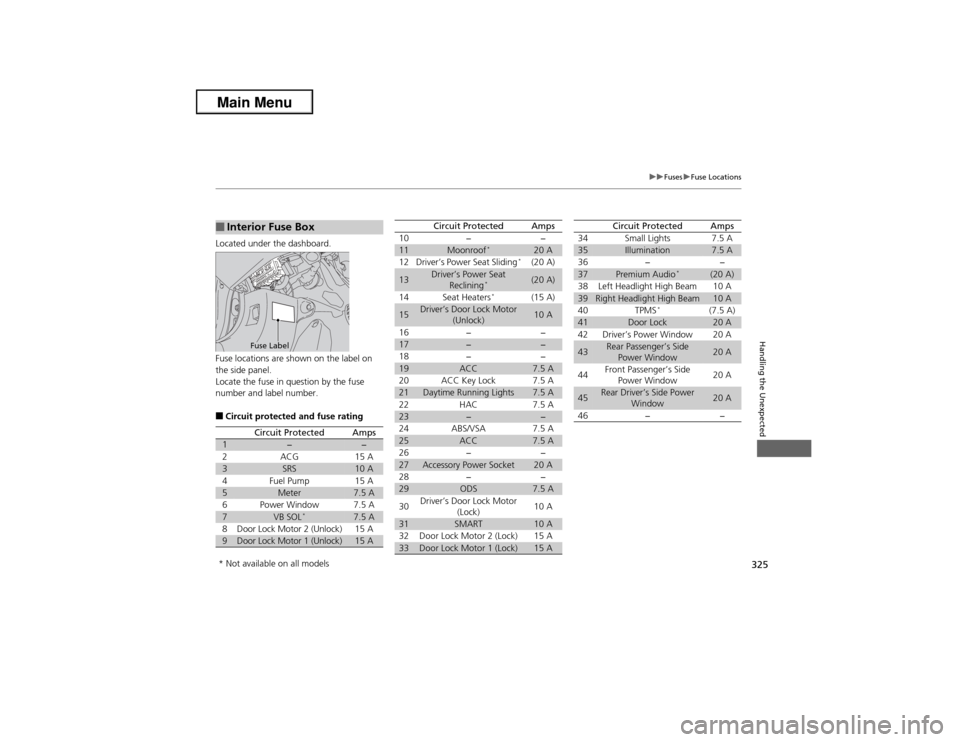
Located under the dashboard.
Fuse locations are shown on the label on
the side panel.
Locate the fuse in question by the fuse
number and label number.■Circuit protected and fuse rating■Interior Fuse Box
Fuse LabelCircuit Protected
Amps
1
−
−
2
ACG
15 A
3
SRS
10 A
4
Fuel Pump
15 A
5
Meter
7.5 A
6
Power Window
7.5 A
7
VB SOL
*
7.5 A
8
Door Lock Motor 2 (Unlock)
15 A
9
Door Lock Motor 1 (Unlock)
15 A
10
−
−
11
Moonroof
*
20 A
12
Driver’s Power Seat Sliding
*
(20 A)
13
Driver’s Power Seat
Reclining
*
(20 A)
14
Seat Heaters
*
(15 A)
15
Driver’s Door Lock Motor
(Unlock)
10 A
16
−
−
17
−
−
18
−
−
19
ACC
7.5 A
20
ACC Key Lock
7.5 A
21
Daytime Running Lights
7.5 A
22
HAC
7.5 A
23
−
−
24
ABS/VSA
7.5 A
25
ACC
7.5 A
26
−
−
27
Accessory Power Socket
20 A
28
−
−
29
ODS
7.5 A
30
Driver’s Door Lock Motor
(Lock)
10 A
31
SMART
10 A
32
Door Lock Motor 2 (Lock)
15 A
33
Door Lock Motor 1 (Lock)
15 A
Circuit Protected
Amps
34
Small Lights
7.5 A
35
Illumination
7.5 A
36
−
−
37
Premium Audio
*
(20 A)
38
Left Headlight High Beam
10 A
39
Right Headlight High Beam
10 A
40
TPMS
*
(7.5 A)
41
Door Lock
20 A
42
Driver’s Power Window
20 A
43
Rear Passenger’s Side
Power Window
20 A
44
Front Passenger’s Side
Power Window
20 A
45
Rear Driver’s Side Power
Window
20 A
46
−
−
Circuit Protected
Amps
* Not available on all models