navigation system Acura ILX 2013 Owner's Manual
[x] Cancel search | Manufacturer: ACURA, Model Year: 2013, Model line: ILX, Model: Acura ILX 2013Pages: 351, PDF Size: 8.21 MB
Page 3 of 351
2Quick Reference Guide
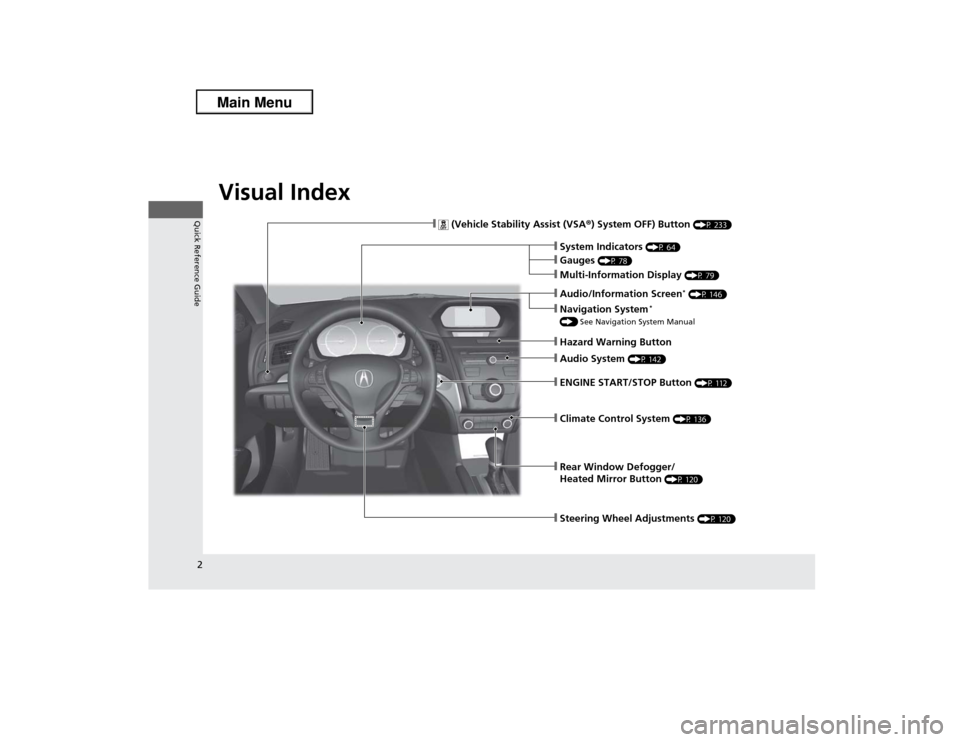
Quick Reference GuideVisual Index
❙Audio System
(P 142)
❙Rear Window Defogger/
Heated Mirror Button
(P 120)
❙Steering Wheel Adjustments
(P 120)
❙
(Vehicle Stability Assist (VSA®) System OFF) Button
(P 233)
❙Climate Control System
(P 136)
❙System Indicators
(P 64)
❙Gauges
(P 78)
❙Multi-Information Display
(P 79)
❙Hazard Warning Button❙ENGINE START/STOP Button
(P 112)
❙Navigation System
*
() See Navigation System Manual❙Audio/Information Screen
* (P 146)
Page 4 of 351
3Quick Reference Guide
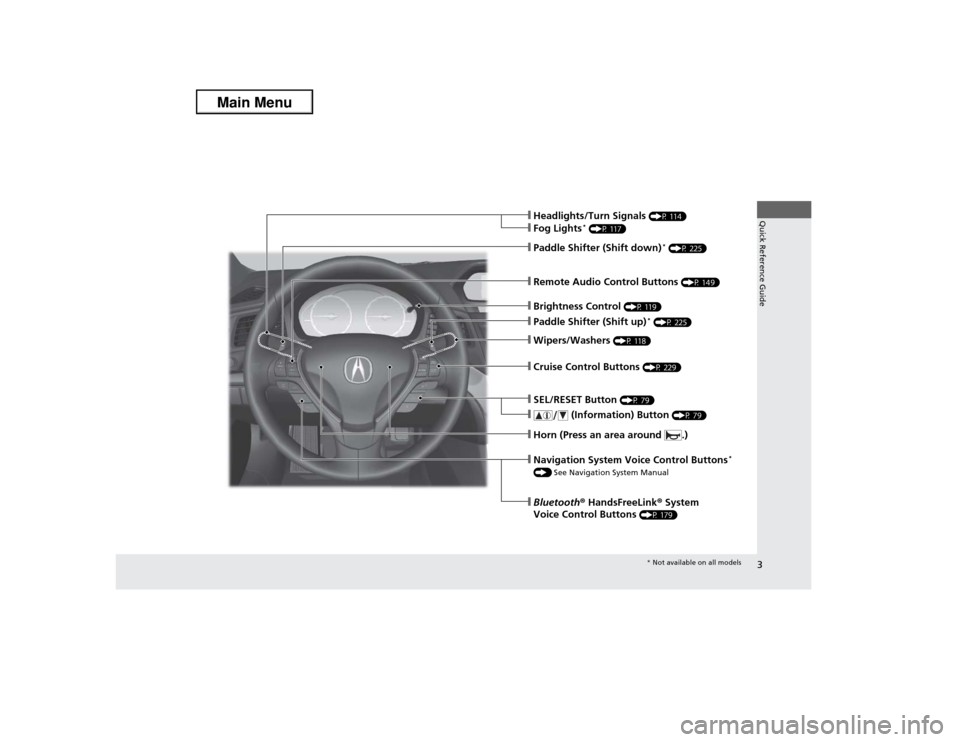
❙Wipers/Washers
(P 118)
❙Cruise Control Buttons
(P 229)
❙Remote Audio Control Buttons
(P 149)
❙SEL/RESET Button
(P 79)
❙
(Information) Button
(P 79)
❙Brightness Control
(P 119)
❙Headlights/Turn Signals
(P 114)
❙Fog Lights
* (P 117)
❙Paddle Shifter (Shift down)
* (P 225)
❙Paddle Shifter (Shift up)
* (P 225)
❙Horn (Press an area around .)❙Navigation System Voice Control Buttons
*
() See Navigation System Manual❙Bluetooth® HandsFreeLink® System
Voice Control Buttons
(P 179)* Not available on all models
Page 12 of 351
11Quick Reference Guide
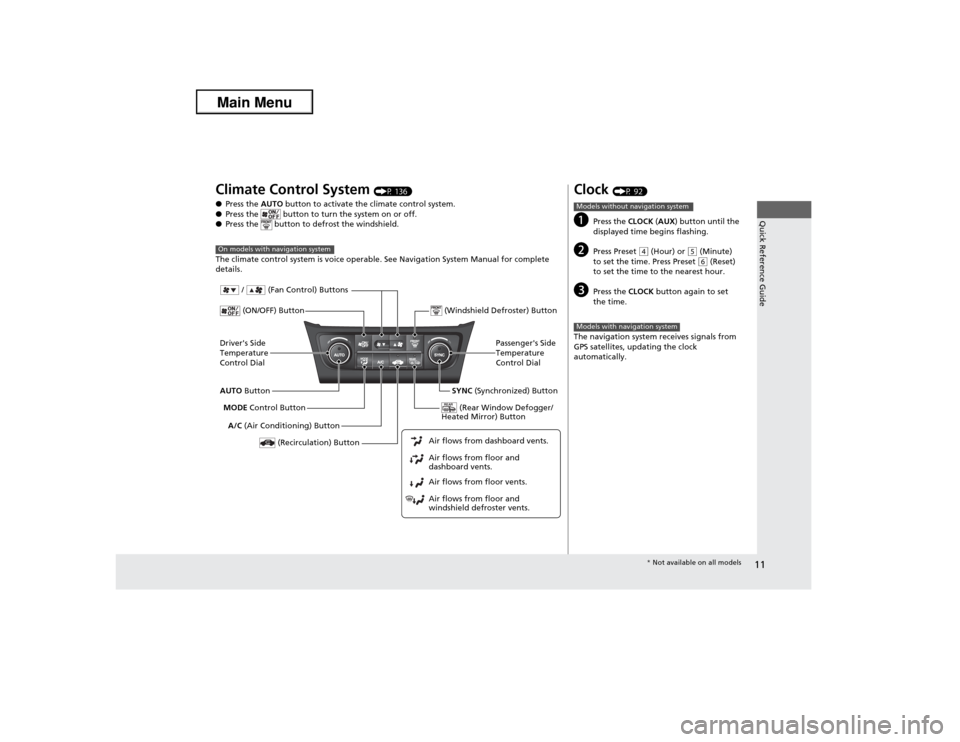
Climate Control System
(P 136)
●Press the AUTO button to activate the climate control system.
●Press the button to turn the system on or off.
●Press the button to defrost the windshield.
The climate control system is voice operable. See Navigation System Manual for complete
details.
On models with navigation systemDriver's Side
Temperature
Control Dial
A/C (Air Conditioning) Button
Air flows from floor and
windshield defroster vents. Air flows from floor vents. Air flows from floor and
dashboard vents. Air flows from dashboard vents.AUTO Button
(Recirculation) Button
Passenger's Side
Temperature
Control Dial
MODE Control Button
(ON/OFF) Button
SYNC (Synchronized) Button (Windshield Defroster) Button
/ (Fan Control) Buttons
(Rear Window Defogger/
Heated Mirror) Button
Clock
(P 92)
a
Press the CLOCK (AUX) button until the
displayed time begins flashing.
b
Press Preset
(4 (Hour) or
(5 (Minute)
to set the time. Press Preset (6 (Reset)
to set the time to the nearest hour.
c
Press the CLOCK button again to set
the time.
The navigation system receives signals from
GPS satellites, updating the clock
automatically.
Models without navigation systemModels with navigation system
* Not available on all models
Page 13 of 351
12Quick Reference Guide
Features
(P 141)
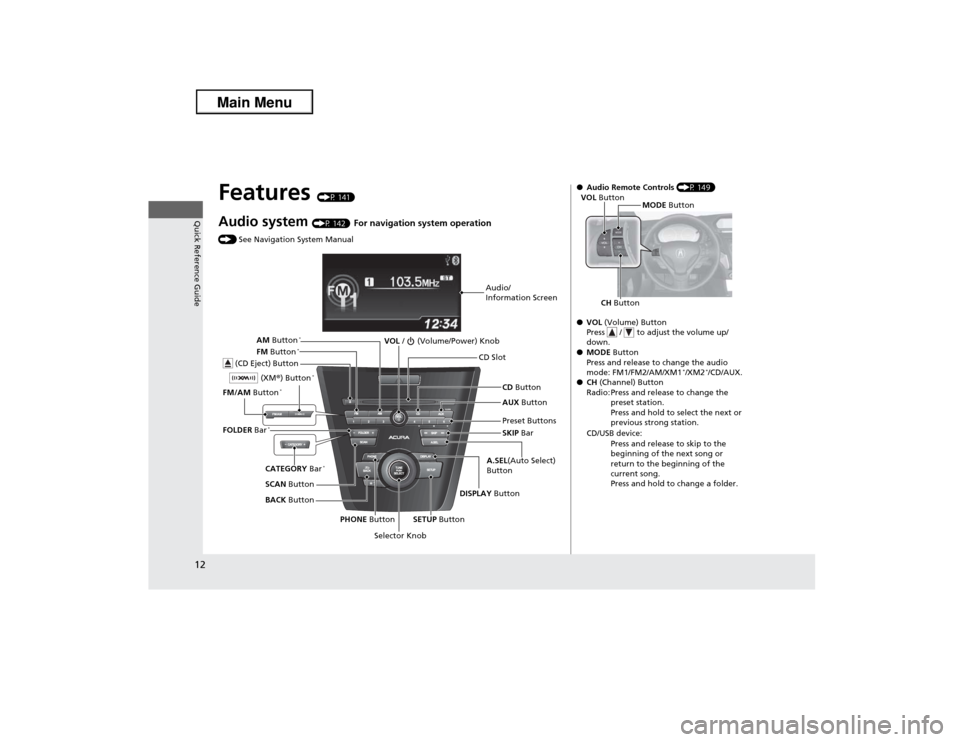
Audio system
(P 142)
For navigation system operation
() See Navigation System Manual
Audio/
Information Screen
Selector KnobVOL / (Volume/Power) Knob
CD Button CD Slot
(CD Eject) ButtonPreset Buttons
SETUP Button PHONE ButtonDISPLAY Button A.SEL(Auto Select)
ButtonSKIP Bar AUX Button
BACK Button SCAN Button CATEGORY Bar
*
FM/AM Button
*
(XM®) Button
*
FM Button
*
AM Button
*
FOLDER Bar
*
●Audio Remote Controls (P 149)
●VOL (Volume) Button
Press / to adjust the volume up/
down.
●MODE Button
Press and release to change the audio
mode: FM1/FM2/AM/XM1
*/XM2
*/CD/AUX.
●CH (Channel) Button
Radio: Press and release to change the
preset station.
Press and hold to select the next or
previous strong station.
CD/USB device:
Press and release to skip to the
beginning of the next song or
return to the beginning of the
current song.
Press and hold to change a folder.
CH ButtonMODE Button VOL Button
Page 93 of 351
92Controls
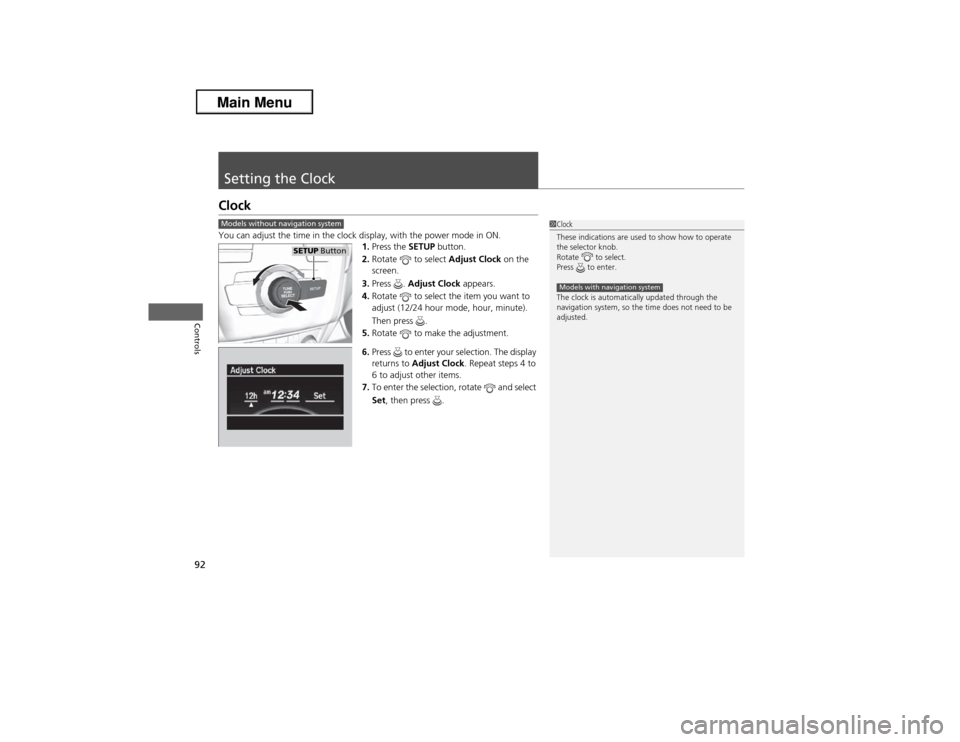
Setting the ClockClockYou can adjust the time in the clock display, with the power mode in ON.
1.Press the SETUP button.
2.Rotate to select Adjust Clock on the
screen.
3.Press . Adjust Clock appears.
4.Rotate to select the item you want to
adjust (12/24 hour mode, hour, minute).
Then press .
5.Rotate to make the adjustment.
6.Press to enter your selection. The display
returns to Adjust Clock. Repeat steps 4 to
6 to adjust other items.
7.To enter the selection, rotate and select
Set, then press .
1Clock
These indications are used to show how to operate
the selector knob.
Rotate to select.
Press to enter.
The clock is automatically updated through the
navigation system, so the time does not need to be
adjusted.Models with navigation system
Models without navigation system
SETUP Button
Page 142 of 351
141
Features
This chapter describes how to operate technology features on models without the navigation system.
Audio System
About Your Audio System ................ 142
USB Adapter Cable .......................... 143
Auxiliary Input Jack .......................... 143
Audio System Theft Protection ......... 144
Audio System Basic Operation........ 145
Audio/Information Screen ................ 146
Audio Remote Controls .................... 149
Adjusting the Sound ........................ 150
Playing the AM/FM Radio ................. 151
Playing the XM® Radio
*.................... 153
Playing a CD .................................... 155
Playing an iPod®............................... 158Playing Internet Radio ...................... 161
Playing a USB Flash Drive ................. 163
Playing Bluetooth® Audio................. 166
Wallpaper Setup .............................. 168
Audio Error Messages
*
CD Player ......................................... 170
iPod®/USB Flash Drive....................... 171
Pandora®......................................... 172
General Information on the Audio
System
XM® Radio Service
*......................... 173
Recommended CDs ......................... 174
Compatible iPod
®, iPhone
®, and USB Flash
Drives .................................................... 176
HomeLink
® Universal Transceiver
*......177
Training HomeLink........................... 177
Bluetooth® HandsFreeLink®
Using HFL ........................................ 179
HFL Menus ...................................... 181
* Not available on all models
Page 143 of 351
142Features
Audio SystemAbout Your Audio SystemOn models with navigation system, see Navigation System Manual for operation of
the audio system, AcuraLink
*, Bluetooth®HandsFreeLink®, and voice commands for
these features.
The audio system features AM/FM radio and the XM® Radio service. It can also play
audio CDs, WMA/MP3/AAC files, iPod®, iPhone®, USB flash drives, and Bluetooth®
devices.
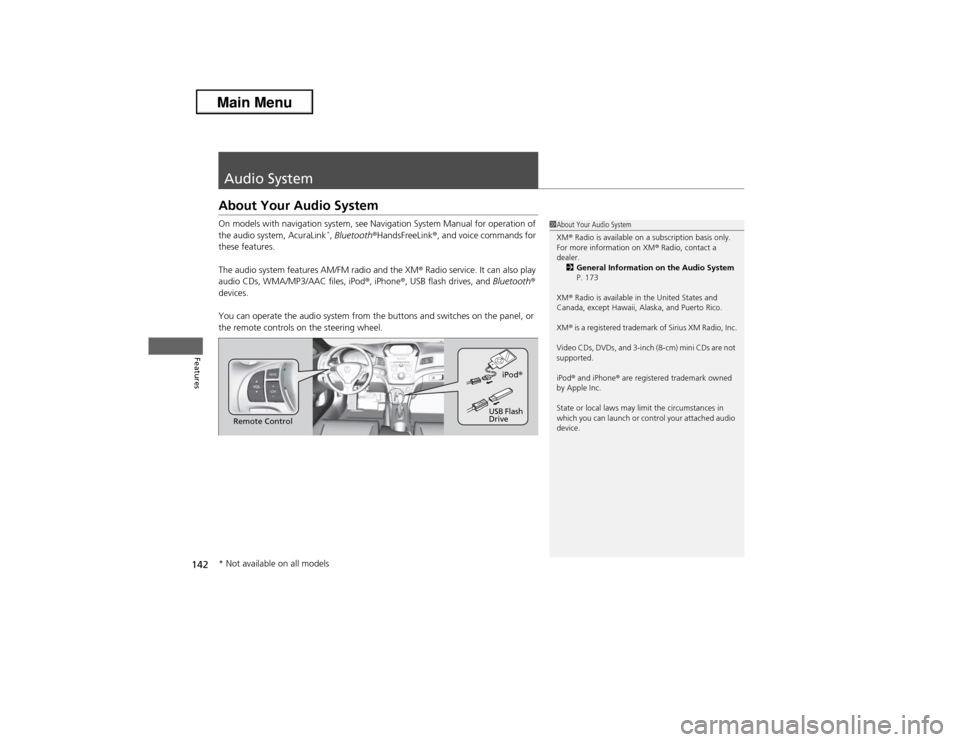
You can operate the audio system from the buttons and switches on the panel, or
the remote controls on the steering wheel.
1About Your Audio System
XM® Radio is available on a subscription basis only.
For more information on XM® Radio, contact a
dealer.
2General Information on the Audio System
P. 173
XM® Radio is available in the United States and
Canada, except Hawaii, Alaska, and Puerto Rico.
XM® is a registered trademark of Sirius XM Radio, Inc.
Video CDs, DVDs, and 3-inch (8-cm) mini CDs are not
supported.
iPod® and iPhone® are registered trademark owned
by Apple Inc.
State or local laws may limit the circumstances in
which you can launch or control your attached audio
device.
Remote ControliPod®
USB Flash
Drive
* Not available on all models
Page 180 of 351
179
Continued
Features
Bluetooth® HandsFreeLink®For models with the navigation system, see Navigation System Manual for how to
operate the Bluetooth® HandsFreeLink®.
Bluetooth® HandsFreeLink® (HFL) allows you to place and receive phone calls using
your vehicle's audio system, without handling your cell phone.Using HFL
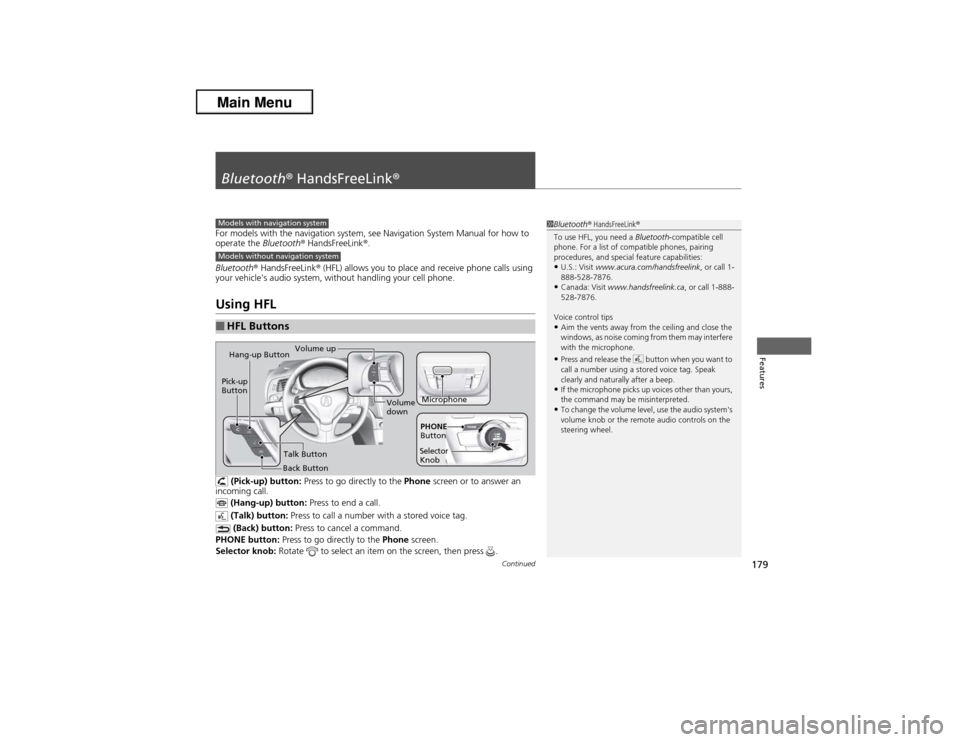
(Pick-up) button: Press to go directly to the Phone screen or to answer an
incoming call.
(Hang-up) button: Press to end a call.
(Talk) button: Press to call a number with a stored voice tag.
(Back) button: Press to cancel a command.
PHONE button: Press to go directly to the Phone screen.
Selector knob: Rotate to select an item on the screen, then press .
■HFL Buttons
1Bluetooth® HandsFreeLink®
To use HFL, you need a Bluetooth-compatible cell
phone. For a list of compatible phones, pairing
procedures, and special feature capabilities:•U.S.: Visit www.acura.com/handsfreelink, or call 1-
888-528-7876.•Canada: Visit www.handsfreelink.ca, or call 1-888-
528-7876.
Voice control tips•Aim the vents away from the ceiling and close the
windows, as noise coming from them may interfere
with the microphone.•Press and release the button when you want to
call a number using a stored voice tag. Speak
clearly and naturally after a beep.•If the microphone picks up voices other than yours,
the command may be misinterpreted.•To change the volume level, use the audio system's
volume knob or the remote audio controls on the
steering wheel.
Models with navigation systemModels without navigation system
Microphone Pick-up
Button
Selector
KnobPHONE
Button
Hang-up Button
Volume up
Volume
down
Back ButtonTalk Button
Page 243 of 351
242Driving
Multi-View Rear Camera
*
About Your Multi-View Rear CameraFor models with the navigation system, see Navigation System Manual.
The audio/information screen can display your vehicle’s rear view. The display
automatically changes to the rear view when the shift lever is moved to
(R.
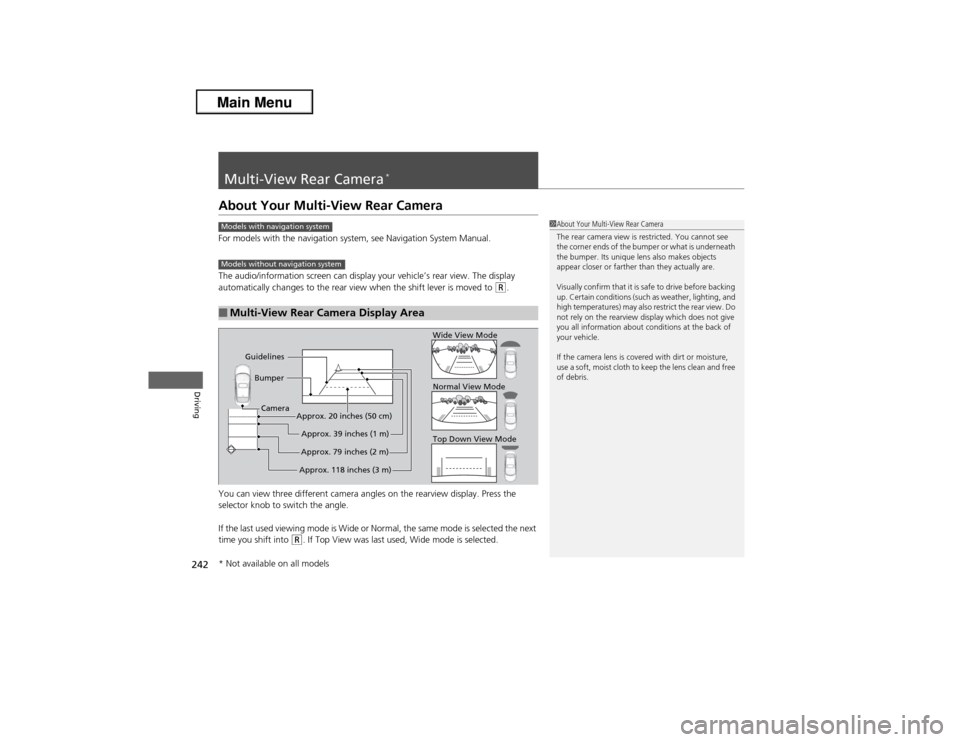
You can view three different camera angles on the rearview display. Press the
selector knob to switch the angle.
If the last used viewing mode is Wide or Normal, the same mode is selected the next
time you shift into
(R. If Top View was last used, Wide mode is selected.
■Multi-View Rear Camera Display Area
1About Your Multi-View Rear Camera
The rear camera view is restricted. You cannot see
the corner ends of the bumper or what is underneath
the bumper. Its unique lens also makes objects
appear closer or farther than they actually are.
Visually confirm that it is safe to drive before backing
up. Certain conditions (such as weather, lighting, and
high temperatures) may also restrict the rear view. Do
not rely on the rearview display which does not give
you all information about conditions at the back of
your vehicle.
If the camera lens is covered with dirt or moisture,
use a soft, moist cloth to keep the lens clean and free
of debris.
Models with navigation systemModels without navigation system
Top Down View Mode Normal View Mode Wide View Mode
Guidelines
Bumper
Camera
Approx. 118 inches (3 m)Approx. 79 inches (2 m)Approx. 39 inches (1 m) Approx. 20 inches (50 cm)
* Not available on all models
Page 296 of 351
295Maintenance
BatteryChecking the Battery
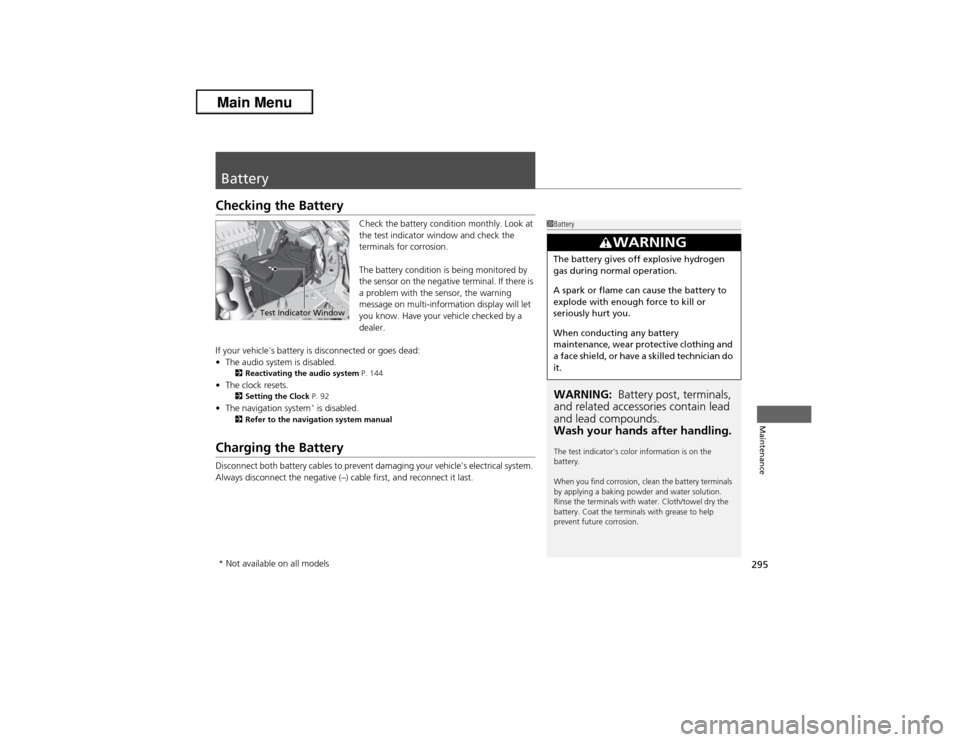
Check the battery condition monthly. Look at
the test indicator window and check the
terminals for corrosion.
The battery condition is being monitored by
the sensor on the negative terminal. If there is
a problem with the sensor, the warning
message on multi-information display will let
you know. Have your vehicle checked by a
dealer.
If your vehicle's battery is disconnected or goes dead:
•The audio system is disabled.
2Reactivating the audio system P. 144
•The clock resets.
2Setting the Clock P. 92
•The navigation system
* is disabled.
2Refer to the navigation system manual
Charging the BatteryDisconnect both battery cables to prevent damaging your vehicle's electrical system.
Always disconnect the negative (–) cable first, and reconnect it last.
1BatteryWARNING: Battery post, terminals,
and related accessories contain lead
and lead compounds.
Wash your hands after handling.The test indicator's color information is on the
battery.
When you find corrosion, clean the battery terminals
by applying a baking powder and water solution.
Rinse the terminals with water. Cloth/towel dry the
battery. Coat the terminals with grease to help
prevent future corrosion.
3
WARNING
The battery gives off explosive hydrogen
gas during normal operation.
A spark or flame can cause the battery to
explode with enough force to kill or
seriously hurt you.
When conducting any battery
maintenance, wear protective clothing and
a face shield, or have a skilled technician do
it.
Test Indicator Window
* Not available on all models