reset Acura ILX 2014 Owner's Guide
[x] Cancel search | Manufacturer: ACURA, Model Year: 2014, Model line: ILX, Model: Acura ILX 2014Pages: 351, PDF Size: 7.94 MB
Page 167 of 351

166
uuAudio System Basic OperationuPlaying Bluetooth® Audio
Features
Playing Bluetooth® AudioYour audio system allows you to listen to music from your Bluetooth®-compatible
phone.
This function is available when the phone is paired and linked to the vehicle's
Bluetooth® HandsFreeLink® (HFL) system.2Phone Setup P. 186
1Playing Bluetooth® Audio
Not all Bluetooth-enabled phones with streaming
audio capabilities are compatible with the system.
For a list of compatible phones:•U.S.: Visit www.acura.com/handsfreelink, or call 1-
888-528-7876.•Canada: Visit www.handsfreelink.ca, or call 1-888-
528-7876.
In some states, it may be illegal to perform some data
device functions while driving.
If more than one phone is paired to the HFL system,
there will be a delay before the system begins to play.
BACK Button
Press to go back to the
previous display.SETUP Button
Press to display menu
items.SKIP Bar
Press or to
change files.
AUX Button
Press to Bluetooth®
Audio. VOL/
(Volume/Power) Knob
Press to turn the audio
system on and off.
Selector Knob
Turn to change files.
Turn to select an item, then press to
set your selection.
Press to display the device’s name.
Bluetooth Indicator
Comes on when your
phone is connected to
HFL.
Preset 1 Button
Press to switch the mode
between pause and
resume.
Page 197 of 351

uuBluetooth® HandsFreeLink®uHFL Menus
196Features
Up to 15 speed dial numbers can be stored per phone.
To store a speed dial number:
1.Press the PHONE button or the button.
2.Rotate to select Phone Setup, then
press .
uRepeat the procedure to select Speed
Dial, then Add New.
3.Rotate to select a place to choose a
number from, then press .
By Phonebook:
uSelect a number from the linked cell
phone’s imported phonebook.
By Call History:
uSelect a number from the call history.
By Phone Number:
uInput the number manually.
4.When the speed dial is successfully stored,
you are asked to create a voice tag for the
number. Rotate to select Yes or No,
then press .
5.Using the button, follow the prompts to
say the name for the speed dial entry.■Speed Dial
1Speed Dial
You can use the audio preset buttons during a call to
store a speed dial number:
1. Press and hold the desired audio preset button
during a call.
2. The contact information for the active call will be
stored for the corresponding speed dial.
When a voice tag is stored, press the button to
call the number using the voice tag.
Page 201 of 351

uuBluetooth® HandsFreeLink®uHFL Menus
200Features
■To make a call using redial
1.Press the PHONE button or the button.
2.Rotate to select Redial, then press .
uDialing starts automatically.■To make a call using the call history
Call history is stored by Dialed Calls,
Received Calls, and Missed Calls.
1.Press the PHONE button or the button.
2.Rotate to select Call History, then press
.
3.Rotate to select Dialed Calls, Received
Calls, or Missed Calls, then press .
4.Rotate to select a number, then press
.
uDialing starts automatically.■To make a call using a speed dial entry
1.Press the PHONE button or the button.
2.Rotate to select Speed Dial, then press
.
3.Rotate to select a number, then press
.
uDialing starts automatically.
1To make a call using the call history
The call history displays the last 20 dialed, received, or
missed calls.
(Appears only when a phone is connected to HFL.)1To make a call using a speed dial entry
On the Phone screen, the first six speed dials on the
list can be directly selected by pressing the
corresponding audio preset buttons (1-6).
Select More Speed Dial Lists to view another paired
phone’s speed dial list.
When a voice tag is stored, press the button to
call the number using the voice tag.
2Speed Dial P. 196
Any voice-tagged speed dial entry can be dialed by
voice from any screen.
Press the button and follow the prompts.
Page 255 of 351

254
uuMaintenance Minder
TMuTo Use Maintenance Minder
TM
Maintenance
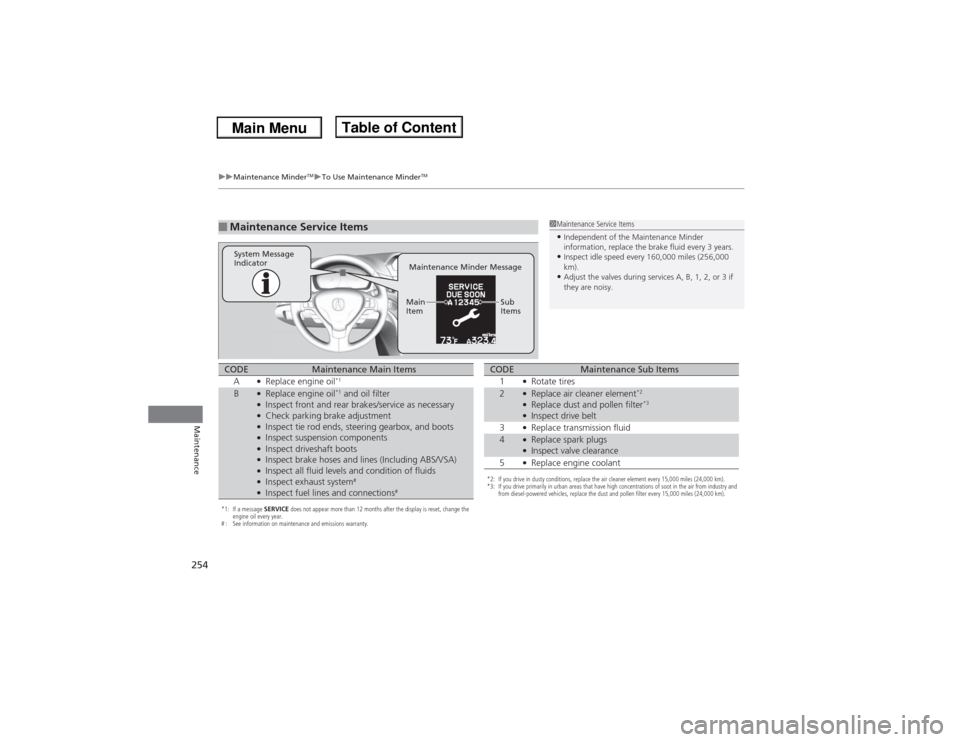
■Maintenance Service Items
1Maintenance Service Items•Independent of the Maintenance Minder
information, replace the brake fluid every 3 years.•Inspect idle speed every 160,000 miles (256,000
km).•Adjust the valves during services A, B, 1, 2, or 3 if
they are noisy.
Maintenance Minder Message System Message
Indicator
Sub
Items Main
Item
*1: If a message SERVICE does not appear more than 12 months after the display is reset, change the
engine oil every year.
# : See information on maintenance and emissions warranty.CODE
Maintenance Main Items
A
●Replace engine oil
*1
B
●Replace engine oil
*1 and oil filter
●Inspect front and rear brakes/service as necessary●Check parking brake adjustment●Inspect tie rod ends, steering gearbox, and boots●Inspect suspension components●Inspect driveshaft boots●Inspect brake hoses and lines (Including ABS/VSA)●Inspect all fluid levels and condition of fluids●Inspect exhaust system
#
●Inspect fuel lines and connections
#
*2: If you drive in dusty conditions, replace the air cleaner element every 15,000 miles (24,000 km).
*3: If you drive primarily in urban areas that have high concentrations of soot in the air from industry and
from diesel-powered vehicles, replace the dust and pollen filter every 15,000 miles (24,000 km).CODE
Maintenance Sub Items
1
●Rotate tires
2
●Replace air cleaner element
*2
●Replace dust and pollen filter
*3
●Inspect drive belt
3●Replace transmission fluid
4
●Replace spark plugs●Inspect valve clearance
5●Replace engine coolant
Page 256 of 351

255
uuMaintenance Minder
TMuTo Use Maintenance Minder
TM
Maintenance
Reset the engine oil life display if you have performed the maintenance service.
1.Set the power mode to ON.
2.Go to the MAINTENANCE INFO. group.
2Customized Features P. 83
3.Press the SEL/RESET button.
uThe oil life reset mode is displayed on the multi-information display.
4.Select RESET with the button, then press the SEL/RESET button.
uThe displayed maintenance items disappear, and the engine oil life display
returns to 100%.
To cancel the oil life reset mode, select CANCEL, then press the SEL/RESET button.■Resetting the Display
1Resetting the DisplayNOTICEFailure to reset the engine oil life after a maintenance
service results in the system showing incorrect
maintenance intervals, which can lead to serious
mechanical problems.
The dealer will reset the engine oil life display after
completing the required maintenance service. If
someone other than a dealer performs maintenance
service, reset the engine oil life display yourself.
Engine Oil Life Maintenance
Item Codes
SEL/RESET Button
Button
Page 296 of 351

295Maintenance
BatteryChecking the BatteryThe battery condition is being monitored by the sensor on the negative terminal. If
there is a problem with the sensor, the warning message on multi-information
display will let you know. Have your vehicle checked by a dealer.
If your vehicle's battery is disconnected or goes dead:
•The audio system is disabled.
2Reactivating the audio system P. 144
•The clock resets.
2Setting the Clock P. 92
•The navigation system
* is disabled.
2Refer to the navigation system manual
Charging the BatteryDisconnect both battery cables to prevent damaging your vehicle's electrical system.
Always disconnect the negative (–) cable first, and reconnect it last.
1BatteryWARNING: Battery post, terminals,
and related accessories contain lead
and lead compounds.
Wash your hands after handling.The test indicator's color information is on the
battery.
When you find corrosion, clean the battery terminals
by applying a baking powder and water solution.
Rinse the terminals with water. Cloth/towel dry the
battery. Coat the terminals with grease to help
prevent future corrosion.
3
WARNING
The battery gives off explosive hydrogen
gas during normal operation.
A spark or flame can cause the battery to
explode with enough force to kill or
seriously hurt you.
When conducting any battery
maintenance, wear protective clothing and
a face shield, or have a skilled technician do
it.
* Not available on all models
Page 349 of 351

348Index
Opening/Closing
Hood ....................................................... 258
Moonroof ................................................ 111
Power Windows ...................................... 108
Trunk....................................................... 102
Operating the Switches Around the
Steering Wheel....................................... 112
Outside Temperature
Adjusting ................................................... 81
Overheating.............................................. 318PPaddle Shifters (Sequential Shift Mode)... 13
Pandora®................................................... 161
Panic Mode............................................... 107
Parking...................................................... 241
Parking Brake............................................ 237
Parking Brake and Brake System
Indicator............................................ 64, 322
Passenger Airbag Off Indicator................. 45
Passing Indicators..................................... 114
Power Windows........................................ 108
Precautions While Driving........................ 220
Rain ......................................................... 220
Pregnant Women....................................... 31
Puncture (Tire).......................................... 305RRadiator..................................................... 269Radio (AM/FM)......................................... 151
Radio (XM®).............................................. 153
Radio Data System (RDS)......................... 152
Range.......................................................... 81
RDS (Radio Data System)......................... 152
Readiness Codes (Emissions Testing)....... 337
Rear Defogger/Heated Door Mirror
Button..................................................... 120
Rear Seat (Folding Down)........................ 129
Rearview Mirror....................................... 121
Refueling.................................................. 243
Fuel Gauge................................................ 78
Gasoline .................................. 243, 330, 332
Low Fuel Indicator ..................................... 67
Regulations............................... 235, 289, 335
Remote Transmitter................................... 95
Replacement
Battery .................................................... 296
Bulbs ....................................................... 274
Fuses ............................................... 324, 325
Tires ........................................................ 292
Wiper Blade Rubber ................................ 284
Reporting Safety Defects......................... 336
Resetting a Trip Meter............................... 80
SSafe Driving................................................ 21
Safety Check............................................... 25
Safety Labels............................................... 61
Safety Message........................................... 20Seat Belts.................................................... 26
Adjusting the Shoulder Anchor ................. 30
Automatic Seat Belt Tensioners ................. 28
Checking .................................................. 32
Fastening .................................................. 29
Installing a Child Seat with a Lap/Shoulder
Seat Belt ................................................. 55
Pregnant Women...................................... 31
Reminder .................................................. 27
Warning Indicator ............................... 27, 66
Seat Heaters............................................. 135
Seats.......................................................... 123
Adjusting ................................................ 123
Front Seats.............................................. 123
Rear Seat ................................................ 129
Seat Heaters ........................................... 135
Security System........................................ 106
Immobilizer System Indicator..................... 71
Security System Alarm Indicator ................ 72
SEL/RESET Button....................................... 79
Select Lever................................ 13, 222, 226
Operation ................................. 13, 223, 226
Releasing ................................................ 317
Won’t Move ........................................... 317
Selecting a Child Seat................................ 52
Selector Knob (Audio)............................. 145
Sequential Shift Mode............................. 224
Sequential Shift Mode Operation........... 225
Setting the Clock........................................ 92
Shift Lever.................................. 13, 222, 226
Shift Lever Position Indicator............ 65, 223