ECU Acura ILX 2014 Owner's Guide
[x] Cancel search | Manufacturer: ACURA, Model Year: 2014, Model line: ILX, Model: Acura ILX 2014Pages: 351, PDF Size: 7.94 MB
Page 193 of 351

uuBluetooth® HandsFreeLink®uHFL Menus
192Features
You can protect each of the six cell phones with a security PIN.
1.Press the PHONE button or the button.
2.Rotate to select Phone Setup, then
press .
uRepeat the procedure to select
Passcode.
3.Select a phone you want to add a security
PIN to.
uRotate to select a phone you want to
add a security PIN to, then press .
4.You will receive a confirmation message on
the screen.
uRotate to select Yes, then press .
5.Enter a new four-digit number.
uRotate to select, then press . Press
to delete. Press to enter the
security PIN.
6.Re-enter the four-digit number.
uThe screen returns to the screen in step
2.■To Create a Security PIN
1To Create a Security PIN
In the phone is already security PIN protected, you
need to enter the current security PIN before clearing
the PIN or creating a new one.
Page 195 of 351

194
uuBluetooth® HandsFreeLink®uHFL Menus
Features
Security codes, paired phones, all stored voice tags, all speed dial entries, and all
imported phonebook data are erased.
1.Press the PHONE button or the button.
2.Rotate to select Phone Setup, then
press .
uRepeat the procedure to select System
Clear.
3.Rotate to select Yes, then press .
4.You will receive a notification message on
the screen. Rotate to select Yes, then
press .
5.You will receive a confirmation message on
the screen. Press to finish.■To Clear the System
Page 211 of 351
210Driving
Before DrivingDriving PreparationCheck the following items before you start driving.
•Make sure there are no obstructions on the windows, door mirrors, exterior
lights, or other parts of the vehicle.
uRemove any frost, snow, or ice.
uRemove any snow on the roof, as this can slip down and obstruct your field of
vision while driving. If frozen solid, remove ice once it has softened.
uWhen removing ice from around the wheels, be sure not to damage the wheel
or wheel components.
•Make sure the hood is securely closed.
uIf the hood opens while driving, your front view will be blocked.
•Make sure the tires are in good condition.
uCheck air pressures, and check for damage and excessive wear.
2Checking and Maintaining Tires P. 286
•Make sure there are no people or objects behind or around the vehicle.
uThere are blind spots from the inside.■Exterior Checks
1Exterior ChecksNOTICEWhen doors are frozen shut, use warm water around
the door edges to melt any ice. Do not try to force
them open, as this can damage the rubber trim
around the doors. When done, wipe dry to avoid
further freezing.
Do not pour warm water into the key cylinder.
You will be unable to insert key if the water freezes in
the hole.
Heat from the engine and exhaust can ignite
flammable materials left under the hood, causing a
fire. If you've parked your vehicle for an extended
period, inspect and remove any debris that may have
collected, such as dried grass and leaves that have
fallen or have been carried in for use as a nest by a
small animal.
Also check under the hood for leftover flammable
materials after you or someone else has performed
maintenance on your vehicle.
Page 212 of 351
Continued
211
uuBefore DrivinguDriving Preparation
Driving
•Store or secure all items on board properly.
uCarrying too much cargo, or improperly storing it, can affect your vehicle's
handling, stability, stopping distance, and tires, and make it unsafe.
2Maximum Load Limit P. 213
•Do not pile items higher than the seat height.
uThey can block your view and may be thrown forward in the event of sudden
braking.
•Do not place anything in the front seat footwells. Make sure to secure the floor
mat.
uAn object or unsecured floor mat can interfere with your brake and accelerator
pedal operation while driving.
•If you have any animals on board, do not let them move around in the vehicle.
uThey may interfere with driving and a crash could occur.
•Securely close and lock all doors and the trunk.
2Locking/Unlocking the Doors from the Inside P. 99
•Adjust your seating position properly.
uAdjust the head restraint, too.
2Adjusting the Seats P. 123
2Adjusting the Head Restraints P. 126
•Adjust the mirrors and steering wheel properly for your driving.
uAdjust them while sitting in the proper driving position.
2Adjusting the Mirrors P. 121
2Adjusting the Steering Wheel P. 120
■Interior Checks
1Interior Checks
The headlight aim is set by the factory, and does not
need to be adjusted. However, if you regularly carry
heavy items in the trunk have the aiming readjusted
at a dealer or by a qualified technician.
Page 259 of 351
258
uuMaintenance Under the HooduOpening the Hood
Maintenance
Opening the Hood
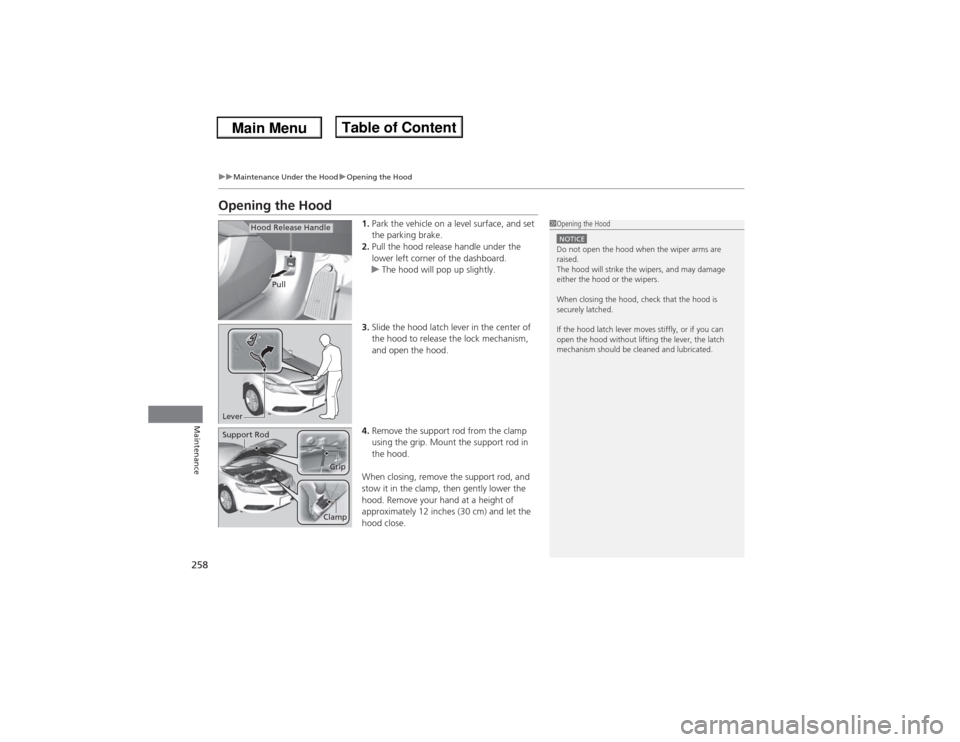
1.Park the vehicle on a level surface, and set
the parking brake.
2.Pull the hood release handle under the
lower left corner of the dashboard.
uThe hood will pop up slightly.
3.Slide the hood latch lever in the center of
the hood to release the lock mechanism,
and open the hood.
4.Remove the support rod from the clamp
using the grip. Mount the support rod in
the hood.
When closing, remove the support rod, and
stow it in the clamp, then gently lower the
hood. Remove your hand at a height of
approximately 12 inches (30 cm) and let the
hood close.
1Opening the HoodNOTICEDo not open the hood when the wiper arms are
raised.
The hood will strike the wipers, and may damage
either the hood or the wipers.
When closing the hood, check that the hood is
securely latched.
If the hood latch lever moves stiffly, or if you can
open the hood without lifting the lever, the latch
mechanism should be cleaned and lubricated.
Pull
Hood Release Handle
LeverSupport Rod
Grip
Clamp
Page 265 of 351

264
uuMaintenance Under the HooduAdding Engine Oil
Maintenance
Adding Engine Oil
1.Unscrew and remove the engine oil fill cap.
2.Add oil slowly.
3.Reinstall the engine oil fill cap, and tighten
it securely.
4.Wait for three minutes and recheck the
engine oil dipstick.
1Adding Engine Oil
If any oil spills, wipe it up immediately. Spilled oil may
damage the engine compartment components.NOTICEDo not fill the engine oil above the upper mark.
Overfilling the engine oil can result in leaks and
engine damage.
2.0 ℓ engine models
Engine Oil Fill Cap
2.4 ℓ engine models
Engine Oil Fill Cap
Page 268 of 351
267
uuMaintenance Under the HooduChanging the Engine Oil and Oil Filter
Maintenance
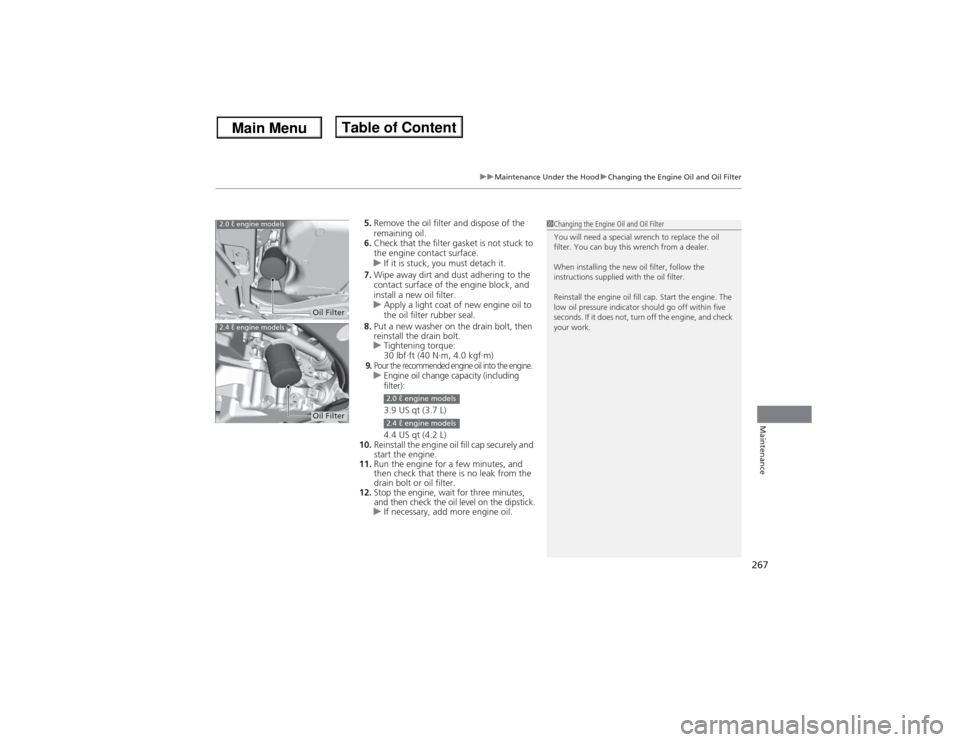
5.Remove the oil filter and dispose of the
remaining oil.
6.Check that the filter gasket is not stuck to
the engine contact surface.
uIf it is stuck, you must detach it.
7.Wipe away dirt and dust adhering to the
contact surface of the engine block, and
install a new oil filter.
uApply a light coat of new engine oil to
the oil filter rubber seal.
8.Put a new washer on the drain bolt, then
reinstall the drain bolt.
uTightening torque:
30 lbf∙ft (40 N∙m, 4.0 kgf∙m)9.Pour the recommended engine oil into the engine.uEngine oil change capacity (including
filter):
3.9 US qt (3.7 L)
4.4 US qt (4.2 L)
10.Reinstall the engine oil fill cap securely and
start the engine.
11.Run the engine for a few minutes, and
then check that there is no leak from the
drain bolt or oil filter.
12.Stop the engine, wait for three minutes,
and then check the oil level on the dipstick.
uIf necessary, add more engine oil.
1Changing the Engine Oil and Oil Filter
You will need a special wrench to replace the oil
filter. You can buy this wrench from a dealer.
When installing the new oil filter, follow the
instructions supplied with the oil filter.
Reinstall the engine oil fill cap. Start the engine. The
low oil pressure indicator should go off within five
seconds. If it does not, turn off the engine, and check
your work.
2.0 ℓ engine models
Oil Filter
2.4 ℓ engine models
Oil Filter
2.0 ℓ engine models2.4 ℓ engine models
Page 271 of 351
270
uuMaintenance Under the HooduTransmission Fluid
Maintenance
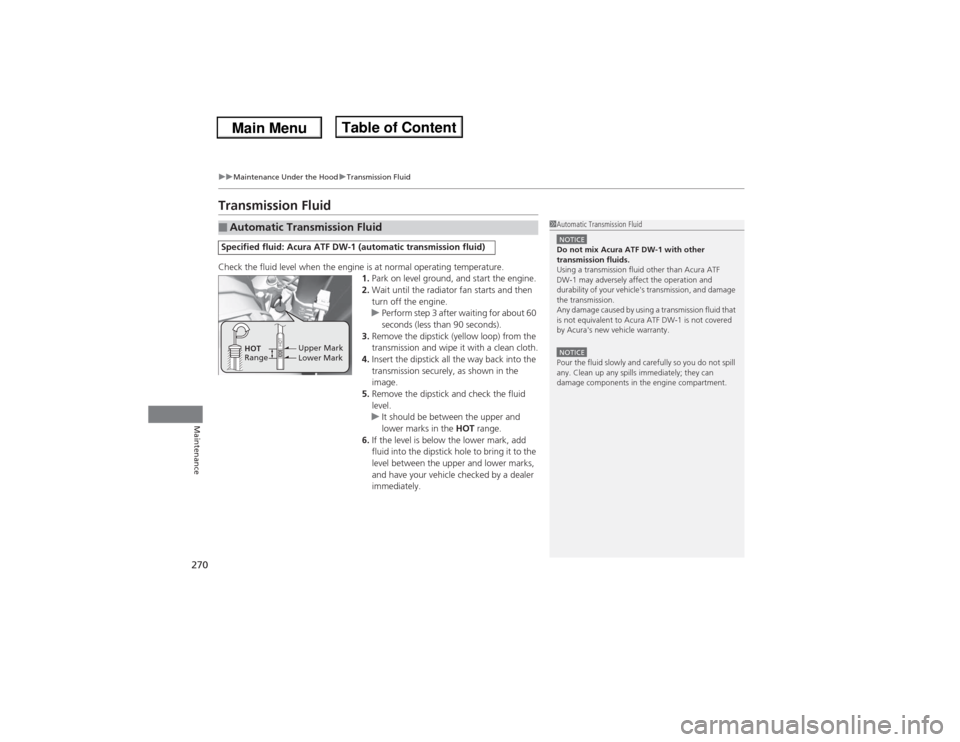
Transmission FluidCheck the fluid level when the engine is at normal operating temperature.
1.Park on level ground, and start the engine.
2.Wait until the radiator fan starts and then
turn off the engine.
uPerform step 3 after waiting for about 60
seconds (less than 90 seconds).
3.Remove the dipstick (yellow loop) from the
transmission and wipe it with a clean cloth.
4.Insert the dipstick all the way back into the
transmission securely, as shown in the
image.
5.Remove the dipstick and check the fluid
level.
uIt should be between the upper and
lower marks in the HOT range.
6.If the level is below the lower mark, add
fluid into the dipstick hole to bring it to the
level between the upper and lower marks,
and have your vehicle checked by a dealer
immediately.■Automatic Transmission FluidSpecified fluid: Acura ATF DW-1 (automatic transmission fluid)
1Automatic Transmission FluidNOTICEDo not mix Acura ATF DW-1 with other
transmission fluids.
Using a transmission fluid other than Acura ATF
DW-1 may adversely affect the operation and
durability of your vehicle's transmission, and damage
the transmission.
Any damage caused by using a transmission fluid that
is not equivalent to Acura ATF DW-1 is not covered
by Acura's new vehicle warranty.NOTICEPour the fluid slowly and carefully so you do not spill
any. Clean up any spills immediately; they can
damage components in the engine compartment.
Upper Mark
Lower Mark HOT
Range
Page 300 of 351

299
uuCleaninguInterior Care
Maintenance
The front floor mats hook over the floor
anchors, which keep the mats from sliding
forward. To remove the mats for cleaning,
turn the anchor knobs to the unlock position.
When reinstalling the mats after cleaning,
turn the knobs to the lock position.
Do not put additional floor mats on top of
the anchored mat.
Vacuum dirt and dust from the leather frequently. Pay close attention to the pleats
and seams. Clean the leather with a soft cloth dampened with a 90% water and
10% neutral soap solution. Then buff it with a clean, dry cloth. Remove any dust or
dirt on leather surfaces immediately.
■Floor Mats
1Floor Mats
If you use any floor mats that were not originally
provided with your vehicle, make sure they are
designed for your specific vehicle, fit correctly, and
are securely anchored by the floor anchors.
Position the rear seat floor mats properly. If they are
not properly positioned, the floor mats can interfere
with the front seat functions.
Unlock
Lock
■Maintaining Genuine Leather
*
* Not available on all models
Page 311 of 351

uuIf a Tire Goes FlatuChanging a Flat Tire
310Handling the Unexpected
1.Remove the center cap.
2.Place the flat tire face down in the spare tire
well.
3.Remove the spacer cone from the wing
bolt, flip it over, and insert it back on the
bolt. Secure the flat tire with the wing bolt.
4.Securely put the jack and wheel nut wrench
back in the tool case. Store the case in the
trunk.
If you replace a flat tire with the spare tire, the low tire pressure/TPMS indicator
comes on while you are driving. After driving for a few miles (kilometers), the
indicator will start blinking for a short time and then stay on. CHECK TPMS
SYSTEM appears on the multi-information display, but this is normal.
If you replace the tire with a specified regular tire, the warning message on the
multi-information display and the low tire pressure/TPMS indicator will go off after
a few miles (kilometers).
■Storing the Flat Tire
1Storing the Flat Tire
3
WARNING
Loose items can fly around the interior in a
crash and can seriously injure the
occupants.
Store the wheel, jack, and tools securely
before driving.
Spacer
Cone Wing
Bolt
For compact spare tireFor
normal
tire■TPMS and the Spare TireU.S. models
1TPMS and the Spare Tire
The system cannot monitor the pressure of the spare
tire. Manually check the spare tire pressure to be sure
that it is correct.
Use TPMS specific wheels. Each is equipped with a
tire pressure sensor mounted inside the tire behind
the valve stem.