ECO mode Acura ILX 2014 Workshop Manual
[x] Cancel search | Manufacturer: ACURA, Model Year: 2014, Model line: ILX, Model: Acura ILX 2014Pages: 351, PDF Size: 7.94 MB
Page 249 of 351
248Maintenance
Before Performing MaintenanceInspection and MaintenanceFor your safety, perform all listed inspections and maintenance to keep your vehicle
in good condition. If you become aware of any abnormality (noise, smell, insufficient
brake fluid, oil residue on the ground, etc.), have your vehicle inspected by a dealer.
(Note, however, that service at a dealer is not mandatory to keep your warranties in
effect.) Refer to the separate maintenance booklet for detailed maintenance and
inspection information.■Daily inspections
Perform inspections before long distance trips, when washing the vehicle, or when
refueling.■Periodic inspections
•Check the automatic transmission fluid level monthly.2Automatic Transmission Fluid P. 270
•Check the brake fluid level monthly.
2Brake/Clutch Fluid P. 272
•Check the tire pressure monthly. Examine the tread for wear and foreign objects.
2Checking and Maintaining Tires P. 286
•Check the operation of the exterior lights monthly.
2Replacing Light Bulbs P. 274
•Check the condition of the wiper blades at least every six months.
2Checking and Maintaining Wiper Blades P. 284
■Types of Inspection and Maintenance
1Inspection and Maintenance
Maintenance, replacement, or repair of
emissions control devices and systems may be
done by any automotive repair establishment or
individuals using parts that are “certified” to
EPA standards.
According to state and federal regulations, failure to
perform maintenance on the maintenance main
items marked with # will not void your emissions
warranties. However, all maintenance services should
be performed in accordance with the intervals
indicated by the multi-information display.
2Maintenance Service Items P. 254
If you want to perform complex maintenance tasks
that require more skills and tools, you can purchase a
subscription to the Service Express website at
www.techinfo.honda.com.
2Authorized Manuals P. 341
If you want to perform maintenance yourself, make
sure that you have the necessary tools and skills first.
After performing maintenance, update the records in
the separate maintenance booklet.U.S. models
Page 263 of 351
262
uuMaintenance Under the HooduOil Check
Maintenance
Oil CheckWe recommend that you check the engine oil level every time you refuel.
Park the vehicle on level ground.
Wait approximately three minutes after turning the engine off before you check the
oil.
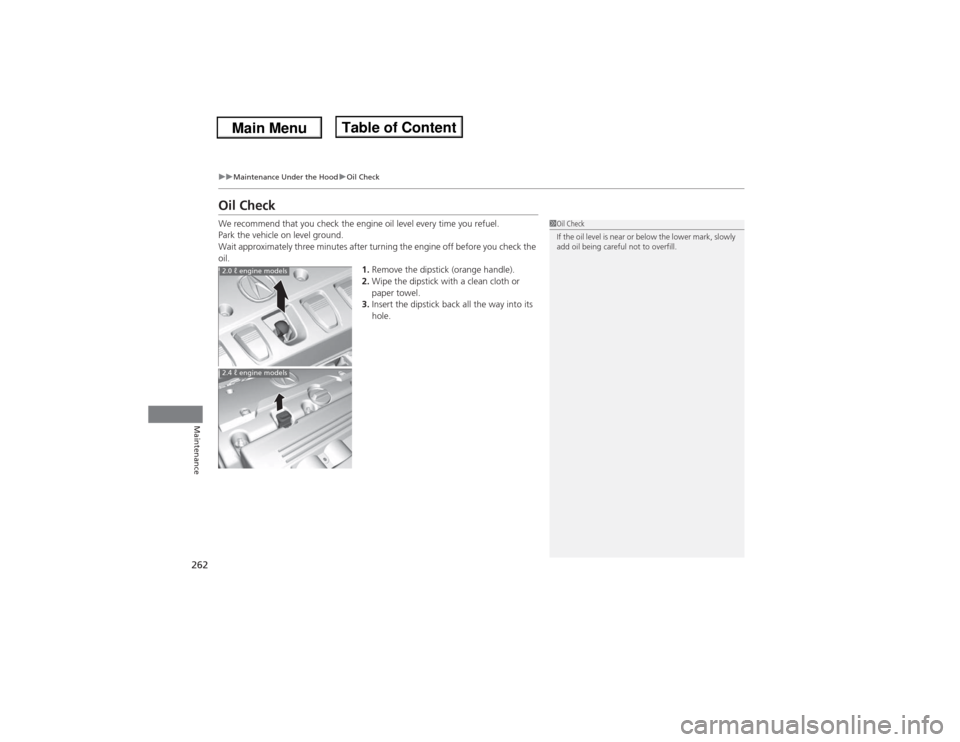
1.Remove the dipstick (orange handle).
2.Wipe the dipstick with a clean cloth or
paper towel.
3.Insert the dipstick back all the way into its
hole.
1Oil Check
If the oil level is near or below the lower mark, slowly
add oil being careful not to overfill.
2.0 ℓ engine models2.4 ℓ engine models
Page 268 of 351
267
uuMaintenance Under the HooduChanging the Engine Oil and Oil Filter
Maintenance
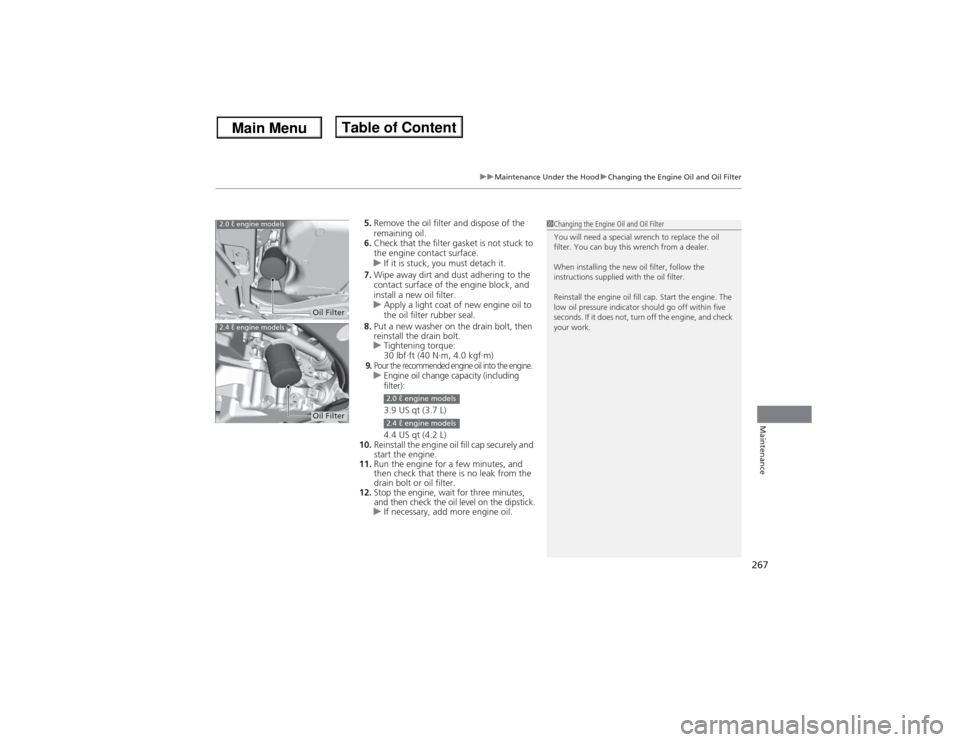
5.Remove the oil filter and dispose of the
remaining oil.
6.Check that the filter gasket is not stuck to
the engine contact surface.
uIf it is stuck, you must detach it.
7.Wipe away dirt and dust adhering to the
contact surface of the engine block, and
install a new oil filter.
uApply a light coat of new engine oil to
the oil filter rubber seal.
8.Put a new washer on the drain bolt, then
reinstall the drain bolt.
uTightening torque:
30 lbf∙ft (40 N∙m, 4.0 kgf∙m)9.Pour the recommended engine oil into the engine.uEngine oil change capacity (including
filter):
3.9 US qt (3.7 L)
4.4 US qt (4.2 L)
10.Reinstall the engine oil fill cap securely and
start the engine.
11.Run the engine for a few minutes, and
then check that there is no leak from the
drain bolt or oil filter.
12.Stop the engine, wait for three minutes,
and then check the oil level on the dipstick.
uIf necessary, add more engine oil.
1Changing the Engine Oil and Oil Filter
You will need a special wrench to replace the oil
filter. You can buy this wrench from a dealer.
When installing the new oil filter, follow the
instructions supplied with the oil filter.
Reinstall the engine oil fill cap. Start the engine. The
low oil pressure indicator should go off within five
seconds. If it does not, turn off the engine, and check
your work.
2.0 ℓ engine models
Oil Filter
2.4 ℓ engine models
Oil Filter
2.0 ℓ engine models2.4 ℓ engine models
Page 293 of 351

292
uuChecking and Maintaining TiresuTire and Wheel Replacement
Maintenance
Tire and Wheel ReplacementReplace your tires with radials of the same size, load range, speed rating, and
maximum cold tire pressure rating (as shown on the tire’s sidewall). Using tires of a
different size or construction can cause the ABS and VSA® (vehicle stability assist)
system to work incorrectly.
It is best to replace all four tires at the same time. If that isn’t possible, replace the
front or rear tires in pairs.
Make sure that the wheel’s specifications match those of the original wheels.
If you replace a wheel, only use TPMS specified wheels approved for your vehicle.
1Tire and Wheel Replacement
3
WARNING
Installing improper tires on your vehicle can
affect handling and stability. This can cause
a crash in which you can be seriously hurt or
killed.
Always use the size and type of tires
recommended in this owner’s manual.
U.S. models only
Page 296 of 351

295Maintenance
BatteryChecking the BatteryThe battery condition is being monitored by the sensor on the negative terminal. If
there is a problem with the sensor, the warning message on multi-information
display will let you know. Have your vehicle checked by a dealer.
If your vehicle's battery is disconnected or goes dead:
•The audio system is disabled.
2Reactivating the audio system P. 144
•The clock resets.
2Setting the Clock P. 92
•The navigation system
* is disabled.
2Refer to the navigation system manual
Charging the BatteryDisconnect both battery cables to prevent damaging your vehicle's electrical system.
Always disconnect the negative (–) cable first, and reconnect it last.
1BatteryWARNING: Battery post, terminals,
and related accessories contain lead
and lead compounds.
Wash your hands after handling.The test indicator's color information is on the
battery.
When you find corrosion, clean the battery terminals
by applying a baking powder and water solution.
Rinse the terminals with water. Cloth/towel dry the
battery. Coat the terminals with grease to help
prevent future corrosion.
3
WARNING
The battery gives off explosive hydrogen
gas during normal operation.
A spark or flame can cause the battery to
explode with enough force to kill or
seriously hurt you.
When conducting any battery
maintenance, wear protective clothing and
a face shield, or have a skilled technician do
it.
* Not available on all models
Page 313 of 351

312
uuEngine Does Not StartuIf the Keyless Access Remote Battery is Weak
Handling the Unexpected
If the Keyless Access Remote Battery is WeakIf the beeper sounds, the TO START, HOLD REMOTE NEAR START BUTTON
message appears on the multi-information display, the indicator on the ENGINE
START/STOP button flashes, and the engine won’t start. Start the engine as
follows.
1.Touch the center of the ENGINE START/
STOP button with the A logo on the keyless
access remote while the indicator on the
ENGINE START/STOP button is flashing.
The buttons on the keyless access remote
should be facing you.
uThe indicator flashes for about 30
seconds.
2.Depress the brake pedal (automatic
transmission) or clutch pedal (manual
transmission) and press the ENGINE
START/STOP button within 10 seconds
after the beeper sounds and the indicator
stays on.
uIf you don’t depress the pedal, the mode
will change to ACCESSORY.
Page 314 of 351

313
uuEngine Does Not StartuEmergency Engine Stop
Handling the Unexpected
Emergency Engine StopIf you cannot stop the engine by pressing the ENGINE START/STOP button, do
either of the following operations:
•Press and hold the ENGINE START/STOP button for three seconds.
•Firmly press the ENGINE START/STOP button three times.
The steering wheel will not lock.
The power mode changes to VEHICLE OFF with the shift lever in
(P, and to
ACCESSORY with the shift lever in any position other than
(P.
The power mode changes to VEHICLE OFF.
1Emergency Engine Stop
Do not press the button while driving unless it is
absolutely necessary for the engine to be switched
off.
Automatic transmission modelsManual transmission models
Page 315 of 351
314Handling the Unexpected
Jump StartingTurn off the power to electric devices, such as audio and lights. Turn off the engine,
then open the hood.
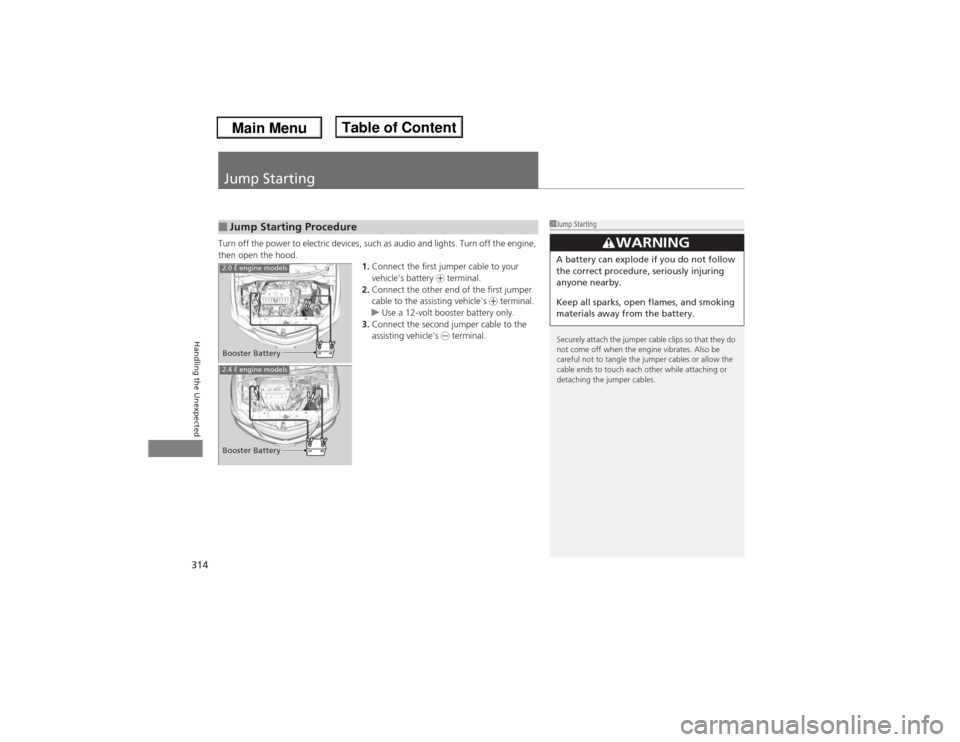
1.Connect the first jumper cable to your
vehicle's battery + terminal.
2.Connect the other end of the first jumper
cable to the assisting vehicle's + terminal.
uUse a 12-volt booster battery only.
3.Connect the second jumper cable to the
assisting vehicle's - terminal.■Jump Starting Procedure
1Jump Starting
Securely attach the jumper cable clips so that they do
not come off when the engine vibrates. Also be
careful not to tangle the jumper cables or allow the
cable ends to touch each other while attaching or
detaching the jumper cables.
3
WARNING
A battery can explode if you do not follow
the correct procedure, seriously injuring
anyone nearby.
Keep all sparks, open flames, and smoking
materials away from the battery.
2.0 ℓ engine modelsBooster BatteryBooster Battery2.4 ℓ engine models
Page 316 of 351
Continued
315
uuJump Startingu
Handling the Unexpected
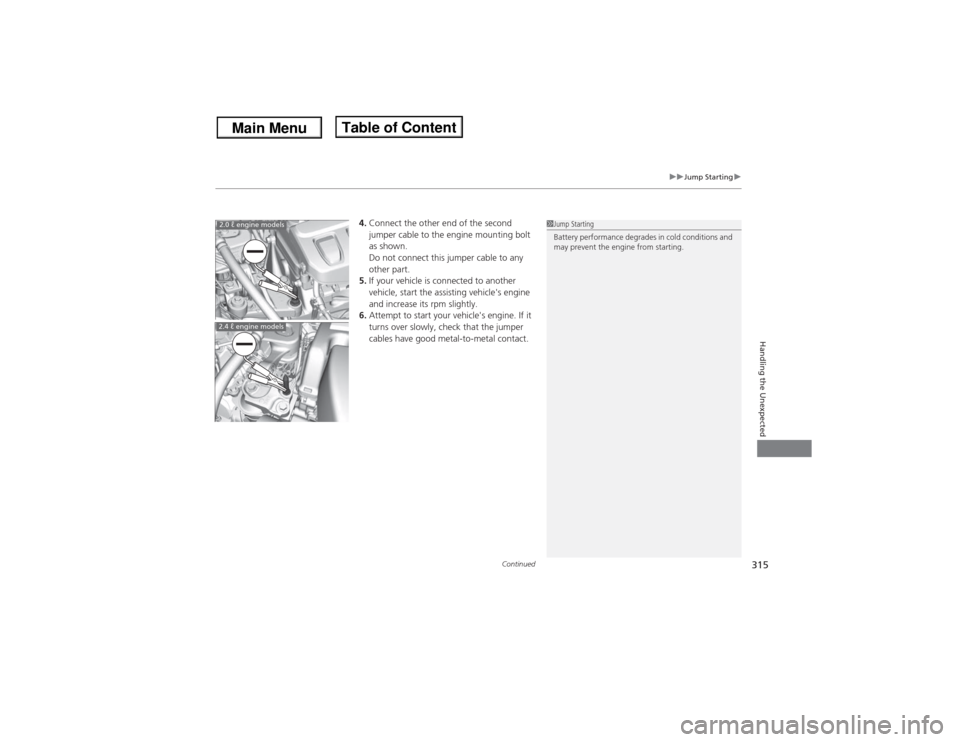
4.Connect the other end of the second
jumper cable to the engine mounting bolt
as shown.
Do not connect this jumper cable to any
other part.
5.If your vehicle is connected to another
vehicle, start the assisting vehicle's engine
and increase its rpm slightly.
6.Attempt to start your vehicle's engine. If it
turns over slowly, check that the jumper
cables have good metal-to-metal contact.
1Jump Starting
Battery performance degrades in cold conditions and
may prevent the engine from starting.
2.0 ℓ engine models2.4 ℓ engine models
Page 338 of 351
337
Continued
Information
Emissions TestingTesting of Readiness CodesYour vehicle uses “readiness codes,” as part of its onboard self diagnostic system.
Some states refer to these codes during testing to see if your vehicle's emissions
components are working properly.
The codes may not be read if you go through the testing just after the battery has
gone dead or been disconnected.
To check if they are set, set the power mode to ON, without starting the engine. The
malfunction indicator lamp will come on for several seconds. If it then goes off, the
readiness codes are set. If it blinks five times, the readiness codes are not set.
If you are required to have your vehicle tested before the readiness codes are ready,
prepare the vehicle for retesting by doing the following:
1.Fill the gas tank to approximately 3/4 full.
2.Park the vehicle and leave the engine off for 6 hours or more.
3.Make sure the ambient temperature is between 40°F and 95°F (4°C and 35°C).
4.Start the engine without touching the accelerator pedal, and let it idle for 20
seconds.
5.Keep the vehicle in
(P (automatic transmission) or
(N (manual transmission).
Increase the engine speed to 2,000 rpm, and hold it there until the temperature
gauge rises to at least 1/4 of the scale (about 3 minutes).
6.Let the engine idle with your foot off the accelerator for 20 seconds.
1Testing of Readiness Codes
The readiness codes are erased when the battery is
disconnected, and set again only after several days of
driving under a variety of conditions.
If a testing facility determines that the readiness
codes are not set, you may be requested to return at
a later date to complete the test.
If the testing facility determines the readiness codes
are still not set, see a dealer.