light Acura ILX 2014 Repair Manual
[x] Cancel search | Manufacturer: ACURA, Model Year: 2014, Model line: ILX, Model: Acura ILX 2014Pages: 351, PDF Size: 7.94 MB
Page 280 of 351
279
uuReplacing Light BulbsuParking/Side Marker Light Bulbs
Maintenance
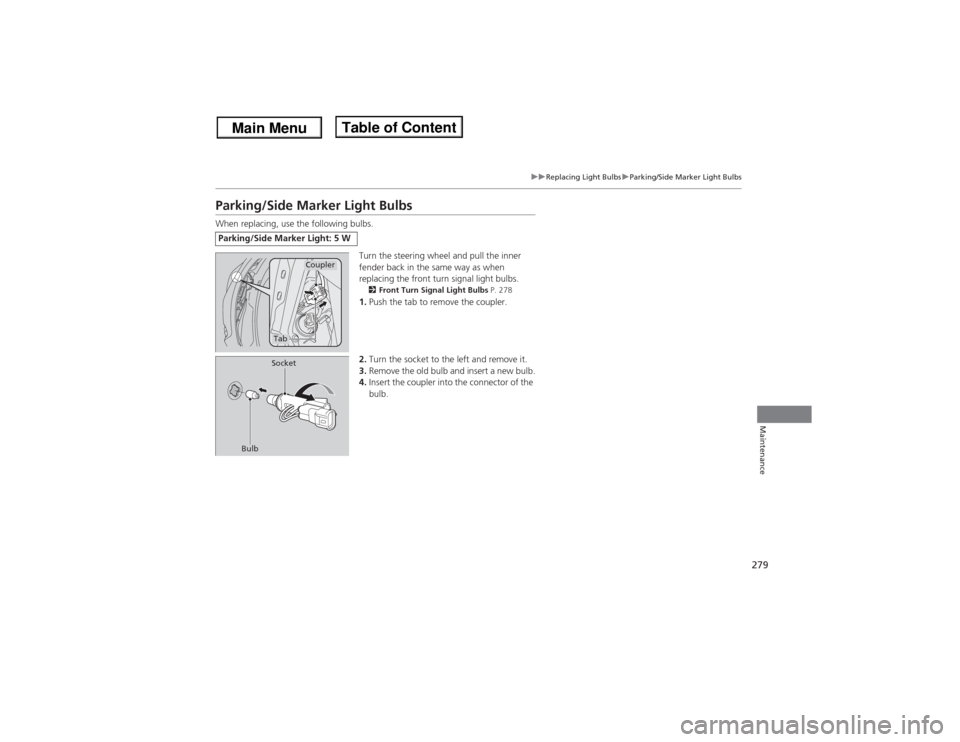
Parking/Side Marker Light BulbsWhen replacing, use the following bulbs.
Turn the steering wheel and pull the inner
fender back in the same way as when
replacing the front turn signal light bulbs.
2Front Turn Signal Light Bulbs P. 2781.Push the tab to remove the coupler.
2.Turn the socket to the left and remove it.
3.Remove the old bulb and insert a new bulb.
4.Insert the coupler into the connector of the
bulb.
Parking/Side Marker Light: 5 W
Coupler
Tab
BulbSocket
Page 281 of 351
280
uuReplacing Light BulbsuBrake Light, Taillight, Rear Turn Signal Light and Rear Side Marker Light Bulbs
Maintenance
Brake Light, Taillight, Rear Turn Signal Light and Rear Side Marker Light BulbsWhen replacing, use the following bulbs.
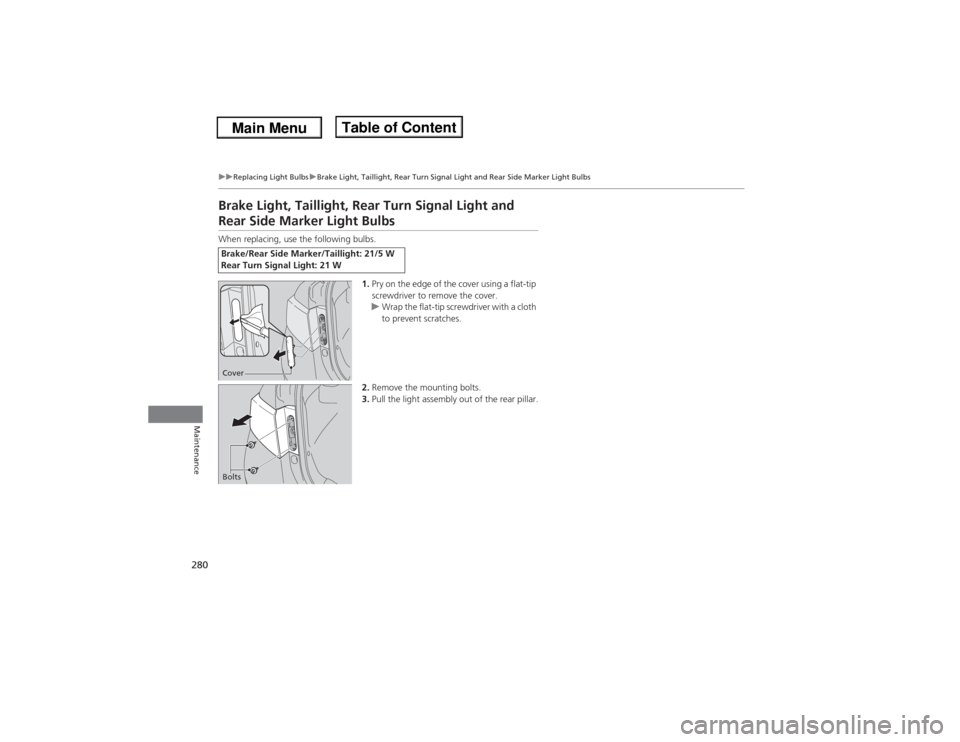
1.Pry on the edge of the cover using a flat-tip
screwdriver to remove the cover.
uWrap the flat-tip screwdriver with a cloth
to prevent scratches.
2.Remove the mounting bolts.
3.Pull the light assembly out of the rear pillar.Brake/Rear Side Marker/Taillight: 21/5 W
Rear Turn Signal Light: 21 WCoverBolts
Page 282 of 351
281
uuReplacing Light BulbsuBrake Light, Taillight, Rear Turn Signal Light and Rear Side Marker Light Bulbs
Maintenance
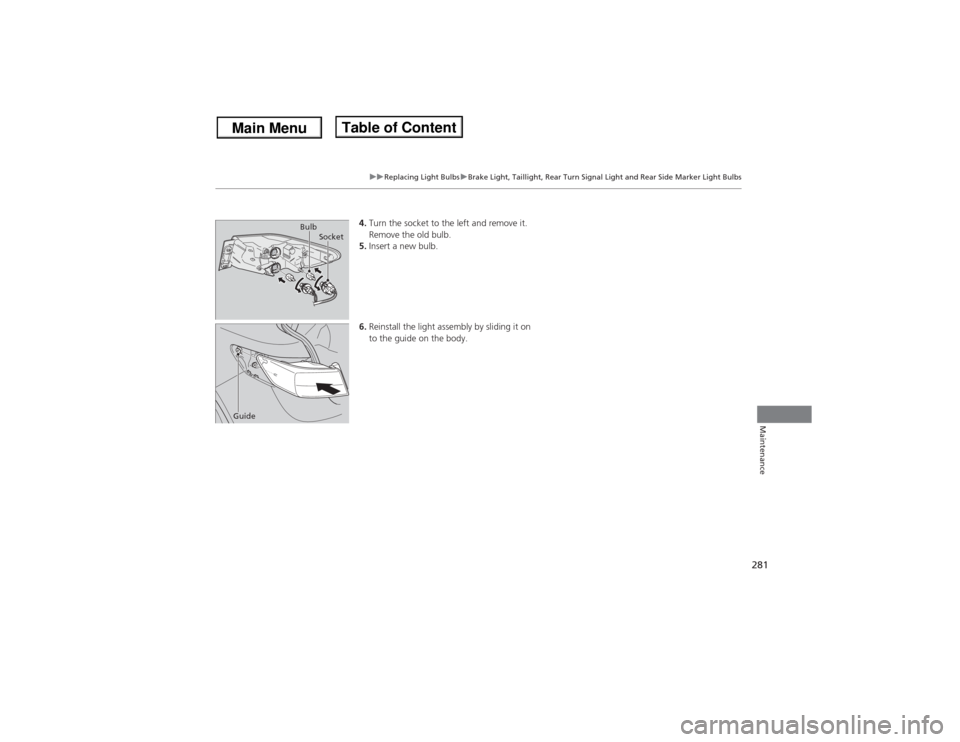
4.Turn the socket to the left and remove it.
Remove the old bulb.
5.Insert a new bulb.
6.Reinstall the light assembly by sliding it on
to the guide on the body.
Socket Bulb
Guide
Page 283 of 351
282
uuReplacing Light BulbsuBack-Up Light Bulbs
Maintenance
Back-Up Light BulbsWhen replacing, use the following bulbs.
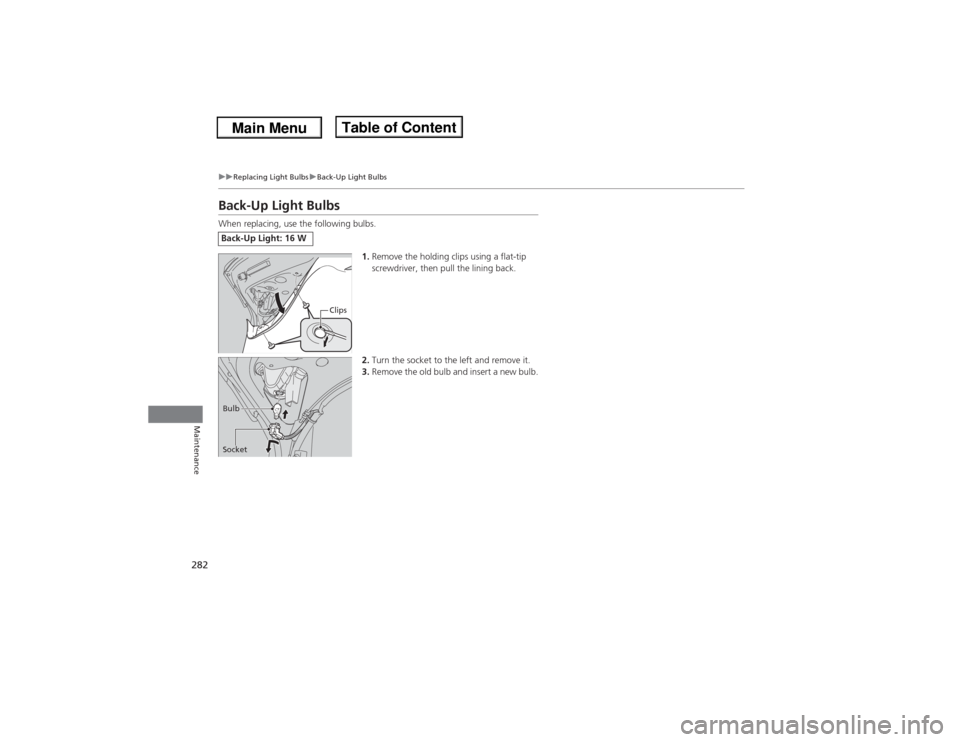
1.Remove the holding clips using a flat-tip
screwdriver, then pull the lining back.
2.Turn the socket to the left and remove it.
3.Remove the old bulb and insert a new bulb.Back-Up Light: 16 W
Clips
Socket Bulb
Page 284 of 351
283
uuReplacing Light BulbsuRear License Plate Light Bulb
Maintenance
Rear License Plate Light BulbWhen replacing, use the following bulb.
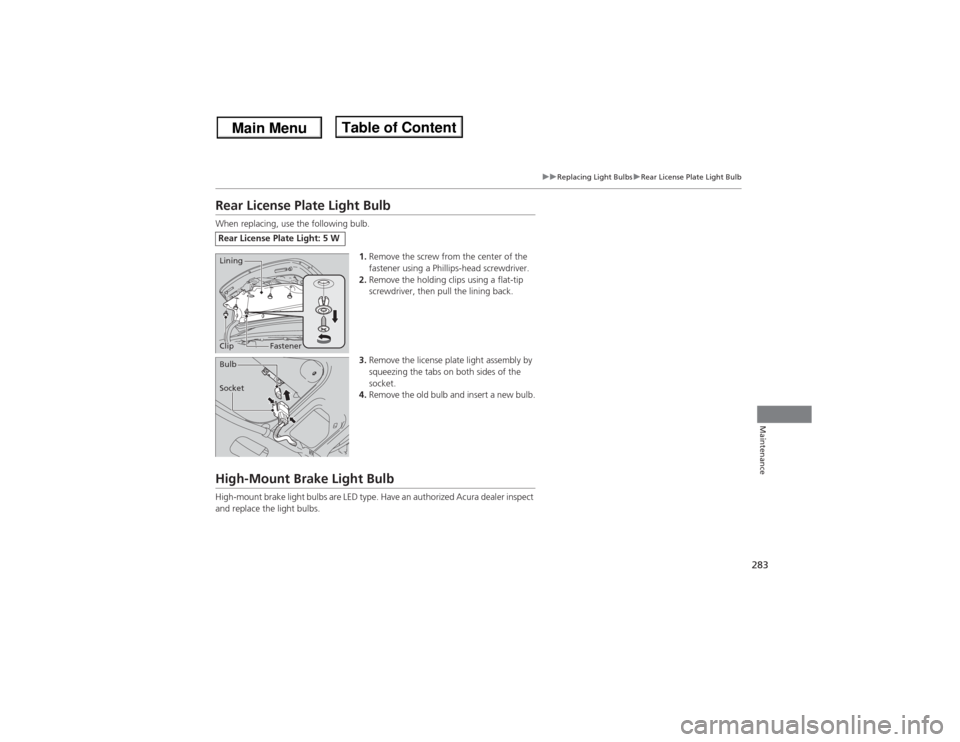
1.Remove the screw from the center of the
fastener using a Phillips-head screwdriver.
2.Remove the holding clips using a flat-tip
screwdriver, then pull the lining back.
3.Remove the license plate light assembly by
squeezing the tabs on both sides of the
socket.
4.Remove the old bulb and insert a new bulb.High-Mount Brake Light BulbHigh-mount brake light bulbs are LED type. Have an authorized Acura dealer inspect
and replace the light bulbs.Rear License Plate Light: 5 W
Fastener Lining
ClipSocket Bulb
Page 306 of 351

305
Continued
Handling the Unexpected
If a Tire Goes FlatChanging a Flat TireIf a tire goes flat while driving, grasp the steering wheel firmly, and brake gradually
to reduce speed. Then, stop in a safe place. Replace the flat tire with a compact
spare tire. Go to a dealer as soon as possible to have the full size tire repaired or
replaced.
1.Park the vehicle on firm, level, and non-slippery and apply the parking brake.
2.Move the shift lever in
(P.
2.Move the shift lever in (R.
3.Set the parking brake.
4.Turn on the hazard warning lights and set the power mode to VEHICLE OFF
(LOCK).
1Changing a Flat Tire
Periodically check the tire pressure of the compact
spare. It should be set to the specified pressure.
Specified Pressure: 60 psi (420 kPa, 4.2 kgf/cm
2)
When driving with the compact spare tire, keep the
vehicle speed under 50 mph (80 km/h). Replace with
a full size tire as soon as possible.
The compact spare tire and wheel in your vehicle are
specifically for this model.
Do not use them with another vehicle.
Do not use another type of compact spare tire or
wheel with your vehicle.
Do not mount tire chains on a compact spare tire.
If a chain-mounted front tire goes flat, remove one of
the full-size rear tires and replace it with the compact
spare tire. Remove the flat front tire and replace it
with the full size tire that was removed from the rear.
Mount the tire chains on the front tire.
Do not use a puncture-repairing agent on a flat tire,
as it can damage the tire pressure sensor.
U.S. models only
Automatic transmission modelsManual transmission modelsAll models
Page 312 of 351
311Handling the Unexpected
Engine Does Not StartChecking the EngineIf the engine does not start, check the starter.
Starter condition
Checklist
Starter doesn’t turn or turns
over slowly.
The battery may be dead. Check
each of the items on the right and
respond accordingly.
Check brightness of the interior light.
Turn on interior lights and check brightness.●If the interior lights are dim or do not come on at all
2Battery P. 295
●If the interior lights come on normally
2 Fuses P. 324
The starter turns over normally
but the engine doesn’t start.
There may be a problem with the
fuse. Check each of the items on
the right and respond accordingly.
Review the engine start procedure.
Follow its instructions, and try to start the engine again.
2 Starting the Engine P. 216
Check the immobilizer system indicator.
When the immobilizer system indicator is blinking, the engine cannot be started.2Immobilizer System P. 106Check the fuel level.
There should be enough fuel in the tank.
2 Fuel Gauge P. 78
Check the fuse.
Check all fuses, or have the vehicle checked by a dealer.2Inspecting and Changing Fuses P. 326If the problem continues:2Emergency Towing P. 327
1Checking the Engine
If you must start the vehicle immediately, use an
assisting vehicle to jump start it.
2Jump Starting P. 314
Page 315 of 351
314Handling the Unexpected
Jump StartingTurn off the power to electric devices, such as audio and lights. Turn off the engine,
then open the hood.
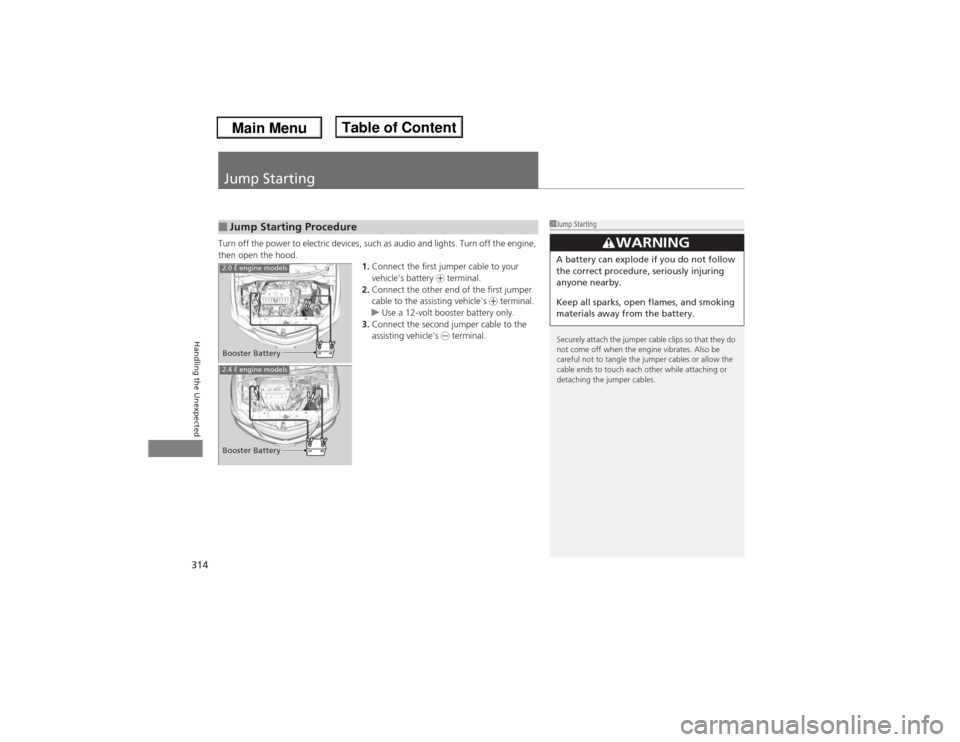
1.Connect the first jumper cable to your
vehicle's battery + terminal.
2.Connect the other end of the first jumper
cable to the assisting vehicle's + terminal.
uUse a 12-volt booster battery only.
3.Connect the second jumper cable to the
assisting vehicle's - terminal.■Jump Starting Procedure
1Jump Starting
Securely attach the jumper cable clips so that they do
not come off when the engine vibrates. Also be
careful not to tangle the jumper cables or allow the
cable ends to touch each other while attaching or
detaching the jumper cables.
3
WARNING
A battery can explode if you do not follow
the correct procedure, seriously injuring
anyone nearby.
Keep all sparks, open flames, and smoking
materials away from the battery.
2.0 ℓ engine modelsBooster BatteryBooster Battery2.4 ℓ engine models
Page 316 of 351
Continued
315
uuJump Startingu
Handling the Unexpected
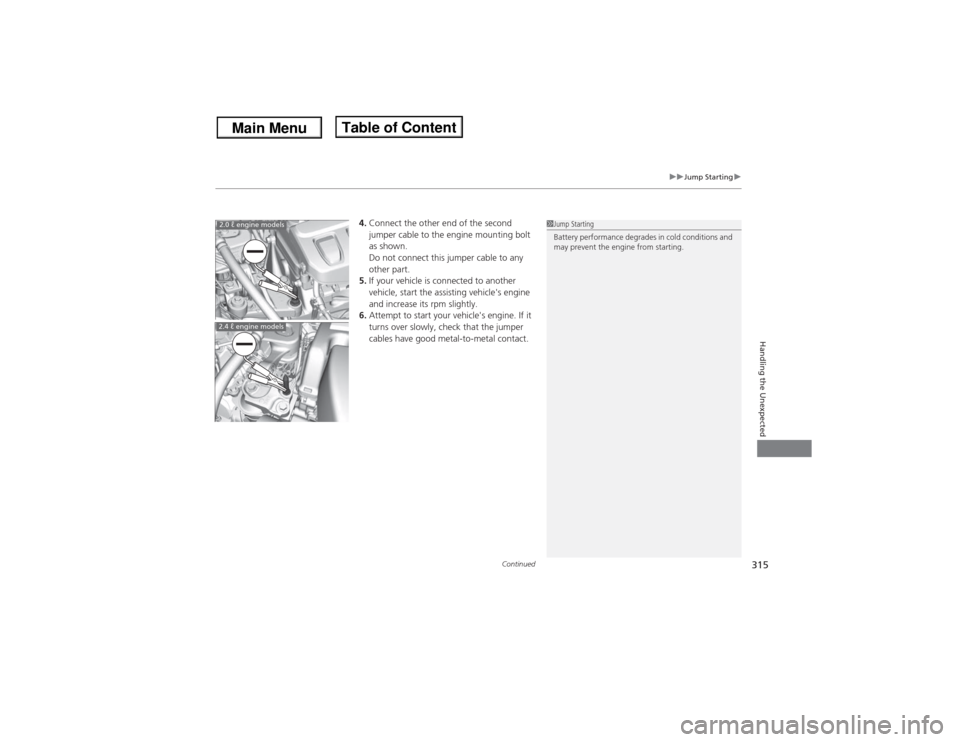
4.Connect the other end of the second
jumper cable to the engine mounting bolt
as shown.
Do not connect this jumper cable to any
other part.
5.If your vehicle is connected to another
vehicle, start the assisting vehicle's engine
and increase its rpm slightly.
6.Attempt to start your vehicle's engine. If it
turns over slowly, check that the jumper
cables have good metal-to-metal contact.
1Jump Starting
Battery performance degrades in cold conditions and
may prevent the engine from starting.
2.0 ℓ engine models2.4 ℓ engine models
Page 319 of 351
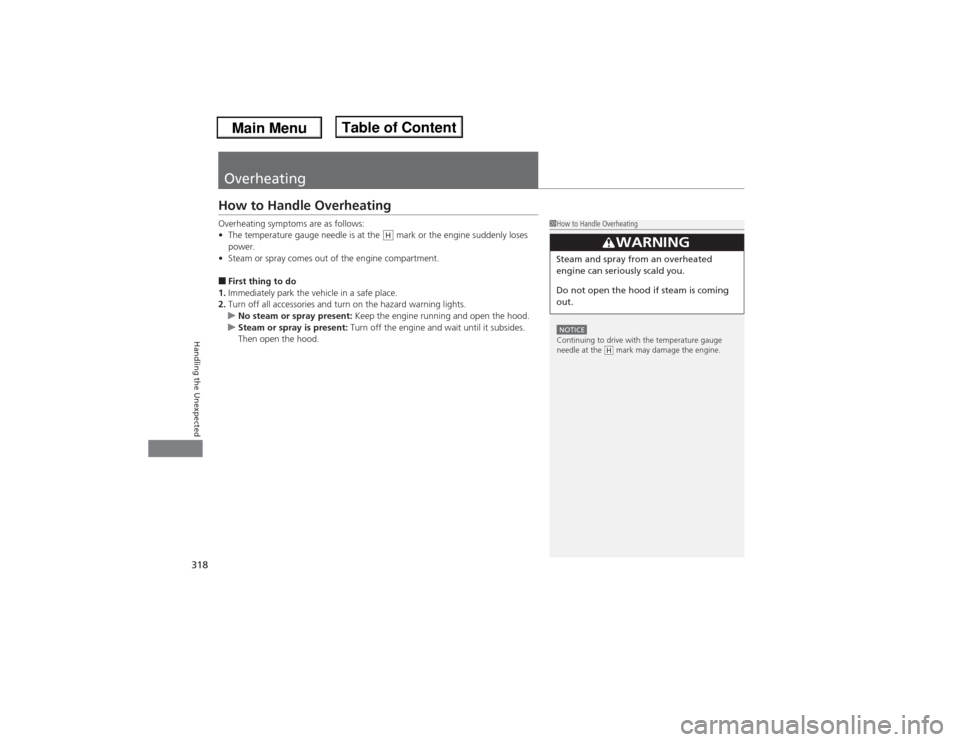
318Handling the Unexpected
OverheatingHow to Handle OverheatingOverheating symptoms are as follows:
•The temperature gauge needle is at the mark or the engine suddenly loses
power.
•Steam or spray comes out of the engine compartment.■First thing to do
1.Immediately park the vehicle in a safe place.
2.Turn off all accessories and turn on the hazard warning lights.
uNo steam or spray present: Keep the engine running and open the hood.
uSteam or spray is present: Turn off the engine and wait until it subsides.
Then open the hood.
1How to Handle OverheatingNOTICEContinuing to drive with the temperature gauge
needle at the mark may damage the engine.
3
WARNING
Steam and spray from an overheated
engine can seriously scald you.
Do not open the hood if steam is coming
out.
H
H