light Acura ILX 2020 Owners Manual
[x] Cancel search | Manufacturer: ACURA, Model Year: 2020, Model line: ILX, Model: Acura ILX 2020Pages: 621, PDF Size: 34.94 MB
Page 531 of 621

530
uuReplacing Light Bulbs uBack-Up Light Bulbs
Maintenance
Back-Up Light Bulbs
When replacing, use the following bulbs.
1.Remove the holding clips using a flat-tip
screwdriver, then pull the lining back.
2. Turn the socket counter-clockwise and
remove it.
3. Remove the old bulb and insert a new bulb.
Back-Up Light: 16 W
Clips
Socket Bulb
20 ACURA ILX-31TX66710.book 530 ページ 2020年4月16日 木曜日 午後8時46分
Page 532 of 621
531
uuReplacing Light Bulbs uRear License Plate Light Bulb
Maintenance
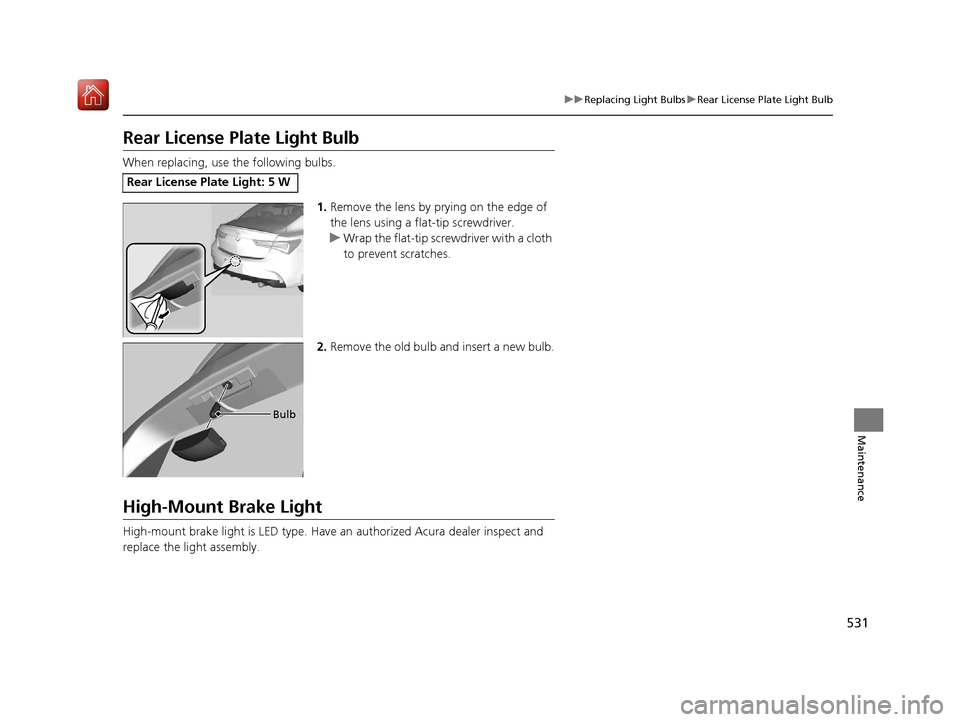
Rear License Plate Light Bulb
When replacing, use the following bulbs.
1.Remove the lens by prying on the edge of
the lens using a flat-tip screwdriver.
u Wrap the flat-tip screwdriver with a cloth
to prevent scratches.
2. Remove the old bulb and insert a new bulb.
High-Mount Brake Light
High-mount brake light is LED type. Have an authorized Acura dealer inspect and
replace the light assembly.
Rear License Plate Light: 5 W
Bulb
20 ACURA ILX-31TX66710.book 531 ページ 2020年4月16日 木曜日 午後8時46分
Page 546 of 621

545
uuRemote Transmitter Care uReplacing the Button Battery
Maintenance
If the indicator does not come on when the button is pressed, replace the battery.
1. Remove the built-in key.
u As a convenience, lightly place masking
tape over the remote buttons to hold
them in place.
2. Remove the upper half of the cover by
carefully prying on the edge with a coin.
u Wrap a coin with a cloth to prevent
scratching the transmitter.
3. Press down on the center of the assembly
and remove the battery.
u When removing the button battery, be
careful not to touch parts around it.
4. Make sure to replace the battery with the
correct polarity.
1Replacing the Button Battery
NOTICE
The Remote transmitter is equipped with two
batteries: A standard replaceable CR2032 coin
button battery and an in tegral non-replaceable
rechargeable battery. To prevent permanent damage
to the rechargeable battery, replace the CR2032
battery every three to four years.
Models with remote control engine start system
Models with remote control engine start system
Battery type: CR2032
Battery
20 ACURA ILX-31TX66710.book 545 ページ 2020年4月16日 木曜日 午後8時46分
Page 549 of 621
uuCleaning uInterior Care
548
Maintenance
Wipe using a glass cleaner.
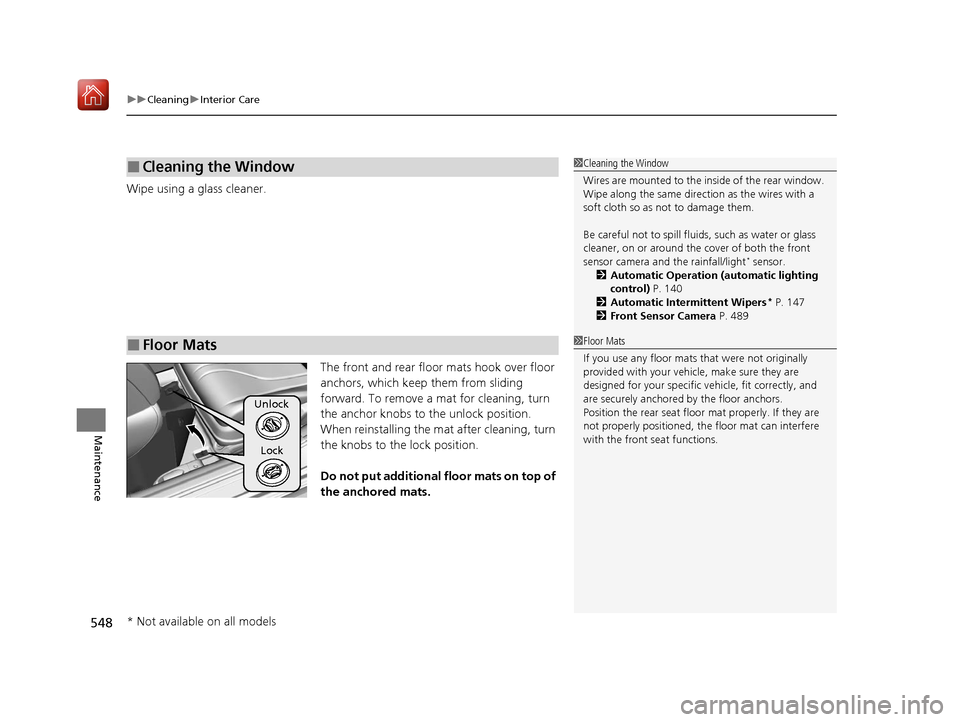
The front and rear floor mats hook over floor
anchors, which keep them from sliding
forward. To remove a mat for cleaning, turn
the anchor knobs to the unlock position.
When reinstalling the mat after cleaning, turn
the knobs to the lock position.
Do not put additional floor mats on top of
the anchored mats.
■Cleaning the Window
■Floor Mats
1 Cleaning the Window
Wires are mounted to the in side of the rear window.
Wipe along the same direct ion as the wires with a
soft cloth so as not to damage them.
Be careful not to spill flui ds, such as water or glass
cleaner, on or around the co ver of both the front
sensor camera and the rainfall/light
* sensor.
2 Automatic Operation (automatic lighting
control) P. 140
2 Automatic Intermittent Wipers
* P. 147
2 Front Sensor Camera P. 489
1Floor Mats
If you use any floor mats that were not originally
provided with your vehicle, make sure they are
designed for your specific ve hicle, fit correctly, and
are securely anchored by the floor anchors.
Position the rear seat floor mat properly. If they are
not properly positioned, th e floor mat can interfere
with the front seat functions.
Unlock
Lock
* Not available on all models
20 ACURA ILX-31TX66710.book 548 ページ 2020年4月16日 木曜日 午後8時46分
Page 553 of 621
552
uuCleaning uExterior Care
Maintenance
The inside lenses of exterior lights (headli ghts, brake lights, etc.) may fog temporarily
if you have driven in the rain, or after the vehicle has been run through a car wash.
Dew condensation also may build up inside the lenses when there is a significant
enough difference between the ambient and inside lens temperatures (similar to
vehicle windows fogging up in rainy conditions). These conditions are natural
processes, not structural design problems in the exterior lights.
Lens design characteristics may result in mo isture developing on the light lens frame
surfaces. This also is not a malfunction.
However, if you see large amounts of wa ter accumulation, or large water drops
building up inside the lenses, have your vehicle inspected by a dealer.
■Fogged Exterior Light Lenses
20 ACURA ILX-31TX66710.book 552 ページ 2020年4月16日 木曜日 午後8時46分
Page 558 of 621
557Continued
Handling the Unexpected
If a Tire Goes Flat
Temporarily Repairing a Flat Tire
If the tire has a large cut or is otherwise severely damaged, you will need to have the
vehicle towed. If the tire only has a small puncture, from a nail for instance, you can
use the temporary tire repair kit so that you can drive to the nearest service station
for a more permanent repair.
If a tire goes flat while driving, grasp the steering wheel firmly, and brake gradually
to reduce speed. Then stop in a safe place.
1. Park the vehicle on a firm, level, and n on-slippery surface and apply the parking
brake.
2. Put the transmission into
(P.
3. Turn on the hazard warning lights an d set the power mode to VEHICLE OFF
(LOCK).
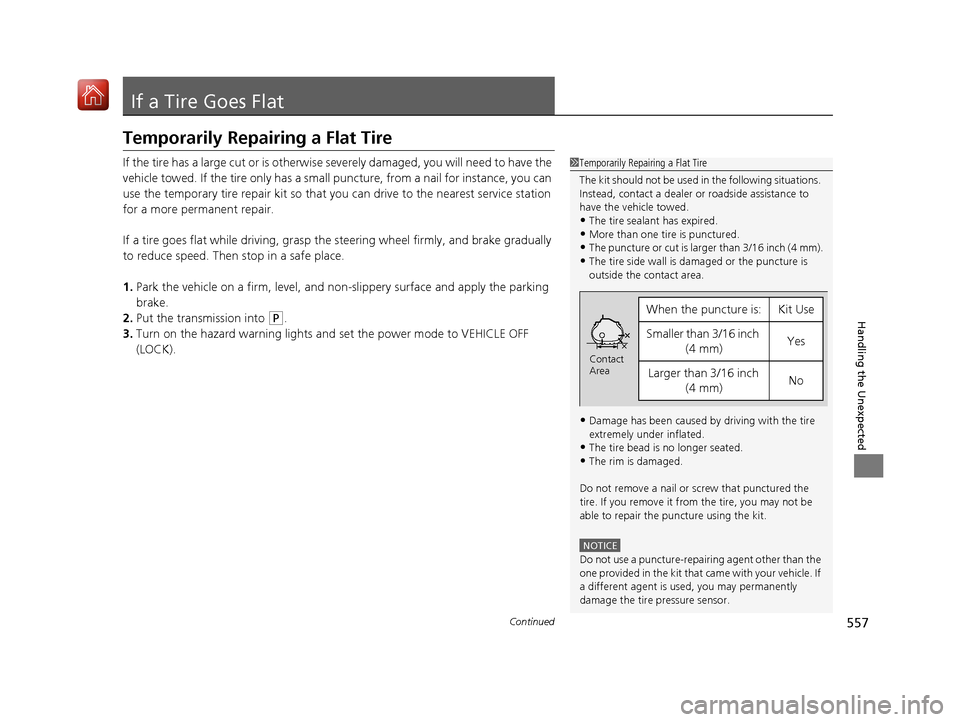
1 Temporarily Repairing a Flat Tire
The kit should not be used in the following situations.
Instead, contact a dealer or roadside assistance to
have the vehicle towed.
•The tire sealant has expired.
•More than one tire is punctured.•The puncture or cut is larger than 3/16 inch (4 mm).
•The tire side wall is da maged or the puncture is
outside the contact area.
•Damage has been caused by driving with the tire
extremely under inflated.
•The tire bead is no longer seated.
•The rim is damaged.
Do not remove a nail or screw that punctured the
tire. If you remove it from the tire, you may not be
able to repair the puncture using the kit.
NOTICE
Do not use a puncture-repairing agent other than the
one provided in the kit that came with your vehicle. If
a different agent is used, you may permanently
damage the tire pressure sensor.
When the puncture isYKit Use
Smaller than 3/16 inch (4 mm)Yes
Larger than 3/16 inch (4 mm)No
Contact
Area
20 ACURA ILX-31TX66710.book 557 ページ 2020年4月16日 木曜日 午後8時46分
Page 573 of 621
572
uuIf a Tire Goes Flat uChanging a Flat Tire
Handling the Unexpected
Changing a Flat Tire
If a tire goes flat while driving, grasp the steering wheel firmly, and brake gradually
to reduce speed. Then, stop in a safe place. Replace the flat tire with a compact
spare tire. Go to a dealer as soon as possible to have th e full-size tire repaired or
replaced.
1. Park the vehicle on firm, level, non-slip pery surface and apply the parking brake.
2. Put the transmission into
(P.
3. Turn on the hazard warning lights an d set the power mode to VEHICLE OFF
(LOCK).
Models with a compact spare tire
1 Changing a Flat Tire
Follow compact spare precautions:
Periodically check the tire pressure of the compact
spare. It should be set to the specified pressure.
Specified Pressure: 60 psi (420 kPa)
When driving with the compact spare tire, keep the
vehicle speed under 50 mph (80 km/h). Replace with
a full-size tire as soon as possible.
The compact spare tire and wheel in your vehicle are
specifically for this model. Do not use them with
another vehicle. Do not us e another type of compact
spare tire or wheel with your vehicle.
Do not mount tire chains on a compact spare tire.
If a chain-mounted front tire goes flat, remove one of
the full-size rear tires and replace it with the compact
spare tire. Remove the flat front tire and replace it
with the full-size tire that was removed from the rear.
Mount the tire chains on the front tire.
Do not use a puncture-repairi ng agent on a flat tire,
as it can damage the tire pressure sensor.
Do not mount the compact spare on the front. If
mounted on the front, the compact spare, smaller in
size than the full-size tire, may damage the
differential.
If either front tire goes flat, remove the rear tire on
the same side, and mount the compact spare on the
rear and the rear tire on the front.
20 ACURA ILX-31TX66710.book 572 ページ 2020年4月16日 木曜日 午後8時46分
Page 580 of 621
579
Handling the Unexpected
Engine Does Not Start
Checking the Engine
If the engine does not start, check the starter.
Starter conditionChecklist
Starter doesn’t turn or turns
over slowly.
The battery may be dead. Check
each of the items on the right and
respond accordingly.Check for a message on the multi-information display.
●If the To Start, Hold Remote Near Start Button message appears
2If the Keyless Access Remote Battery is Weak P. 580
uMake sure the keyless remote is in its operating range.
2 ENGINE START/STOP Button Operating Range P. 135
Check the brightness of the interior lights.
Turn on the interior lights and check the brightness.
●If the interior lights are dim or do not come on at all
2 Battery P. 543●If the interior lights come on normally 2 Fuses P. 592
The starter turns over normally
but the engine doesn’t start.
There may be a problem with the
fuse. Check each of the items on
the right and respond accordingly. Review the engine start procedure.
Follow its instructions, and try
to start the engine again.
2 Starting the Engine P. 426
Check the immobilizer system indicator.
When the immobilizer system indicator is blinking, the engine cannot be started.
2Immobilizer System P. 128
Check the fuel level.
There should be enough fuel in the tank.
2 Fuel Gauge P. 88
Check the fuse.
Check all fuses, or have the vehicle checked by a dealer.
2Inspecting and Changing Fuses P. 594
If the problem continues:
2Emergency Towing P. 595
1Checking the Engine
If you must start the vehi cle immediately, use an
assisting vehicle or booster battery to jump start it.
2 Jump Starting P. 582
20 ACURA ILX-31TX66710.book 579 ページ 2020年4月16日 木曜日 午後8時46分
Page 583 of 621
582
Handling the Unexpected
Jump Starting
Turn off the power to electric devices, such as audio and lights. Turn off the engine,
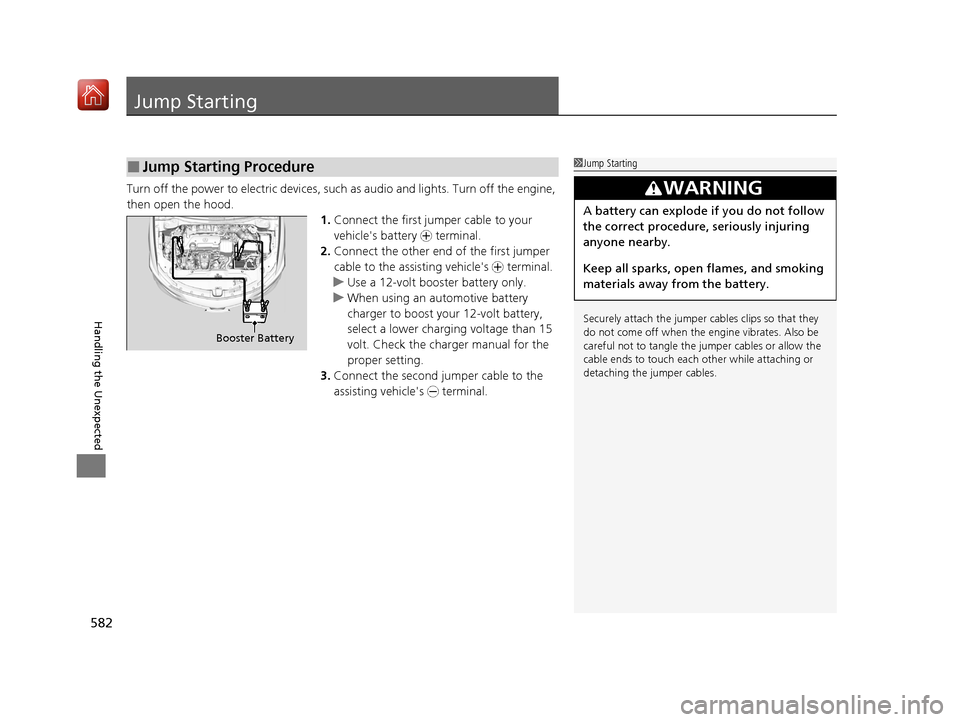
then open the hood. 1.Connect the first jump er cable to your
vehicle's battery + terminal.
2. Connect the other end of the first jumper
cable to the assisting vehicle's + terminal.
u Use a 12-volt booster battery only.
u When using an automotive battery
charger to boost your 12-volt battery,
select a lower charging voltage than 15
volt. Check the charger manual for the
proper setting.
3. Connect the second jumper cable to the
assisting vehicle's - terminal.
■Jump Starting Procedure1Jump Starting
Securely attach the jumper cables clips so that they
do not come off when the e ngine vibrates. Also be
careful not to tangle the ju mper cables or allow the
cable ends to touch each other while attaching or
detaching the jumper cables.
3WARNING
A battery can explode if you do not follow
the correct procedure, seriously injuring
anyone nearby.
Keep all sparks, open flames, and smoking
materials away from the battery.
Booster Battery
20 ACURA ILX-31TX66710.book 582 ページ 2020年4月16日 木曜日 午後8時46分
Page 584 of 621
Continued583
uuJump Starting u
Handling the Unexpected
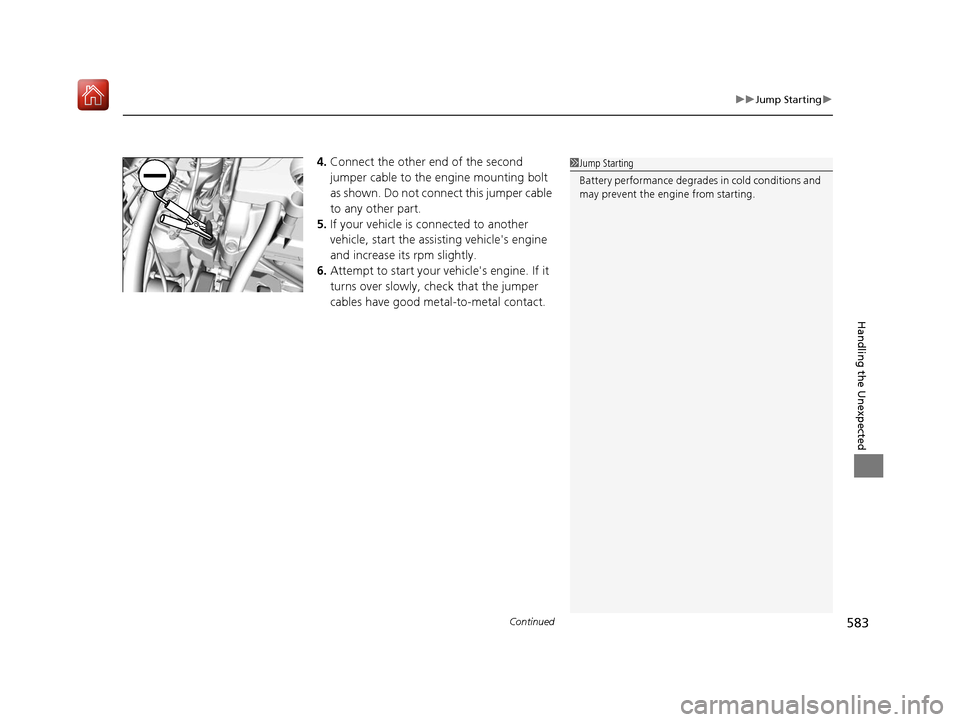
4.Connect the other end of the second
jumper cable to the engine mounting bolt
as shown. Do not connect this jumper cable
to any other part.
5. If your vehicle is connected to another
vehicle, start the assisting vehicle's engine
and increase its rpm slightly.
6. Attempt to start your ve hicle's engine. If it
turns over slowly, check that the jumper
cables have good metal-to-metal contact.1 Jump Starting
Battery performance degrades in cold conditions and
may prevent the engi ne from starting.
20 ACURA ILX-31TX66710.book 583 ページ 2020年4月16日 木曜日 午後8時46分