warning light Acura ILX 2020 User Guide
[x] Cancel search | Manufacturer: ACURA, Model Year: 2020, Model line: ILX, Model: Acura ILX 2020Pages: 621, PDF Size: 34.94 MB
Page 460 of 621
459
uuAcuraWatchTMuAdaptive Cruise Control (ACC)
Continued
Driving
Adaptive Cruise Control (ACC)
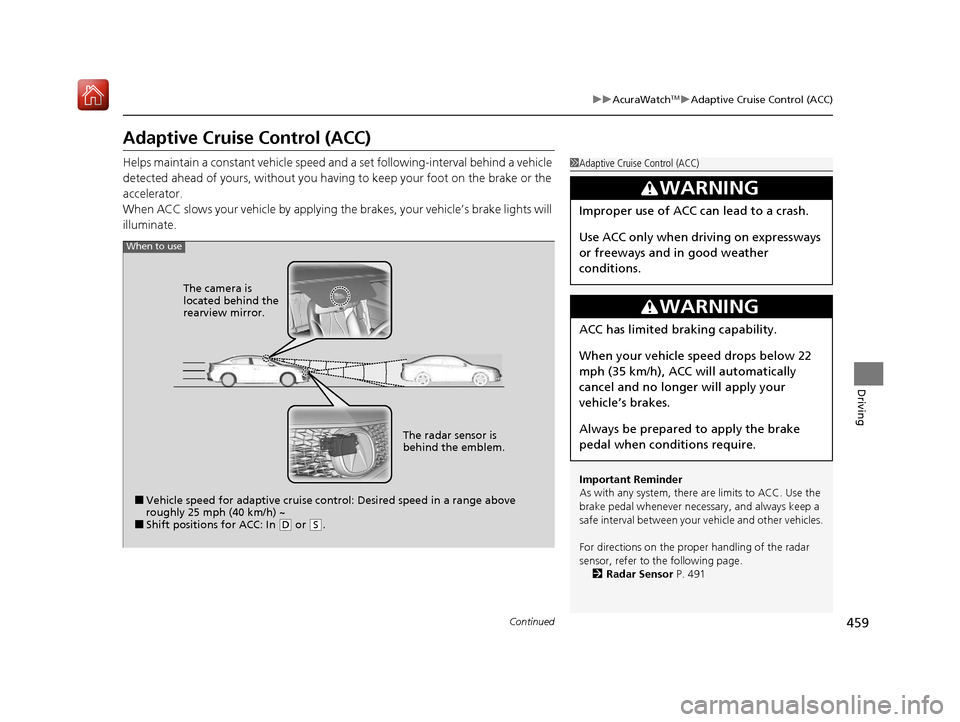
Helps maintain a constant vehicle speed a nd a set following-interval behind a vehicle
detected ahead of yours, without you having to keep your foot on the brake or the
accelerator.
When ACC slows your vehicle by applying the brakes, your vehicle’s brake lights will
illuminate.1 Adaptive Cruise Control (ACC)
Important Reminder
As with any system, there are limits to ACC. Use the
brake pedal whenever necessary, and always keep a
safe interval betw een your vehicle and other vehicles.
For directions on the prop er handling of the radar
sensor, refer to the following page. 2 Radar Sensor P. 491
3WARNING
Improper use of ACC can lead to a crash.
Use ACC only when driving on expressways
or freeways and in good weather
conditions.
3WARNING
ACC has limited braking capability.
When your vehicle speed drops below 22
mph (35 km/h), ACC will automatically
cancel and no longer will apply your
vehicle’s brakes.
Always be prepared to apply the brake
pedal when conditions require.
When to use
■Vehicle speed for adaptive cruise control: Desired speed in a range above
roughly 25 mph (40 km/h) ~
■Shift positions for ACC: In ( D or (S. The radar sensor is
behind the emblem.
The camera is
located behind the
rearview mirror.
20 ACURA ILX-31TX66710.book 459 ページ 2020年4月16日 木曜日 午後8時46分
Page 465 of 621
uuAcuraWatchTMuAdaptive Cruise Control (ACC)
464
Driving
The system may automatically shut off and the ACC indicator will come on under
certain conditions. Some examples of th ese conditions are listed below. Other
conditions may reduce some of the ACC functions.
2 Front Sensor Camera P. 489
■Environmental conditions
Driving in bad weather (r ain, fog, snow, etc.).
■Roadway conditions
Driving on a snowy or wet roadway (obscure d lane marking, vehicle tracks, reflected
lights, road spray, high contrast).
■Vehicle conditions
• The outside of the windshie ld is blocked by dirt, mud, leaves, wet snow, etc.
• An abnormal tire or wheel condition (wrong sized, varied size or construction,
improperly inflated, compact spare tire
*, etc.).
• The camera temperature gets too high.
• The parking brake is applied.
• When the front grille is dirty.
• The vehicle is tilted due to a heav y load or suspension modifications.
• When tire chains are installed.
■ACC Conditions and Limitations1ACC Conditions and Limitations
Have your vehicle checked by a dealer if you find any
unusual behavior of the system (e.g., the warning
message appears too frequently).
* Not available on all models
20 ACURA ILX-31TX66710.book 464 ページ 2020年4月16日 木曜日 午後8時46分
Page 476 of 621
Continued475
uuAcuraWatchTMuLane Keeping Assist System (LKAS)
Driving
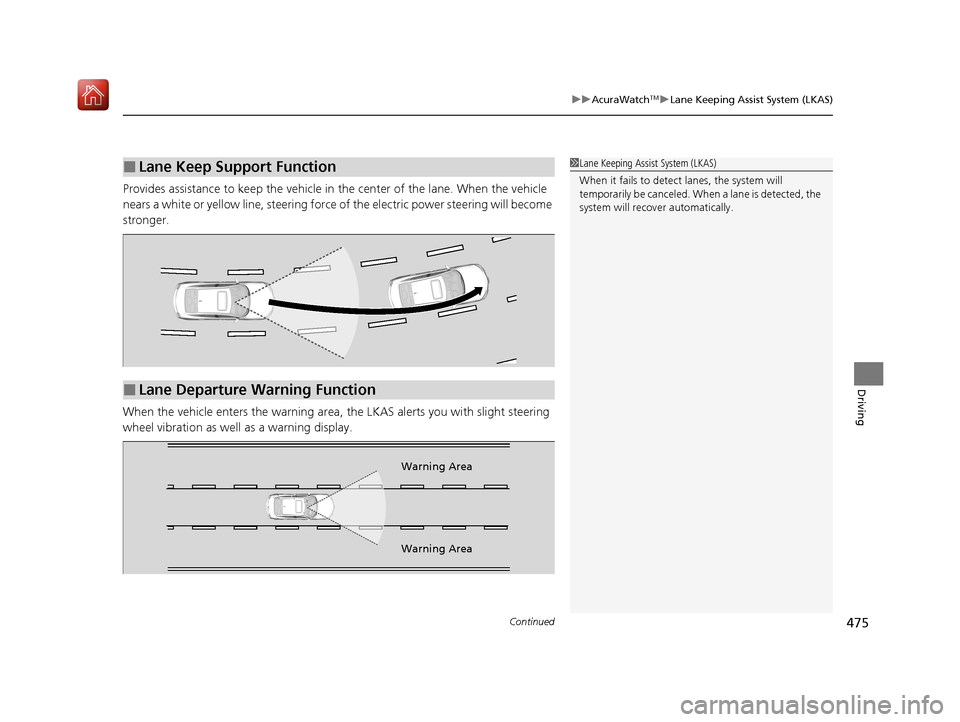
Provides assistance to keep the vehicle in the center of the lane. When the vehicle
nears a white or yellow line, steering force of the electric power steering will become
stronger.
When the vehicle enters the warning area, the LKAS alerts you with slight steering
wheel vibration as well as a warning display.
■Lane Keep Support Function1 Lane Keeping Assist System (LKAS)
When it fails to detect lanes, the system will
temporarily be canceled. When a lane is detected, the
system will recover automatically.
■Lane Departure Warning Function
Warning Area
Warning Area
20 ACURA ILX-31TX66710.book 475 ページ 2020年4月16日 木曜日 午後8時46分
Page 493 of 621
492
Driving
Braking
Brake System
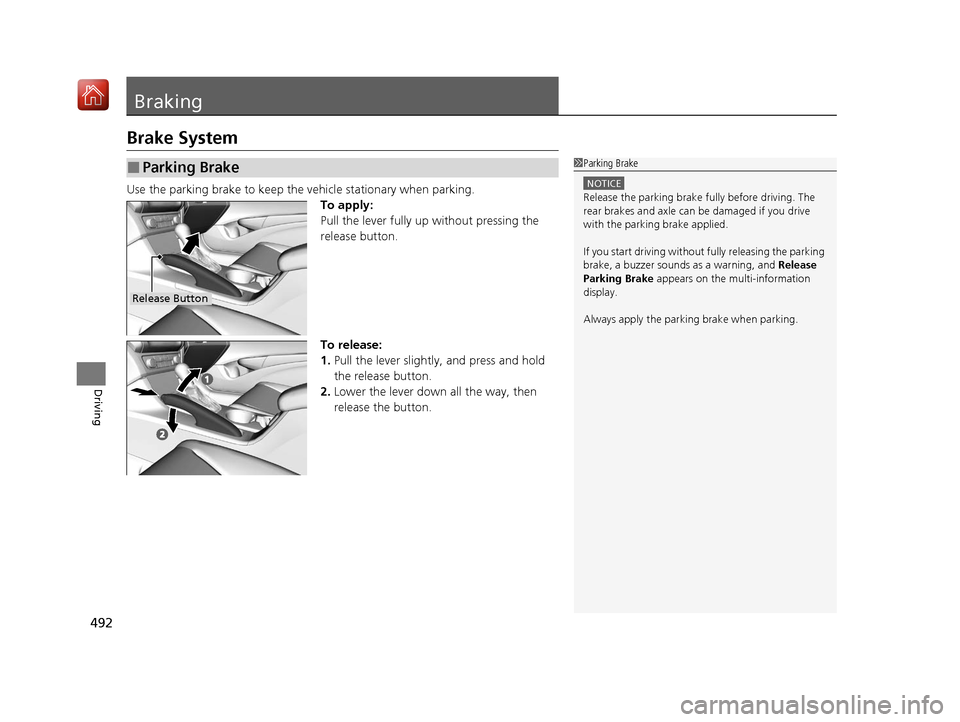
Use the parking brake to keep the vehicle stationary when parking.To apply:
Pull the lever fully up without pressing the
release button.
To release:
1. Pull the lever slightly, and press and hold
the release button.
2. Lower the lever down all the way, then
release the button.
■Parking Brake1Parking Brake
NOTICE
Release the parking brake fu lly before driving. The
rear brakes and axle can be damaged if you drive
with the parki ng brake applied.
If you start driving without fully releasing the parking
brake, a buzzer sounds as a warning, and Release
Parking Brake appears on the multi-information
display.
Always apply the parking brake when parking.
Release Button
20 ACURA ILX-31TX66710.book 492 ページ 2020年4月16日 木曜日 午後8時46分
Page 558 of 621
557Continued
Handling the Unexpected
If a Tire Goes Flat
Temporarily Repairing a Flat Tire
If the tire has a large cut or is otherwise severely damaged, you will need to have the
vehicle towed. If the tire only has a small puncture, from a nail for instance, you can
use the temporary tire repair kit so that you can drive to the nearest service station
for a more permanent repair.
If a tire goes flat while driving, grasp the steering wheel firmly, and brake gradually
to reduce speed. Then stop in a safe place.
1. Park the vehicle on a firm, level, and n on-slippery surface and apply the parking
brake.
2. Put the transmission into
(P.
3. Turn on the hazard warning lights an d set the power mode to VEHICLE OFF
(LOCK).
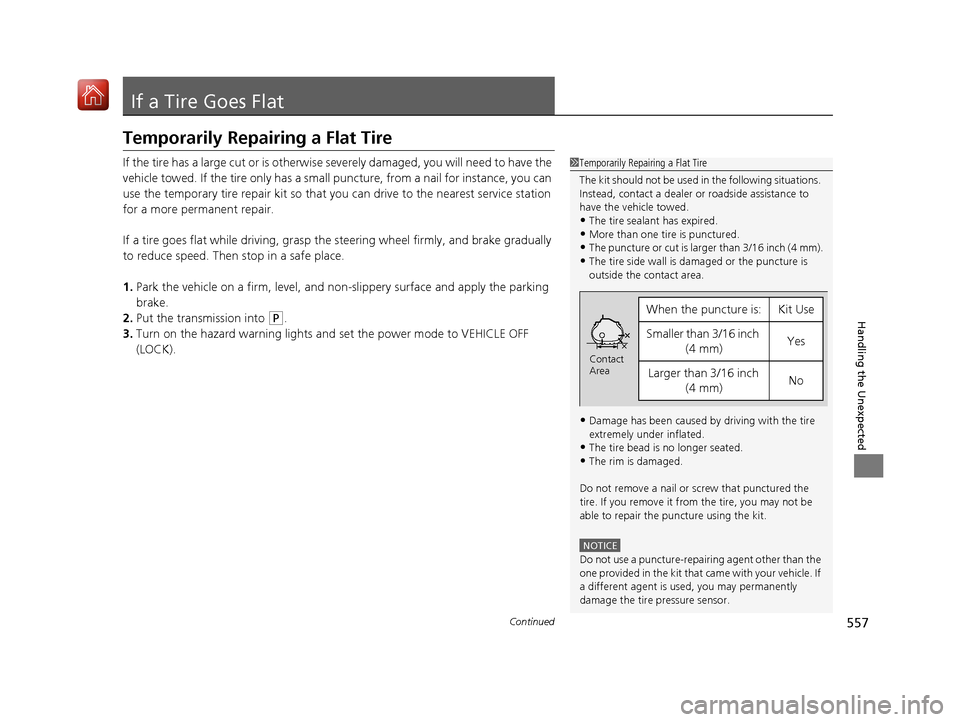
1 Temporarily Repairing a Flat Tire
The kit should not be used in the following situations.
Instead, contact a dealer or roadside assistance to
have the vehicle towed.
•The tire sealant has expired.
•More than one tire is punctured.•The puncture or cut is larger than 3/16 inch (4 mm).
•The tire side wall is da maged or the puncture is
outside the contact area.
•Damage has been caused by driving with the tire
extremely under inflated.
•The tire bead is no longer seated.
•The rim is damaged.
Do not remove a nail or screw that punctured the
tire. If you remove it from the tire, you may not be
able to repair the puncture using the kit.
NOTICE
Do not use a puncture-repairing agent other than the
one provided in the kit that came with your vehicle. If
a different agent is used, you may permanently
damage the tire pressure sensor.
When the puncture isYKit Use
Smaller than 3/16 inch (4 mm)Yes
Larger than 3/16 inch (4 mm)No
Contact
Area
20 ACURA ILX-31TX66710.book 557 ページ 2020年4月16日 木曜日 午後8時46分
Page 573 of 621
572
uuIf a Tire Goes Flat uChanging a Flat Tire
Handling the Unexpected
Changing a Flat Tire
If a tire goes flat while driving, grasp the steering wheel firmly, and brake gradually
to reduce speed. Then, stop in a safe place. Replace the flat tire with a compact
spare tire. Go to a dealer as soon as possible to have th e full-size tire repaired or
replaced.
1. Park the vehicle on firm, level, non-slip pery surface and apply the parking brake.
2. Put the transmission into
(P.
3. Turn on the hazard warning lights an d set the power mode to VEHICLE OFF
(LOCK).
Models with a compact spare tire
1 Changing a Flat Tire
Follow compact spare precautions:
Periodically check the tire pressure of the compact
spare. It should be set to the specified pressure.
Specified Pressure: 60 psi (420 kPa)
When driving with the compact spare tire, keep the
vehicle speed under 50 mph (80 km/h). Replace with
a full-size tire as soon as possible.
The compact spare tire and wheel in your vehicle are
specifically for this model. Do not use them with
another vehicle. Do not us e another type of compact
spare tire or wheel with your vehicle.
Do not mount tire chains on a compact spare tire.
If a chain-mounted front tire goes flat, remove one of
the full-size rear tires and replace it with the compact
spare tire. Remove the flat front tire and replace it
with the full-size tire that was removed from the rear.
Mount the tire chains on the front tire.
Do not use a puncture-repairi ng agent on a flat tire,
as it can damage the tire pressure sensor.
Do not mount the compact spare on the front. If
mounted on the front, the compact spare, smaller in
size than the full-size tire, may damage the
differential.
If either front tire goes flat, remove the rear tire on
the same side, and mount the compact spare on the
rear and the rear tire on the front.
20 ACURA ILX-31TX66710.book 572 ページ 2020年4月16日 木曜日 午後8時46分
Page 583 of 621
582
Handling the Unexpected
Jump Starting
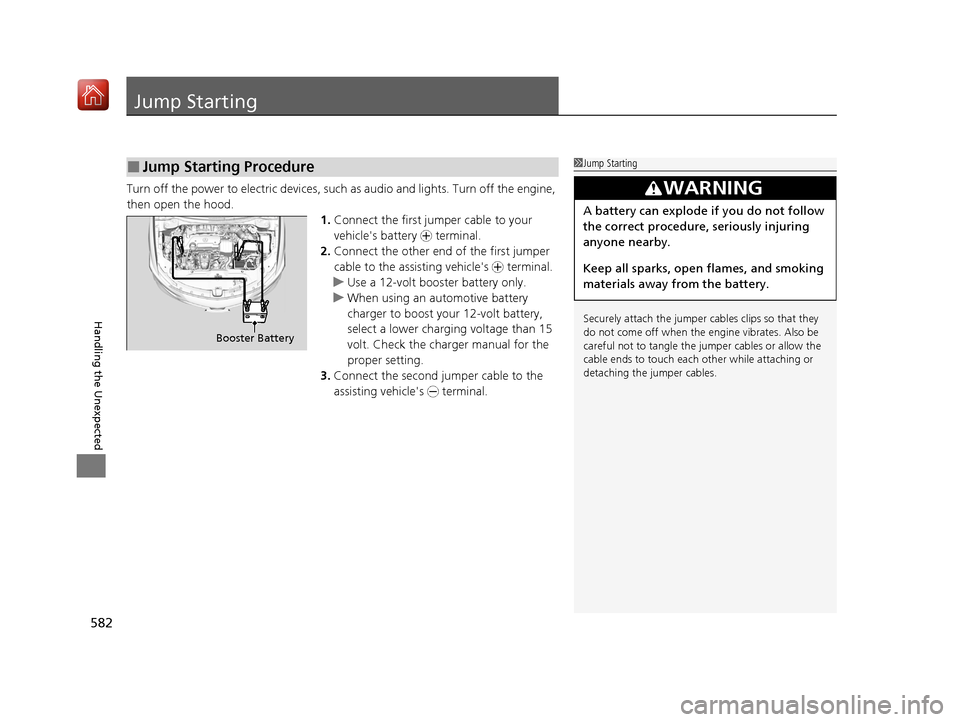
Turn off the power to electric devices, such as audio and lights. Turn off the engine,
then open the hood. 1.Connect the first jump er cable to your
vehicle's battery + terminal.
2. Connect the other end of the first jumper
cable to the assisting vehicle's + terminal.
u Use a 12-volt booster battery only.
u When using an automotive battery
charger to boost your 12-volt battery,
select a lower charging voltage than 15
volt. Check the charger manual for the
proper setting.
3. Connect the second jumper cable to the
assisting vehicle's - terminal.
■Jump Starting Procedure1Jump Starting
Securely attach the jumper cables clips so that they
do not come off when the e ngine vibrates. Also be
careful not to tangle the ju mper cables or allow the
cable ends to touch each other while attaching or
detaching the jumper cables.
3WARNING
A battery can explode if you do not follow
the correct procedure, seriously injuring
anyone nearby.
Keep all sparks, open flames, and smoking
materials away from the battery.
Booster Battery
20 ACURA ILX-31TX66710.book 582 ページ 2020年4月16日 木曜日 午後8時46分
Page 587 of 621
586
Handling the Unexpected
Overheating
How to Handle Overheating
Overheating symptoms are as follows:
•The temperature gauge needle is at th e mark or the engine suddenly loses
power.
• The Engine Temperature Too Hot. message appears on the multi-information
display.
• Steam or spray comes out of the engine compartment.
■First thing to do
1. Immediately park the vehicle in a safe place.
2. Turn off all accessories and turn on the hazard warning lights.
u No steam or spray present: Keep the engine running and open the hood.
u Steam or spray is present: Turn off the engine and wait until it subsides.
Then open the hood.
1 How to Handle Overheating
NOTICE
Continuing to drive with the temperature gauge
needle at the mark may damage the engine.
Continuing to drive with the Engine Temperature
Too Hot. message on the multi- information display
may damage the engine.
3WARNING
Steam and spray from an overheated
engine can seri ously scald you.
Do not open the hood if steam is coming
out.
H
H
20 ACURA ILX-31TX66710.book 586 ページ 2020年4月16日 木曜日 午後8時46分
Page 589 of 621
588
Handling the Unexpected
Indicator, Coming On/Blinking
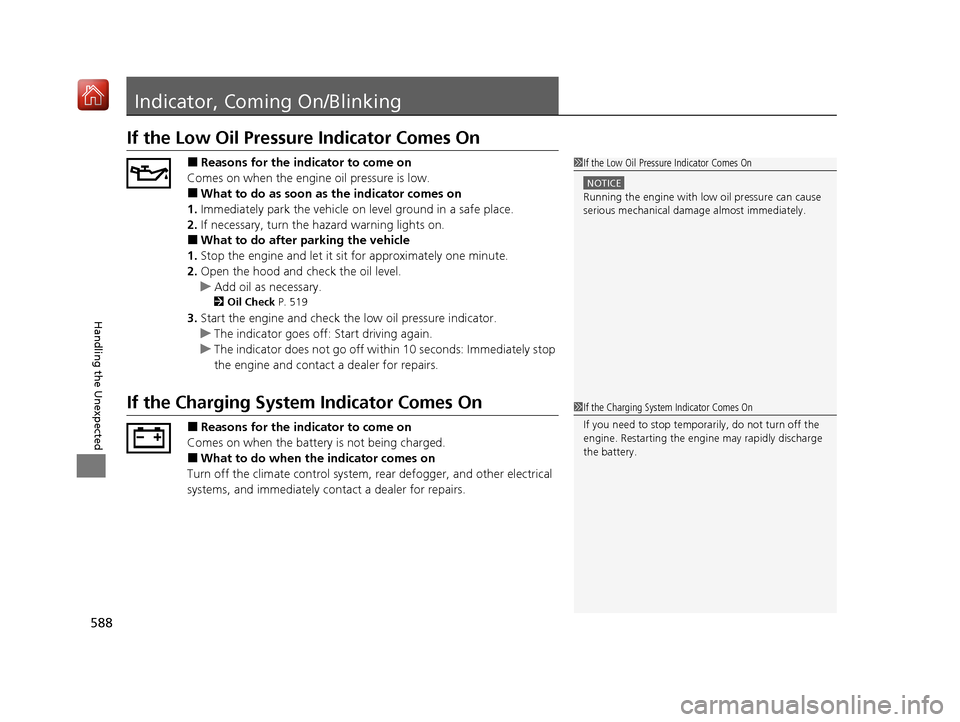
If the Low Oil Pressure Indicator Comes On
■Reasons for the indicator to come on
Comes on when the engine oil pressure is low.
■What to do as soon as the indicator comes on
1. Immediately park the vehicle on level ground in a safe place.
2. If necessary, turn the ha zard warning lights on.
■What to do after parking the vehicle
1. Stop the engine and let it sit for approximately one minute.
2. Open the hood and check the oil level.
u Add oil as necessary.
2 Oil Check P. 519
3.Start the engine and check th e low oil pressure indicator.
u The indicator goes off: Start driving again.
u The indicator does not go off with in 10 seconds: Immediately stop
the engine and contact a dealer for repairs.
If the Charging System Indicator Comes On
■Reasons for the indicator to come on
Comes on when the battery is not being charged.
■What to do when the indicator comes on
Turn off the climate con trol system, rear defogger, and other electrical
systems, and immediately contact a dealer for repairs.
1 If the Low Oil Pressure Indicator Comes On
NOTICE
Running the engine with low oil pressure can cause
serious mechanical damage almost immediatelyM
1If the Charging System Indicator Comes On
If you need to stop temporarily, do not turn off the
engine. Restarting the engi ne may rapidly discharge
the battery.
20 ACURA ILX-31TX66710.book 588 ページ 2020年4月16日 木曜日 午後8時46分
Page 616 of 621
615
Index
G
Gasoline (Fuel)Economy................................................. 505
Gauge ...................................................... 88
Information............................................. 503
Instant Fuel Economy ................................ 93
Low Fuel Indicator..................................... 71
Refueling ................................................ 503
Gauges ........................................................ 88
Gear Position Indicator .............................. 69
Glass (care) ............................................... 551
Glove Box ................................................. 166
H
Handling the Unexpected ....................... 555
HandsFreeLink ® (HFL) ...................... 339, 368
Auto Answer .......................................... 385
Automatic Import of Cellular Phonebook and Call History .......... 355, 387
Automatic Transferring ................... 353, 385
Caller’s ID Information ............................ 353
Displaying Messages ....................... 364, 405
HFL Buttons .................................... 339, 368
HFL Menus...................................... 341, 371
HFL Status Display ........................... 340, 369
Limitations for Manual Operation.... 340, 370
Making a Call ................................. 358, 396
Options During a Call...................... 362, 402
Phone Setup ................................... 346, 376
Phonebook Phonetic Modification........... 391 Receiving a Call ............................... 361, 401
Receiving a Text Message ........................ 363
Receiving a Text/E-mail Message .............. 403
Ring Tone ................................................ 386
Roadside Assistance ................................. 409
Selecting a Text/E-mail Message
Account................................................. 404
Speed Dial ....................................... 356, 388
Text Message .................................. 351, 363
To Clear the System ................................. 354
To Create a Security PIN .................. 352, 383
To Set Up a Text Message Notice Option ................................................... 351
To Set Up a Text/E-mail Message Option .. 381
Use Contact Photo .................................. 386
Hard Disk Drive (HDD) Audio .................. 238
Hazard Warning Button ............................... 4
Head Restraints ......................................... 158
Headlights ................................................. 139
Auto High-Beam System .......................... 143
Automatic Operation ............................... 140
Dimming ......................................... 139, 142
Operating ................................................ 139
Heaters (Seat) ........................................... 170
HFL (HandsFreeLink ®)....................... 339, 368
High-Beam Indicator .................................. 74
Hill Start Assist System ............................. 430
HomeLink® Universal Transceiver ............ 336
Honda App License Agreement ............... 290
I
Identification Numbers............................ 600
Engine and Transmission ......................... 600
Vehicle Identification ............................... 600
Illumination Control ................................. 148
Knob ....................................................... 148
Immobilizer System .................................. 128
Indicator.................................................... 75
20 ACURA ILX-31TX66710.book 615 ページ 2020年4月16日 木曜日 午後8時46分