parking brake ACURA INTEGRA 1998 Service Owner's Manual
[x] Cancel search | Manufacturer: ACURA, Model Year: 1998, Model line: INTEGRA, Model: ACURA INTEGRA 1998Pages: 1680, PDF Size: 53.14 MB
Page 579 of 1680
Transmission
SUB.SHAFT
MAINSHAFT
Reassembly {cont'd)
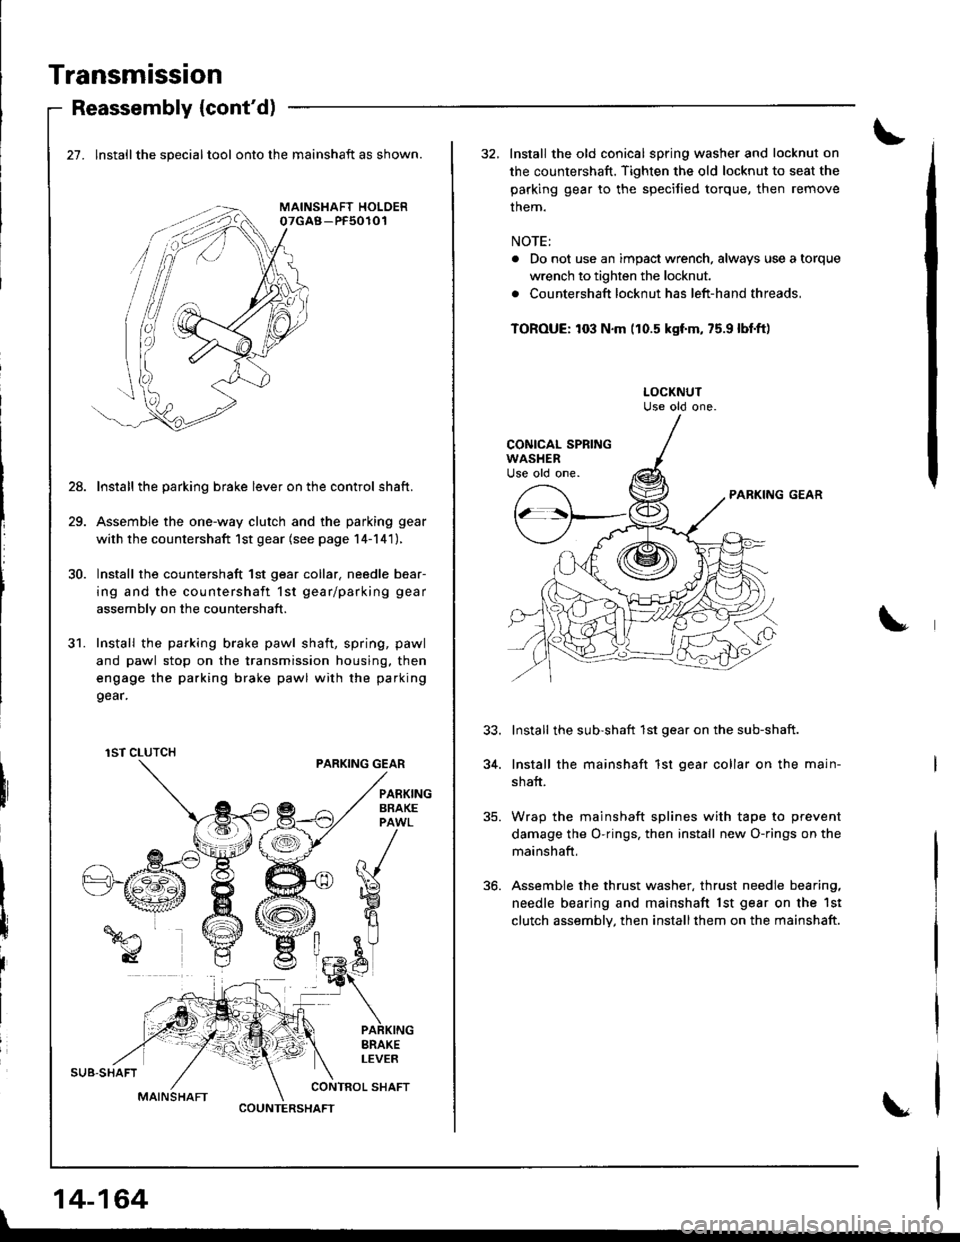
27. lnstallthe specialtool onto the mainshaft as shown.
Install the parking brake lever on the control shaft.
Assemble the one-way clutch and the parking gear
with the countershaft 1st gear (see page 14-141),
Install the countershaft 1st gear collar. needle bear-
ing and the countershaft 1st gear/parking gear
assembly on the countershaft.
Install the parking brake pawl shaft, spring, pawl
and pawl stop on the transmission housing. then
engage the parking brake pawl with the parking
9ear.
PARKING GEAR
28.
31.
I
I
iIBRAKELEVER
CONTROL SHAFT
1ST CLUTCH
COUNTERSHAFT
|
14-164
32, Install the old conical spring washer and locknut on
the countershaft. Tighten the old locknut to seat the
parking gear to the speciJied torque, then remove
them.
NOTE:
. Do not use an impact wrench, always use a torque
wrench to tighten the locknut.
. Countershaft locknut has left-hand threads,
TOROUE: to3 N.m (10.5 kgf'm, 75.9 lbl.ft)
PARKING GEAR
Install the sub-shaft 1st gear on the sub-shaft.
Install the mainshaft 1st gear collar on the main-
shaft.
Wrap the mainshaft splines with tape to prevent
damage the O-rings, then install new O-rings on the
mainshaft,
Assemble the thrust washer, thrust needle bearing,
needle bearing and mainshaft lst gear on the 1st
clutch assembly, then installthem on the mainshaft.
34.
Page 580 of 1680
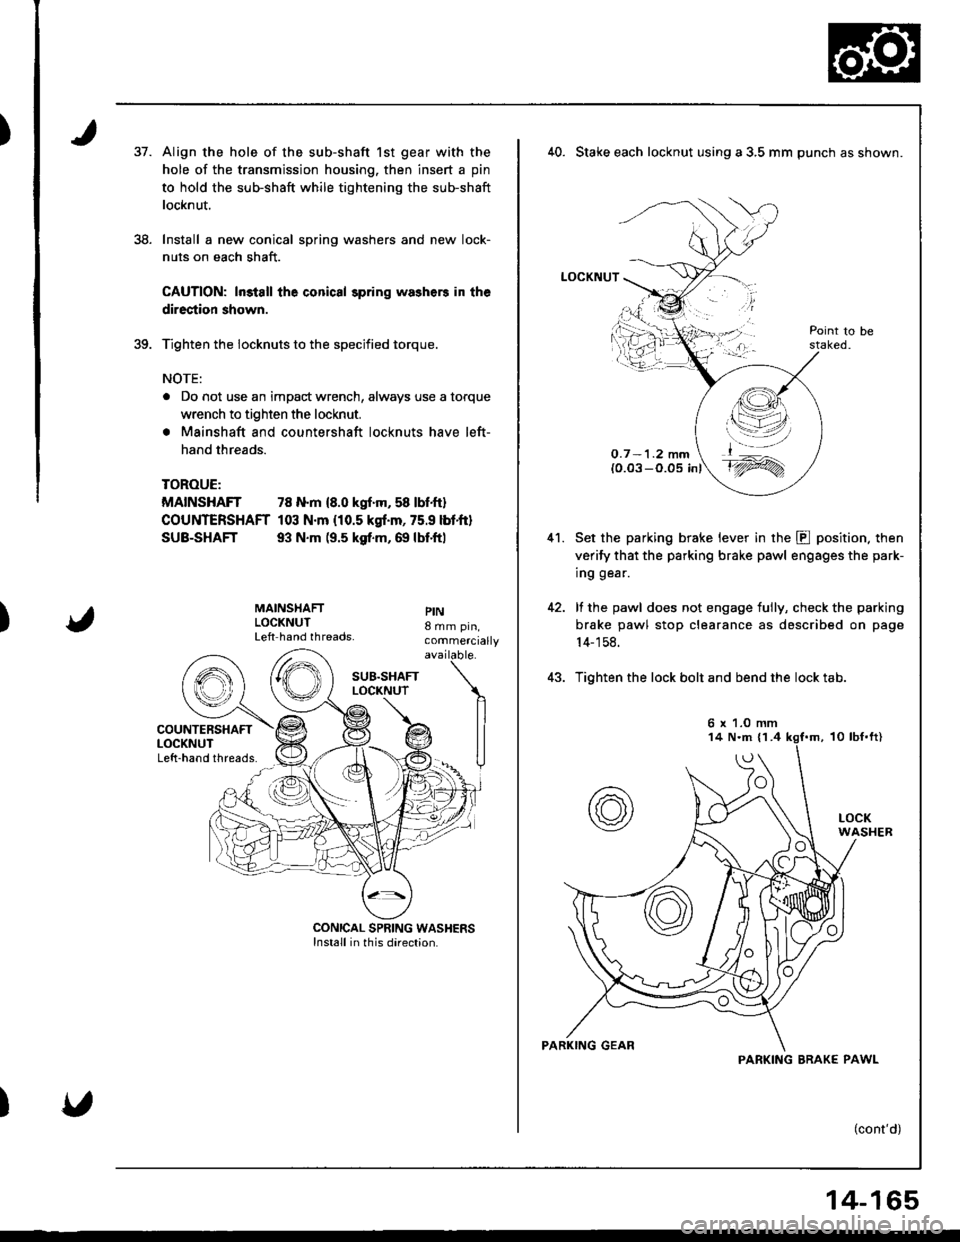
)37.
38.
Align the hole of the sub-shaft 1st gear with the
hole of the transmission housing. then insert a pin
to hold the sub-shaft while tightening the sub-shaft
locknut.
Install a new conical spring washers and new lock-
nuts on each shaft.
CAUTION: ln3tall the conical spring washers in the
direction shown.
Tighten the iocknuts to the specified torque.
NOTE:
a Do not use an impact wrench, always use a torque
wrench to tighten the locknut.
. Mainshaft and countershaft locknuts have left-
hand threads.
TOROUE:
MAINSHAFT 78 N.m {8.0 kgf.m, 58 lbf.ft}
COUNTERSHAFT 103 N.m {10.5 kgf.m, 75.9 lbtft}
SUB-SHAFT 93 N.m (9.5 ksf.m, 69 lbf.ftl
)
MAINSHAFTLOCKNUTLeft hand threads.
PIN8 mm pin,commercially
40. Stake each locknut using a 3,5 mm punch as shown.
LOCKNUT
O.7 -1.2 mm(0.03 -O.05 inl
Set the parking brake lever in the E position. then
verify that the parking brake pawl engages the park-
ing gear.
lf the pawl does not engage tully, check the parking
brake pawl stop clearance as described on page
14- 1 58.
Tighten the lock bolt and bend the lock tab.
(cont'd)
41.
t,\--l--'-,4 l';-.-='/
t_^
t'1ry
6 x 1.0 mm
PARKING BRAK€ PAWL
14-165
Page 586 of 1680
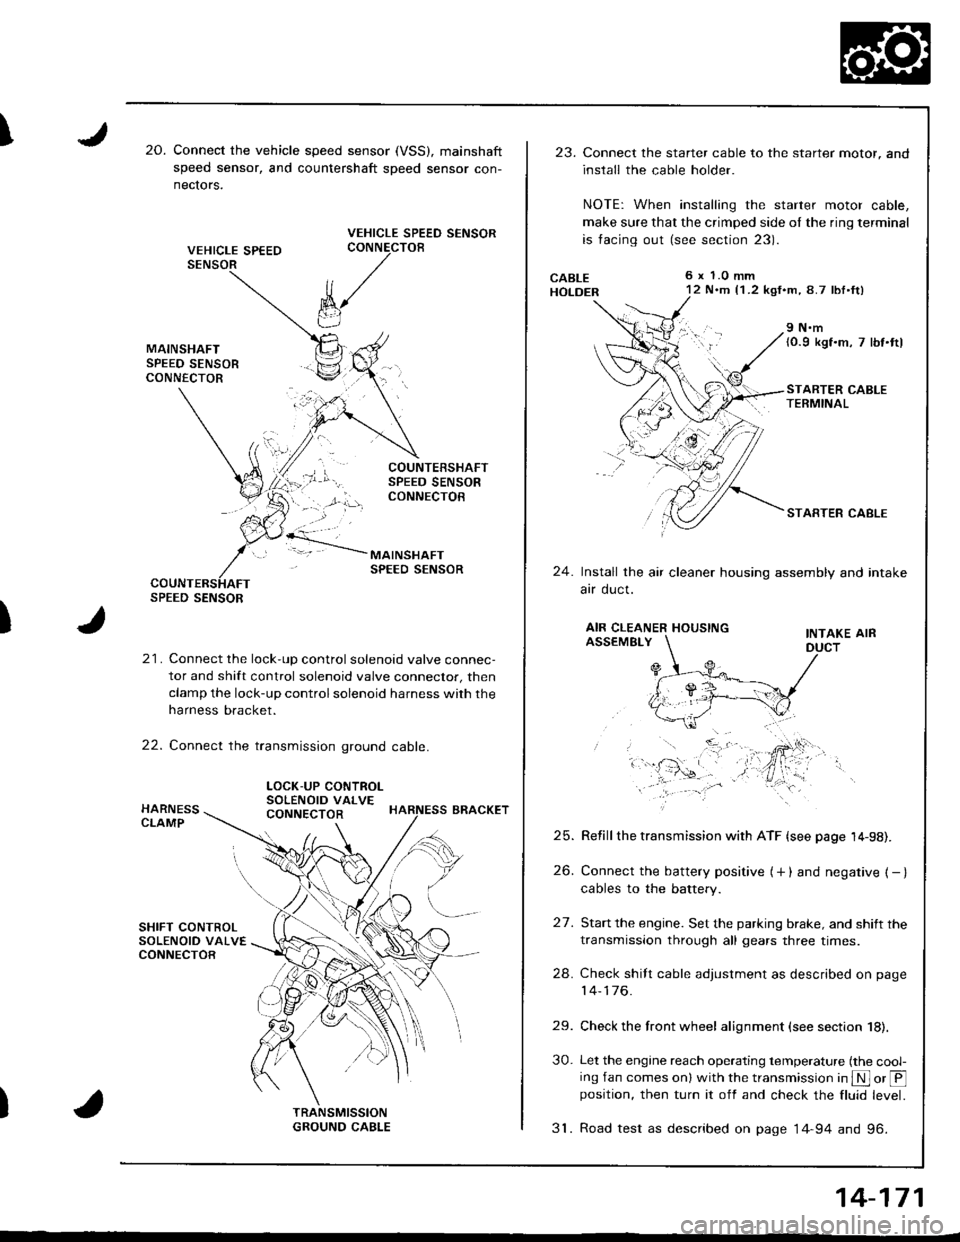
I20.Connect the vehicle speed sensor (VSS), mainshaft
speed sensor, and countershaft sDeed sensor con-
nectors.
VEHICLE SPEED SENSORCONNECTOB
)
k/
t"J
21. Connect the lock-up control solenoid valve connec-
tor and shift control solenoid valve conneclor, then
clamp the lock-up control solenoid harness with the
harness bracket.
22. Connect the transmission ground cable.
SPEED SENSOR
LOCK-UP CONTROLSOLENOID VALVECONNECTOR
23.Connect the starter cable to the starter motor, and
install the cable holder.
NOTE: When installing the starter motor cable,
make sure that the crimped side ol the ring terminal
is facing out (see section 23).
6 x 1.0 mm12 N.m {1 .2 kgf.m, 8.7 lbl.ft)
9 N.m(0.9 kgf.m, 7 lbt.ttl
STARTER CABLETERMINAL
STARTER CABLE
24.Install the air cleaner housing assembly and intake
arr oucl.
AIR CLEANER HOUSINGINTAKE AIRASSEMBLY
27.
Refill the transmission with ATF {see page 14-98).
Connect the battery positive (+ ) and negative { - }cables to the battery.
Start the engine. Set the parking brake, and shift the
transmission through all gears three times.
Check shilt cable adjustment as described on page
14-176.
Check the front wheel alignment (see section 18).
Let the engine reach operating temperature (the cool-ing fan comes onl with the transmission in S or @position, then turn it off and check the fluid level.
31. Road test as described on page 14-94 and 96.
25.
26.
24.
29.
30.
14-171
Page 619 of 1680
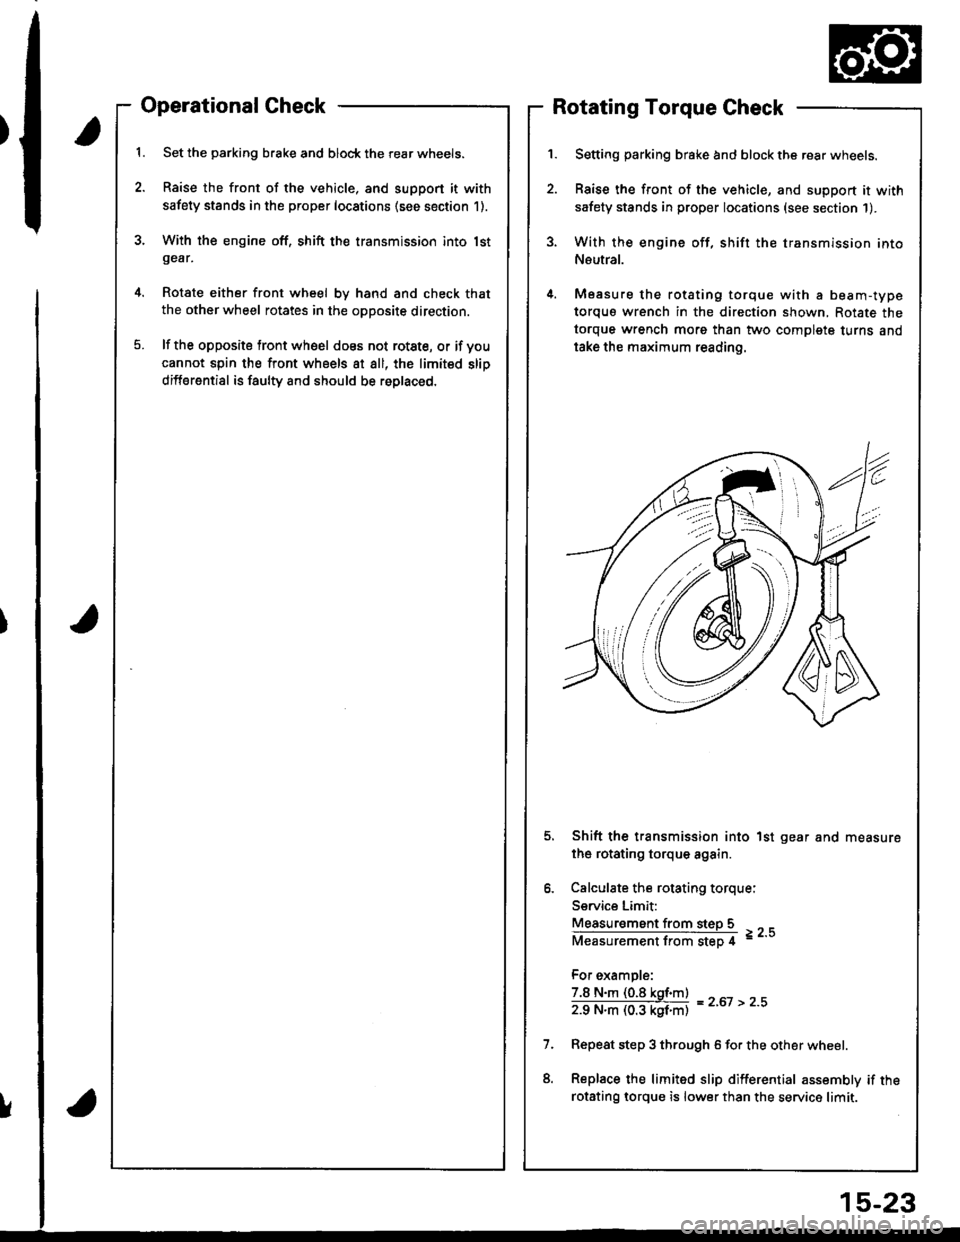
Operational Check
Set the parking brake and block the rear wheels.
Raise the front of the vehicle, and support it with
safety stands in the proper locations (see section 1).
With the engine off, shift the transmission into lstgear,
Rotate either front wheel bv hand and check that
the other wheel rotates in the opposite direction.
lf the opposite tront wheel does not rotste, or if voucannot spin the front wheels at all, the limited slip
differential is faulty and should be roplaced.
Rotating Torque Check
Setting parking brake and block the rear wheels.
Raise the front of the vehicle, and support it with
safety stands in proper locations (see section 1).
With the engine off, shift the transmission into
Neutral.
Measure the rotating torque with a beam-type
torquo wrench in the direction shown, Rotate the
torque wrench morg than two complete turns and
take the maximum reading.
Shift the transmission into 1st gear and measure
the rotating torque again.
Calculate the rotating torque:
Service Limit:
Measur€ment from steD 5
Measurementfrom step 4 =--
For example:
7.8 N.m (0.8 kgf.m)
zg N"ll (03 kgf'ntl = z'ot > z''
Repeat step 3 through 6 for the other wheel.
Replace the limited slip differential assembly if the
rotsting lorque is lower than the service limit.
!
15-23
Page 714 of 1680
\
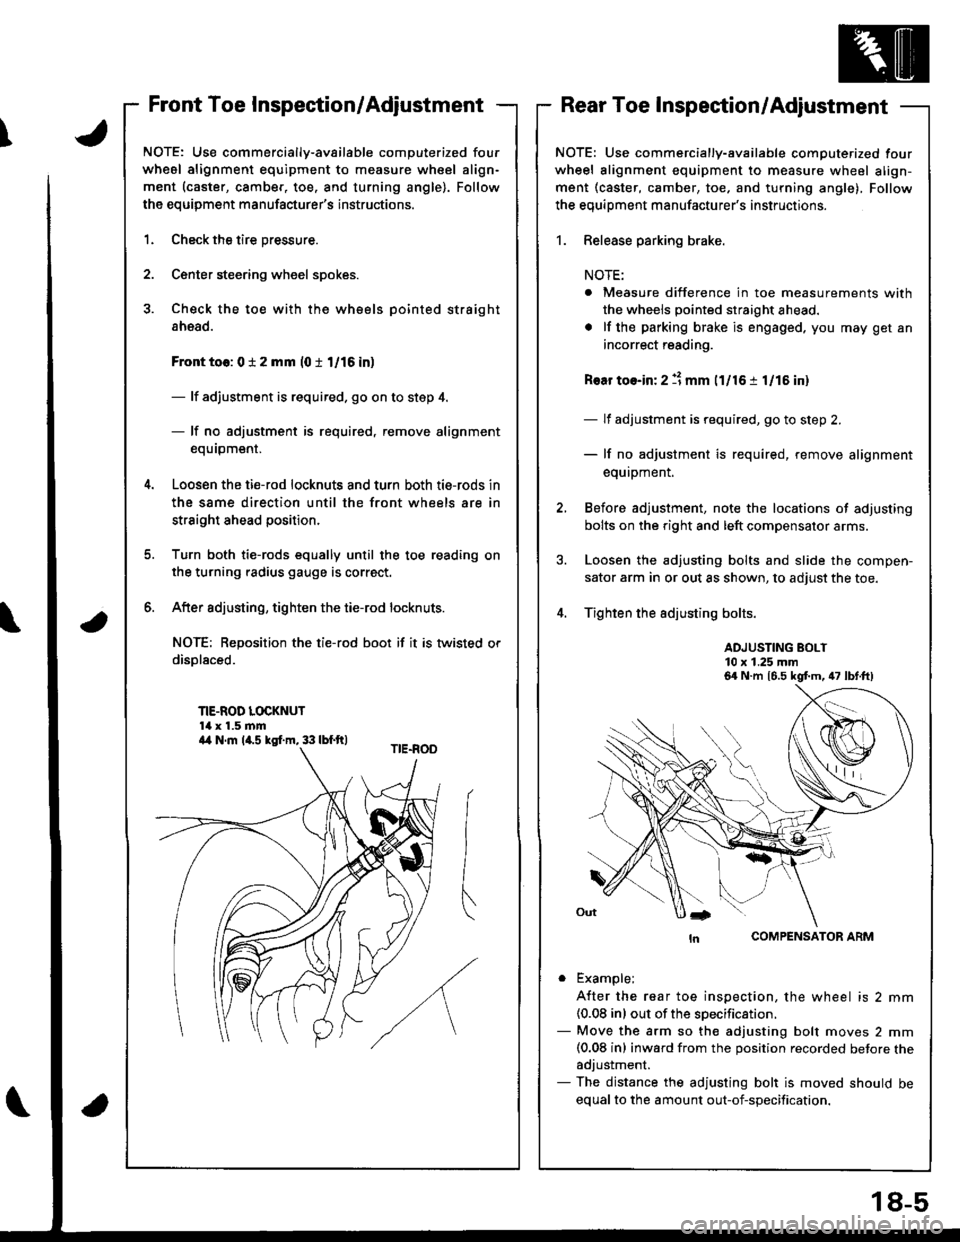
Front Toe Inspection/AdjustmentRear Toe Inspection/Adjustment
NOTE: Use commercially-available computerized four
whesl alignment equipment to measure wheel align-
ment (caster, camber, toe. and turning angle). Follow
the equipment manufacturer's instructions.
1.
2.
Check the tire pressure.
C€nter steering wheel spokes.
Check the toe with the wh€els pointed straight
ahead.
Front to6: 0 i 2 mm (0 t 1/16 in)
- lf adjustment is required. go on to step 4.
- lf no adjustment is required, remove alignment
equrpm€nr,
Loosen the ti€-rod locknuts and turn both tie-rods in
the same direction until the front wheels are in
straight ahead position.
Turn both tie-rods equally until the toe reading on
the turning radius gauge is correct.
After sdjusting, tighten the tie-rod locknuts.
NOT€: Reposition the tie-rod boot if it is twisted or
displaced.
TIE-ROD LOCKNUT14 x 1.5 mm
6.
a
NOTE: Use commercially-available computerized four
wheel alignment equipment to measure wheel align-
ment (caster, camber, toe, and turning angle), Follow
the equiDment manufacturer's instructions.
1. Release parking brake.
NOTE:
. Measure difference in toe measurements with
the wheels pointed straight ahead.
. lf the parking brake is engaged. you may get an
incorrect reading.
Rear toe-in: 2 11 mm l1l16 i 1/15 in)
- lf adjustment is required, go to step 2.
- lf no adjustment is required, remove alignment
equipment.
Before adjustment, note the locations of adjusting
bolts on the right and left compensator arms.
Loosen the adjusting bolts and slide the compen-
sator arm in or out as shown, to adjust the toe.
Tighten the adjusting bolts.
ADJUSTING BOLT10 x 1.25 mm
COMPENSATOR ARM
. Example;
A{ter the rear toe inspection, the wheel is 2 mm(0.08 inl out of the soecification.- Move the arm so the adjusting bolt moves 2 mm(0.08 inl inward from the position recorded betore theadjustment.- The distance the adjusting bolt is moved should be
equal to the amount out-of-specification.
6a N.m 16.5 kgt m, 47 lbt.ft)
a4 N.m la.s kgI.m, 33 lbf.ft)
18-5
Page 738 of 1680
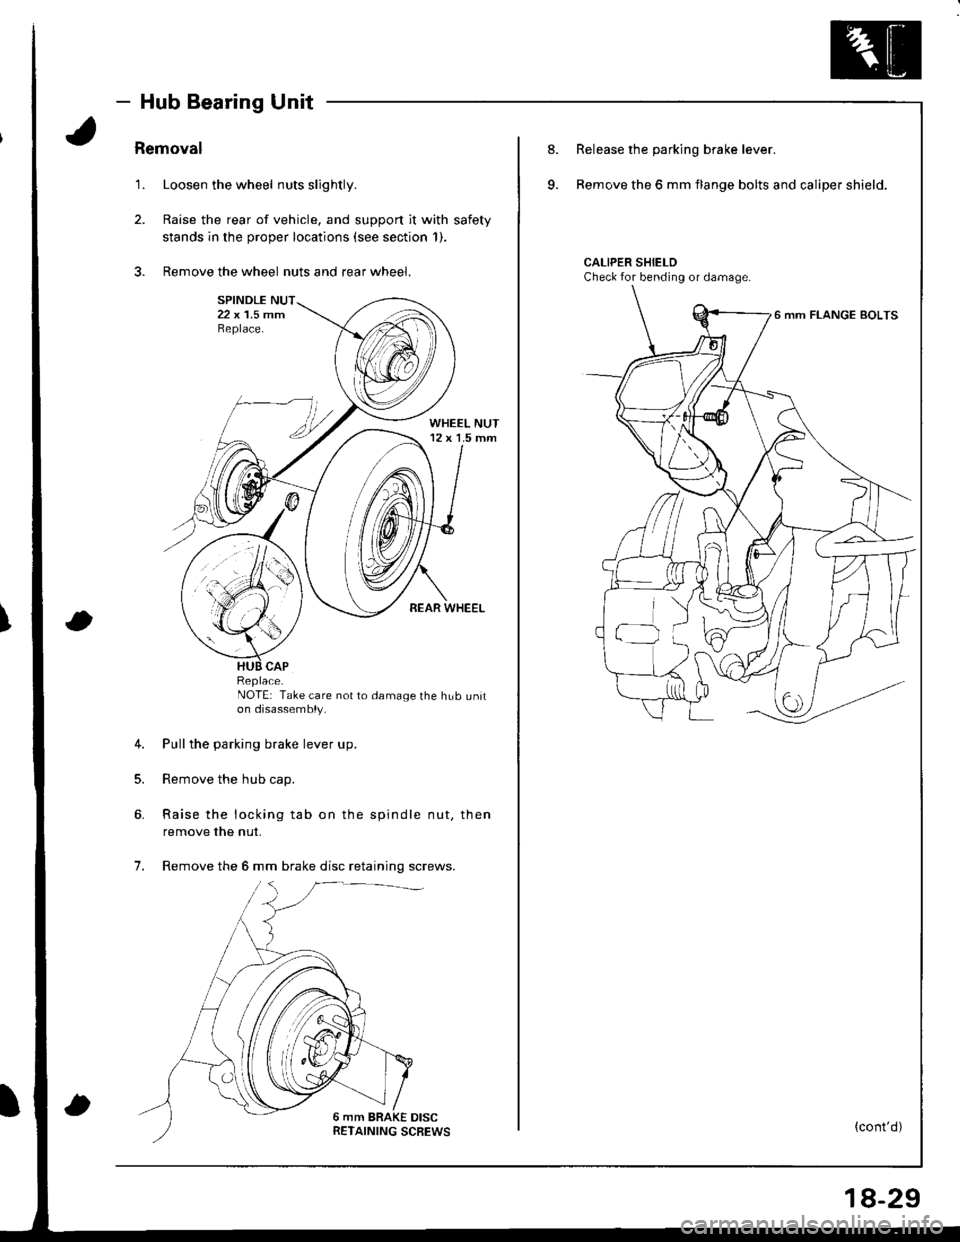
- Hub Bearing Unit
Removal
1. Loosen the wheel nuts slightly.
2. Raise the rear of vehicle, and support it with safety
stands in the proper locations (see section 1).
3. Remove the wheel nuts and rear wheel.
NOTE: Take care not to damage the hub uniton disassembly.
4. Pull the parking brake lever up.
5. Remove the hub cap.
6. Raise the locking tab on the spindle nut, then
remove the nut.
7. Remove the 6 mm brake disc retaining screws.
Replace.
8.
9.
Release the parking brake lever.
Remove the 6 mm flange bolts and caliper shield.
CALIPER SHIELDCheck for bending or damage.
6 mm FLANGE BOLTS
(cont'd)
18-29
Page 752 of 1680
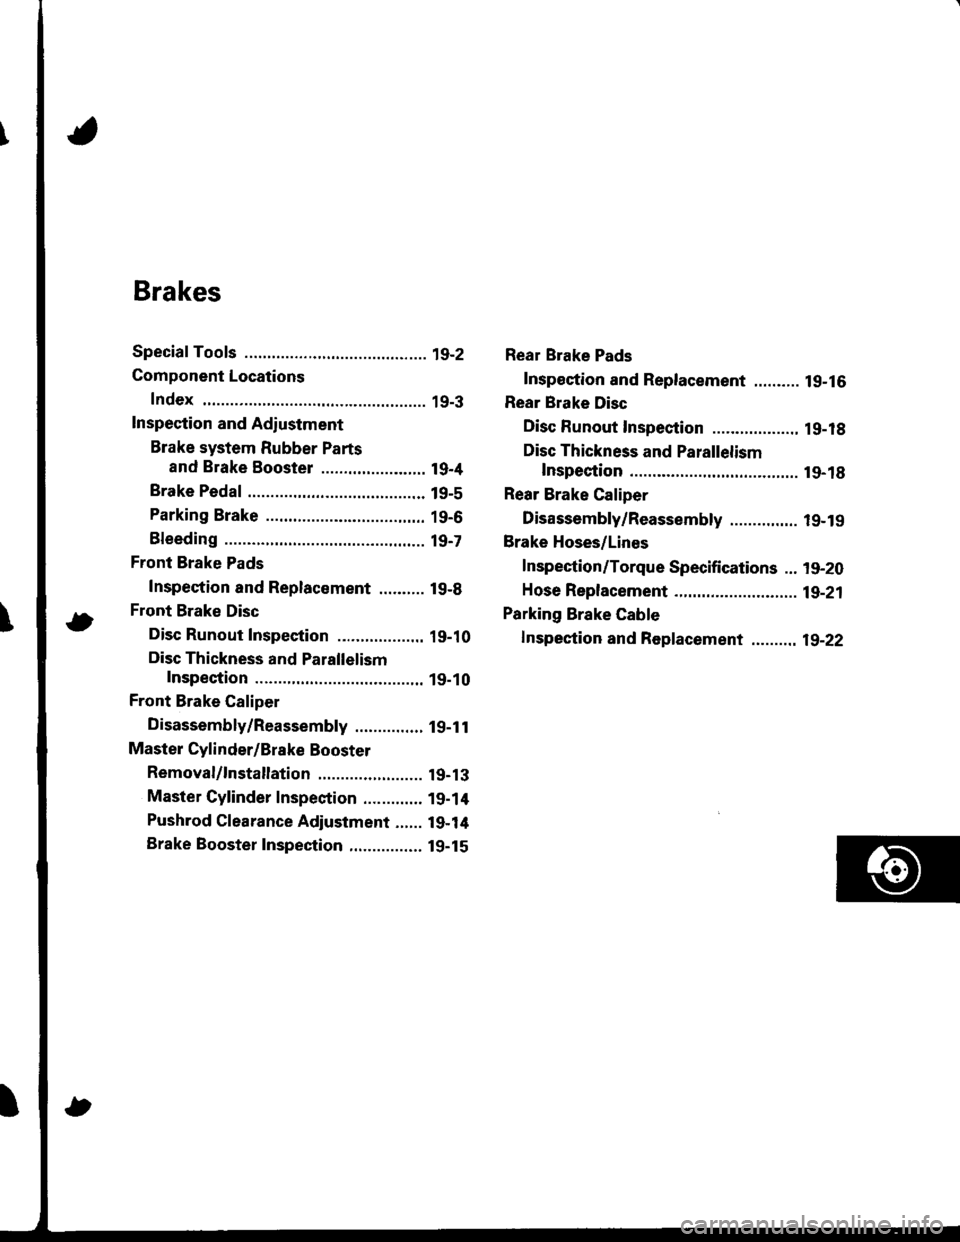
Brakes
Special Tools ............. 19-2
Component Locations
Index ................ ...... 19-3
Inspection and Adiustment
Brake system Rubber Parts
and Brake Booster ....................... 19-4
Brake Pedal ............ 19-5
Parking Brake ........ 19-6
Bleeding ................. t9-7
Front Brake Pads
Inspection and Replacement .......... l9-B
Front Brake Disc
Disc Runout Inspection ................... 19-10
Disc Thickness and Parallelism
Inspection .......... 19-10
Front Brake Caliper
Disassembly/Reassembly ............... l9-1 l
Master Cylinder/Brake Booster
Removal/1nsta|lation ....................... 19-13
Master Cylinder Inspection ............. 19-14
Pushrod Clearance Adjustment ...... 19-14
Brake Booster Inspection,.............,, lg-15
Rear Brake Pads
Inspeetion and Replacement .......... l9-16
Rear Brake Disc
Disc Runout Inspection ................... 1 g-18
Disc Thickness and Parallelism
Inspection .......... t9-18
Rear Brake Caliper
Disassembly/Reassembly ............... l9-19
Brake Hoses/Lines
Inspection/Torque Specifications ... l9-20
Hose Replacement ...................... ..... 19-21
Parking Brake Gable
f nspection and Replacement ,......,.,19-22
Page 754 of 1680
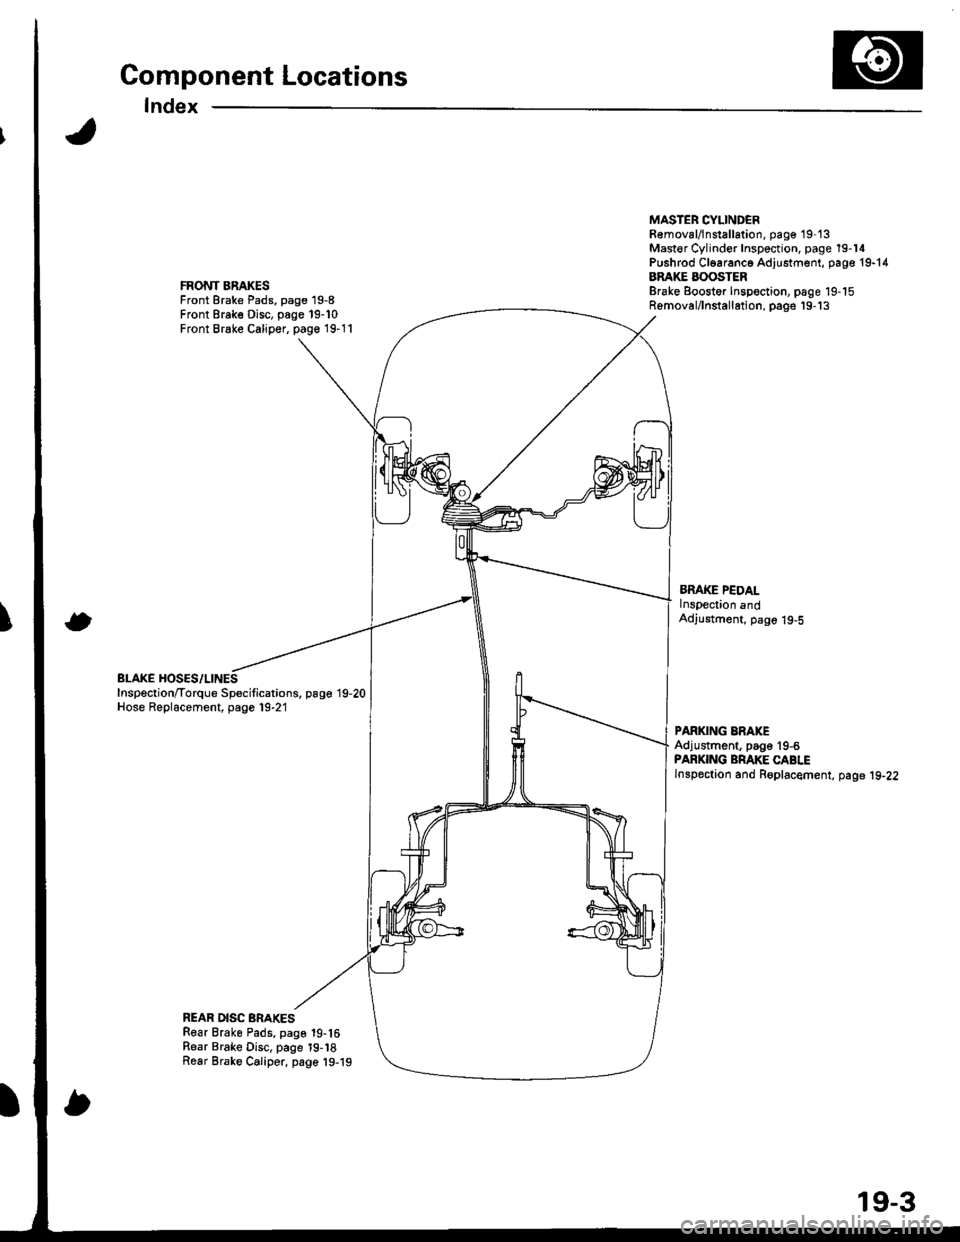
Component Locations
Index
FRONT BRAKESFront Brake Pads, page 19-8Front Brake Disc, page 19-10Front Brake Caliper, page 19-11
BLAKE HOSES/LINESInspection/Torque Specitications. page 19,20Hose Replacement, page 19-21
MASTER CYLINDEBR€moval/lnstallation, pag€ 19-'t3Mast€r Cylinder Inspection, page 19-14Pushrod Cl6aranc6 Adjustment, page 19-14BRAKE BOOSTERBrake Eoostor Inspoction, page 19-15Removal/lnstallation, pags'19-'13
BMKE PEDALlnspection andAdjustment, page 19-5
PARKING ERAKEAdjustment, page'19-6PARKING BRAKE CABLElnspoction and Roplacement, page 19-22
REAR DISC BRAKESRear Brake Pads, page 19-16Rear Brake Disc, page 19-18Rear Brake Caliper, page 19-19
19-3
Page 757 of 1680
Inspection and Adiustment
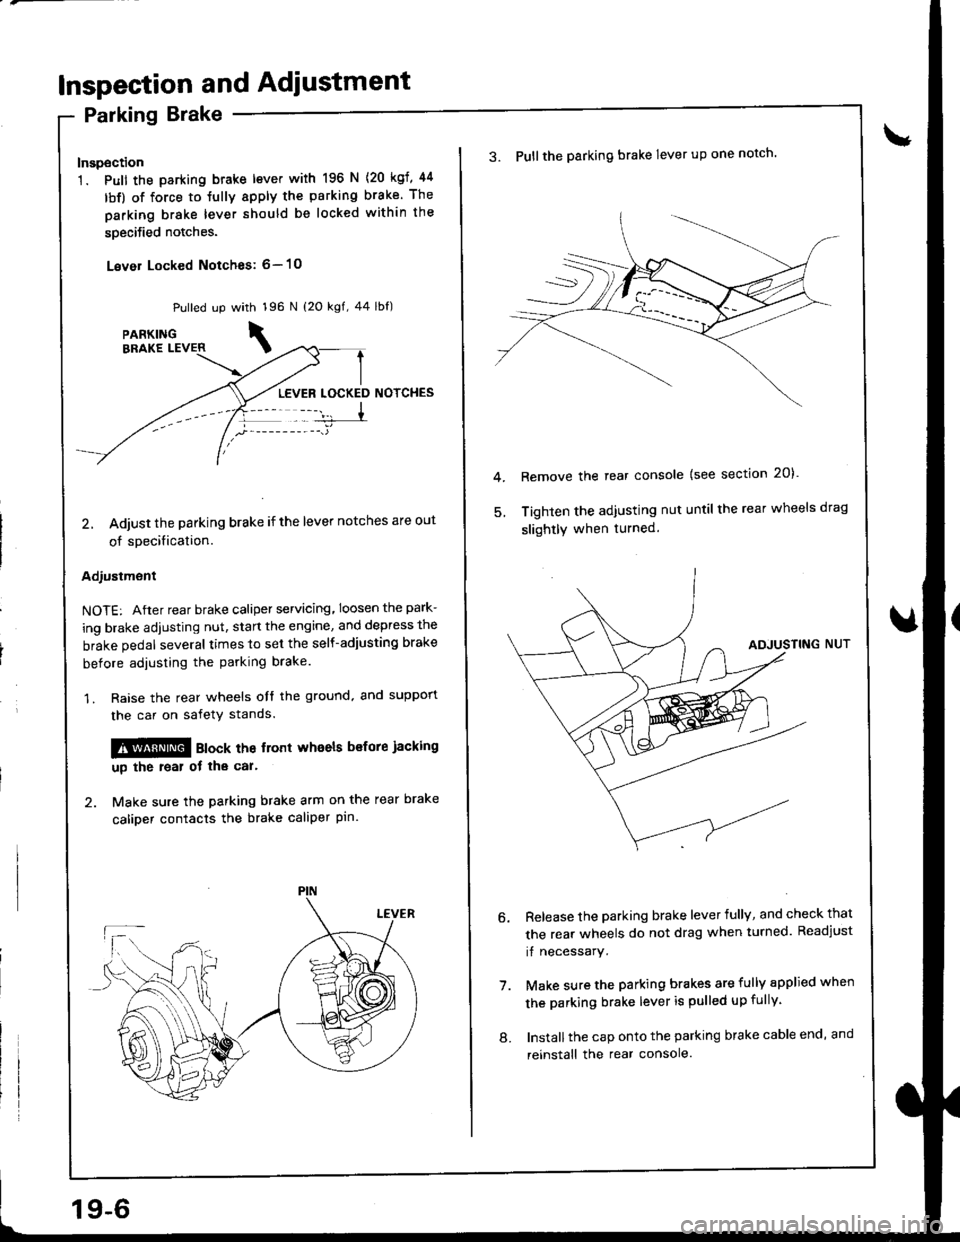
Parking Brake
Inspection
1. Pull the parking btake lever with 196 N
lbf) of force to Jully apply the parking
parking brake lever should be locked
soecified notches.
Lever Locked Notches: 6- l0
{20 kgf, 44
brake. The
within the
Pulled up with 196 N {2O kgf, 44 lbf)
LEVER LOCKED NOTCHES
2, Adjust the parking brake if the lever notches are out
of specification.
Adjustment
NOTE: After rear brake caliper servicing.loosen the park-
ing brake adjusting nut, start the engine, and depress the
brake pedal several times to set the self-adjusting brake
before adiusting the parking brake
1. Raise the rear wheels oIt the ground. and suppon
the car on safety stands.
!!@ ato"t the trort whoels bsfore jacking
up the roal ot tha car'
2. Make sure the parking brake arm on the rear brake
caliDer contacts the brake caliper pin.
19-6
8.
3. Pullthe parking brake lever up one notch'
Remove the rear console {see section 20)'
Tighten the adjusting nut until the rear wheels drag
slightly when turned.
7.
Release the parking brake lever fully, and check that
the rear wheels do not drag when turned. Readjust
if necessary.
Make sure the parking brakes are fully spplied when
the parking brake lever is pulled up fully.
Install the cap onto the parking brake cable end, and
reinstall the rear console.
Page 767 of 1680
Rear Brake Pads
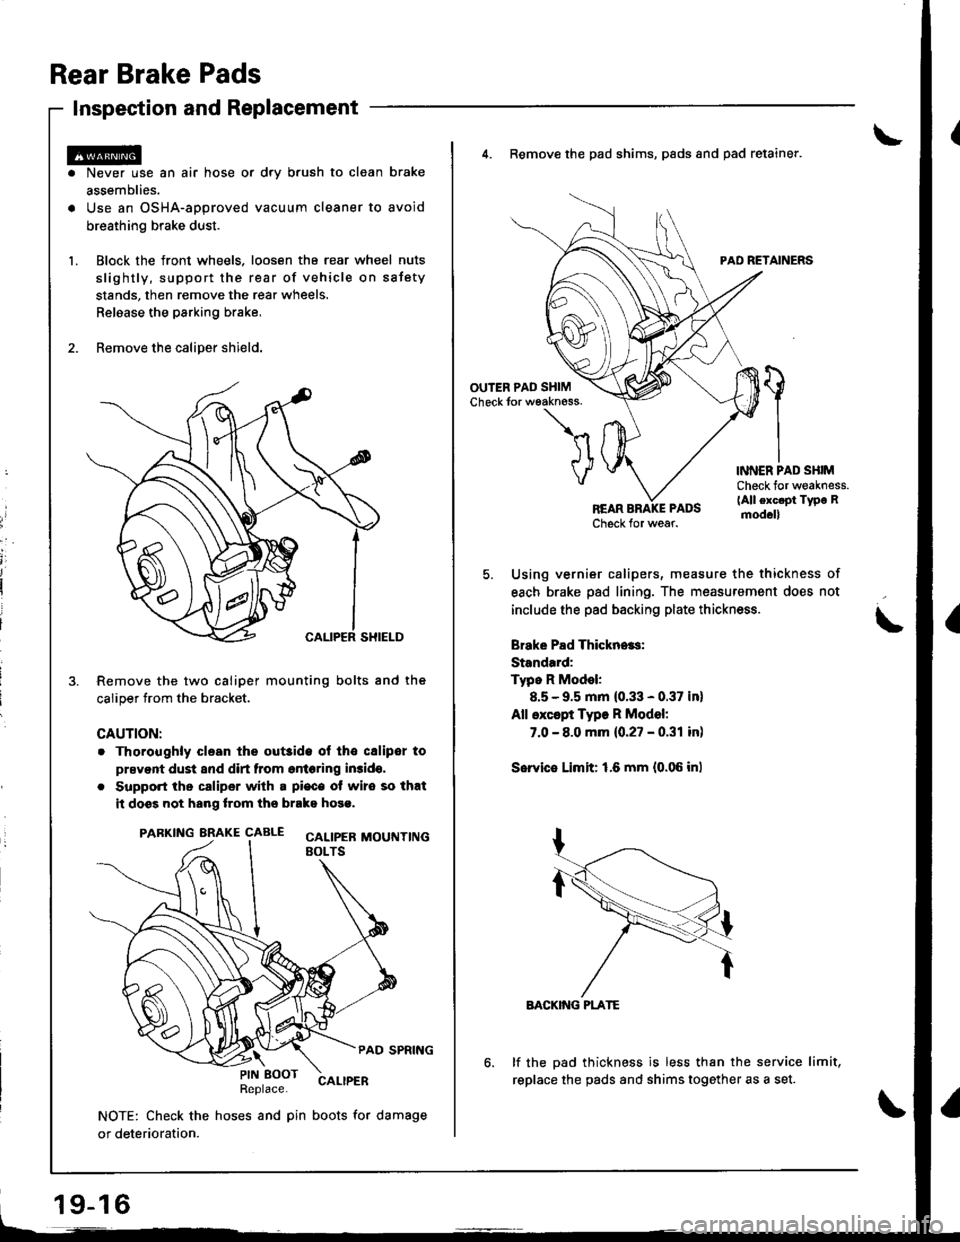
Inspection and Replacement
Never use an air hose or dry b.ush to clean brake
assemblies.
Use an OSHA-approved vacuum cleaner to avoid
breathing brake dust.
Block the front wheels. loosen tha rear wheel nuts
slightly, support the rear of vehicle on sstety
stands, then remove the rear wheels.
Relaase the parking brake,
Remove the caliper shield.
Remove the two caliper mounting bolts and the
caliper trom the bracket.
CAUTION:
. Thoroughly clesn the out3ide ol tho csliper to
prsvent dust and dirt from entering in3ido,
. Support the caliper with a pi€c€ ot wire so that
it doss not hang lrom ths brako hose.
PARKING BRAKE CAALE cALtpEB MOUTTT|NGEOLTS
PAD SPRING
Replace.CALIPER
NOTE: Check the hoses and pin boots for damage
or deterioration.
\PIN EOOT
19-16
4. Remove the pad shims, pads and pad retainer.
PAD RETAINERS
'l
VINNER PAD SHIMCheck for weakness.(All exc.pt Type Rmod.ll
Using vernier calipers, measure the thickness of
each brake pad lining. The measurement does not
include the pad backing plate thickness.
Brake Pad Thickn..s:
Standard:
Typo R Model:
8.5 - 9.5 mm (0.33 - 0.37 in)
All except Type R Model:
7.0 - 8.0 mm {0.27 - 0.31 in)
Sorvie Limit: 1.6 mm {0.06 inl
BACKIiIG PLATE
lf the pad thickness is less than the service limit,
replace the pads and shims together as a set.