ACURA INTEGRA 1998 Service Repair Manual
Manufacturer: ACURA, Model Year: 1998, Model line: INTEGRA, Model: ACURA INTEGRA 1998Pages: 1680, PDF Size: 53.14 MB
Page 941 of 1680
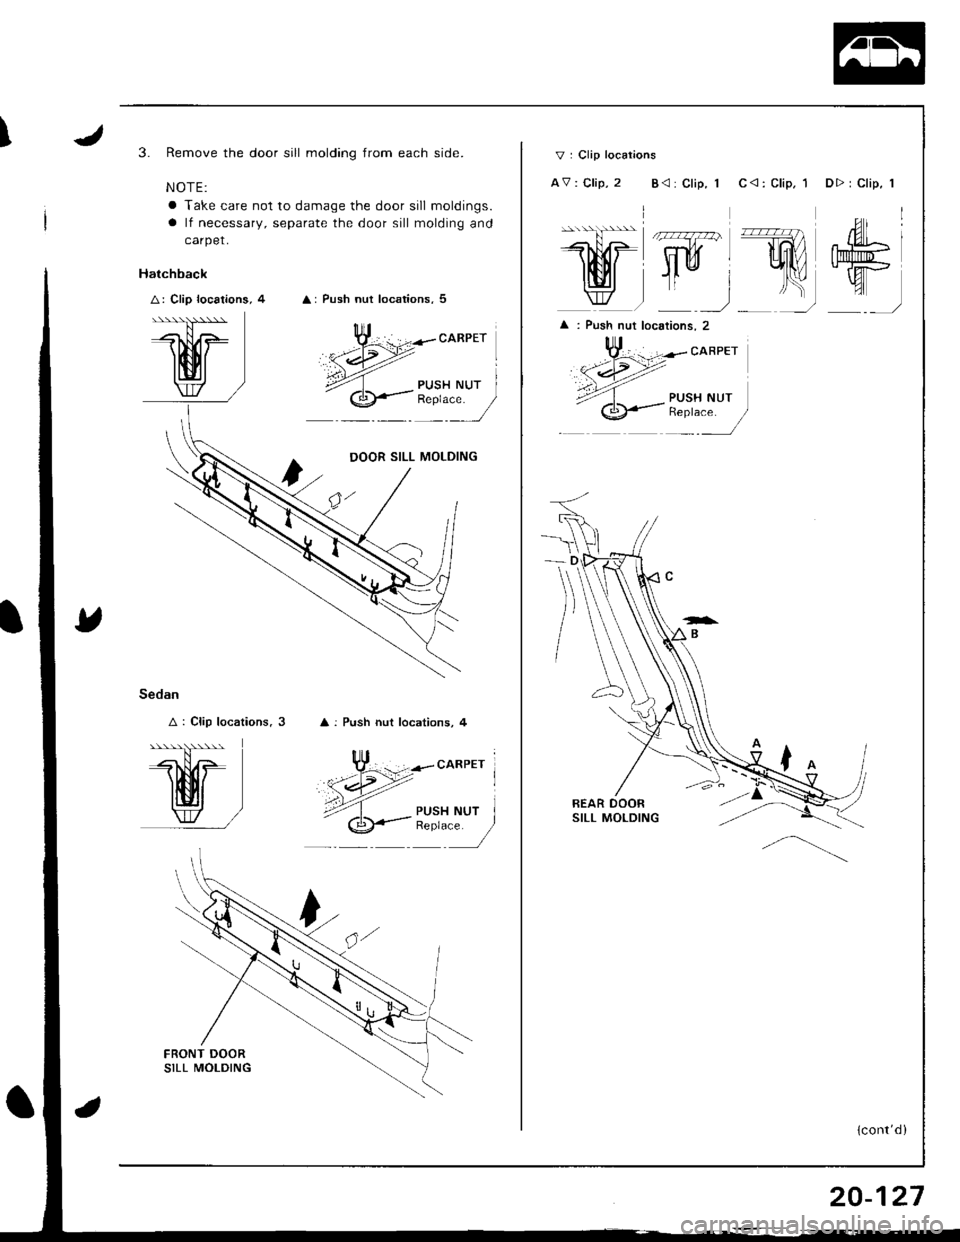
I3. Remove the door sill molding from each side.
NOTE:
a Take care not to damage the door sill moldings.
a lf necessary, separate the door sill molding and
carpet.
A: Push nut locations, 5
Hatchback
A: Clip localions, 4
M]
Sedan
A : Clip locations. 3
ffilw/
: Push nut locations, 4
PUSH NReplace.
DOOR SILL MOLDING
V : Clip locations
AV: Clip, 2 B<: Clip, 1
ffi\u,]
C <: Clip, 1 D> : Clip, I
m.a- &l ;
WffiI
_)
^')
{cont'd )
20-127
Page 942 of 1680
Carpet
Replacement (cont'd)
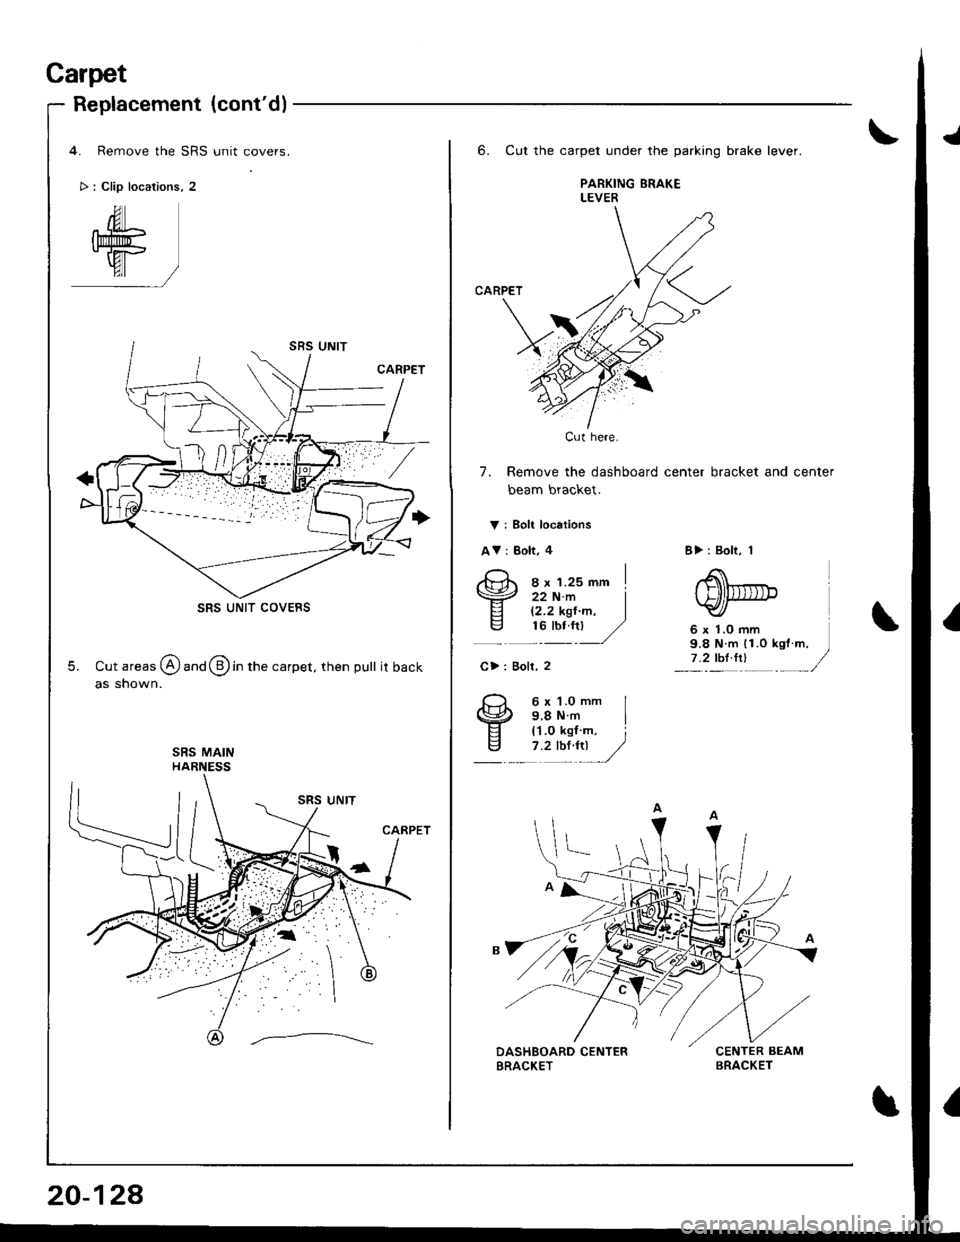
4. Remove the SRS unit covers.
> : Clip locations, 2
SRS UNIT COVEBS
5. Cut areas @ and @ in the carpet, then pull itback
as shown.
20-128
6. Cut the carpet under the parking brake lever.
PARKING ERAKELEVER
CARPET
7. Remove the dashboard center bracket and center
beam bracket.
V i Bolt locations
AV: Bolt, 4
ex r.zsmm I
B>: Bolt, 1
6 x 1.0 mm9.8 N m 11.0 kgt m.7 .2 thl.trl
22 N.m I12.2 kgt'm, Itu-:u ,/
C>: Boll, 2
6 x 1.O mm I9.8Nm I('l.0 kgl m, i7 .2 tbt4tl /,/
Cut here.
Page 943 of 1680
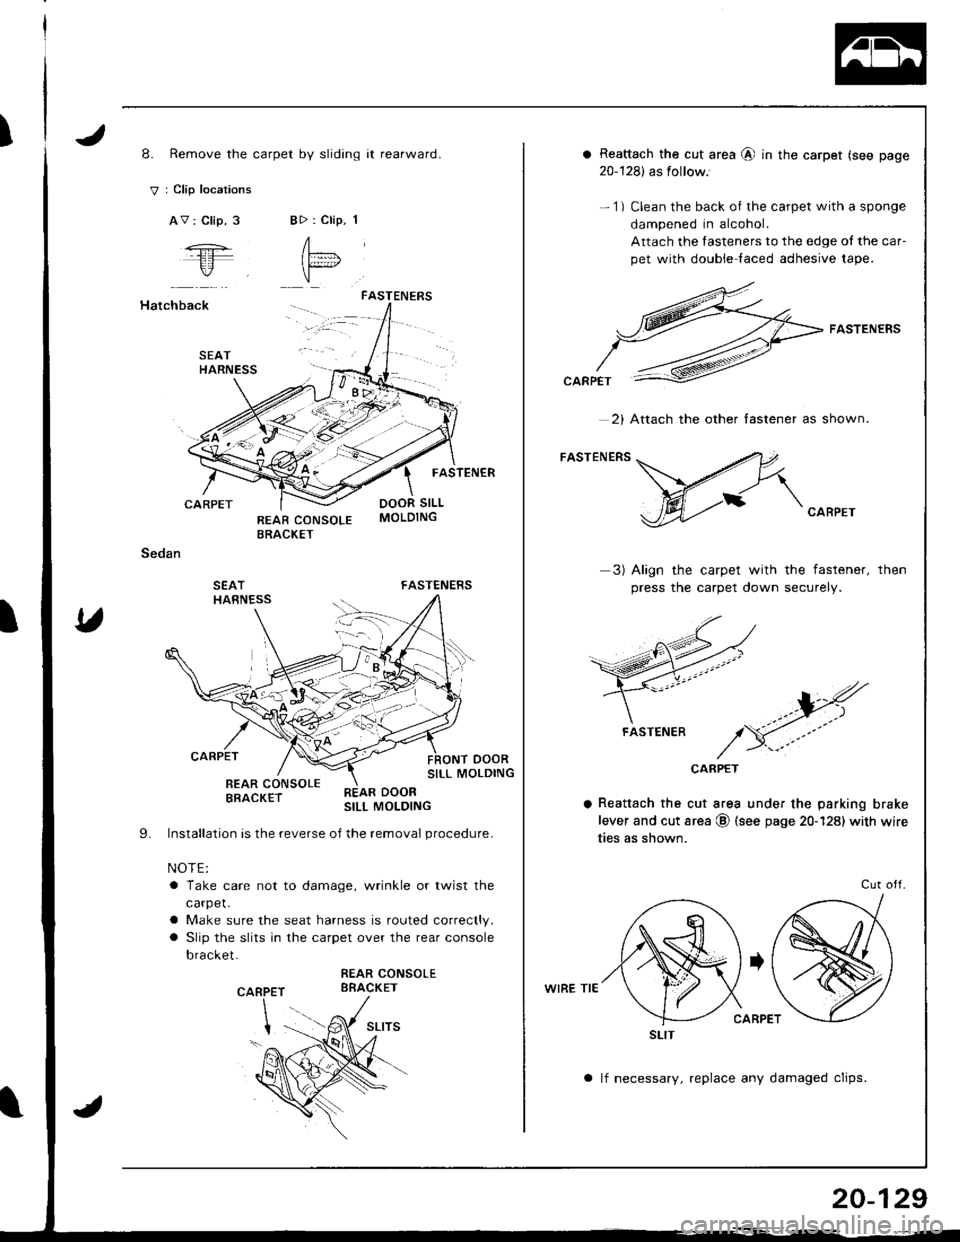
I8. Remove the carpet by sliding it rearward.
V : Clip locations
AV : Clip, 3BD : Clip. 1
A"= l
"
Hatchback
CARPET
Sedan
SEATHARNESS
FASTENERS
FASTENER
DOOR SILL
FASTENERS
oooRSILL MOLDING
SEATHARNESS
I
CARPET
REAR CONSOLEBRACKET
Installation is the reverse oJ the removal procedure.
NOTE:
a Take care not to damage, wrinkle or twist the
carpet.
a Make sure the seat harness is routed correctly.
a Slip the slits in the carpet over the rear console
bracket.
REAR CONSOLEBBACKETP
REAR DOORSILL MOLDING
9.
CAR
a Reattach the cut area @ in the carpet (see page
20-128) as follow.'
- 1) Clean the back of the carpet with a sponge
dampened in alcohol.
Attach the fasteners to the edge ol the car-
pet with double laced adhesive tape.
FASTENERS
CARPET
3) Align the carpet with the fastener,
press the carpet down securely.
then
CARPET
a Reattach the cut area under the parking brake
lever and cut area @ (see page 20-128) with wire
ties as shown.
WIRE TIE
Cut otl.
a lf necessary, replace any damaged clips.
2) Attach the other lastener as shown.
FASTENER
SLIT
20-129
Page 944 of 1680
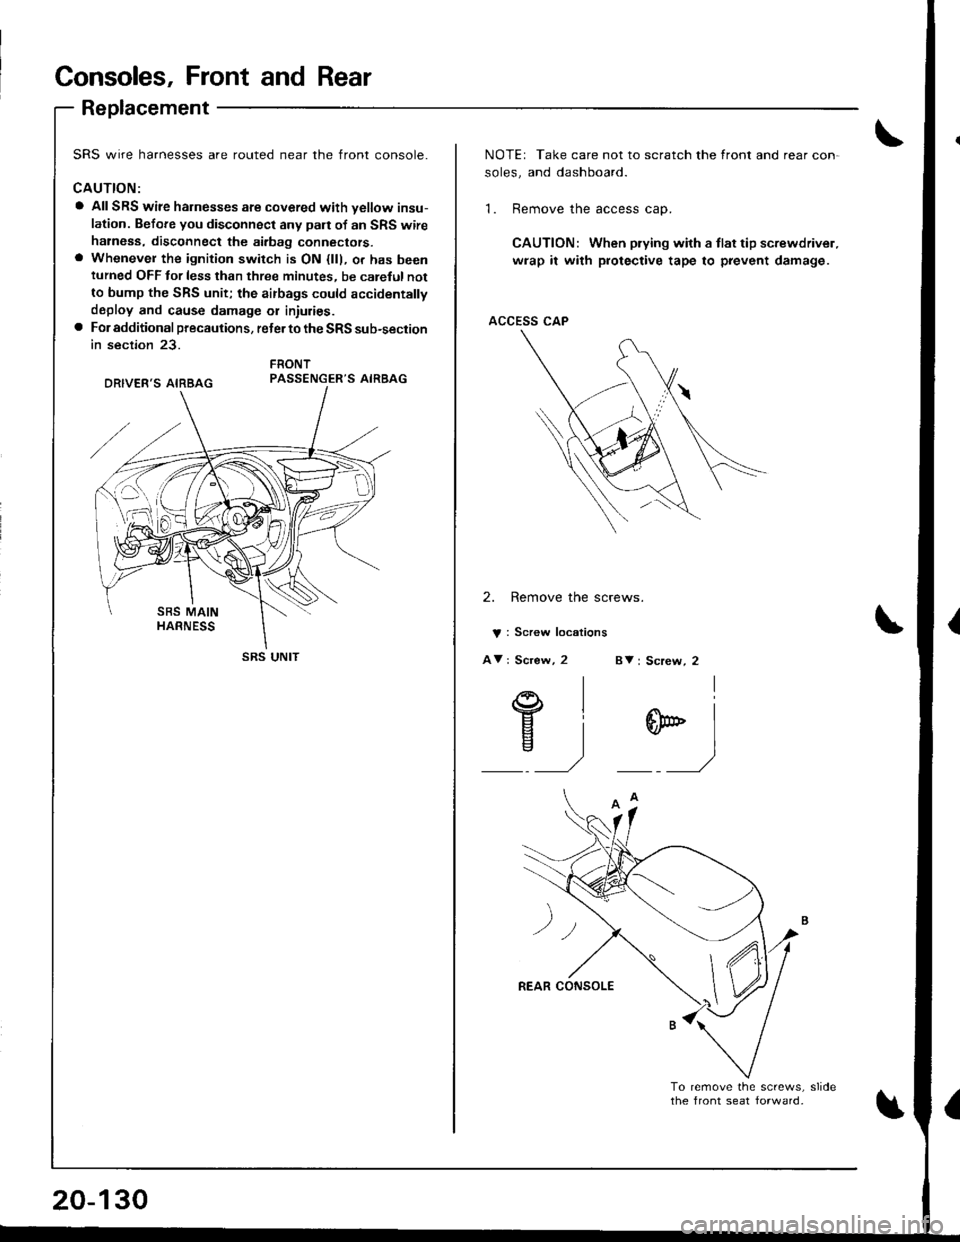
Consoles, Front and Rear
Replacement
SRS wire harnesses are routed near the front console.
CAUTION:
a AIISRS wire harnesses are covered with vellow insu-
lation. Before you disconnect any pan of an SRS wire
halness, disconnect the airbag connectors.a Whenever the ignition switch is ON {lll, o. has beenturned OFF for less than three minutes, be carefulnot
to bump the SRS unit; the airbags could accidentally
deploy and cause damage or injuries.a For additional pfecautions, reter to the SRS sub-section
in section 23.
PASSENGER'S AIRBAG
SRS UNIT
20-130
NOTEr Take care not to scratch the lront and rear con-
soles, and dashboard.
1. Remove the access cap.
CAUTION: When prying with a tlat tip screwdriver.
wrap it with protective tape to prevent damage.
ACCESS CAP
2. Remove the screws.
V : Screw locations
AV : Screw, 2 BV : Screw, 2
el
Ei-,)
*)
Page 945 of 1680
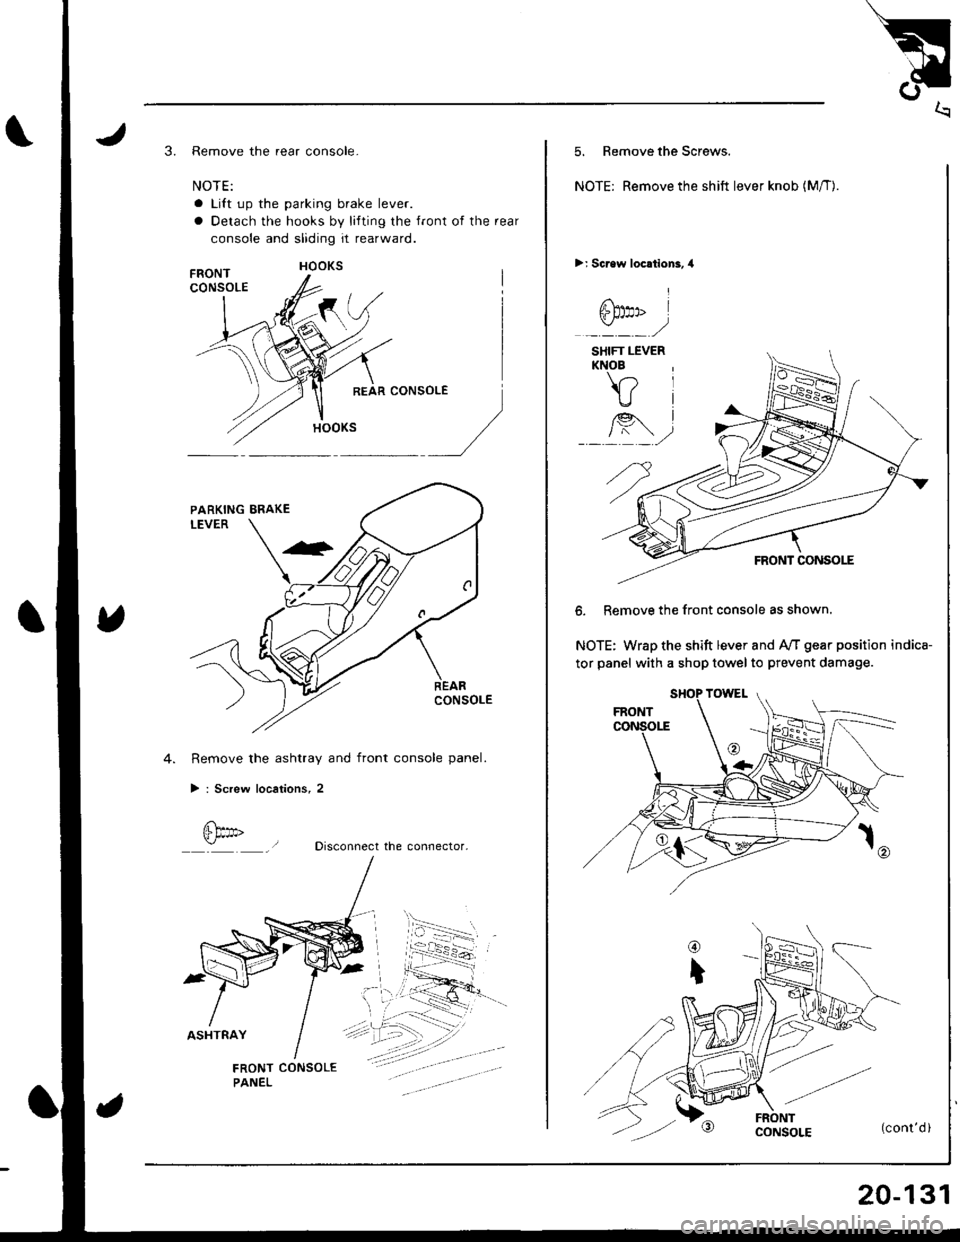
3. Remove the rear console-
NOTE:
a Lift up the parking brake lever.
a Detach the hooks by lifting the front of the rear
console and sliding it rearward.
Remove the ashtray and front console panel.
> : Screw locations, 2
Disconnect the connector.
5. Remove the Screws.
NOTE: Remove the shift lever knob (M/T).
>; Screw locationi,4
!
6h:ro I",/
SHIFT LEVERKNOB
FRONT CONSOLE
6. Remove the front console as shown.
NOTE: Wrap the shift lever and Ay'T gear position indica-
tor panel with a shop towel to prevent damage.
20-131
Page 946 of 1680
Consoles, Front and Rear
Replacement (cont'dl
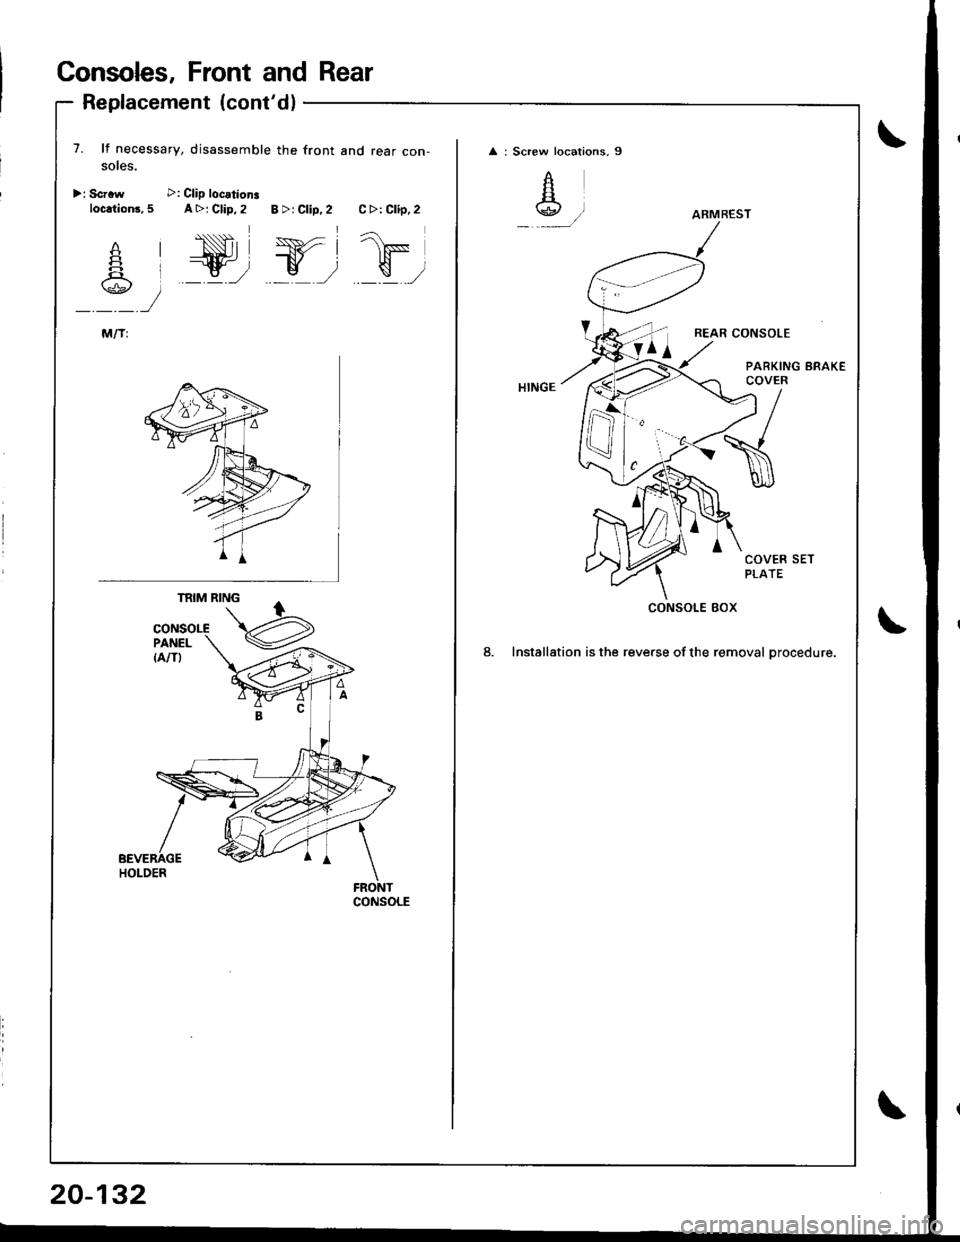
7. lf necessary, disassemble the front and rear con-soles.
>r Scrrw >: Clip locationsloc.tion3, 5 A >j Clip, 2 B >r Clip. 2 C >: Clip, 2
1F
\,,a';\\g.E/
20-132
: Screw locations, 9
A
Aw.)
REAR CONSOLE
PARKING BRAKECOVER
COVER SETPLATE
8. Installation is the reverse of the removal orocedure.
ARMREST
CONSOLE 80X
Page 947 of 1680
Dashboard
Component Removal/lnstallation
\J
U
uomponenl r{emoval/ Insrallarlon -
SRS wire harnesses are routed near the dashboard and
sreenng corumn.
CAUTION:
a AIISRS wire harnesses are cove.ed with yellow insu-
lation. Belore you disconnect any part of an SRS wire
hahess, disconnect the airbag connectors.
o Whenever the ignition switch is ON (ll), or has been
turned OFF fol less than three minutes, be caretul not
to bump the SRS unit; the airbags could accidentally
deploy and cause damage or inturies.
a For additional precautions, reJer to the SRS sub-section
in section 23.
FRONTPASSENGER'S AIRBAG
SRS UNIT
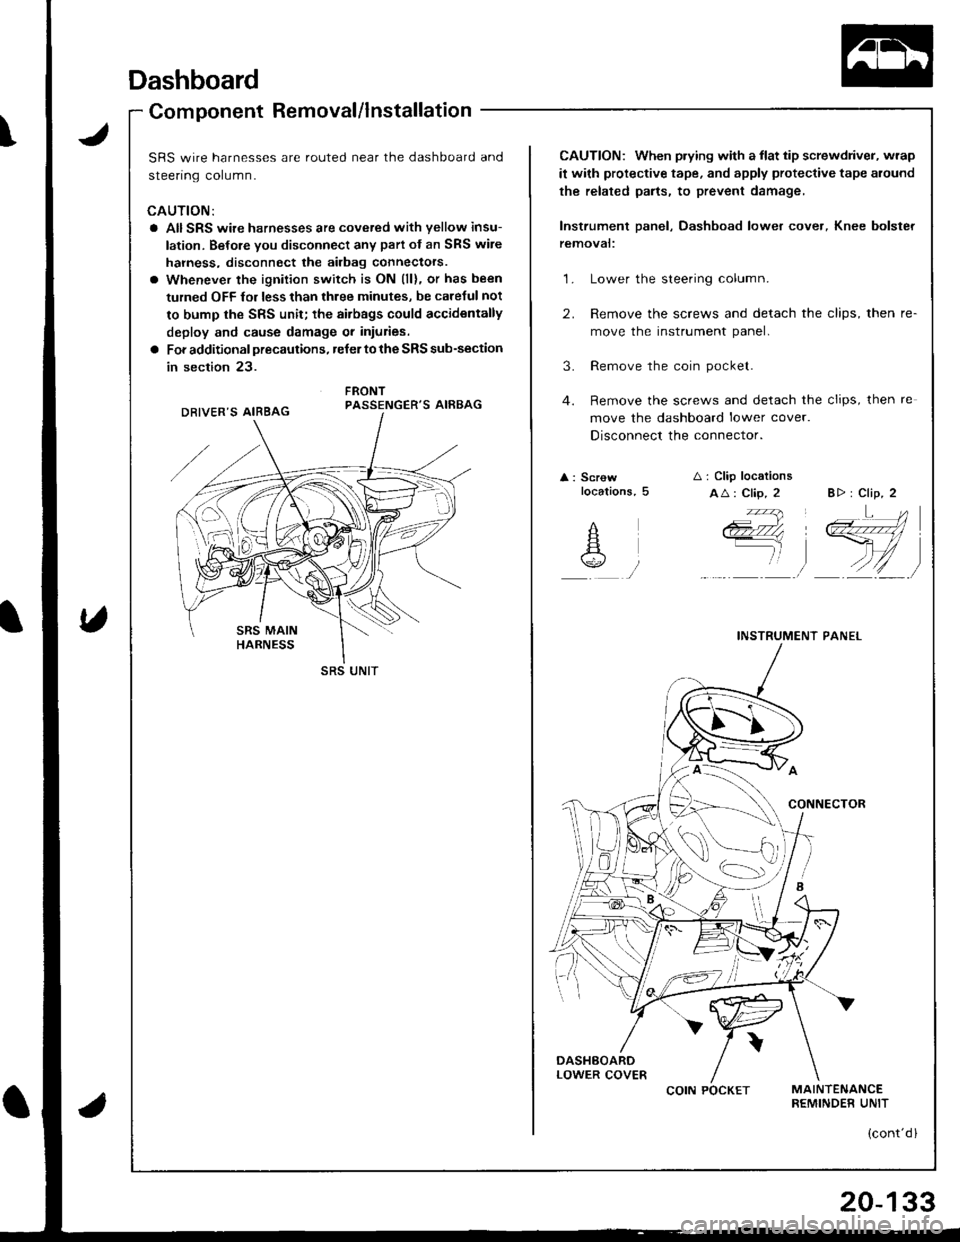
CAUTION: When prying with a flat tip screwdriver, wrap
it with protective tape, and apply proteclive tape around
the related parts, to prevent damage,
Instrument panel, Dashboad lower cover, Knee bolster
temovat:
1. Lower the steering column.
2. Remove the screws and detach the clips, then re-
move the instrument panel.
3. Remove the coin pocket.
4. Remove the screws and detach the clips, then re
move the dashboard lower cover.
Disconnect the connector.
A : Screwlocations,5A i Clip locations
AA: Clip, 2 B> : Clip, 2
INSTRUMENT PANEL
ii'- ' iq4'ii \Ll1
COIN POCKET
(cont'd l
20-133
Page 948 of 1680

Dashboard
Component Removal/lnstallation (cont'dl
5. Remove the knee bolster.
: Bolt
A'ir
locations,3
6 x 1.0 mm9.8 N.m
{1.0 kgt m,7.2 tbf.fit
0
6. lnstallation is the reverse o{ the removal procedure.
Ste.eo ladio/cassette, Heatet contlol Danel removal:
1. Remove the rear console, then remove the front
console (see page 20-130).
Loosen the bolts, then remove the stereo radio/
cassette by pulling it out.
Disconnect the connector and antenna lead.
NOTEr The original radio has a coded theft protec-
tion circuit. Be sure to get the customer's code num-
ber before- disconnecting the battery.- removing the No. 47 (7.5 A) tuse from the under-
hood fuse/relay box.- removing the radio,
After service, reconnect power to the radio and turn
it on. When the word "CODE" is displayed, enter
the customer's 5-digit code to restore radio
ope.ation.
KNEE BOLSTER
20-134
CONNECTOR
CASSETTE
: Bolt locations, 2
6x1.0mm9.8 N.m {1.0 kgt m,
3. Carefully pry the hazard warning switch and rear
window detogger switch out of the heater control
panel.
Disconnect the connectors.
HAZARD WARNINGswtTcHREAR WINDOWDEFOGGER SWITCH
CONNECTORS
Page 949 of 1680
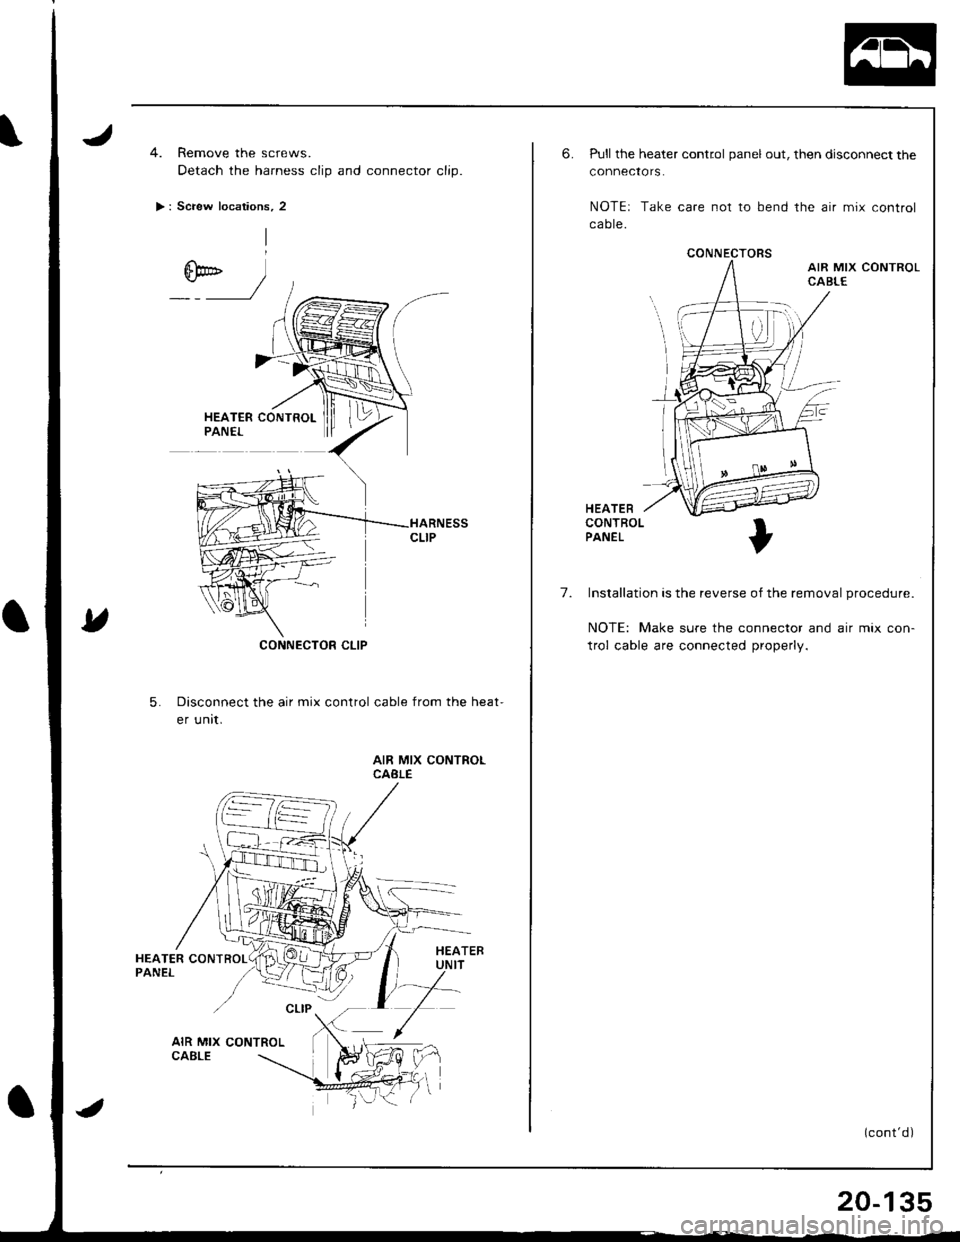
4. Remove the screws.
Detach the harness clip and connector clip.
> : Screw locations, 2
CONNECTOR CLIP
5.Disconnect the air mix control cable from the heat-
er unit.
AIR MIX CONTROLCABLE
CONNECTORS
6.Pull the heater control panel out, then disconnect the
connectors.
NOTEr Take care not to bend the air mix control
ca ote.
HEATERCONTROLPANEL
7. Installation is the reverse of the removal procedure.
NOTE: Make sure the connector and air mix con-
trol cable are connected properly.
(cont'd)
20-135
Page 950 of 1680
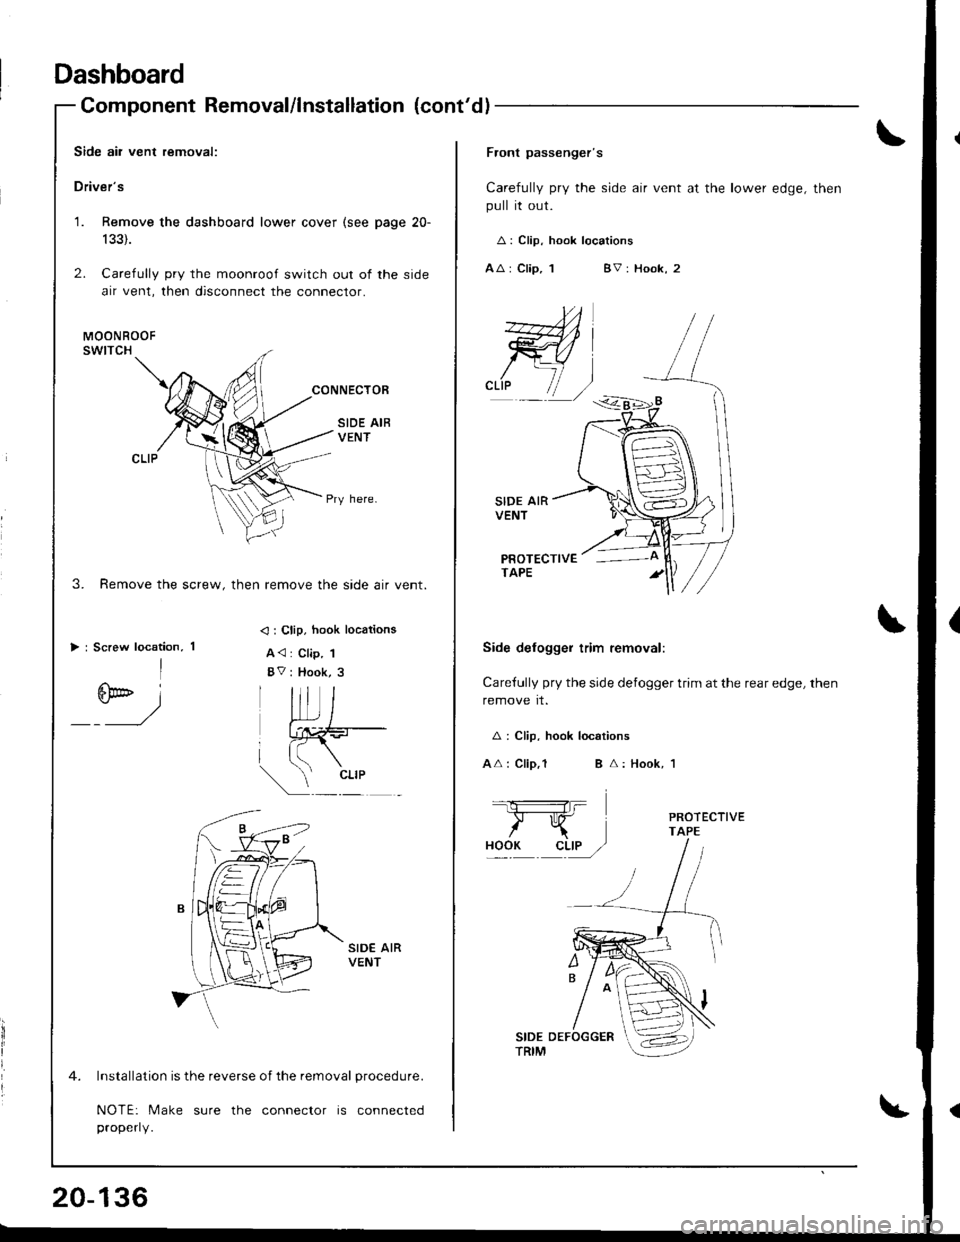
Dashboard
Component Removal/lnstallation (cont'dl
Side air vent removal:
Driver's
1. Remove the dashboard lower cover (see page 20-
133).
2. Carefully pry the moonroof switch out of the side
air vent, then disconnect the conneclor.
Pry here.
3. Remove the screw, then remove the side air vent.
> : Screw locstion,
I
6F- i
------r/
< : Clip, hook locations
A<: Clip, 1
BV : Hook, 3
Installation is the reverse of the removal procedure.
NOTE: Make sure the connector is connected
properly.
20-136
Flont passenger's
Carefully pry the side air vent at the lower edge, then
pull it out.
A: Clip. hook locations
AA : Clip, 1BV: Hook, 2
SIDE AIRVENT
PROTECTIVETAPE
Side delogger trim removal:
Carefully pry the side defogger trim at the rear edge, then
remove it.
A : Clip, hook locations
AA: Clip,lB A: Hook, 1
_1_iF
/KHOOK cLtP /