warning Acura Integra 2000 Hatchback Owner's Manual
[x] Cancel search | Manufacturer: ACURA, Model Year: 2000, Model line: Integra, Model: Acura Integra 2000Pages: 279, PDF Size: 3.57 MB
Page 4 of 279
A
Fe w Word s Abou t Safet y
Your safety, and the safety of others, is very important. And operating this
car safely is an important
responsibility.
To help you make informed decisions about safety, we have
provided operating procedures and
other information on labels and in
this manual. This information alerts
you to potential hazards that could hurt you or others.
Of course, it is not practical or
possible to warn you about all the
hazards associated with operating or maintaining your car. You must use
your own good judgement. You will find this important safety information in a variety of forms,
including:
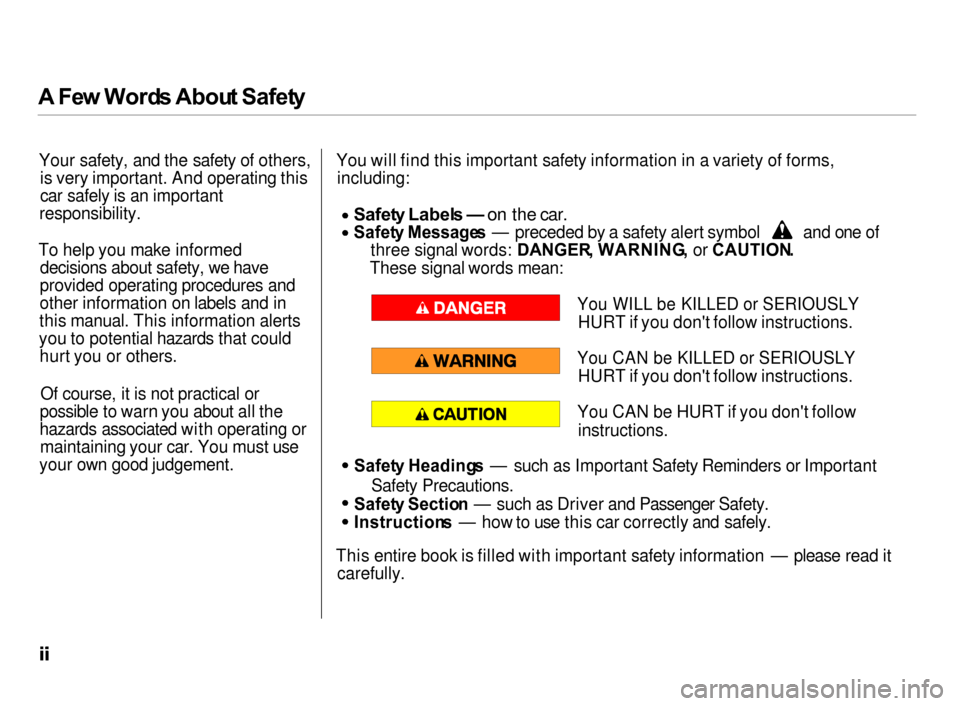
Safet y Label s — on the car.
Safet
y Message s — preceded by a safety alert symbol and one of
three signal words: DANGER , WARNING , or CAUTION .
These signal words mean:
You WILL be KILLED or SERIOUSLY
HURT if you don't follow instructions.
You CAN be KILLED or SERIOUSLY
HURT if you don't follow instructions.
You CAN be HURT if you don't follow instructions.
Safet y Heading s — such as Important Safety Reminders or Important
Safety Precautions.
Safet y Sectio n — such as Driver and Passenger Safety. Instruction
s — how to use this car correctly and safely.
This entire book is filled with important safety information — please read it carefully.
Page 9 of 279
Importan
t Safet y Precaution s
You'll find many safety recommendations throughout thissection, and throughout this manual.
The recommendations on this page are the ones we consider to be the
most important.
Alway s Wea r You r Sea t Bel t
A seat belt is your best protection in
all types of collisions. Airbags
supplement seat belts, but airbags
are designed to inflate only in a
moderate to severe frontal collision.
So even though your car is equipped
with airbags, make sure you and
your passengers always wear your
seat belts, and wear them properly.
(See page 16.)
Restrai n All Childre n
Children are safest when they are
properly restrained in the back seat, not the front seat. A child who is toosmall for a seat belt must be properly
restrained in a child safety seat. (See
page 21.) B
e Awar e o f Airba g Hazard s
While airbags can save lives, they can cause serious or fatal injuries tooccupants who sit too close to them,
or are not properly restrained.
Infants, young children, and short adults are at the greatest risk. Be
sure to follow all instructions and
warnings in this manual. (See page 9 .)
Don' t Drin k an d Driv e
Alcohol and driving don't mix. Even one drink can reduce your ability to
respond to changing conditions, and
your reaction time gets worse with every additional drink. So don't drink
and drive, and don't let your friendsdrink and drive, either. Contro
l You r Spee d
Excessive speed is a major factor in
crash injuries and deaths. Generally,
the higher the speed the greater the
risk, but serious accidents can also occur at lower speeds. Never drive
faster than is safe for current conditions, regardless of the
maximum speed posted.
Kee p You r Ca r i n Saf e Conditio n
Having a tire blowout or a
mechanical failure can be extremely
hazardous. To reduce the possibility of such problems, check your tire
pressures and condition frequently, and perform all regularly scheduled
maintenance. (See page 162.)
Drive r an d Passenge r Safet y
Page 26 of 279
Protectin
g Childre n
U.S. Models
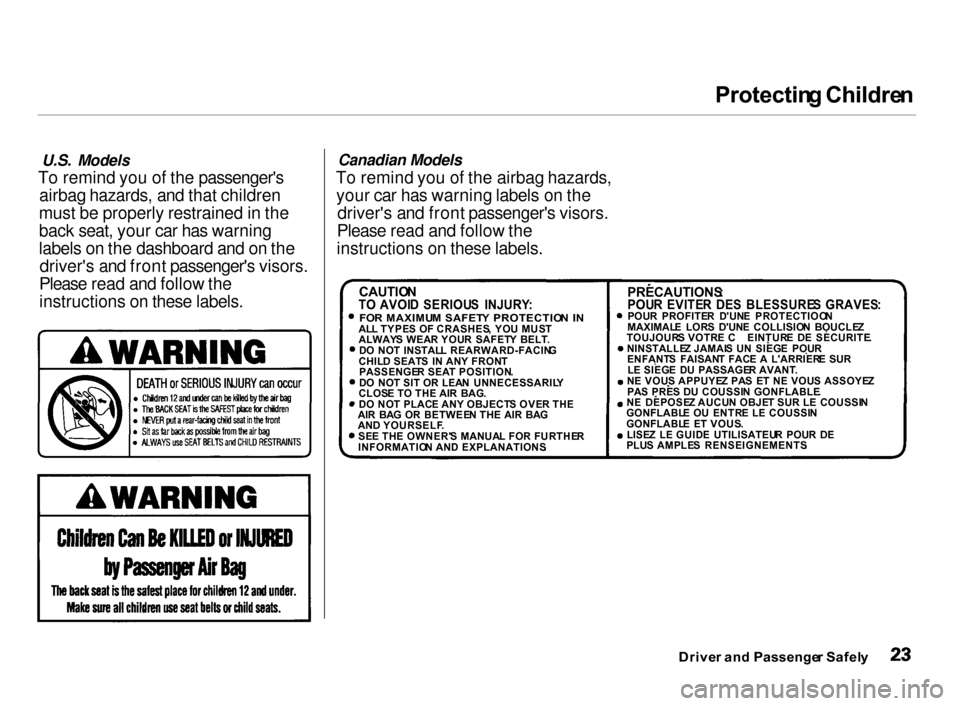
To remind you of the passenger's airbag hazards, and that children
must be properly restrained in the
back seat, your car has warning
labels on the dashboard and on the driver's and front passenger's visors.
Please read and follow the
instructions on these labels. Canadian Models
To remind you of the airbag hazards, your car has warning labels on the driver's and front passenger's visors.
Please read and follow the
instructions on these labels.
Driver an d Passenge r Safel y
CAUTIO
N
T O AVOI D SERIOU S INJURY :
FO R MAXIMU M SAFET Y PROTECTIO N IN
AL L TYPE S O F CRASHES , YO U MUS T
ALWAY S WEA R YOU R SAFET Y BELT .
D O NO T INSTAL L REARWARD-FACIN G
CHIL D SEAT S I N AN Y FRON T
PASSENGE R SEA T POSITION .
D O NO T SI T O R LEA N UNNECESSARIL Y
CLOS E T O TH E AI R BAG .
D O NO T PLAC E AN Y OBJECT S OVE R TH E
AI R BA G O R BETWEE N TH E AI R BA G
AN D YOURSELF .
SE E TH E OWNER' S MANUA L FO R FURTHE R
INFORMATIO N AN D EXPLANATIONS .
PRECAUTIONS
:
POU R EVITE R DE S BLESSURE S GRAVES :
POU R PROFITE R D'UN E PROTECTIOO N
MAXIMAL E LOR S D'UN E COLLISIO N BOUCLE Z
TOUJOUR S VOTR E C EINTUR E D E SECURITE .
NINSTALLE Z JAMAI S U N SIEG E POU R
ENFANT S FAISAN T FAC E A L'ARRIER E SU R
L E SIEG E D U PASSAGE R AVANT .
N E VOU S APPUYE Z PA S E T N E VOU S ASSOYE Z
PA S PRE S D U COUSSI N GONFLABLE .
N E DEPOSE Z AUCU N OBJE T SU R L E COUSSI N
GONFLABL E O U ENTR E L E COUSSI N
GONFLABL E E T VOUS .
LISE Z L E GUID E UTILISATEU R POU R D E
PLU S AMPLE S RENSEIGNEMENTS .
Page 54 of 279
Instrument
s an d Control s
This section gives information about the controls and displays thatcontribute to the daily operation of
your Acura. All the essential controls
are within easy reach.
Control Locations............................ 52
Indicator Lights................................ 53
Gauges.............................................. 58
Speedometer................................ 58
Tachometer.................................. 58
Odometer...................................... 58
Trip Meter.................................... 58
Fuel Gauge................................... 59
Temperature Gauge.................... 59 Maintenance Required
Indicator.................................... 60
Controls Near the Steering Wheel....................................... 61
Headlights.................................... 62
Daytime Running Lights............. 62 Instrument Panel Brightness..... 63
Turn Signals................................. 63
Windshield Wipers...................... 64
Windshield Washers................... 64
Rear Window Wiper and
Washer...................................... 65
Hazard Warning .......................... 65
Rear Window Defogger
.............. 65
Steering Wheel Adjustment ...... 66
Steering Wheel Controls................ 67
Cruise Control.............................. 67
Keys and Locks................................
71
Keys...............................................
71
Immobilizer System....................
. 72
Ignition Switch............................. 73
Door Locks................................... 75
Power Door/Hatch Locks.......... 75
Hatch............................................. 76
Glove Box..................................... 78
Seat Adjustments............................ 79
Front Seat Adjustments.............. 79
Driver's Seat Height
Adjustment
.............................. 80
Driver's Lumbar Support............ 80
Rear Seat Access........................ 81
Head Restraints...........................
82
Folding Rear Seat .......................... 83 Cargo Area Cover............................ 83
Power Windows............................... 84
Moonroof.......................................... 85
Mirrors.............................................. 86
Adjusting the Power Mirrors .....
86
Parking Brake..................................
87
Digital Clock .................................... 88
Beverage Holder.............................. 89
Console Compartment.................... 90
Cigarette Lighter............................. 90
Ashtrays............................................ 91 Interior Lights.................................. 92
Instrument s an d Control s
Page 59 of 279
Indicato
r Light s
Turn Signa l an d
Hazar d Warnin g
Indicator s
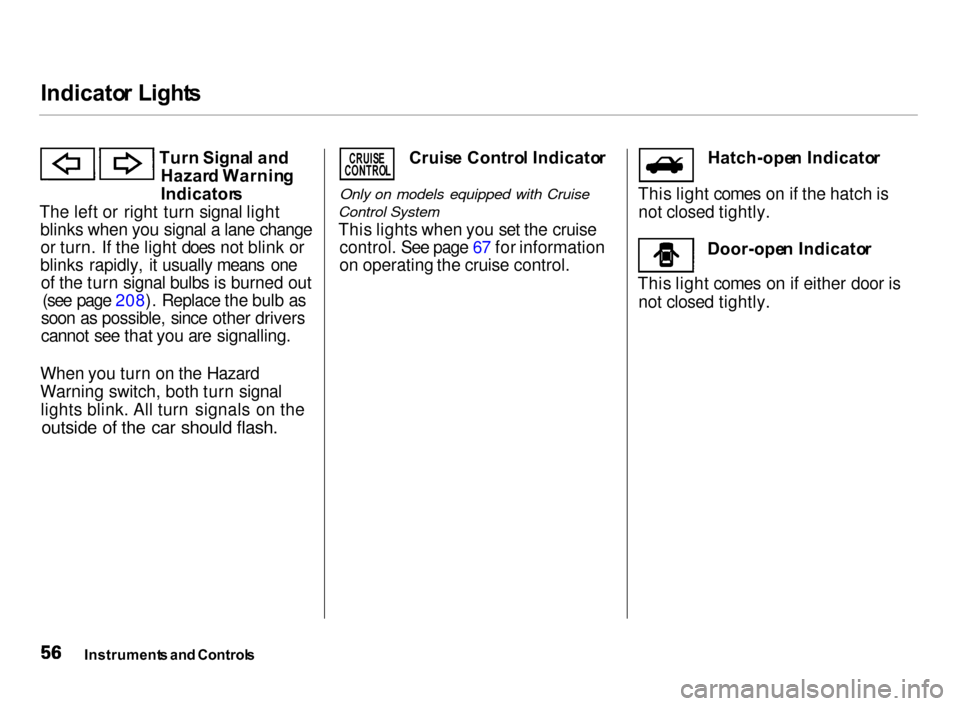
The left or right turn signal light blinks when you signal a lane changeor turn. If the light does not blink or
blinks rapidly, it usually means one of the turn signal bulbs is burned out (see page 208). Replace the bulb as
soon as possible, since other drivers
cannot see that you are signalling.
When you turn on the Hazard
Warning switch, both turn signal lights blink. All turn signals on theoutside of the car should flash.
Cruis e Contro l Indicato r
Only on models equipped with Cruise
Control System
This lights when you set the cruise control. See page 67 for information
on operating the cruise control. Hatch-ope
n Indicato r
This light comes on if the hatch is not closed tightly.
Door-ope n Indicato r
This light comes on if either door is not closed tightly.
Instrument s an d Control s
CRUIS
E
CONTRO L
Page 64 of 279
Control
s Nea r th e Steerin g Whee l
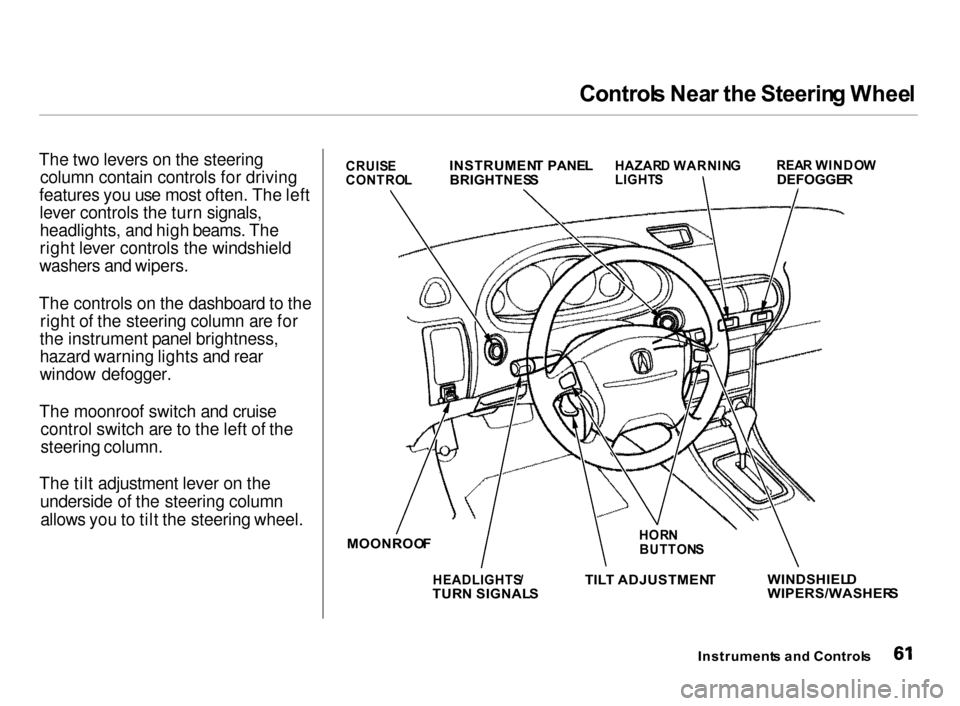
The two levers on the steering column contain controls for driving
features you use most often. The left lever controls the turn signals,
headlights, and high beams. The
right lever controls the windshield
washers and wipers.
The controls on the dashboard to the right of the steering column are for
the instrument panel brightness,
hazard warning lights and rear
window defogger.
The moonroof switch and cruise control switch are to the left of the
steering column.
The tilt adjustment lever on the underside of the steering columnallows you to tilt the steering wheel.
Instruments an d Control s
WINDSHIEL
D
WIPERS/WASHER S
HOR
N
BUTTON S
TIL T ADJUSTMEN T
HEADLIGHTS /
TUR N SIGNAL S
MOONROO
F
HAZAR
D WARNIN G
LIGHT S REA
R WINDO W
DEFOGGE R
INSTRUMEN
T PANE L
BRIGHTNES S
CRUIS
E
CONTRO L
Page 68 of 279
Control
s Nea r th e Steerin g Whee l
Rea r Windo w Wipe r an d Washe r
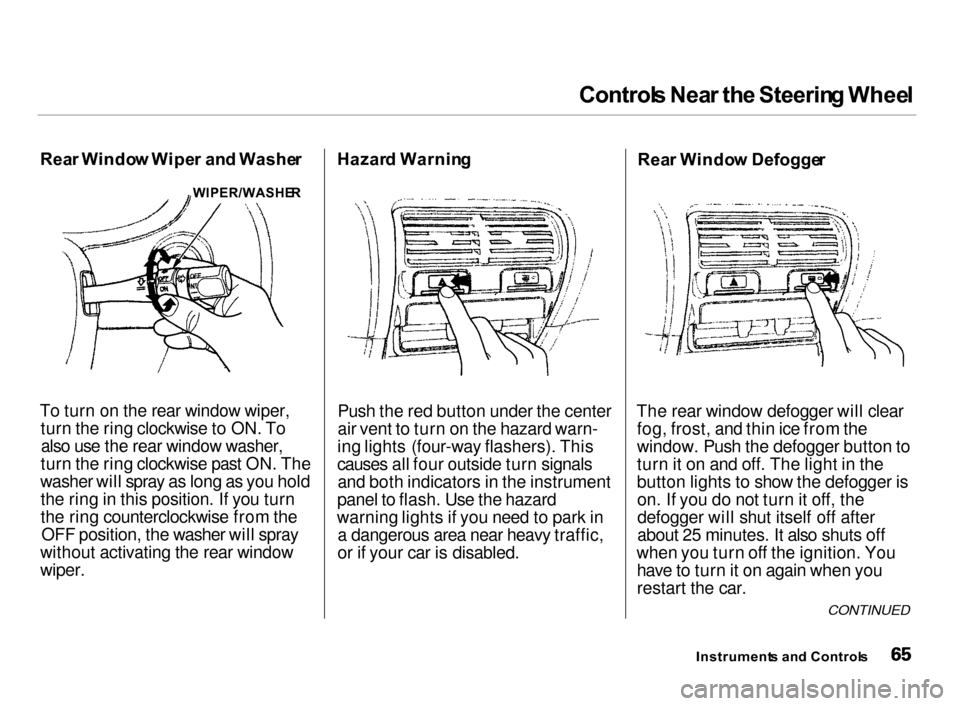
To turn on the rear window wiper, turn the ring clockwise to ON. Toalso use the rear window washer,
turn the ring clockwise past ON. The
washer will spray as long as you hold the ring in this position. If you turn
the ring counterclockwise from the OFF position, the washer will spray
without activating the rear window
wiper. Hazar
d Warnin g
Push the red button under the center
air vent to turn on the hazard warn-
ing lights (four-way flashers). This
causes all four outside turn signals and both indicators in the instrument
panel to flash. Use the hazard
warning lights if you need to park in a dangerous area near heavy traffic,
or if your car is disabled. Rea
r Windo w Defogge r
The rear window defogger will clear fog, frost, and thin ice from the
window. Push the defogger button to
turn it on and off. The light in the
button lights to show the defogger ison. If you do not turn it off, the
defogger will shut itself off after
about 25 minutes. It also shuts off
when you turn off the ignition. You have to turn it on again when you
restart the car.
Instrument s an d Control s
WIPER/WASHE
R
CONTINUED
Page 82 of 279

Sea
t Adjustment s
Front Seat Adjustment s
See pages 13 — 14 for important safety
information and warnings about how to
properly position seats and seat-backs.
Make all seat adjustments before
you start driving.
To adjust the seat forward andbackward, pull up on the lever under
the seat cushion's front edge. Move
the seat to the desired position and
release the lever. Try to move theseat to make sure it is locked in
position.
To change the angle of the seat-back,
pull up on the lever on the outside of
the seat bottom. Move the seat-back
to the desired position and release
the lever. Let the seat-back latch in
the new position.
Instrument s an d Control s
Page 83 of 279
Sea
t Adjustment s
Driver' s Sea t Heigh t Adjustmen t
Except SE and Type-R models See pages 13 — 14 for important safety
information and warnings about how to
properly position seats and seat-backs.
Make all adjustments before youstart driving.
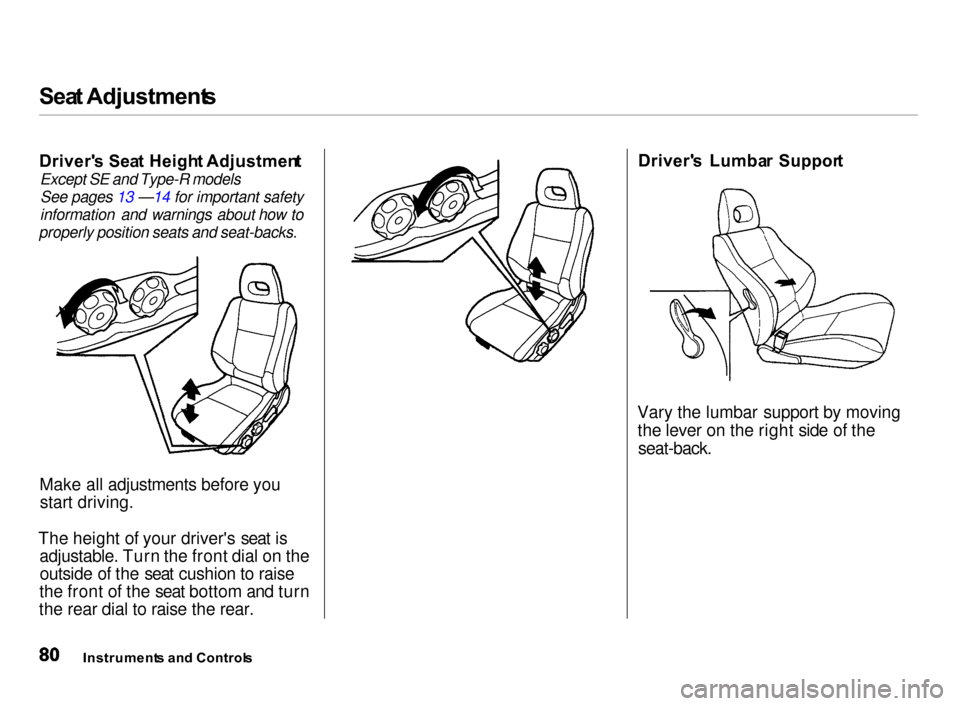
The height of your driver's seat is adjustable. Turn the front dial on theoutside of the seat cushion to raise
the front of the seat bottom and turn
the rear dial to raise the rear. Driver'
s Lumba r Suppor t
Vary the lumbar support by moving the lever on the right side of the
seat-back.
Instrument s an d Control s
Page 85 of 279
Sea
t Adjustment s
Hea d Restraint s
See page 15 for important safety
information and a warning about how to
properly position the head restraints.
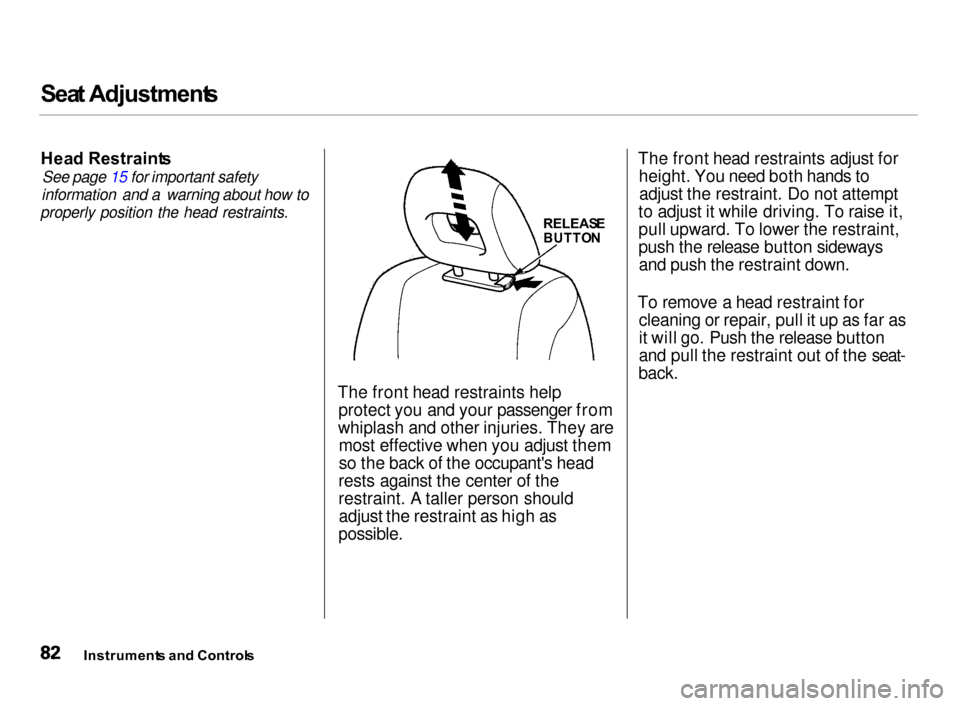
RELEASE
BUTTO N
The front head restraints help protect you and your passenger from
whiplash and other injuries. They are most effective when you adjust them
so the back of the occupant's head
rests against the center of the
restraint. A taller person should adjust the restraint as high as
possible.
The front head restraints adjust for
height. You need both hands toadjust the restraint. Do not attempt
to adjust it while driving. To raise it,
pull upward. To lower the restraint,
push the release button sideways and push the restraint down.
To remove a head restraint for cleaning or repair, pull it up as far as
it will go. Push the release button
and pull the restraint out of the seat-
back.
Instrument s an d Control s