automatic transmission Acura Integra 2000 Hatchback Owner's Manual
[x] Cancel search | Manufacturer: ACURA, Model Year: 2000, Model line: Integra, Model: Acura Integra 2000Pages: 279, PDF Size: 3.57 MB
Page 71 of 279
Steerin
g Whee l Control s
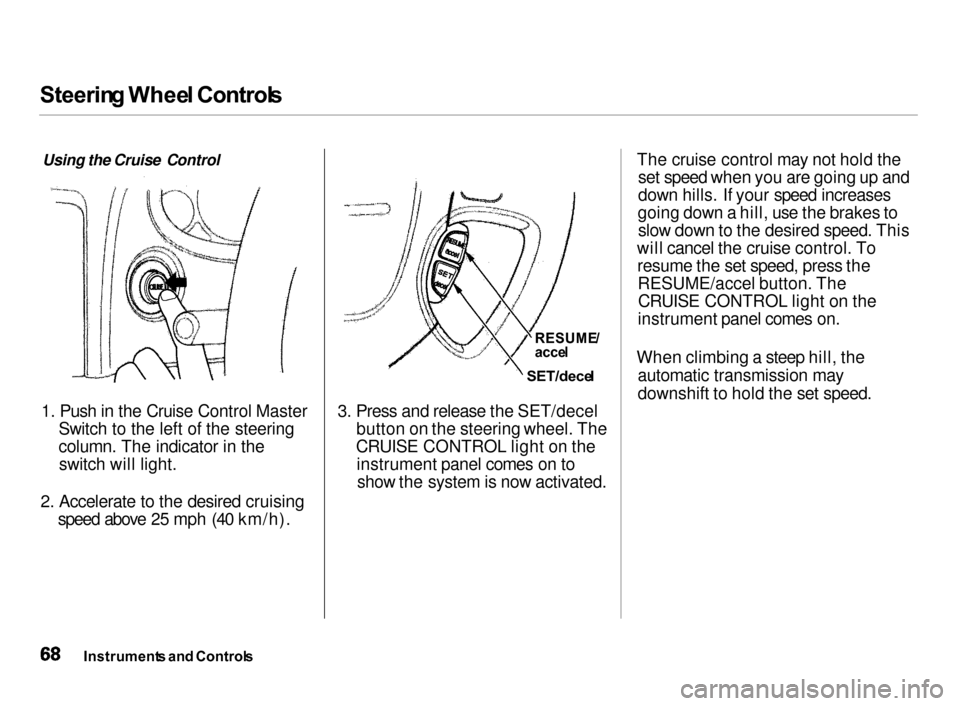
Using the Cruise Control
1. Push in the Cruise Control Master
Switch to the left of the steering
column. The indicator in the switch will light.
2. Accelerate to the desired cruising
speed above 25 mph (40 km/h). 3. Press and release the SET/decel
button on the steering wheel. The
CRUISE CONTROL light on the instrument panel comes on toshow the system is now activated.
The cruise control may not hold the
set speed when you are going up and
down hills. If your speed increases
going down a hill, use the brakes to slow down to the desired speed. This
will cancel the cruise control. To resume the set speed, press theRESUME/accel button. TheCRUISE CONTROL light on the
instrument panel comes on.
When climbing a steep hill, the automatic transmission may
downshift to hold the set speed.
Instrument s an d Control s
RESUME
/
acce l
SET/dece l
Page 77 of 279
Key
s an d Lock s
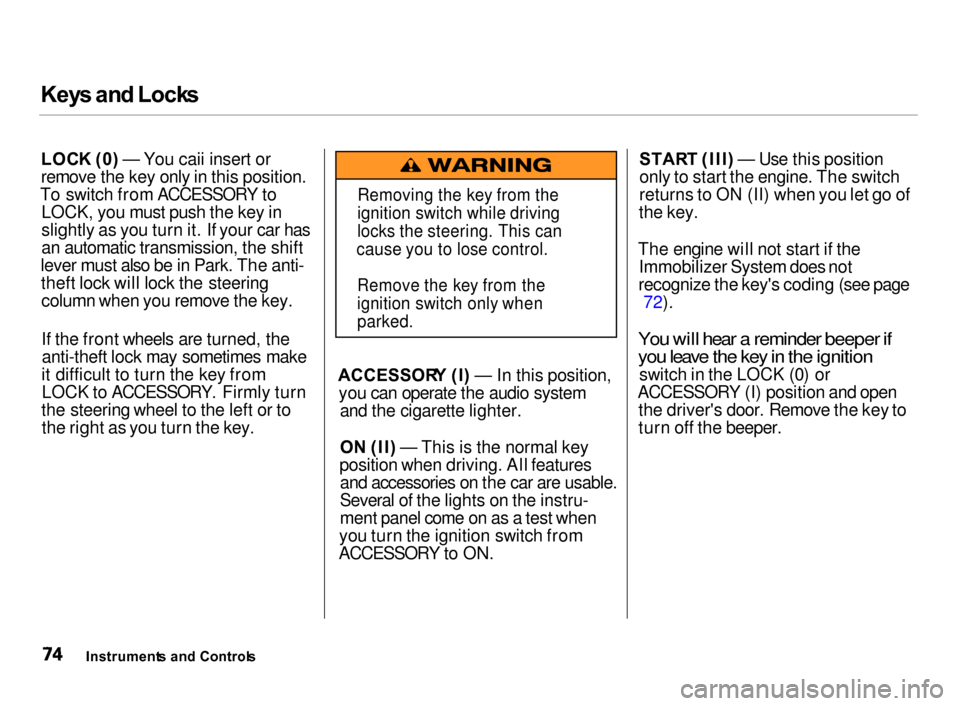
LOC K (0 ) — You caii insert or
remove the key only in this position.
To switch from ACCESSORY to LOCK, you must push the key in
slightly as you turn it. If your car has
an automatic transmission, the shift
lever must also be in Park. The anti- theft lock will lock the steeringcolumn when you remove the key.
If the front wheels are turned, theanti-theft lock may sometimes make
it difficult to turn the key from LOCK to ACCESSORY. Firmly turn
the steering wheel to the left or to the right as you turn the key. ACCESSOR
Y (I ) — In this position,
you can operate the audio system and the cigarette lighter.
O N (II ) — This is the normal key
position when driving. All features and accessories on the car are usable.
Several of the lights on the instru-
ment panel come on as a test when
you turn the ignition switch from
ACCESSORY to ON. STAR
T (III ) — Use this position
only to start the engine. The switch
returns to ON (II) when you let go of
the key.
The engine will not start if the Immobilizer System does not
recognize the key's coding (see page 72).
You will hear a reminder beeper if
you leave the key in the ignition
switch in the LOCK (0) or
ACCESSORY (I) position and open the driver's door. Remove the key to
turn off the beeper.
Instrument s an d Control s
Removing the key from the
ignition switch while driving
locks the steering. This can
cause you to lose control.
Remove the key from the
ignition switch only when
parked.
Page 138 of 279
Drivin
g
This section gives you tips on starting the engine under various
conditions, and how to operate the 5-speed manual and automatic
transmissions. It also includes
important information on parking
your car, the braking system, and
facts you need if you are planning to
tow a trailer. Preparing to Drive......................... 136
Starting the Engine........................ 137
Starting in Cold Weatherat High Altitude..................... 137
5-speed Manual Transmission..... 138
Recommended Shift Points...... 139
Engine Speed Limiter............... 139
Automatic Transmission............... 140 Shift Lever Position Indicator.. 140
Shift Lever Positions................. 140
Engine Speed Limiter............... 142
Shift Lock Release..................... 143
Parking............................................ 144
The Braking System...................... 145 Brake Wear Indicators.............. 145
Brake System Design................ 146
Anti-lock Brakes........................ 146 Important SafetyReminders.......................... 147
ABS Indicator......................... 148
Limited Slip Differential............... 148
Driving in Bad Weather................ 149
Towing a Trailer............................ 151
Driving
Page 140 of 279

Startin
g th e Engin e
1. Apply the parking brake.
2. In cold weather, turn off all
electrical accessories to reduce
the drain on the battery.
3. Manual Transmission:
Push the clutch pedal down all the
way. START
(III) does not
function unless the clutch pedal is
depressed.
Automatic Transmission:
Make sure the shift lever is in
Park. Press on the brake pedal.
4. Without touching the accelerator
pedal, turn the ignition key to the
START (III) position. If the engine does not start right away, do not
hold the key in START (III) for
more than 15 seconds at a time.
Pause for at least 10 seconds
before trying again.
5. If the engine does not start within
15 seconds, or starts but stalls
right away, repeat step 4 with the
accelerator pedal pressed half-waydown. If the engine starts, release
pressure on the accelerator pedal so the engine does not race.
6. If the engine still does not start,
press the accelerator pedal all the
way down and hold it there while starting in order to clear flooding.
As before, keep the ignition key in the START (III) position for no
more than 15 seconds. Return tostep 5 if the engine does not start.
If it starts, lift your foot off the accelerator pedal so the engine
does not race.
Startin g in Col d Weathe r a t Hig h
Altitud e (Abov e 8,00 0 feet /
2,40 0 meters )
An engine is harder to start in cold weather. The thinner air found at
high altitude above 8,000 feet (2,400 meters) adds to the problem.
Use the following procedure:
1. Turn off all electrical accessories
to reduce the drain on the battery.
2. Push the accelerator pedal half-
way to the floor and hold it there
while starting the engine. Do nothold the ignition key in START (III) for more than 15 seconds.
When the engine starts, release the accelerator pedal gradually as
the engine speeds up and smooths
out.
3. If the engine fails to start in step 2,
push the accelerator pedal to the
floor and hold it there while you
try to start the engine for no more than 15 seconds. If the enginedoes not start, return to step 2.
Driving
Page 144 of 279
Automati
c Transmissio n
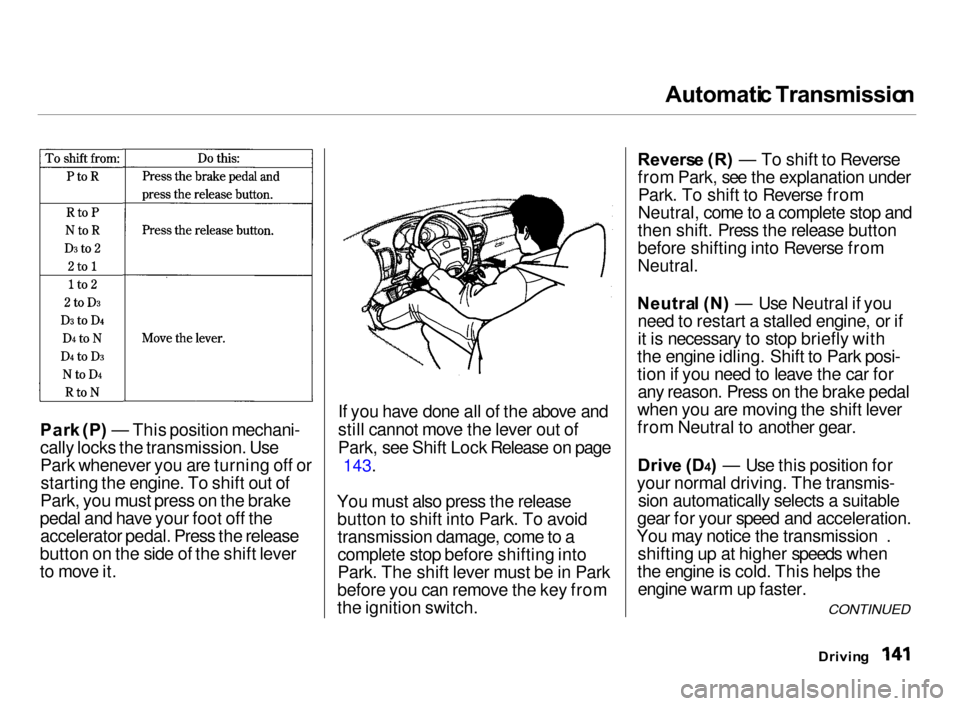
Par k (P ) — This position mechani-
cally locks the transmission. Use
Park whenever you are turning off or starting the engine. To shift out of
Park, you must press on the brake
pedal and have your foot off the accelerator pedal. Press the release
button on the side of the shift lever
to move it. If you have done all of the above and
still cannot move the lever out of
Park, see Shift Lock Release on page
143.
You must also press the release button to shift into Park. To avoidtransmission damage, come to a
complete stop before shifting into
Park. The shift lever must be in Park
before you can remove the key from
the ignition switch. Revers
e (R ) — To shift to Reverse
from Park, see the explanation under Park. To shift to Reverse from
Neutral, come to a complete stop and
then shift. Press the release button
before shifting into Reverse from
Neutral.
Neutra l (N ) — Use Neutral if you
need to restart a stalled engine, or if
it is necessary to stop briefly with
the engine idling. Shift to Park posi-
tion if you need to leave the car for any reason. Press on the brake pedal
when you are moving the shift lever
from Neutral to another gear.
Driv e (D 4) — Use this position for
your normal driving. The transmis- sion automatically selects a suitable
gear for your speed and acceleration.
You may notice the transmission . shifting up at higher speeds when
the engine is cold. This helps the engine warm up faster.
Driving
CONTINUED
Page 145 of 279

Automati
c Transmissio n
Driv e (D 3) —This position is similar
to D4, except only the first three
gears are selected. Use D3 when
towing a trailer in hilly terrain, or to
provide engine braking when going down a steep hill. D3 can also keep
the transmission from cycling
between third and fourth gears in stop-and-go driving.
For faster acceleration when in D3 or
D4, you can get the transmission to
automatically downshift by pushing
the accelerator pedal to the floor.
The transmission will shift down one or two gears, depending on your
speed.
Secon d (2 ) — To shift to Second,
press the release button on the side of the shift lever. This position locks
the transmission in second gear. It does not downshift to first gear
when you come to a stop. Second
gives you more power when climbing, and increased engine braking when going down steep hills. Use second
gear when starting out on a slippery
surface or in deep snow. It will help
reduce wheelspin.
Firs t (1 ) — To shift from Second to
First, press the release button on the side of the shift lever. With the lever
in this position, the transmission
locks in First gear. By upshifting and downshifting through 1, 2, D3 and D4,
you can operate this transmission much like a manual transmission
without a clutch pedal. Engin
e Spee d Limite r
If you exceed the maximum speed
for the gear you are in, the engine speed will enter into the
tachometer's red zone. If this occurs, you may feel the engine
cut in and out. This is caused by a
limiter in the engine's computer
controls. The engine will run
normally when you reduce the
RPM below the red zone.
Drivin g
Page 147 of 279
Parkin
g
Always use the parking brake when you park your car. The indicator onthe instrument panel shows that the
parking brake is not fully released; it does not indicate that the parking
brake is firmly set. Make sure the
parking brake is set firmly or your car may roll if it is parked on an
incline.
If your car has an automatic
transmission, set the parking brake
before you put the transmission inPark. This keeps the car frommoving and putting pressure on the
parking mechanism in the
transmission — making it easier to move the shift lever out of Park
when you want to drive away. If the car is facing uphill, turn the
front wheels away from the curb. If
you have a manual transmission, put it in first gear.
If the car is facing downhill, turn the
front wheels toward the curb. If you
have a manual transmission, put it in reverse gear.
Make sure the parking brake is fully
released before driving away.
Driving with the parking brake
partially set can overheat or damagethe rear brakes. Parkin
g Tip s Make sure the moonroof and the
windows are closed.
Turn off the lights. Place any packages, valuables, etc.,
in the cargo area or take them
with you.
Lock the doors.
Never park over dry leaves, tall
grass, or other flammable materials. The three way catalytic
converter gets very hot, and could
cause these materials to catch on
fire.
Drivin g
Page 158 of 279

Towin
g a Traile r
Drivin g Safel y Wit h a Traile r
The added weight, length, and height of a trailer will affect your
vehicle's handling and performance, so driving with a trailer requires
some special driving skills and
techniques.
For your safety and the safety ofothers, take time to practice driving
maneuvers before heading for the open road, and follow the guidelines
discussed below.
Towing Speeds and Gears
Driving slower than normal in all
driving situations, and obey posted
speed limits for vehicles with trailers.
Use D4 position when towing a trailer
on level roads. D3 is the proper shift
lever position to use when towing a
trailer in hilly terrain. (See "Driving on Hills" in the next column for
additional gear information.)
Making Turns and Braking
Make turns more slowly and wider
than normal. The trailer tracks a smaller arc than your vehicle, and it
can hit or run over something the
vehicle misses. Allow more time and distance for braking. Do not brake or
turn suddenly as this could cause the
trailer to jackknife or turn over.
Driving on Hills
When climbing hills, closely watch your temperature gauge. If it nearsthe red mark, turn the air conditioning off, reduce speed and, if
necessary, pull to the side of the
road to let the engine cool.
If the automatic transmission shifts
frequently between 3rd and 4th
gears while going up a hill, shift to
D3.
If you must stop when facing uphill,
use the foot brake or parking brake. Do not try to hold the vehicle in
place by pressing on the accelerator, as this can cause the transmission to
overheat.
When driving down hills, reduce
your speed and shift down to 2nd gear. Do not "ride" the brakes, and
remember it will take longer to slow down and stop when towing a trailer.
CONTINUED
Drivin g
Page 159 of 279

Towin
g a Traile r
Handling Crosswinds and Buffeting
Crosswinds and air turbulence
caused by passing trucks can disrupt
your steering and cause trailer
swaying. When being passed by a
large vehicle, keep a constant speed
and steer straight ahead. Do not try
to make quick steering or braking
corrections.
Backing Up
Always drive slowly and have someone guide you when backing up.
Grip the bottom of the steering
wheel; then turn the wheel to the leftto get the trailer to move to the left,and turn the wheel right to move the
trailer to the right.
Parking
Follow all normal precautions when
parking, including firmly setting the
parking brake and putting the transmission in Park (automatic) or
in 1 st or Reverse (manual). Also,
place wheel chocks at each of the
trailer's tires.
Drivin g
Page 160 of 279
Maintenanc
e
This section explains why it is important to keep your car well
maintained and to follow basic
maintenance safety precautions.
This section also includes Maintenance Schedules for normaldriving and severe driving conditions,
a Maintenance Record, and instruc-
tions for simple maintenance tasks
you may want to take care of
yourself.
If you have the skills and tools to per-
form more complex maintenance
tasks on your Acura, you may want
to purchase the Service Manual. See
page 265 for information on how to obtain a copy, or see your Acura
dealer.
Maintenance Safety....................... 158
Important Safety Precautions.. 159
Maintenance Schedule.................. 160
Maintenance Record..................... 167
Owner Maintenance Checks........ 169
Fluid Locations............................... 170
Engine Oil....................................... 171 Adding Oil................................... 171
Recommended Oil..................... 171
Synthetic Oil............................... 173
Additives..................................... 173
Changing the Oil and Filter...... 173
Cooling System.............................. 176
Adding Engine Coolant............. 176Replacing Engine Coolant........ 178
Windshield Washers..................... 181
Transmission Fluid........................ 182 AutomaticTransmission.......................... 182
5-speed Manual Transmission.......................... 183
Brake and Clutch Fluid................. 183 Brake System............................. 184
Clutch System............................ 184
Power Steering............................... 185
Air Cleaner Element...................... 186
Hood Latch..................................... 187
Spark Plugs..................................... 187 Replacement............................... 187
Specifications............................. 189
Battery............................................ 189
Wiper Blades.................................. 192
Air Conditioning System............... 194
Drive Belts...................................... 195
Timing Belt..................................... 195
Tires................................................ 196 Inflation....................................... 196
Inspection................................... 197
Maintenance............................... 198
Tire Rotation.............................. 199
Tire Wear.................................... 199
Replacing Tires and Wheels.... 200
Wheels and Tires....................... 201
Winter Driving........................... 201
Snow Tires.............................. 202
Tire Chains............................. 202
Lights.............................................. 203 Headlight Aiming...................... 205
Replacing Bulbs......................... 207
Storing Your Car............................ 214
Maintenance