brake light Acura Integra 2000 Sedan Owner's Manual
[x] Cancel search | Manufacturer: ACURA, Model Year: 2000, Model line: Integra, Model: Acura Integra 2000Pages: 273, PDF Size: 4.4 MB
Page 54 of 273

Instrument
s an d Control s
This section gives information about the controls and displays that
contribute to the daily operation of
your Acura. All the essential controls
are within easy reach.
Control Locations............................ 52
Indicator Lights................................ 53
Gauges.............................................. 57
Speedometer................................ 57
Tachometer.................................. 57
Odometer...................................... 57
Trip Meter.................................... 57
Fuel Gauge................................... 58
Temperature Gauge....................
58
Maintenance Require
d
Indicator.................................... 59
Controls Near the Steering
Wheel........................................ 60
Headlights.................................... 61
Instrument Panel Brightness.....
62
Turn S
ignals.................................
62
Windshield Wipers.
..................... 63
Windshield Washers..................
. 63
Hazard Warning...........................
64
Rear Windo
w Defogger.............. 64
Steering Wheel Adjustment....... 65
Steering Wheel Controls................ 66
Cruise Control.............................. 66
Keys and Locks................................ 69
Keys............................................... 69
Immobilizer System..................... 69
Ignition Switch............................. 70
Power Door Locks....................... 72
Childproof Door Locks............... 73
Trunk............................................ 73
Glove Box..................................... 75
Seat Adjustments............................. 75
Driver's Seat Height
Adjustment............................... 76
Driver's Lumbar Support............ 76
Head Restraints........................... 77
Folding Rear Seat............................ 77
Power Windows............................... 79
Moonroof.......................................... 80
Mirrors.............................................. 81
Adjusting the Power Mirrors..... 81
Parking Brake.................................. 82
Digital Clock..................................... 83
Beverage Holder.............................. 84 Console Compartment.................... 85
Cigarette Lighter............................. 85
Ashtrays............................................ 86
Interior Lights.................................. 87
Instrument s an d Control s
Page 57 of 273

Indicato
r Light s
Sea t Bel t Reminde r Ligh t
This indicator lights when you turn
the ignition switch ON (II). It is a
reminder to you and your passengers
to protect yourselves by fastening the seat belts. A beeper also sounds
if you have not fastened your seat
belt.
If you do not fasten your seat belt,
the beeper will stop after a few seconds but the light stays on until
you do. Both the light and the beeper
stay off if you fasten your seat belt
before turning on the ignition. Chargin
g Syste m
Indicato r
If this light comes on when the
engine is running, the battery is not
being charged. For complete
information, see page 232 .
Low Oi l Pressur e
Indicato r
The engine can be severely damaged
if this light flashes or stays on when the engine is running. For complete
information, see page 231.
Parkin
g Brak e an d
Brak e Syste m Indicato r
This light has two functions:
1. It lights as a reminder that you have not released the parking
brake. Driving with the parking
brake applied can damage thebrakes and tires, and cause the
Anti-lock brake system to turn off (see page 142).
2. If it remains lit after you release the parking brake while the engine
is running, or comes on while
driving, it can indicate a problem
in the brake system. For complete
information, see page 234.
Instrument s an d Control s
BRAK
E
Page 70 of 273

Steerin
g Whee l Control s
3. Press and release the SET/decel
button on the steering wheel. The
CRUISE CONTROL light on the
instrument panel comes on to
show the system is now activated.
The cruise control may not hold
the set speed when you are going
up and down hills. If your speed
increases going down a hill, use
the brakes to slow down to the
desired speed. This will cancel the
cruise control. To resume the set
speed, press and hold the
RESUME/accel button until the
CRUISE CONTROL light on the
instrument panel comes on. When
climbing a steep hill, the automatic
transmission may downshift to
hold the set speed.
Changing the Set Speed
You can increase the set cruising
speed in any of these ways: Press and hold the RESUME/
accel button. The car will acceler-
ate. When you reach the desired
cruising speed, release the button. Push on the accelerator pedal. Ac-
celerate to the desired cruising
speed and press the SET/decel
button.
You can decrease the set cruising
speed in any of these ways: Press and hold the SET/decel
button. The car will decelerate. Release the button when you
reach the desired speed.
Tap the brake or clutch pedal
lightly with your foot. The CRUISE CONTROL light on the
instrument panel will go out.
When the car slows to the desired
speed, press the SET/decel button.
The car will then maintain the
desired speed.
CONTINUED
Instrument s an d Control s
RESUME
/
acce l
SET/dece l
Page 71 of 273

Steerin
g Whee l Control s
Even with the cruise control turned on, you can still use the accelerator
pedal to speed up for passing. After
completing the pass, take your foot
off the accelerator pedal. The car
will return to the set cruising speed.
Resting your foot on the brake or
clutch pedal will cause the cruise
control to cancel. Cancelling the Cruise Control
You can cancel the cruise control in
any of these ways: Tap the brake or clutch pedal.
Press the SET/decel and RE-
SUME/accel buttons at the same
time. Press the Cruise Control Master
Switch.
When you tap the brake or clutch
pedal, or press the SET and RE-
SUME buttons at the same time, the CRUISE CONTROL light on the
instrument panel will go out and the car will begin to slow down. You can
use the accelerator pedal in the
normal way.
If you use the brake or clutch pedal
to cancel cruise control, the system
remembers the previously-set cruising speed. To return to that
speed, accelerate to above 25 mph (40 km/h) and press the RESUME/
accel button until the CRUISE CON-
TROL light comes on. The car will accelerate to the same cruising
speed as before.
Pressing the Cruise Control Master
Switch turns the system completely
off and erases the previous cruising
speed from memory. To use the
system again, refer to Using the
Cruise Control.
Instrument s an d Control s
Page 85 of 273

Mirrors
, Parkin g Brak e
3. Push the appropriate edge of the adjustment switch to move the
mirror right, left, up or down.
4. When you finish, move the selector switch to the center (off)
position. This turns off the adjustment switch so you can't
move a mirror out of position by accidentally bumping the switch. Parkin
g Brak e
To apply the parking brake, pull the lever up fully. To release it, pull up slightly, push the button, and lower
the lever. The parking brake light on
the instrument panel should go out
when the parking brake is fully
released (see page 54).
Driving the car with the parking brake
applied can damage the rear brakes
and axles.
Instrument s an d Control s NOTIC
E
PARKIN G BRAK E LEVE R
ADJUSTMEN
T
SWITC H
Page 121 of 273

Break-i
n Period , Gasolin e
Break-i n Perio d
Help assure your car's future
reliability and performance by paying
extra attention to how you drive
during the first 600 miles (1,000 km).
During this period:
Avoid full-throttle starts and rapid
acceleration.
Avoid hard braking. New brakes
need to be broken-in by moderate
use for the first 200 miles (300
km).
You should follow these same re-
commendations with an overhauled
or exchanged engine, or when the
brakes are relined.
Gasolin
e
Your Acura is designed to operate on
unleaded gasoline.
We recommend gasolines containing
detergent additives that help prevent
fuel system and engine deposits.
Using gasoline containing lead will
damage your car's emissions
controls. This contributes to air
pollution.
(LS and GS models)
Use an unleaded gasoline with a
pump octane number of 86 or higher. Use of a lower octane gasoline can
cause a persistent, heavy metallic
rapping noise in the engine that can
lead to mechanical damage.
(GS-R model)
Use a premium unleaded gasoline
with a pump octane number of 91 or
higher.
If you are unable to find premium
unleaded gasoline, you may substi-
tute an unleaded regular gasoline. The engine will compensate for the
lower octane, but you may notice a slight decrease in power as a result.
Befor e Drivin g
Page 123 of 273

Servic
e Statio n Procedure s
5. Screw the fuel fill cap back on, tighten it until it clicks several
times. If you do not properly
tighten the cap, the Malfunction
Indicator Lamp may come on (see
page 233 ).
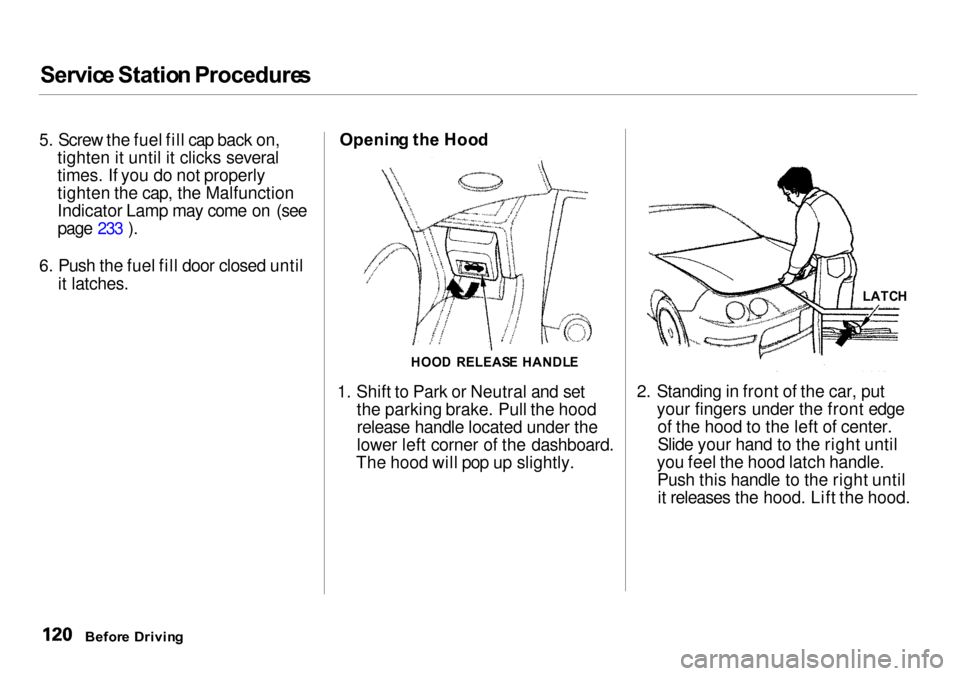
6. Push the fuel fill door closed until it latches. Openin
g th e Hoo d
1. Shift to Park or Neutral and set the parking brake. Pull the hood
release handle located under the
lower left corner of the dashboard.
The hood will pop up slightly. 2. Standing in front of the car, put
your fingers under the front edgeof the hood to the left of center.
Slide your hand to the right until
you feel the hood latch handle. Push this handle to the right untilit releases the hood. Lift the hood.
Befor e Drivin g
HOO
D RELEAS E HANDL E LATC
H
Page 128 of 273

Accessorie
s an d Modification s
Modifying your car, or installing some non-Acura accessories, can
make your car unsafe. Before you
make any modifications or add any
accessories, be sure to read the following information.
Accessorie s
Your dealer has Genuine Acura
accessories that allow you to
personalize your car. These accessories have been designed and
approved for your car, and are
covered by warranty.
Non-Acura accessories are usually
designed for universal applications.
Although aftermarket accessories
may fit on your car, they may not
meet factory specifications, and
could adversely affect your car's
handling and stability. (See
"Modifications" on the page 126 for
additional information.) When properly installed, cellular
phones, alarms, two-way radios, and
low-powered audio systems should not interfere with your car's
computer-controlled systems, such
as the SRS and anti-lock brake
system.
However, if electronic accessories
are improperly installed, or exceed your car's electrical system capacity,
they can interfere with the operation of your car, or even cause the
airbags to deploy.
Before installing any accessory:
Make sure the accessory does not
obscure any lights, or interfere
with proper car operation or
performance. Be sure electronic accessories do
not overload electrical circuits (see page 236 ). Have the installer contact your
Acura dealer for assistance before
installing any electronic accessory.
If possible, have your dealer inspect
the final installation.
Before Drivin g
Improper accessories or
modifications can affect your
car's handling, stability and performance, and cause a
crash in which you can be hurt
or killed.
Follow all instructions in this
owner's manual regarding
accessories and modifications.
Page 143 of 273

Parkin
g
Always use the parking brake when
you park your car. The indicator on
the instrument panel shows that the
parking brake is not fully released; it does not indicate that the parking brake is firmly set. Make sure the
parking brake is set firmly or your
car may roll if it is parked on an
incline.
If your car has an automatic
transmission, set the parking brake
before you put the transmission in
Park. This keeps the car from
moving and putting pressure on the
parking mechanism in the transmission — making it easier to
move the shift lever out of Park
when you want to drive away. If the car is facing uphill, turn the
front wheels away from the curb. If
you have a manual transmission, put it in first gear.
If the car is facing downhill, turn the
front wheels toward the curb. If you
have a manual transmission, put it in
reverse gear.
Make sure the parking brake is fully released before driving away.Driving with the parking brake
partially set can overheat or damage the rear brakes. Parkin
g Tip s
Make sure the moonroof and the windows are closed. Turn off the lights.
Place any packages, valuables, etc.,
in the trunk or take them with you.
Lock the doors. Never park over dry leaves, tall
grass, or other flammable
materials. The three way catalytic
converter gets very hot, and could cause these materials to catch on
fire.
Drivin g
Page 144 of 273

Th
e Brakin g Syste m
Your Acura is equipped with disc brakes at all four wheels. A power
assist helps reduce the effort needed
on the brake pedal.
Put your foot on the brake pedal only
when you intend to brake. Resting
your foot on the pedal keeps the
brakes applied lightly, causing them
to build up heat. Heat build-up can reduce how well your brakes work. Italso keeps your brake lights on all
the time, confusing drivers behind
you.
Constant application of the brakes
when going down a long hill builds
up heat and reduces their effective-
ness. Use the engine to assist the
brakes by downshifting to a lower
gear and taking your foot off the
accelerator pedal.
Check your brakes after driving
through deep water. Apply the
brakes moderately to see if they feel
normal. If not, apply them gently and
frequently until they do. Since a
longer distance is needed to stop with wet brakes, be extra cautious
and alert in your driving. Brak
e Wea r Indicator s
All four brakes have audible brake
wear indicators.
When the brake pads need replacing, you will hear a distinctive metallic"screeching" sound when you apply
the brakes. If you do not have the
brake pads replaced, they will begin screeching all the time.
Your brakes may sometimes squeal or squeak when you apply them
lightly. Do not confuse this with the
brake wear indicators. They make a
very audible "screeching."
Driving