remove seats Acura MDX 2002 Owner's Manual
[x] Cancel search | Manufacturer: ACURA, Model Year: 2002, Model line: MDX, Model: Acura MDX 2002Pages: 372, PDF Size: 5.48 MB
Page 33 of 372

Af ter selecting a proper child seat,
and a good position to install the seat,
there are three main steps in
installing the seat:Make sure the child is properly
strappedinthechildseat
according to the child seat maker’s
instructions. A child who is not
properly secured in a child seat
canbethrownoutof theseatina
crash and be seriously injured.
However, a child seat does not need
to be ‘‘rock solid.’’ In some vehicles
or seating positions, it may be
dif f icult to install a child seat so that
it does not move at all. Some side-to-
side or back-and-f orth movement can
be expected and should not reduce
the child seat’s ef f ectiveness. When you are not using a child seat,
either remove it and store it in a saf e
place, or make sure it is properly
secured. An unsecured child seat can
be thrown around the vehicle during
a crash or sudden stop and injure
someone.
If the child seat is not secure, try
installing it in a dif f erent seating
position, or use a dif f erent style of
child seat that can be f irmly secured
in the desired seating position. To provide security during normal
driving maneuvers as well as during
a collision, we recommend that
parents secure a child seat as f irmly
as possible.
All child seats are
designed to be secured to the
vehicle with the lap part of a lap/
shoulder belt. Some child seats
can be secured to the vehicle’s
LATCH anchorage system instead.
A child whose seat is not properly
secured to the vehicle can be
endangered in a crash. See pages , and f or instructions on
howtoproperlysecurechildseats
in this vehicle.
Af ter installing a child
seat, push and pull the seat
f orward and f rom side to side to
verif y that it is secure. 31 4436
Inst alling a Child Seat
Secure t he child in t he child seat .
Storing a Child Seat
Properly secure t he child seat t o
the vehicle.
Make sure t he child seat is f irmlysecured.
1.
2. 3.
Protecting Children
Driver and Passenger Saf ety29
01/09/07 12:00:25 31S3V610_034
Page 46 of 372

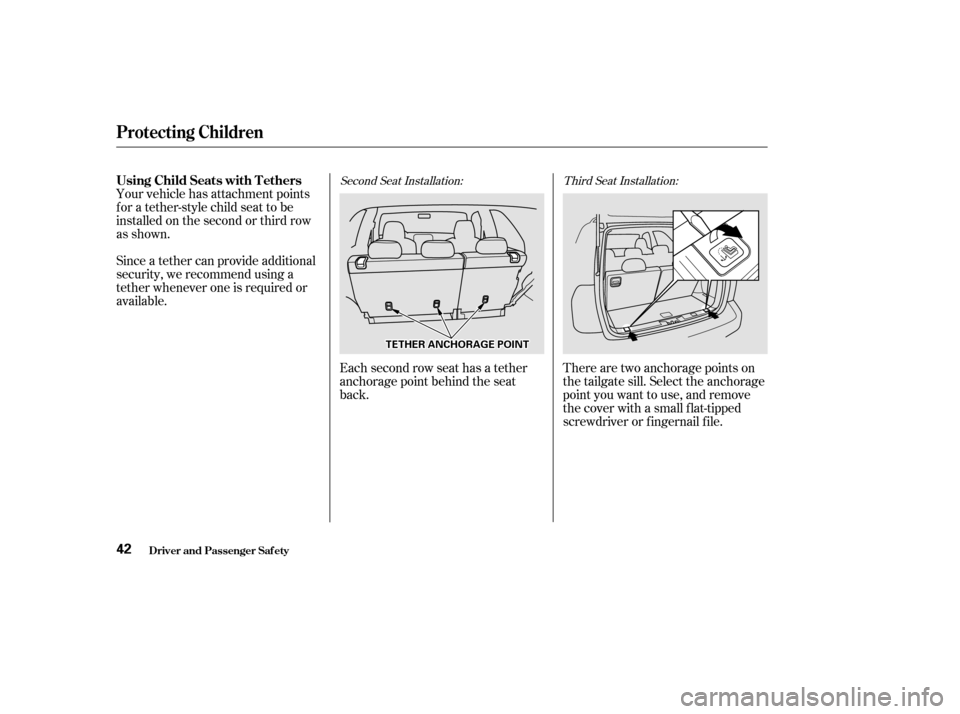
Your vehicle has attachment points
for a tether-style child seat to be
installed on the second or third row
as shown.
Since a tether can provide additional
security, we recommend using a
tether whenever one is required or
available.There are two anchorage points on
the tailgate sill. Select the anchorage
point you want to use, and remove
the cover with a small f lat-tipped
screwdriver or f ingernail f ile.
Each second row seat has a tether
anchorage point behind the seat
back.
Second Seat Installation:
Third Seat Installation:Using Child Seats with T ethers
Protecting Children
Driver and Passenger Saf ety42
T TE
ET
TH
H E
ER
R A
AN
NC CHH O
OR RAA G
GE E P
PO
OI INNT T
01/09/07 12:02:30 31S3V610_047
Page 98 of 372

See page f or important saf etyinf ormation and a warning about how toproperly position the head restraints. 14
To remove a head restraint f or
cleaning or repair, pull it up as f ar as
it will go. Push the release button
and pull the restraint out of the seat-
back.
The head restraints adjust f or height.
You need both hands to adjust the
restraint. Do not attempt to adjust it
while driving. To raise it, pull upward.
To lower the restraint, push the
release button sideways and push
the restraint down.
The head restraints help protect you
and your passengers f rom whiplash
and other injuries. They are most
ef f ective when you adjust them so
the back of the occupant’s head rests
against the center of the restraint. A
taller person should adjust the
restraint as high as possible. Your vehicle is equipped with head
restraints in all seating positions.
Seats
Inst rument s and Cont rols
Head Restraints
94
R RE
EL
LEE A
A S
SEE B
BUUT TT
TO
ON N
01/09/07 12:10:42 31S3V610_099
Page 99 of 372

To get into the third row seats, pull
upontheleveronthesideof the
passenger’s side second row seat-
back. The seat-back will tilt f orward,
and the seat will slide f orward.
After you return the seat-back to the
upright position, push the whole seat
backwards until it latches. Make
sure the seat is f ully latched bef ore
sitting in it.The lef t and right halves of the
second seat can be f olded up
separately to create more cargo
space.
If you are f olding the lef t half of
the seat, use the ignition key to
release the seat belt from the
detachable anchor. Allow the seat
belt to retract into the roof . Insert
the latch plate into the roof holder.
Lower the head restraint to its
lowest position.
Pull up on the handle on the
outside of the seat-back. Fold the seat-back forward.
Reverse this procedure to return the
seat to the upright position. Make
sure the seat is locked securely
bef ore driving.
(Lef t half ) Remove the seat belt
f rom its holder in the roof , and
connect it to the detachable anchor
(see page ).
2.
3. 1.
4.
98
Seats
Inst rument s and Cont rols
Rear Seat A ccess Folding the Second Seat
95
R REEL
LEE A
A S
SEE L
LEE V
V E
ER
R H
H
A
AN
ND DL
LEE
01/09/07 12:10:55 31S3V610_100
Page 100 of 372

Store the head restraints in the
storage compartment under the
cargo area f loor. Insert the shaf ts
of the head restraints into the
holes in the sides of the storage
compartment.Use the ignition key to release the
seat belt from the detachable
anchor.
To create more cargo space, you can
fold the third seat forward.
To fold the third seat:
Remove the head restraints by
pushing the release buttons and
pulling the restraints out.
1. 2. 3.
Folding the T hird Seat
Inst rument s and Cont rols
Seats
96
R RE
EL
LEE A
A S
SEE B
BUUT TT
TO
ON N
01/09/07 12:11:05 31S3V610_101