ignition Acura MDX 2004 Workshop Manual
[x] Cancel search | Manufacturer: ACURA, Model Year: 2004, Model line: MDX, Model: Acura MDX 2004Pages: 284, PDF Size: 3.92 MB
Page 195 of 284

Your MDX can be towed behind a
motorhome at legal highway speeds
up to 65 mph (100 km/h). Do not
exceed 65 mph (100 km/h) or severe
transmission damage will occur. To
avoid damage to the 4WD system, it
must be towed with all f our wheels
on the ground (f lat towing).
When purchasing a tow bar, make
sure you select a reputable
manuf acturer. Follow the
manufacturer’s attachment
instructions caref ully.
Perf orm this procedure every day
immediately bef ore you begin towing.
Otherwise, severe automatic
transmission damage will occur.Start the engine. Check the transmission f luid level
(see page ). Press on the brake pedal. Shif t the
lever through all the positions (P,
R,N,D,D,D,2,1).
ShifttoD ,thentoN.Letthe
engine run f or three minutes, then
turn it off.
Release the parking brake.
Leave the ignition switch in the
ACCESSORY (I) position so the
steering wheel does not lock.
Make sure the radio and any items
plugged into the accessory power
sockets are turned of f so you do
not run down the battery.
If you tow more than 8 hours in one
day, you should repeat the above
procedure at least every 8 hours
(when you stop f or f uel, etc.)
210
543 5
Ext ended T owing
Towing Your Vehicle Behind a Motorhome
Driving191
NOTICE: T he steering system can be
damaged if the steering wheel is locked.
Leave the ignition switch in the
ACCESSORY (I) position, and make
sure the steering wheel turns f reely
bef ore you begin towing.
Page 235 of 284

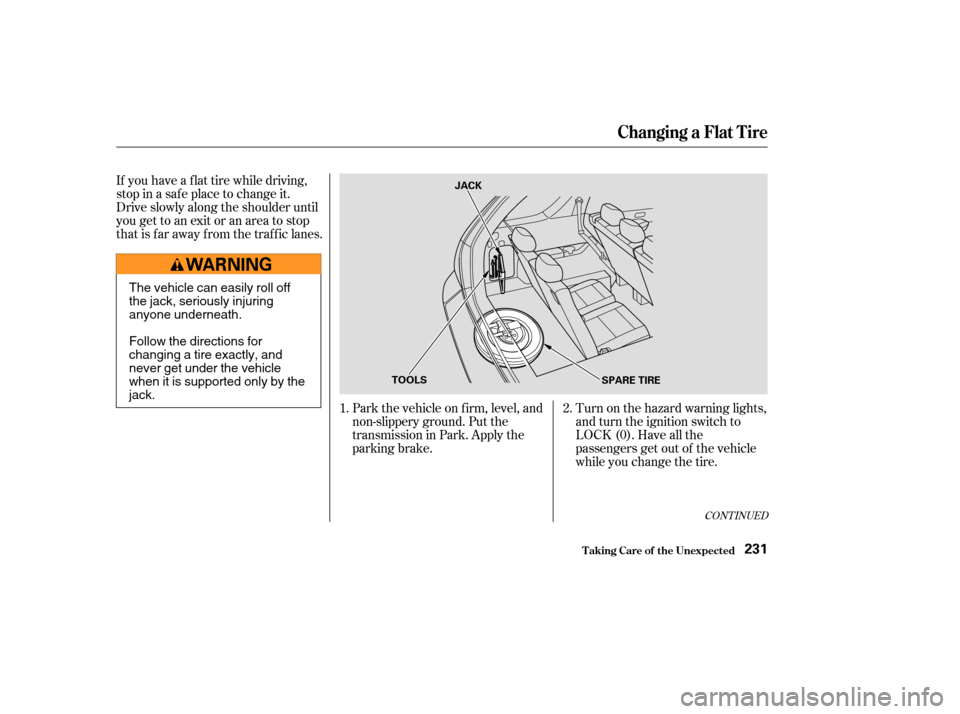
If you have a f lat tire while driving,
stop in a saf e place to change it.
Drive slowly along the shoulder until
you get to an exit or an area to stop
that is far away from the traffic lanes.Park the vehicle on f irm, level, and
non-slippery ground. Put the
transmission in Park. Apply the
parking brake.Turn on the hazard warning lights,
and turn the ignition switch to
LOCK (0). Have all the
passengers get out of the vehicle
while you change the tire.
2.
1.
CONT INUED
Changing a Flat T ire
T aking Care of t he Unexpect ed231
JACK
TOOLS SPARE TIRE
The vehicle can easily roll off
the jack, seriously injuring
anyone underneath.
Follow the directions for
changing a tire exactly, and
never get under the vehicle
when it is supported only by the
jack.
Page 241 of 284

Diagnosing why the engine won’t
start f alls into two areas, depending
on what you hear when you turn the
key to START (III):You hear nothing, or almost
nothing. The engine’s starter
motor does not operate at all, or
operates very slowly.
You can hear the starter motor
operating normally, or the starter
motor sounds like it is spinning
f aster than normal, but the engine
does not start up and run.
When you turn the ignition switch to
START (III), you do not hear the
normal noise of the engine trying to
start. You may hear a clicking sound
or series of clicks, or nothing at all.
Check these things: Check the transmission interlock.
The transmission must be in Park
orNeutralorthestarterwillnot
operate.
Turn the ignition switch to ON (II).
Turn on the headlights, and check
their brightness. If the headlights
are very dim or don’t light at all,
the battery is discharged. See
on page .
Turn the ignition switch to START
(III). If the headlights do not dim,
check the condition of the f uses. If
thefusesareOK,thereis
probably something wrong with
the electrical circuit f or the
ignition switch or starter motor.
You will need a qualif ied
technician to determine the
problem (see
on page ). If the headlights dim noticeably or
go out when you try to start the
engine, either the battery is dis-
charged or the connections are
corroded. Check the condition of
the battery and terminal connec-
tions (see page ). You can
then try jump starting the vehicle
f rom a booster battery (see page
).
In this case, the starter motor’s
speed sounds normal, or even f aster
than normal, when you turn the
ignition switch to START (III), but
the engine does not run. Are you using a properly coded
key? An improperly coded key will
cause the immobilizer system
indicator in the dash panel to blink
rapidly(seepage ).
238
244 226
238
78
CONT INUED
If Your Engine Won’t Start
Nothing Happens or the Starter
Motor Operates Very Slowly Jump Starting
Emergency T owing T he Starter Operates Normally
T aking Care of t he Unexpect ed237
Page 247 of 284

If your vehicle battery has been
disconnected or gone dead, these
codes are erased. It takes at least
three days of driving under various
conditions to set the codes again.
To check if they are set, turn the
ignition to ON (II), without starting
the engine. The Malf unction
Indicator Lamp will come on f or 20
seconds. If it then goes of f , the
readiness codes are set. If it blinks 5
times, the readiness codes are not
set. If possible, do not take your
vehicle f or a state emissions test
until the readiness codes are set.
Refer to State Emissions Testing for
more inf ormation (see page ).
If this indicator comes on
while driving, it means one
of the engine’s emissions control
systems may have a problem. Even
though you may f eel no dif f erence in
your vehicle’s perf ormance, it can
reduce your f uel economy and cause
increased emissions. Continued
operation may cause serious damage.
If you have recently ref ueled your
vehicle, the indicator could come on
because of a loose or missing f uel f ill
cap. Tighten the cap until it clicks at
least three times. Tightening the cap
will not turn the indicator turn of f
immediately; it takes at least three
days of normal driving. If the indicator comes on repeatedly,
even though it may turn of f as you
continue driving, have the vehicle
checked by the dealer as soon as
possible.
Your vehicle has certain ‘‘readiness
codes’’ that are part of the on-board
diagnostics f or the emissions
systems. In some states, part of the
emissions testing is to make sure
these codes are set. If they are not
set, the test cannot be completed.
262
Malf unction Indicator L amp
T aking Care of t he Unexpect ed
Malf unction Indicator L amp
Readiness Code
243
NOTICE:If you keep driving with the
Malf unction Indicator Lamp on, you
can damage your vehicle’s emission
controls and the engine. Those repairs
may not be covered by your vehicle’s
warranties.
Page 248 of 284

The brake system indicator
normally comes on when
you turn the ignition switch
to ON (II), and as a
reminder to check the
parking brake. It will stay
on if you do not f ully
release the parking brake.
If the brake system indicator comes
on while driving, the brake f luid level
is probably low. Press lightly on the
brake pedal to see if it f eels normal.
If it does, check the brake f luid level
thenexttimeyoustopataservice
station (see page ).
If the f luid level is low, take the
vehicle to your dealer and have the
brake system inspected f or leaks or
worn brake pads. However, if the brake pedal does not
f eel normal, you should take
immediate action. A problem in one
part of the system’s dual circuit
design will still give you braking at
two wheels. You will f eel the brake
pedal go down much f arther bef ore
the vehicle begins to slow down, and
you will have to press harder on the
pedal.
If your vehicle needs to be towed,
call a professional towing service or
organization. Never tow your vehicle
with just a rope or chain. It is very
dangerous.
The operator will load
your vehicle on the back of a truck.
Any other method of towing will
damage the drive system. When you
contact the towing agency, inf orm
them a f lat-bed is required.
Refer to on page
for non-emergency towing
inf ormation.
Slow down by shif ting to a lower
gear, and pull to the side of the road
when it is saf e. Because of the long
distance needed to stop, it is
hazardous to drive the vehicle. You
should have it towed, and repaired as
soon as possible.
If you must drive the vehicle a short
distance in this condition, drive
slowly and caref ully.
212
191
Brake System Indicator
Emergency Towing
The only way you can saf ely tow
your vehicle is with f lat-bed
equipment.
Towing Your Vehicle
Behind a Motorhome
T aking Care of t he Unexpect ed
Brake System Indicator, Emergency Towing
244
NOTICE:
Canada U.S.
Towing your vehicle with
two tires on the ground will damage
parts of the 4WD system. It should be
transported on a f lat-bed truck or
trailer.
Page 250 of 284

If something electrical in your
vehicle stops working, the first thing
youshouldcheckforisablownfuse.
Determine f rom the chart on pagesand , or the diagram on the
fuse box lid, which fuse or fuses
control that device. The diagram f or
theinteriordriver’ssidefuseboxis
on the kick panel below the f use box.
Check those f uses f irst, but check all
the f uses bef ore deciding that a
blown f use is the cause. Replace any
blown f uses, and check if the device
works.
Turn the ignition switch to LOCK
(0). Make sure the headlights and
all other accessories are off.
Remove the cover f rom the f use
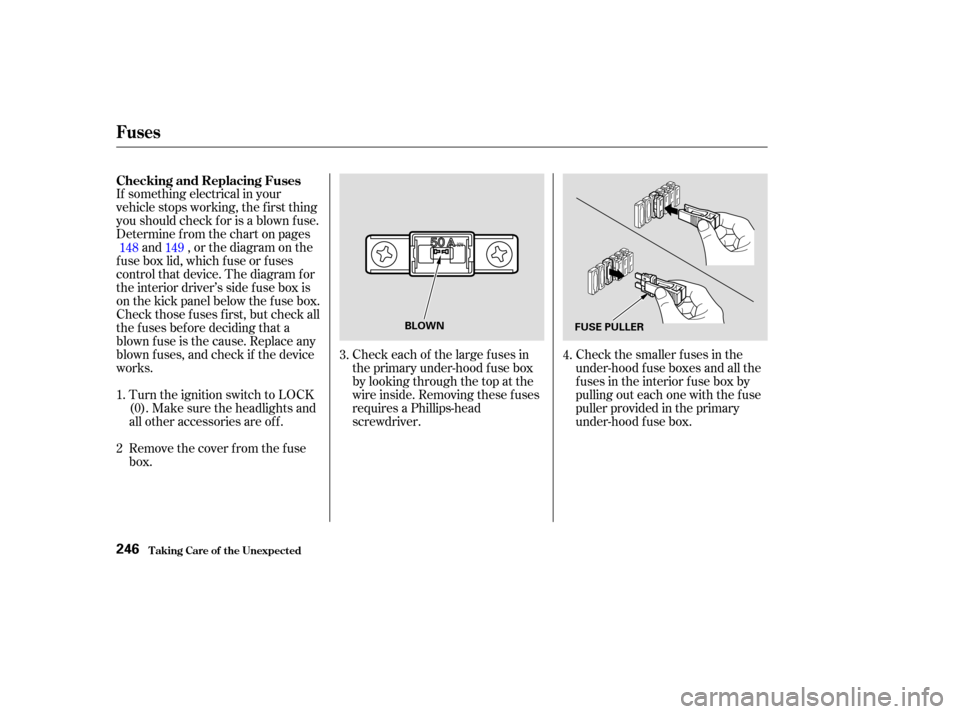
box. Check each of the large f uses in
the primary under-hood f use box
by looking through the top at the
wire inside. Removing these f uses
requires a Phillips-head
screwdriver.
Check the smaller f uses in the
under-hood f use boxes and all the
fuses in the interior fuse box by
pulling out each one with the f use
puller provided in the primary
under-hood f use box.
4.
3.
1.
2 148 149
Checking and Replacing Fuses
Fuses
T aking Care of t he Unexpect ed246
BLOWN
FUSE PULLER
Page 255 of 284

Thediagramsinthissectiongive
you the dimensions and capacities of
your Acura, and the locations of the
identif ication numbers. It also
includes inf ormation you should
know about your vehicle’s tires and
emissions control systems.................
Identif ication Numbers . 252
................................
Specif ications .254
..........
DOT Tire Quality Grading . 256
Unif orm Tire Quality ..................................
Grading .256
.................................
Treadwear .256
......................................
Traction .256
.............................
Temperature .257
.................................
Tire Labeling .258 .......................
Emissions Controls .259
.....................
The Clean Air Act .259
Crankcase Emissions Control ....................................
System .259
Evaporative Emissions Control ....................................
System .259
Onboard Ref ueling Vapor ................................
Recovery .259
...
Exhaust Emissions Controls . 260
....................
PGM-FI System .260
Ignition Timing Control ................................
System .260
Exhaust Gas Recirculation ...................
(EGR) System . 260
Three Way Catalytic ...........................
Converter .260
....................
Replacement Parts . 260
..
Three Way Catalytic Converter . 261
..............
State Emissions Testing . 262
T echnical Inf ormat ion
T echnical Inf ormation251
Page 264 of 284

The exhaust emissions controls
include f our systems: PGM-FI,
Ignition Timing Control, Exhaust
Gas Recirculation and Three Way
Catalytic Converter. These four
systems work together to control the
engine’s combustion and minimize
the amount of HC, CO, and NOx that
comes out the tailpipe. The exhaust
emissions control systems are
separate f rom the crankcase and
evaporative emissions control
systems.
The PGM-FI System uses sequential
multiport f uel injection.
It has three subsystems: Air Intake,
Engine Control, and Fuel Control.
The Powertrain Control Module
(PCM) uses various sensors to
determine how much air is going
into the engine. It then controls how
much f uel to inject under all
operating conditions.This system constantly adjusts the
ignition timing, reducing the amount
of HC, CO, and NOx produced.
The Exhaust Gas Recirculation
(EGR) system takes some of the
exhaust gas and routes it back into
the intake manif old. Adding exhaust
gas to the air/f uel mixture reduces
the amount of NOx produced when
the f uel is burned.
The three way catalytic converter is
in the exhaust system. Through
chemical reactions, it converts HC,
CO, and NOx in the engine’s exhaust
to carbon dioxide (CO ), dinitrogen
(N ), and water vapor.
The emissions control systems are
covered by warranties separate from
the rest of your vehicle. Read your
warranty manual f or more informa-
tion. The emissions control systems are
designed and certif ied to work
together in reducing emissions to
levels that comply with the Clean Air
Act. To make sure the emissions
remain low, you should use only new
Acura replacement parts or their
equivalent f or repairs. Using lower
qualitypartsmayincreasethe
emissions f rom your vehicle.
2
2
Emissions Cont rols
Exhaust Emissions Controls Replacement Parts
PGM-FI Syst emIgnit ion T iming Cont rol Syst em
Exhaust Gas Recirculat ion (EGR)Syst em
Three Way Catalytic Converter
T echnical Inf ormation260
Page 275 of 284

CONT INUED
...
Accessories and Modif ications . 163
ACCESSORY (Ignition Key .......................................
Position) .79
............
Accessory Power Sockets . 101
....................
Additives, Engine Oil . 206
...............................
Airbag (SRS) .9, 22
..............
Air Conditioning System . 104
.....................
Rear A/C Control .109
.........................................
Usage .105
.......................
Air Outlets (Vents) .106
.......................
Air Pressure, Tires .221
......................................
Antif reeze .208
Anti-lock Brakes (ABS) ....................
Indicator Light .59, 181
...................................
Operation .181
..............
Anti-thef t, Audio System . 129
.
Anti-thef t Steering Column Lock . 79
................
Audio System . 110,115,125
...
Automatic Seat Belt Tensioners . 20
.........................
Automatic Lighting .73
.............
Automatic Speed Control . 144
..............
Automatic Transmission . 172
..........................
Capacity, Fluid .254
...............
Checking Fluid Level . 210.......................................
Shif ting .172
.
Shif t Lever Position Indicator . 172
................
Shif t Lever Positions . 172
....................
Shif t Lock Release . 175
...........................
Automatic Wipers .70
Battery Charging System ...........................
Indicator .58, 242
............................
Jump Starting .238
..............................
Maintenance .226
............................
Specif ications .255
..............................
Bef ore Driving .157
....................................
Belts,Seat .8,19
...........................
Beverage Holders .99
..................................
Booster Seats .48
Brakes ...........
Anti-lock System (ABS) . 181
.............
Break-in, New Linings . 158
...........................................
Fluid .212
....................
Bulb Replacement .216
.........................................
Parking .92
.................
System Indicator . 59,244
........................
Wear Indicators .180 .............................
Braking System .180
.................
Break-in, New Vehicle . 158
..
Brightness Control, Instruments . 74
........................
Brights, Headlights .72
Bulb Replacement ..........................
Back-up Lights .216
..............................
Brake Lights .216
................
Front Parking Lights . 215
........
Front Side Marker Lights . 215
.................................
Headlights .214
.........
High-mount Brake Light . 217
.................................
Rear Bulbs .216
............................
Specif ications .255
....................
Turn Signal Lights . 215
..............................
Bulbs, Halogen .214
Index
A
B
I
Page 278 of 284

.................................................
Fuel .158
......................
Fill Door and Cap .159
...........................................
Gauge .66
................
Octane Requirement . 158
...............................
Oxygenated .158
........................
Reserve Indicator .61
........................
Tank, Filling the .159
.....................
Fuses, Checking the .246
.............
Halogen Headlight Bulbs . 214
..............
Hazard Warning Flashers . 74
........................................
Headlights .72
........................................
Aiming .214
....................
Automatic Lighting .73
............
Daytime Running Lights . 74
..................
High Beam Indicator . 61
...........
High Beams, Turning on . 72
............
Low Beams, Turning on . 72
.........................
Reminder Chime .72
........
Replacing Halogen Bulbs . 214
...................................
Turning on .72
...................................
Headphones .141
..............................
Head Restraints .86
.................................
Heated Mirror .93
.................................
Heaters, Seats .89
.....................
Heating and Cooling .104 .................
High-Low Beam Switch . 72
HomeLink Universal ................................
Transceiver .153
....................................
Hood Latch .214
.......................
Hood, Opening the .160
..................................................
Horn .68
...............
Gas Mileage, Improving . 162
.........................................
Gasoline .158
...............
Fuel Reserve Indicator . 61
...........................................
Gauge .66
................
Octane Requirement . 158
........................
Tank, Filling the .159
................
Gas Station Procedures . 159
Gauges ...
Engine Coolant Temperature . 67
...............................................
Fuel .66
...............................
Speedometer .66
.................................
Tachometer .66
GAWR (Gross Axle Weight .......................................
Rating) .185 GCWR (Gross Combined Weight
.......................................
Rating) .185
............
Gearshif t Lever Positions . 172
........................................
Glove Box .99
GVWR (Gross Vehicle Weight .......................................
Rating) .185
...
Identif ication Number, Vehicle . 252
Ignition ..............................................
Keys .77
...........................................
Switch .79
............
Timing Control System . 260
........................
Immobilizer System .78
.........
Important Safety Precautions . 6
.........
Indicators, Instrument Panel . 58
...............
ABS (Anti-lock Brake) . 59
....................................
A/T Temp .62
Brake (Parking and Brake ....................................
System) .59
.................................
Brake Lamp .60
........................
Charging System .58
.............................
Cruise Control .61
DRL (Daytime Running ......................................
Lights) .61
Index
G HI
IV