lock Acura MDX 2012 Advanced Technology Guide
[x] Cancel search | Manufacturer: ACURA, Model Year: 2012, Model line: MDX, Model: Acura MDX 2012Pages: 22, PDF Size: 13.58 MB
Page 3 of 22

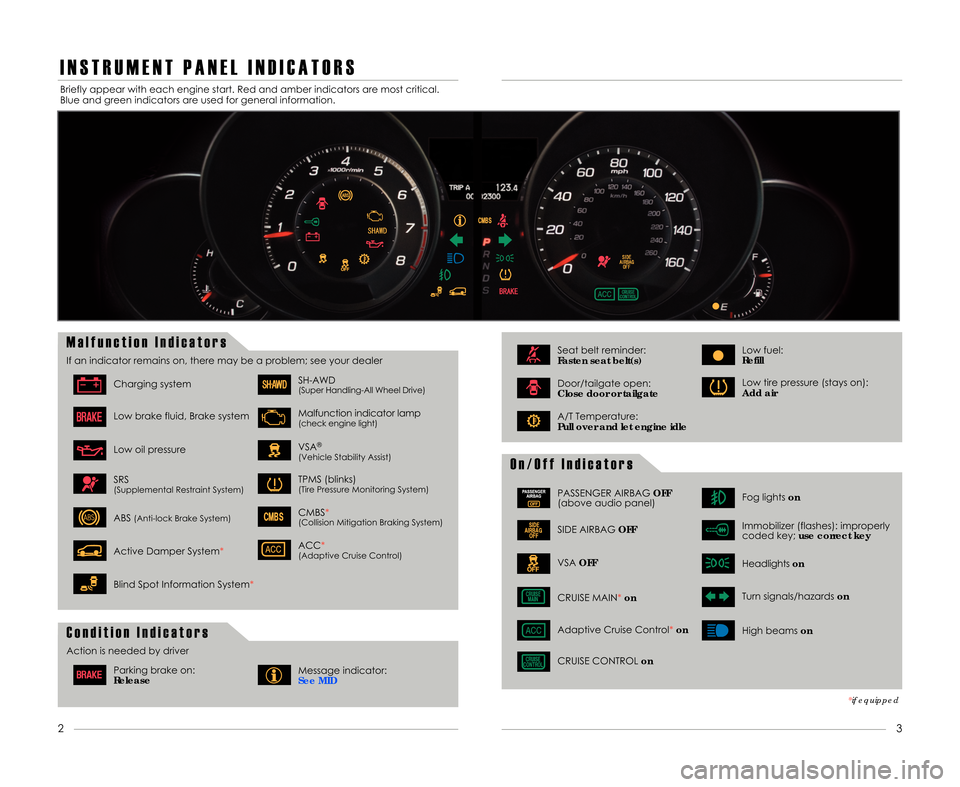
I N S T R U M E N T P A N E L I N D I C A T O R S
O n \b O f f I n d i c a t o r s
M a l f u n c t i o n I n d i c a t o r s
If an indicator remains on\b there may be a problem; see your dealer
Charging system
Low brake fluid\b Brake system
Low oil pressure
SH-AWD(Super Handling-All Wheel Drive)
VSA®
(Vehicle Stability Assist)
Malfunction indicator lamp(check engine light)
TPMS (blinks)(Tire Pressure Monitoring System)
CMBS*(Collision Mitigation Braking System)
SRS(Supplemental Restraint System)
ABS(Anti-lock Brake System)
ACC*(Adaptive Cruise Control)Active Damper System*
Blind Spot Information System*
PASSENGER AIRBAGOFF
(above audio panel)
SIDE AIRBAG OFF
VSAOFF
Fog lights on
Immobilizer (flashes): improperly
coded key; use correct key
Headlightson
Turn signals/hazards on
CRUISE MAIN* on
CRUISE CONTROL on High beams
on
Briefly appear with each engine start. Red and amber indicators are most critical.
Blue and green indicators are used for general information.
*if equipped
3
2
C o n d i t i o n I n d i c a t o r s
Action is needed by driver
Parking brake on:
ReleaseMessage indicator:
See MID
Door/tailgate open:
Close door or tailgate
A/T Temperature:
Pull over and let engine idle
Low tire pressure (stays on):
\fdd air
Seat belt reminder:
Fasten seat belt(s)Low fuel:
Refill
Adaptive Cruise Control* on
12 MDX ATG\fATG_NEW STYLE 8/2/2011 3\f57 PM Page 3
Page 6 of 22

K E Y L E S S M E M O R Y S E T T I N G S
9
8
2. Check the MID:
• If you have the correct remote\b the driver ID that first appears onthe MID will match the ID number on the back of your remote.
Go to step 3.
• If the numbers do not match\b follow these simple instructions:
-Remove the key from the ignition switch.
- Press the unlock button on your remote.
- Insert the key into the ignition switch\b turnit to ON (II)\b and
check the MID. The driver ID that first appears on the MID
should now match the number on the back of your remote.
C u s t o m i z i n g S e t t i n g s U s i n g t h e M I D
1. Select “CHG SETTING.”
3. Select “AUTO DOOR
UNLOCK.”4. Select “SHIFT TO P.”
5.Select “ALL DOORS.”
6. Once the setting has been saved\b select“EXIT.”
Six groups of settings can be programmed using the MID*: Adaptive Cruise Control
(ACC) Setup (if equipped)\b Meter Setup\b Position Setup\b Lighting Setup\b
Door/Window Setup\b and Wiper Setup.
SEL/RESET
button
Info
button
Pressthe Info button to toggle to
the “Keyless Memory Settings”
display\b then pressSEL/RESET to
activate the menu.
M o d i f y i n g t h e A u t o D o o r U n l o c k S e t t i n g
* See Customized Settings in your Owner’s Manual for other programmable settings.
When linked\b each remote (labeled 1 or 2 on the back) activates its own set of
programmable audio\b climate\b driving position memory\b and customized settings (MID).
1. Verify that you are using the correct remote by inserting the key inthe ignition switch and turning to ON (II).
R e m o t e V e r i f i c a t i o n
2. Select “DOOR/WINDOW
SETUP.”
3. Once you have the correct remote\b you can begin to program your
Keyless Memory Settings.
As the default setting\b only the driver's door unlocks when you shift to Park.
Follow the steps below to set all doors to unlock when you shift to Park:
12 MDX ATG\fATG_NEW STYLE 8/2/2011 3\f58 PM Page \b
Page 7 of 22

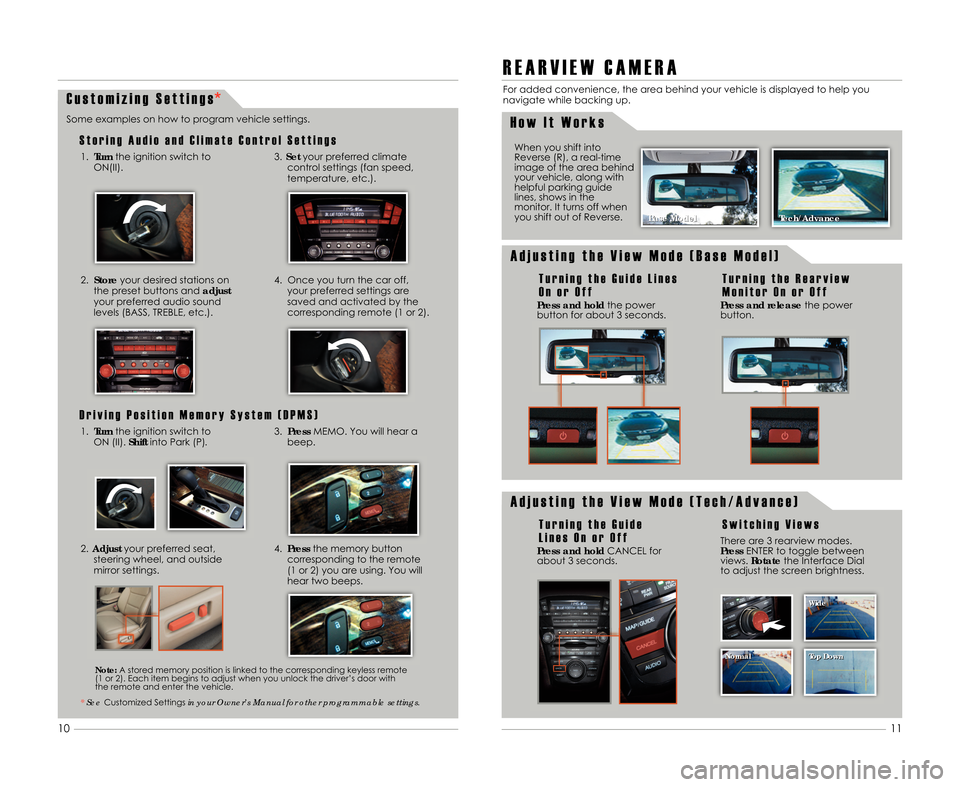
C u s t o m i z i n g S e t t i n g s
S t o r i n g A u d i o a n d C l i m a t e C o n t r o l S e t t i n g s
Some examples on how to program vehicle settings.1.Turn the ignition switch to
ON(II).
2. Store your desired stations on
the preset buttons and adjust
your preferred audio sound
levels (BASS\b TREBLE\b etc.).
3. Set your preferred climate
control settings (fan speed\b
temperature\b etc.).
4. Once you turn the car off\b your preferred settings are
saved and activated by the
corresponding remote (1 or 2).
D r i v i n g P o s i t i o n M e m o r y S y s t e m ( D P M S )
1. Turn the ignition switch to
ON (II). Shiftinto Park (P).3.Press MEMO. You will hear a
beep.
2. \fdjust your preferred seat\b
steering wheel\b and outside
mirror settings.4. Press the memory button
corresponding to the remote
(1 or 2) you are using. You will
hear two beeps.
* See Customized Settings in your Owner’s Manual for other programmable settings.
R E A R V I E W C A M E R A
For added convenience\b the area behind your vehicle is displayed to help you
navigate while backing up.
When you shift into
Reverse (R)\b a real-time
image of the area behind
your vehicle\b along with
helpful parking guide
lines\b shows in the
monitor. It turns off when
you shift out of Reverse.
H o w I t W o r k s
Press and hold the power
button for about 3 seconds.
A d j u s t i n g t h e V i e w M o d e ( B a s e M o d e l )
T u r n i n g t h e G u i d e L i n e s
O n o r O f f
Press and release the power
button.
T u r n i n g t h e R e a r v i e w
M o n i t o r O n o r O f f
Press and hold CANCEL for
about 3 seconds.
A d j u s t i n g t h e V i e w M o d e ( T e c h \b A d v a n c e )
T u r n i n g t h e G u i d e
L i n e s O n o r O f fS w i t c h i n g V i e w s
Note: A stored memory position is linked to the corresponding keyless remote
(1 or 2). Each item begins to adjust when you unlock the driver’s door with
the remote and enter the vehicle. Base Model
Base Model
Tech/\fdvance
Tech/\fdvance
There are 3 rearview modes.
Press ENTER to toggle between
views. Rotate the Interface Dial
to adjust the screen brightness.
11
1\f
Normal Top Down Wide
Normal Top Down
Wide
12 MDX ATG\fATG_NEW STYLE 8/2/2011 4\f00 PM Page 7
*