buttons Acura MDX 2012 Navigation Manual
[x] Cancel search | Manufacturer: ACURA, Model Year: 2012, Model line: MDX, Model: Acura MDX 2012Pages: 185, PDF Size: 23.67 MB
Page 12 of 185
Navigation System11
ACURA MDX KA 31STX850
Getting Started
Display Mode button Adjusts the screen brightness for Day or
Night mode, or turns the screen OFF.
See page 118.AUDIO buttonPress to display the audio screen.
For more information on audio system
features, see the Audio section of your
Owner’s Manual.Other buttonsSee your Owner’s Manual.
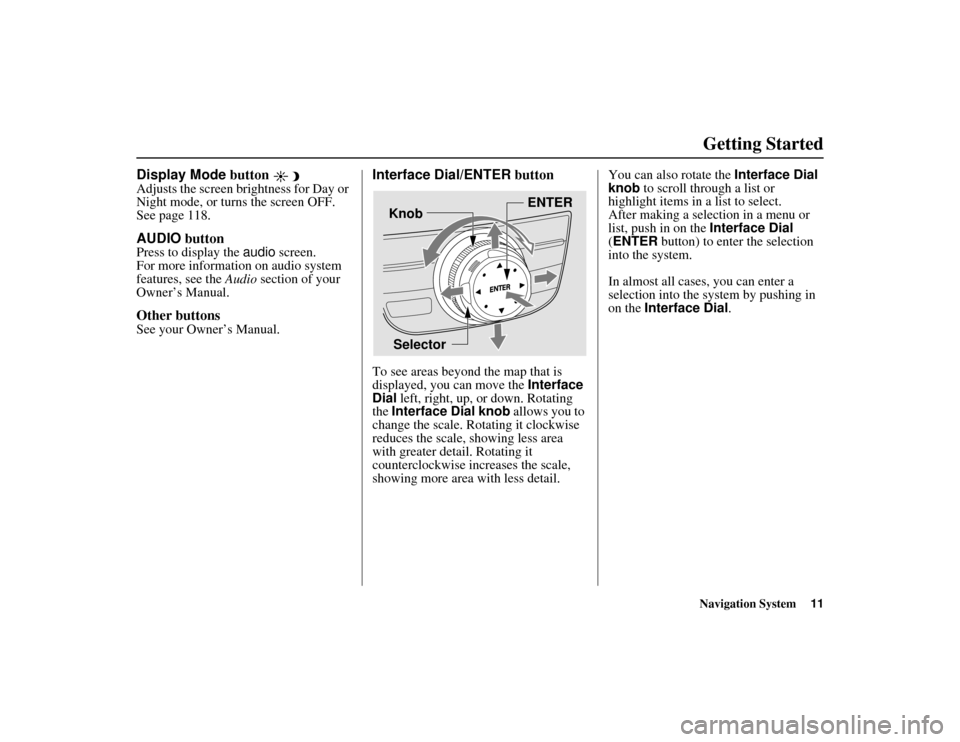
Interface Dial/ENTER buttonTo see areas beyond the map that is
displayed, you can move the Interface
Dial left, right, up, or down. Rotating
the Interface Dial knob allows you to
change the scale. Ro tating it clockwise
reduces the scale, showing less area
with greater detail. Rotating it
counterclockwise increases the scale,
showing more area with less detail. You can also rotate the Interface Dial
knob to scroll through a list or
highlight items in a list to select.
After making a selection in a menu or
list, push in on the
Interface Dial
(ENTER button) to enter the selection
into the system.
In almost all cases, you can enter a
selection into the sy stem by pushing in
on the Interface Dial .
Selector ENTER
Knob
00 ACURA MDX_KA.book 11 ページ 2011年7月27日 水曜日 午前11時6分
Page 14 of 185
Navigation System13
ACURA MDX KA 31STX850
Getting Started
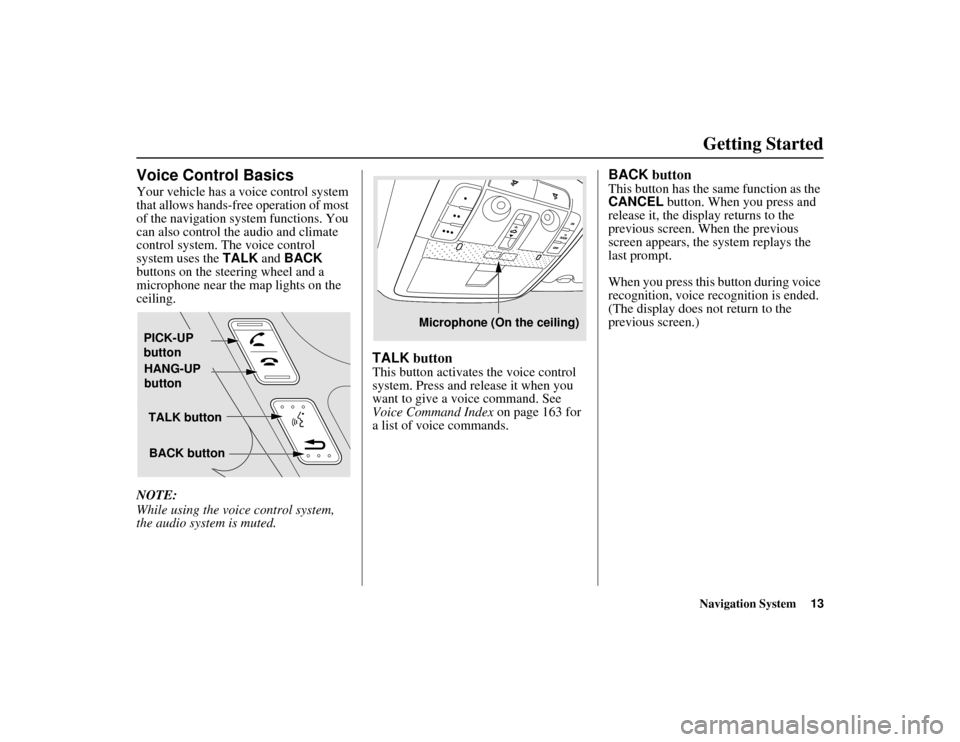
Voice Control BasicsYour vehicle has a voice control system
that allows hands-free operation of most
of the navigation system functions. You
can also control the audio and climate
control system. The voice control
system uses the TALK and BACK
buttons on the steering wheel and a
microphone near the map lights on the
ceiling.
NOTE:
While using the voic e control system,
the audio system is muted.
TALK buttonThis button activates the voice control
system. Press and release it when you
want to give a vo ice command. See
Voice Command Index on page 163 for
a list of voice commands.
BACK buttonThis button has the same function as the
CANCEL button. When you press and
release it, the display returns to the
previous screen. When the previous
screen appears, the system replays the
last prompt.
When you press this button during voice
recognition, voice recognition is ended.
(The display does not return to the
previous screen.)
TALK button
BACK button
PICK-UP
button
HANG-UP
button
Microphone (On the ceiling)
00 ACURA MDX_KA.book 13 ページ 2011年7月27日 水曜日 午前11時6分
Page 16 of 185
Navigation System15
ACURA MDX KA 31STX850
Getting Started
Adjust the dashboard and side vents
so air does not blow against the
microphone on the ceiling.
If more than one person is speaking at the same time, the system may
misinterpret your command.
After pressing and releasing the TALK button, wait for the beep, then
give a voice command while the
icon is displayed on the top left of the
screen.
Give a voice command in a clear, natural speaking voice without
pausing between words.
Try to reduce any background noise.
If you are still having trouble with the voice control system, refer to Voice
Help on the INFO screen ( Main
Info. ) or say “Help” while the
icon is displayed on the top left of the
screen.
NOTE:
The voice control system can only be
used in the driver’s seat because the
microphone unit removes noises from
the front passenger’s side.
Selecting an Item (Button)
on the ScreenOn most screens, there are items that
can be selected (like buttons with titles
such as OK or Return ). To select an
item on any screen, do one of the
following:
Use the voice control system and say
the name of the desired item. Almost
all selectable items on the screen,
including some listed items, are
recognized by the voice control
system.
Move the highlighting to the desired item with the Interface Dial or its
knob , then push in on the Interface
Dial .
Tip:
If items are grayed out, this means that
they cannot be selected.
Selecting an Item in a ListTo scroll through a list, do one of the
following:
Rotate the Interface Dial knob to
scroll one item at a time.
Use the voice control system to scroll page by page. For example, to scroll
up, say “Up” or “Previous.” To scroll
down, say “Next” or “Down.”
If you cannot find the desired name, or
have made an error, return to the
previous screen by pressing the
CANCEL or the BACK button on the
steering wheel.
To select the desired item in the list, do
one of the following:
Use the voice control system, and say
the item number of the desired item.
Rotate the Interface Dial knob to
move the highligh ting to the item,
then push in on the Interface Dial.
00 ACURA MDX_KA.book 15 ページ 2011年7月27日 水曜日 午前11時6分
Page 120 of 185
Navigation System119
ACURA MDX KA 31STX850
System Setup
Switching Display Mode AutomaticallyIRecommended Display Mode Day/Night Settings:
With the headlights on, select mid-rang e for the dash illumination (see your Owner’s Manual for location of buttons).
With the headlights off, select mid-range for the dash illumination (see your Owner’s Manual for location of buttons).
On the SETUP Color adjustment sc reen, choose white for the map Day display and black for the map Night display (see
page 117). Inappropriate adjustment of these colors can cause the Day/Night modes to appear inoperative. llumination control Prior ity Operation But remember
Display Mode button
(see page 11) 1 Allows selection of Day
, Night , or Off display
mode. This button has the highest priority and
overrides all other display control adjustments
listed below. Once you press this button, you assume full
manual control of the display mode until the
ignition key is cycled again.
Sunlight sensor (middle of
dash near the windshield, see
your Owner’s Manual for
location) 2 If the sunlight sensor detects daylight and the
headlights are turned on, the system
automatically overrides (cancels) the Night
display and displays the Day display mode. If desired, use the
Display Mode
button
to override this automatic choice.
Dash illumination adjustment
buttons (see the vehicle
Owner’s manual for location) 3 When headlights are turned on, and you wish to
have the Day display mode, then adjust the
illumination to the full bright setting (beeps). Adjust the dash brightness back to mid-range
to allow auto switching by sensing the
headlights are on or off.
Headlights (Auto/On/Off) 4 When turned on, the display changes to Night
display mode. The previous three controls
listed above can “cancel” this function. Use the
Display Mode button , or
adjust the dash illumination to full bright to set
the display to your desired choice.
Map Day/Night screen color
choice (see page 118 for the
Day and Night color choices) N/A The user can select the color of the screen that
will be displayed for the Day and Night
display modes described above. For best contrast, ensure that the map color is
white for
Day and black for Night.
00 ACURA MDX_KA.book 119 ページ 2011年7月27日 水曜日 午前11時6分
Page 127 of 185
126
Navigation System
ACURA MDX KA 31STX850
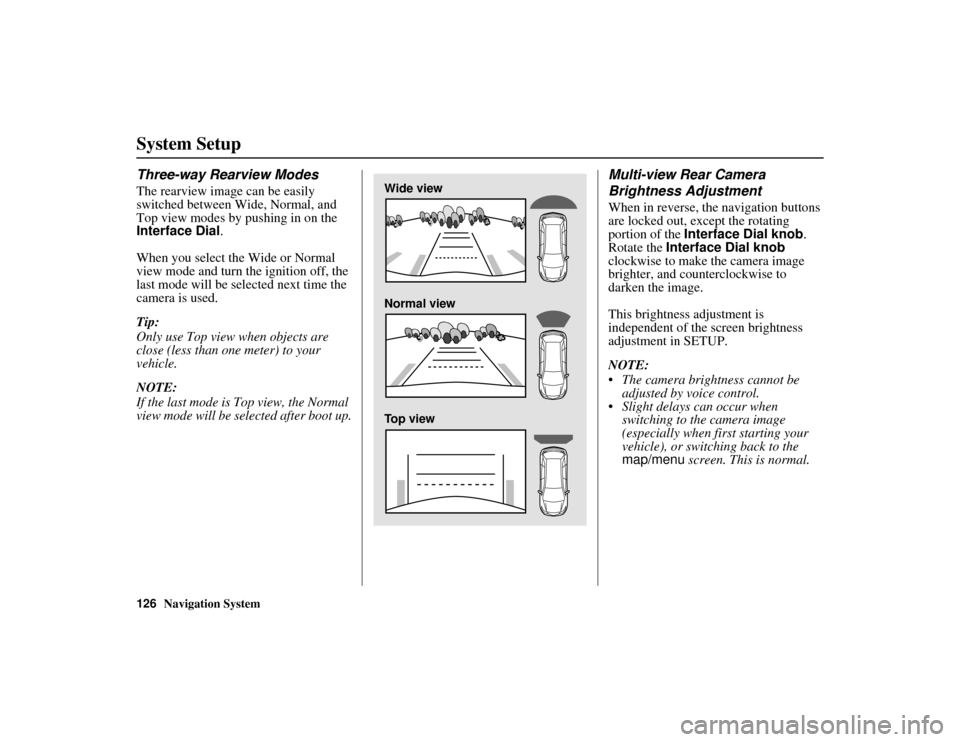
System SetupThree-way Rearview ModesThe rearview image can be easily
switched between Wide, Normal, and
Top view modes by pushing in on the
Interface Dial.
When you select the Wide or Normal
view mode and turn the ignition off, the
last mode will be selected next time the
camera is used.
Tip:
Only use Top view when objects are
close (less than one meter) to your
vehicle.
NOTE:
If the last mode is Top view, the Normal
view mode will be selected after boot up.
Multi-view Rear Camera
Brightness AdjustmentWhen in reverse, the navigation buttons
are locked out, except the rotating
portion of the Interface Dial knob .
Rotate the Interface Dial knob
clockwise to make the camera image
brighter, and counterclockwise to
darken the image.
This brightness adjustment is
independent of the screen brightness
adjustment in SETUP.
NOTE:
The camera brightness cannot be adjusted by voice control.
Slight delays can occur when switching to the camera image
(especially when first starting your
vehicle), or switching back to the
map/menu screen. This is normal.
Wide view
Normal view
Top view
00 ACURA MDX_KA.book 126 ページ 2011年7月27日 水曜日 午前11時6分
Page 163 of 185
162
Navigation System
ACURA MDX KA 31STX850
GlossaryUSB - Universal Serial Bus. A computer
hardware interface used to store and
play audio files from USB devices,
such as thumb drives or iPods. Image
files can also be stored to USB
devices and uploaded to the HDD.
See the Audio section in your
Owner’s Manual for more
information.
Vehicle Speed Sensor - Provides speed
signal to the navigation system for
moving the VP icon on the map.
Verified Streets - These streets consist
of the detailed metropolitan coverage
areas and all other inter-town
connection roads. These roads are
shown in black, red, or pink on the
map.
Voice Control - See VR. VP -
Vehicle Position. When in map
mode, this circul ar icon shows the
vehicle position on the map. Push in
on the Interface Dial , select Map
Information on the Map menu , and
then rotate the Interface Dial Knob
to select Current Location . It
shows the latitude, longitude, and
elevation of your current position.
VR - Voice Recognition. This allows
voice control of many of the
navigation functions. The hardware
consists of the microphone, voice
control switch ( TALK/BACK
buttons), and the front speakers.
Waypoint - A temporary destination
you may enter while en route (e.g., a
gas station, ATM, etc.). See page 76. Yaw Rate Sensor -
Senses when the
vehicle makes a turn, which makes
the VP change direction on the map
as you turn.
Zagat Ratings - Restaurant ratings
information provided by Zagat
Survey. See the INFO screen on
page 92 for an explanation of the
ratings.00 ACURA MDX_KA.book 162 ページ 2011年7月27日 水曜日 午前11時6分
Page 169 of 185
168
Navigation System
ACURA MDX KA 31STX850
Voice Command Index
Radio select XM2
XM channel # (#: 1-255)
XM channel up
XM channel down
XM category up
XM category down
XM preset # (#: 1-6)
XM1 preset # (#: 1-6)
XM2 preset # (#: 1-6)
XM scan*
XM category scan*
XM channel scan*
XM category mode
XM channel mode
* Repeating these commands switches (toggles) the function between On
and Off, so the action that occurs
may not match the command you
speak.
NOTE:
Radio volume levels cannot be
controlled using voice control. Use the
buttons on your steering wheel. See your
Owner’s Manual for more information.
Disc CommandsThe system accepts these commands on
most screens. DISC play
DISC play track # (#: 1-30)
DISC skip forward
DISC skip back
DISC track random*
DISC track repeat*
DISC track scan*
DISC folder up
DISC folder down
DISC folder random*
DISC folder repeat*
DISC folder scan*
DISC normal play (resumes “Play”
from the random-, repeat-, or scan-
play)
* Repeating these commands switches (toggles) the function between On
and Off, so the action that occurs
may not match the command you
speak.
HDD CommandsThe system accepts these commands on
most screens.
HDD play
HDD search (activates Song By Voice™)
HDD skip forward
HDD skip back
HDD album up*
HDD album down*
HDD genre up*
HDD genre down*
HDD artist up*
HDD artist down*
HDD track up
HDD track down
HDD playlist up*
HDD playlist down*
HDD track random**
HDD track repeat**
HDD track scan**
HDD normal play (resumes “Play”
from the random-, repeat-, or scan-
play)
00 ACURA MDX_KA.book 168 ページ 2011年7月27日 水曜日 午前11時6分
Page 172 of 185
Navigation System171
ACURA MDX KA 31STX850Voice Command Index
Rear XM channel # (#: 1-255)
Rear XM channel up
Rear XM channel down
Rear XM category up
Rear XM category down
Rear XM preset # (#: 1-6)
Rear XM1 preset # (#: 1-6)
Rear XM2 preset # (#: 1-6)
Rear XM scan*
Rear XM category scan*
Rear XM channel scan*
Rear XM category mode
Rear XM channel mode
* Repeating these commands switches (toggles) the function between On
and Off, so the action that occurs
may not match the command you
speak.
NOTE:
Radio volume levels cannot be
controlled using voice control. Use the
buttons on your steering wheel. See your
Owner’s Manual for more information.
Rear CD CommandsThe system accepts these commands on
most screens. Rear CD play
Rear CD play track # (#: 1-30)
Rear CD skip forward
Rear CD skip back
Rear CD track random*
Rear CD track repeat*
Rear CD track scan*
Rear CD normal play (resumes
“Play” from the random-, repeat-,
or scan-play)
Rear CD folder up
Rear CD folder down
Rear CD folder random*
Rear CD folder repeat*
Rear CD folder scan*
* Repeating these commands switches (toggles) the function between On
and Off, so the action that occurs
may not match the command you
speak.
Rear DVD CommandsThe system accepts these commands on
most screens.
Rear DVD play
Rear DVD pause
Rear DVD title up
Rear DVD title down
Rear DVD chapter up
Rear DVD chapter down
Rear DVD title # (#: 1-30)
Rear DVD chapter # (#: 1-30)
Rear DVD title #1 chap. #2 (#1, #2:
1-30)
Rear DVD play track # (#: 1-30)
Rear DVD skip forward
Rear DVD skip back
Rear DVD track random*
Rear DVD track repeat*
Rear DVD track scan*
Rear DVD normal play (resumes “Play” from the random-, repeat-,
or scan-play)
Rear DVD folder random*
Rear DVD folder repeat*
Rear DVD folder scan*
00 ACURA MDX_KA.book 171 ページ 2011年7月27日 水曜日 午前11時6分