ECO mode Acura MDX 2012 Repair Manual
[x] Cancel search | Manufacturer: ACURA, Model Year: 2012, Model line: MDX, Model: Acura MDX 2012Pages: 621, PDF Size: 11.15 MB
Page 289 of 621
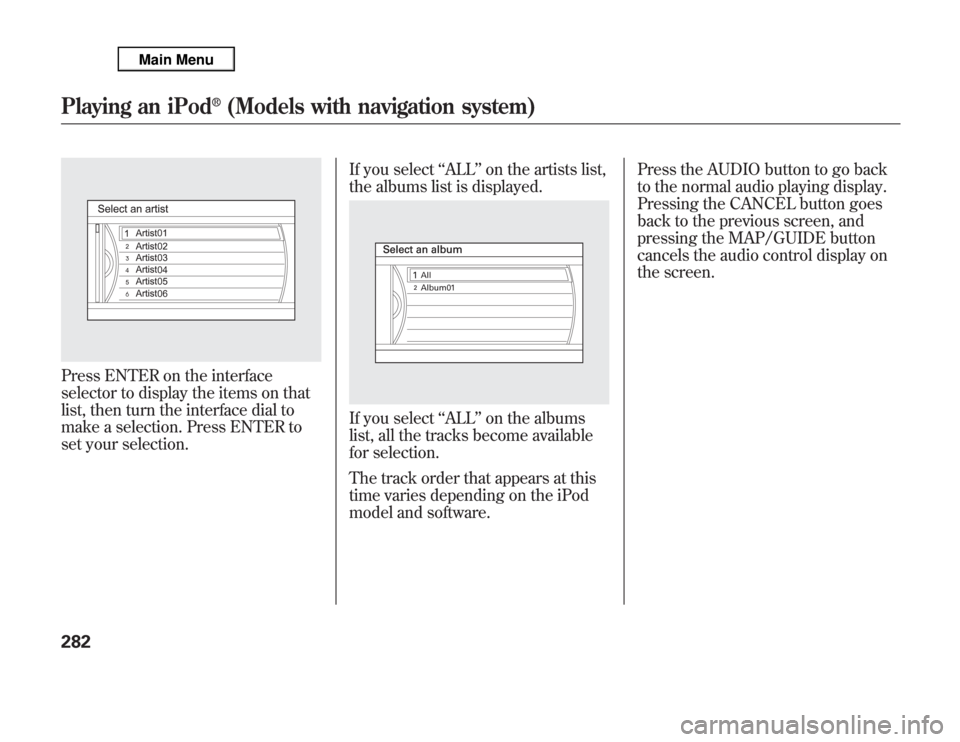
Press ENTER on the interface
selector to display the items on that
list, then turn the interface dial to
make a selection. Press ENTER to
set your selection.If you select‘‘ALL’’on the artists list,
the albums list is displayed.
If you select‘‘ALL’’on the albums
list, all the tracks become available
for selection.
The track order that appears at this
time varies depending on the iPod
model and software.Press the AUDIO button to go back
to the normal audio playing display.
Pressing the CANCEL button goes
back to the previous screen, and
pressing the MAP/GUIDE button
cancels the audio control display on
the screen.
Playing an iPod
®
(Models with navigation system)
282
Page 292 of 621
To Stop Playing Your iPod
ᤎ
To play the radio, press the AM/FM,
or XM button. Press the DISC button
to switch to the disc mode. Press the
HDD button to switch to HDD Audio
and press the USB/AUX button to
switch to
Bluetooth
ᤎ
Audio.
Disconnecting an iPod
ᤎ
You can disconnect the iPod at any
time when you see the‘‘OK to
disconnect’’message
ᤳ
in the iPod
display. Always make sure you see
the‘‘OK to disconnect’’message in
the iPod display before you
disconnect it. Make sure to follow
the iPod’s instructions on how to
disconnect the dock connector from
the USB adapter cable.ᤳ: The displayed message may
vary on models or versions. On
some models, there is no
message to disconnect.
When you disconnect the iPod while
it is playing, the audio display and
the navigation screen (if selected)
show USB NO DATA.
If you reconnect the same iPod, the
system may begin playing where it
left off, depending on what mode the
iPod is in when it is reconnected.
When you connect your iPod to the
navigation system, the most recent
settings (Shuffle, Repeat, etc.) will be
carried over.
iPod
ᤎ
Error Messages
If you see an error message in the
audio display, see page 286.
Playing an iPod
®
(Models with navigation system)
285
Features
Page 295 of 621
To Play a USB Flash Memory
Device
This audio system can select and
play the audio files on a USB flash
memory device with the same
controls used for the disc player. To
play a USB flash memory device,
connect it to the USB adapter cable
in the console compartment, then
press the USB/AUX button until you
see‘‘USB’’in the display. The
ignition switch must be in
ACCESSORY (I) or ON (II) position.The audio system reads and plays
the audio files on the USB flash
memory device in MP3, WMA or
ACC
ᤳ
formats.
ᤳ: Only AAC format files recorded
with iTunes are playable on this
audio unit.
The recommended USB flash
memory devices are 256 MB or
higher, and formatted with the FAT
file system. Some digital audio
players may be compatible as well.
Some USB flash memory devices
(such as devices with security
lockout features, etc.) will not work
in this audio unit.
NOTE:
●
Do not use a device such as a card
reader or hard drive as it or your
files may be damaged.
●
Do not connect your USB flash
memory device using a hub.
●
Do not use an extension cable to
the USB adapter cable equipped
with your vehicle.
●
Do not keep a USB flash memory
device in the vehicle. Direct
sunlight and high heat will damage
it.
●
We recommend backing up your
data before playing a USB flash
memory device.
●
Some devices cannot be powered
or charged via the USB adapter, if
this is the case use the accessory
adapter to supply power to your
device.
●
Depending on the type and
number of files, it may take some
time before they begin to play.
Playing a USB Flash Memory Device (Models with navigation system)288
Page 296 of 621
●
Depending on the software the
files were made with, it may not be
possible to play some files, or
display some text data.
●
Depending on the type of
encoding and writing software
used, there may be cases where
character information does not
display properly.
●
The order of files in USB playback
may be different from the order of
files displayed in PC or other
devices etc. Files are played in the
order stored in USB flash memory
device.
Voice Control SystemYou can select the AUX mode by
using the voice control buttons, but
cannot operate the play mode
functions.Even if recorded in MP3, WMA or
AAC format, a file with unsupported
version cannot be played. If the
system finds it, the audio unit
displays UNSUPPORTED, and then
skips to the next file.
Combining a low sampling frequency
with a low bitrate may result in
extremely degraded sound quality.
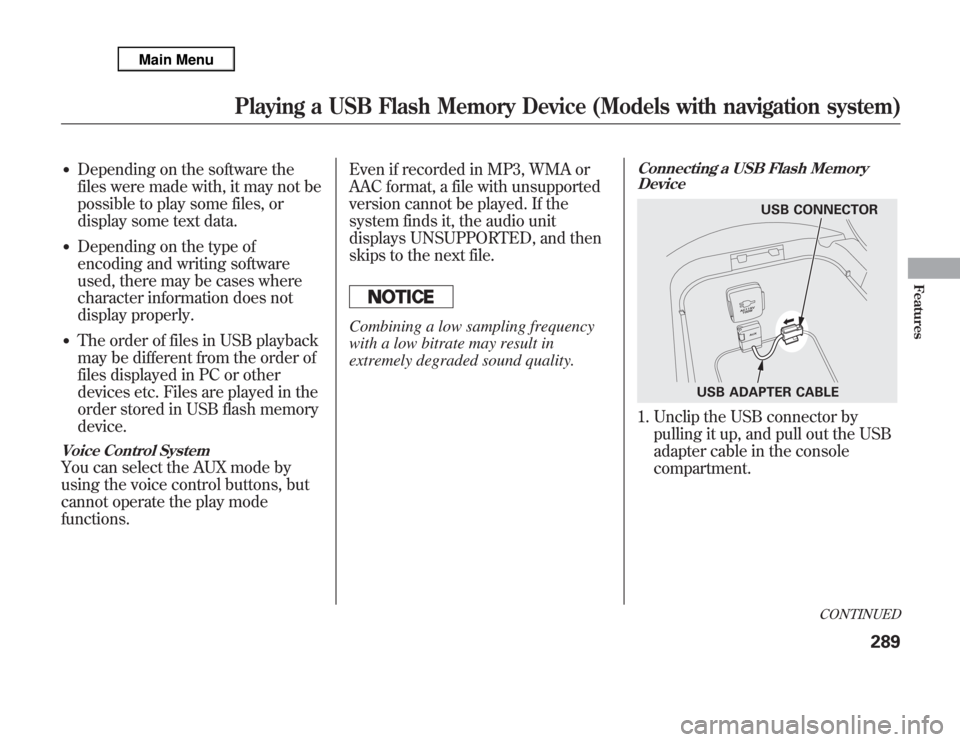
Connecting a USB Flash Memory
Device1. Unclip the USB connector by
pulling it up, and pull out the USB
adapter cable in the console
compartment.
USB CONNECTOR
USB ADAPTER CABLE
CONTINUED
Playing a USB Flash Memory Device (Models with navigation system)
289
Features
Page 301 of 621
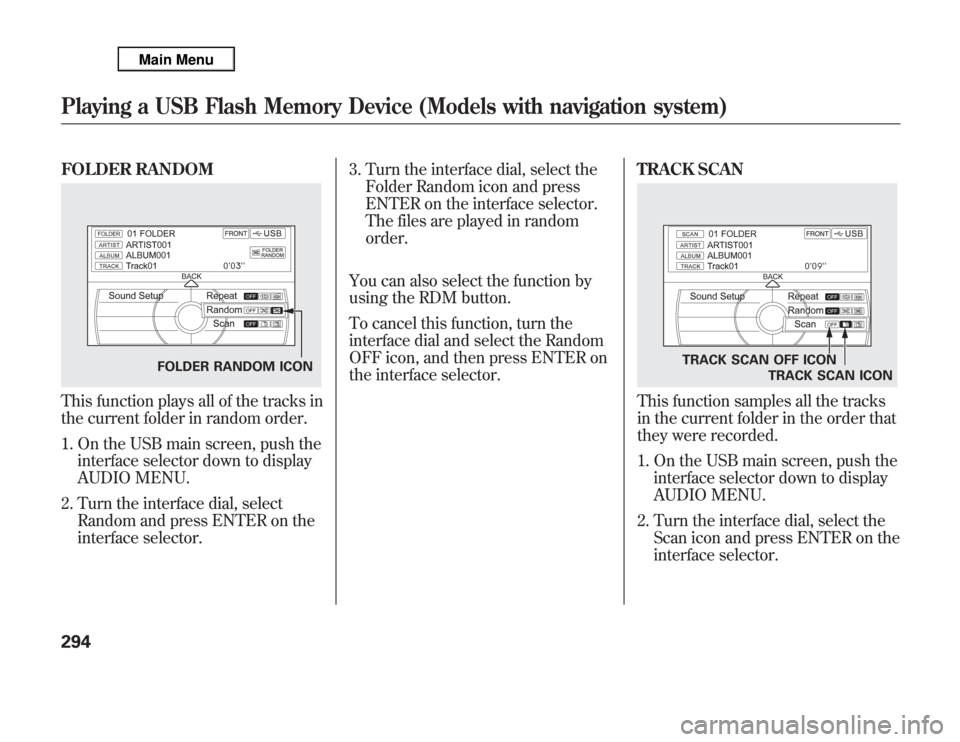
FOLDER RANDOMThis function plays all of the tracks in
the current folder in random order.
1. On the USB main screen, push the
interface selector down to display
AUDIO MENU.
2. Turn the interface dial, select
Random and press ENTER on the
interface selector.3. Turn the interface dial, select the
Folder Random icon and press
ENTER on the interface selector.
The files are played in random
order.
You can also select the function by
using the RDM button.
To cancel this function, turn the
interface dial and select the Random
OFF icon, and then press ENTER on
the interface selector.TRACK SCAN
This function samples all the tracks
in the current folder in the order that
they were recorded.
1. On the USB main screen, push the
interface selector down to display
AUDIO MENU.
2. Turn the interface dial, select the
Scan icon and press ENTER on the
interface selector.
FOLDER RANDOM ICON
TRACK SCAN OFF ICON
TRACK SCAN ICON
Playing a USB Flash Memory Device (Models with navigation system)294
Page 302 of 621
3. Turn the interface dial, select the
Track Scan icon and press ENTER
on the interface selector. Each
track or file is sampled for 10
seconds. When all the tracks in the
folder have been scanned, regular
playback is resumed.
You can also select the function by
using the SCAN button.
To cancel this function, turn the
interface dial and select the Scan
OFF icon, and then press ENTER on
the interface selector to play the last
track sampled.FOLDER SCAN
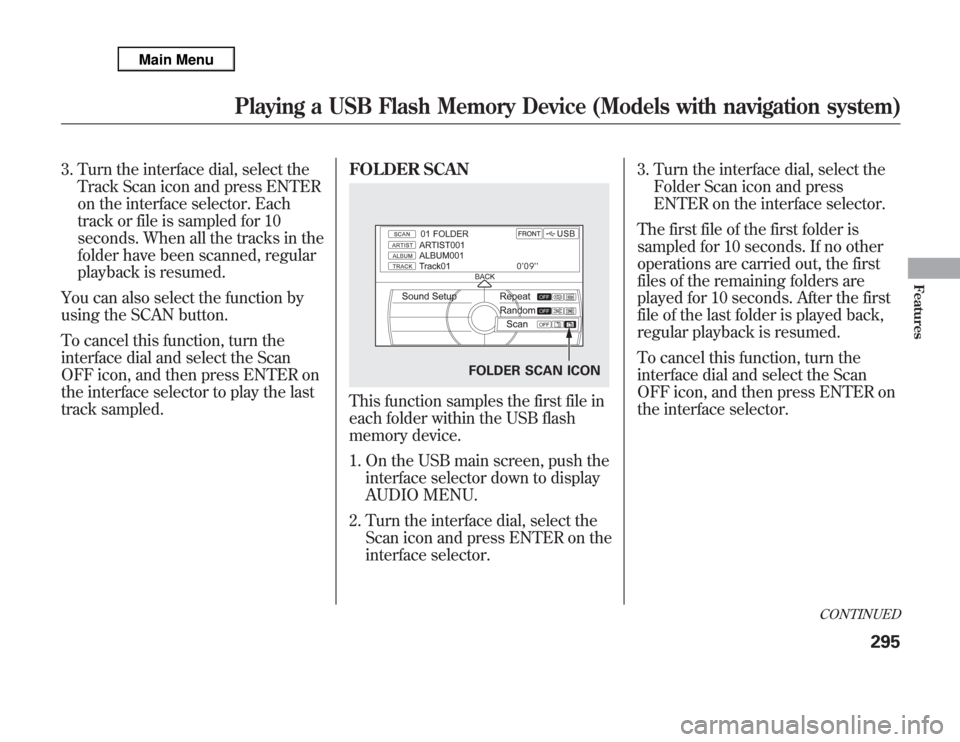
This function samples the first file in
each folder within the USB flash
memory device.
1. On the USB main screen, push the
interface selector down to display
AUDIO MENU.
2. Turn the interface dial, select the
Scan icon and press ENTER on the
interface selector.3. Turn the interface dial, select the
Folder Scan icon and press
ENTER on the interface selector.
The first file of the first folder is
sampled for 10 seconds. If no other
operations are carried out, the first
files of the remaining folders are
played for 10 seconds. After the first
file of the last folder is played back,
regular playback is resumed.
To cancel this function, turn the
interface dial and select the Scan
OFF icon, and then press ENTER on
the interface selector.
FOLDER SCAN ICON
CONTINUED
Playing a USB Flash Memory Device (Models with navigation system)
295
Features
Page 303 of 621
To Stop Playing a USB Flash
Memory Device
To play the radio, press the AM/FM,
or XM button. Press the DISC button
to switch to the disc mode. Press the
HDD button to switch to HDD
Audio.
If you reconnect the same USB flash
memory device, the system will
begin playing where it left off.
Disconnecting a USB Flash Memory
DeviceYou can disconnect the USB flash
memory device at any time even if
the USB mode is selected on the
audio system. Always follow the USB
flash memory device's instructions
when you remove it.
When you disconnect the USB flash
memory device while it is playing,
the audio display and the navigation
screen (if selected) show NO DATA.
Playing a USB Flash Memory Device (Models with navigation system)296
Page 306 of 621
Your vehicle is equipped with aBluetooth
®audio system, which
allows you to listen to streaming
audio from your
Bluetooth
®audio
compatible phone. This function is
only available on
Bluetooth
®Audio
Compatible phones that are paired
and linked to the vehicle's
Bluetooth
®HandsFreeLink
®(HFL)
system (see page 390).
Not all Bluetooth-enabled phones
with streaming audio capabilities are
compatible with the system. You can
find an approved phone by visiting
www.acura.com/handsfreelink
,orby
calling the HandsFreeLink
®
consumer support at 1-888-528-7876.
In Canada, visit
www.acura.ca
, or call
1-888-9-ACURA-9.
NOTE:In some states, provinces,
and territories it may be illegal to
perform some data device functions
while driving.To Play
Bluetooth
®Audio Files
Make sure that your phone is paired
and linked to the HFL.
To begin to play the audio files, you
may need to operate your phone. If
so, follow the phone maker's
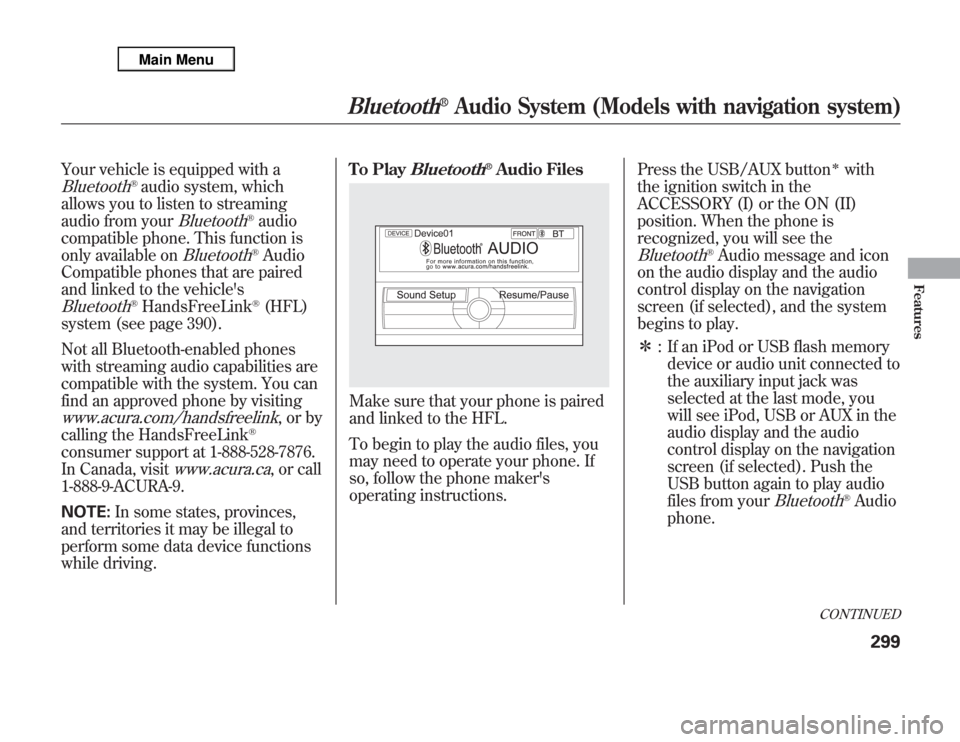
operating instructions.Press the USB/AUX button
ᤳ
with
the ignition switch in the
ACCESSORY (I) or the ON (II)
position. When the phone is
recognized, you will see the
Bluetooth
®Audio message and icon
on the audio display and the audio
control display on the navigation
screen (if selected), and the system
begins to play.
ᤳ: If an iPod or USB flash memory
device or audio unit connected to
the auxiliary input jack was
selected at the last mode, you
will see iPod, USB or AUX in the
audio display and the audio
control display on the navigation
screen (if selected). Push the
USB button again to play audio
files from your
Bluetooth
®Audio
phone.
CONTINUED
Bluetooth
®
Audio System (Models with navigation system)
299
Features
Page 315 of 621
If your vehicle’s battery is disconnected
or goes dead, the audio system
disables itself. If this happens, you will
see‘‘ENTER CODE’’in the frequency
display next time you turn on the
system. Use the preset buttons (Icons
on models with navigation system) to
enter the five-digit code. The code is on
the Anti-theft Identification Card
included in your owner’s manual kit.
When it is entered correctly, the radio
will start playing.
The Anti-theft Identification Card also
lists your audio serial number. It is best
to store the card in a safe place at
home. In addition, you should write the
audio system’s serial number in this
owner’s manual.
If you make a mistake entering the
code, do not start over; complete the
five-digit sequence, then enter the
correct code. You have ten tries to
enter the correct code. If you are
unsuccessful in ten attempts, you must
then leave the system on for one hour
before trying again.The system will retain your AM and
FM presets even if power is
disconnected.
NOTE:
If you have a My Acura account, it is
easy to retrieve the anti-theft code
online without having to access the
serial number.
U.S. ownersWe recommend that you register the
security code at My Acura (myacura.
com.) If you lose the Anti-theft
Identification Card before registering
the code at My Acura, you must obtain
the code from your dealer or
https://
radionavicode.acura.com/
. To do this,
you will need the audio system’s serial
number. If you do not have the serial
number with you, ask your dealer or go
to
https://radionavicode.acura.com/
for
information on how to retrieve it.
Canadian ownersIf you lose the Anti-theft Identification
Card, you must obtain the code from
your dealer. To do this, you will need
the audio system’s serial number. If
you do not have the serial number with
you, ask your dealer how to retrieve it.Models with navigation systemYou need to enter the same code for
the navigation system to reactivate.
Read the navigation system manual for
details.
Radio Theft Protection308
Page 316 of 621
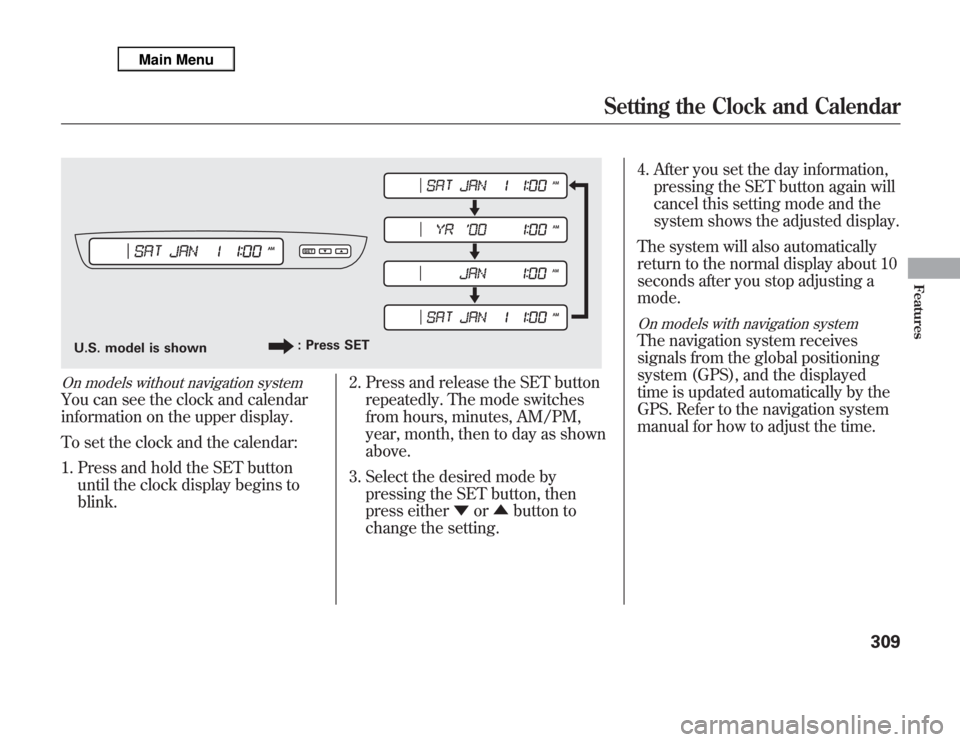
On models without navigation systemYou can see the clock and calendar
information on the upper display.
To set the clock and the calendar:
1. Press and hold the SET button
until the clock display begins to
blink.2. Press and release the SET button
repeatedly. The mode switches
from hours, minutes, AM/PM,
year, month, then to day as shown
above.
3. Select the desired mode by
pressing the SET button, then
press either▼or▲button to
change the setting.4. After you set the day information,
pressing the SET button again will
cancel this setting mode and the
system shows the adjusted display.
The system will also automatically
return to the normal display about 10
seconds after you stop adjusting a
mode.
On models with navigation systemThe navigation system receives
signals from the global positioning
system (GPS), and the displayed
time is updated automatically by the
GPS. Refer to the navigation system
manual for how to adjust the time.
U.S. model is shown: Press SET
Setting the Clock and Calendar
309
Features