light Acura MDX 2015 User Guide
[x] Cancel search | Manufacturer: ACURA, Model Year: 2015, Model line: MDX, Model: Acura MDX 2015Pages: 79, PDF Size: 16.44 MB
Page 26 of 79
44 || 45
veHICLe CoNTroLS
veHICLe CoNTroLS
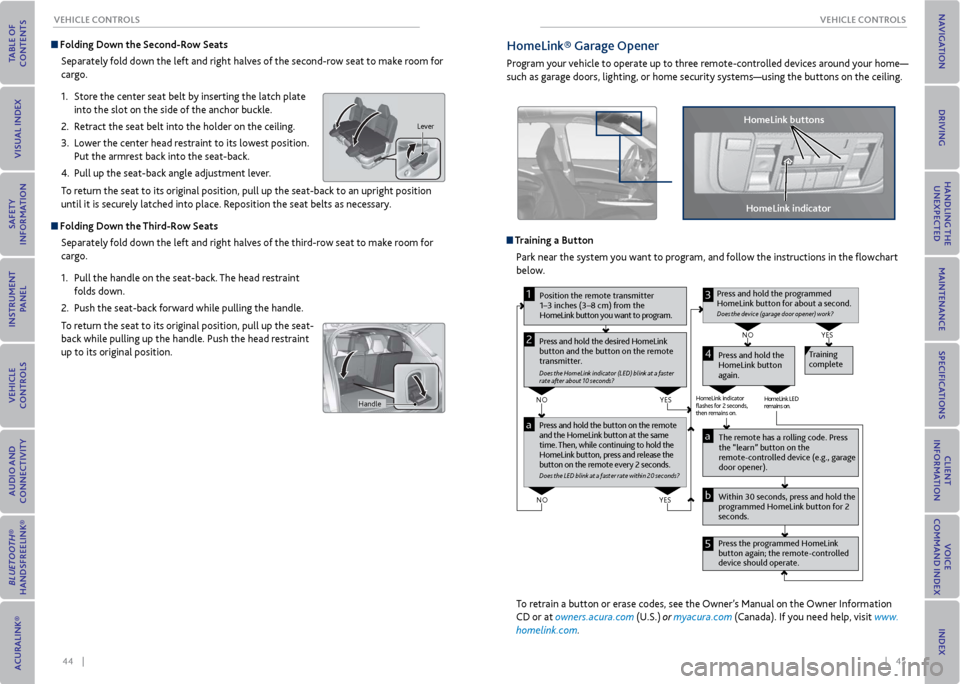
Folding Down the Second-row Seats
Separately fold down the left and right halves of the second-row seat to make room for
cargo.
1. Store the center seat belt by inserting the latch plate
into the slot on the side of the anchor buckle.
2. Retract the seat belt into the holder on the ceiling.
3. Lower the center head restraint to its lowest position.
Put the armrest back into the seat-back.
4. Pull up the seat-back angle adjustment lever.
To return the seat to its original position, pull up the seat-back to an upright position
until it is securely latched into place. Reposition the seat belts as necessary.
Folding Down the Third-row Seats
Separately fold down the left and right halves of the third-row seat to make room for
cargo.
1. Pull the handle on the seat-back. The head restraint
folds down.
2. Push the seat-back forward while pulling the handle.
To return the seat to its original position, pull up the seat-
back while pulling up the handle. Push the head restraint
up to its original position.
Lever
Handle
HomeLink® Garage opener
Program your vehicle to operate up to three remote-controlled devices around your home—
such as garage doors, lighting, or home security systems—using the buttons on the ceiling.
Training a Button Park near the system you want to program, and follow the instructions in the flowchart
below.
Pr ess and hold the button on the r emote
and the HomeLink button at the same
time. Then, while continuing to hold the
HomeLink button, pr ess and release the
button on the r emote every 2 seconds.
Does the LED blink at a fa ster ra te within 20 seconds ?
Press and hold the
HomeLink button
again. T
raining
complete
YES
NO
HomeLink indicator
�ashes for 2 seconds,
then rem ains on. HomeLink LED
r
emains on.YES
NO
YES
NO
P osition the remote transmitter
1–3 inches (3–8 cm) from the
HomeLink button you want to program.1
Press and hold the desir ed HomeLink
button and the button on the r emote
transmitter .
Does the HomeLink indicat or (LED) blink at a f ast er
rate after about 10 seconds ?
2
a
The remote has a ro lling code. Press
the “learn” button on the
r emote-contr olled device (e.g., garage
door opener).
Pr ess the pr ogrammed HomeLink
button again; the remote-contr olled
device should operate.
Within 30 seconds, pr
ess and hold the
pr ogrammed HomeLink button for 2
seconds.a
Pr ess and hold the programmed
HomeLink button for about a second.
Does the devic e (garage door opener) work?
3
b
4
5
To retrain a button or erase codes, see the Owner’s Manual on the Owner Information
CD or at owners.acura.com (U.S.) or myacura.com (Canada). If you need help, visit www.
homelink.com.
HomeLink indicator
HomeLink buttons
Page 29 of 79
50 || 51
AUDIo AND CoNNeCTIvITy
veHICLe CoNTroLS
*if equipped
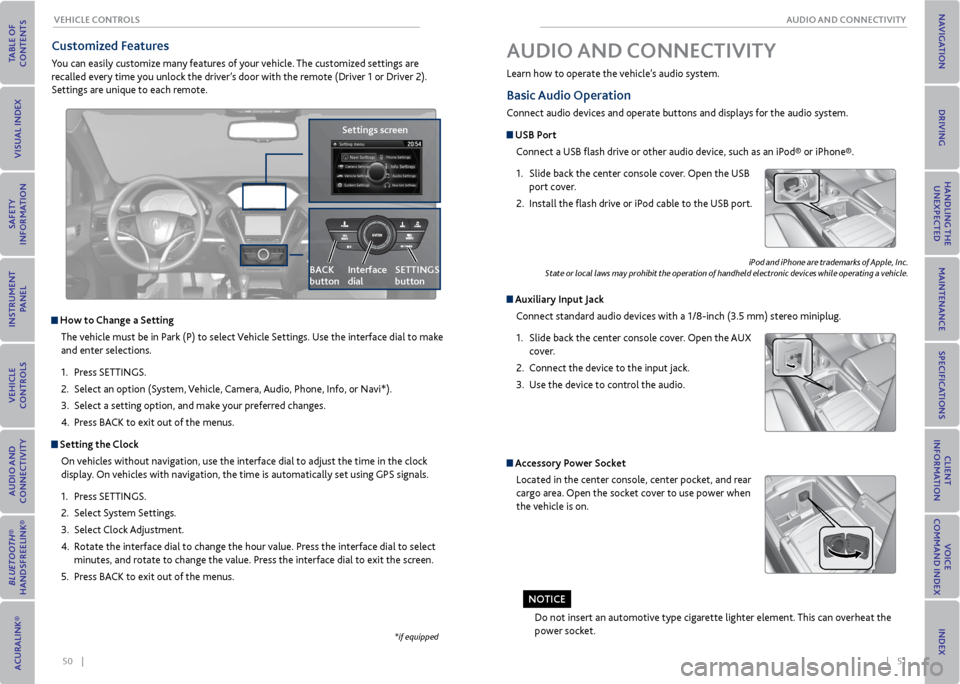
Customized Features
You can easily customize many features of your vehicle. The customized settings are
recalled every time you unlock the driver’s door with the remote (Driver 1 or Driver 2).
Settings are unique to each remote.
How to Change a Setting
The vehicle must be in Park (P) to select Vehicle Settings. Use the interface dial to make
and enter selections.
1. Press SETTINGS.
2. Select an option (System, Vehicle, Camera, Audio, Phone, Info, or Navi*).
3. Select a setting option, and make your preferred changes.
4. Press BACK to exit out of the menus.
Setting the Clock
On vehicles without navigation, use the interface dial to adjust the time in the clock
display. On vehicles with navigation, the time is automatically set using GPS signals.
1. Press SETTINGS.
2. Select System Settings.
3. Select Clock Adjustment.
4. Rotate the interface dial to change the hour value. Press the interface dial to select
minutes, and rotate to change the value. Press the interface dial to exit the screen.
5. Press BACK to exit out of the menus.
Settings screen
BACK
button
Interface
dial SeTTINGS
button
Basic
Audio operation
Connect audio devices and operate buttons and displays for the audio system.
USB Port
Connect a USB flash drive or other audio device, such as an iPod® or iPhone®.
1. Slide back the center console cover. Open the USB
port cover.
2. Install the flash drive or iPod cable to the USB port.
Auxiliary Input Jack
Connect standard audio devices with a 1/8-inch (3.5 mm) stereo miniplug.
1. Slide back the center console cover. Open the AUX
cover.
2. Connect the device to the input jack.
3. Use the device to control the audio.
iPod and iPhone are trademarks of Apple, Inc.
State or local laws may prohibit the operation of handheld electronic devices while operating a vehicle.
AUDIo AND CoNNeCTIvITy
Learn how to operate the vehicle’s audio system.
Accessory Power Socket
Located in the center console, center pocket, and rear
cargo area. Open the socket cover to use power when
the vehicle is on.
Do not insert an automotive type cigarette lighter element. This can overheat the
power socket.
No TICe
Page 36 of 79
64 || 65
AUDIo AND CoNNeCTIvITy
AUDIo AND CoNNeCTIvITy
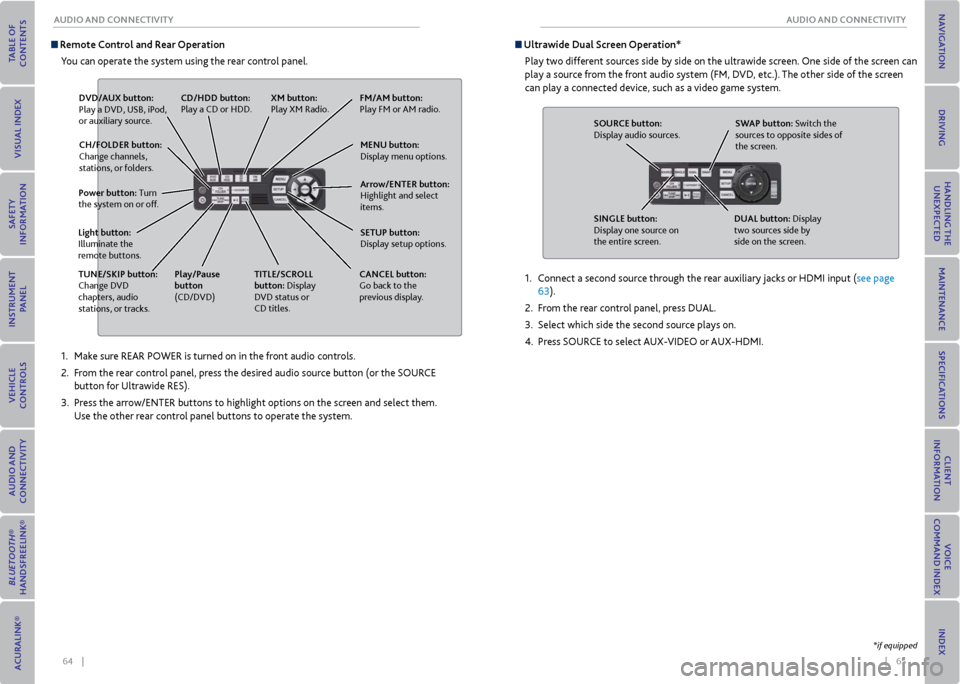
1. Make sure REAR POWER is turned on in the front audio controls.
2. From the rear control panel, press the desired audio source button (or the SOURCE
button for Ultrawide RES).
3. Press the arrow/ENTER buttons to highlight options on the screen and select them.
Use the other rear control panel buttons to operate the system.
remote Control and rear operation
You can operate the system using the rear control panel.
D vD/AUx button:
Play a DVD, USB, iPod,
or auxiliary source.
TUNe/SKIP button:
Change DVD
chapters, audio
stations, or tracks. TITLe/SCroLL
button: Display
DVD status or
CD titles.
Play/Pause
button
(CD/DVD)
Power button: Turn
the system on or off.
CH/FoLDer button:
Change channels,
stations, or folders.
Light button:
Illuminate the
remote buttons. CANCeL button:
Go back to the
previous display.
CD/HDD button:
Play a CD or HDD.
xm button:
Play XM Radio.Fm/Am button:
Play FM or AM radio.
meNU button:
Display menu options.
SeTUP button:
Display setup options. Arrow/eNTer button:
Highlight and select
items.
Ultrawide Dual Screen operation*
Play two different sources side by side on the ultrawide screen. One side of the screen can
play a source from the front audio system (FM, DVD, etc.). The other side of the screen
can play a connected device, such as a video game system.
SoUr Ce button:
Display audio sources.
SINGLe button:
Display one source on
the entire screen. SWAP button: Switch the
sources to opposite sides of
the screen.
DUAL button: Display
two sources side by
side on the screen.
1. Connect a second source through the rear auxiliary jacks or HDMI input (see page
63).
2. From the rear control panel, press DUAL.
3. Select which side the second source plays on.
4. Press SOURCE to select AUX-VIDEO or AUX-HDMI.
*if equipped
Page 37 of 79
66 || 67
Learn how to operate the vehicle’s hands-free calling system.
Basic HFL operation
Make and receive phone calls using the vehicle’s audio system, without handling your
phone. Visit www.acura.com/handsfreelink (U.S.) or www.handsfreelink.ca (Canada) to
check phone compatibility.
To reduce the potential for driver distraction, certain manual functions may be
inoperable or grayed out while the vehicle is moving. voice commands are always
available.
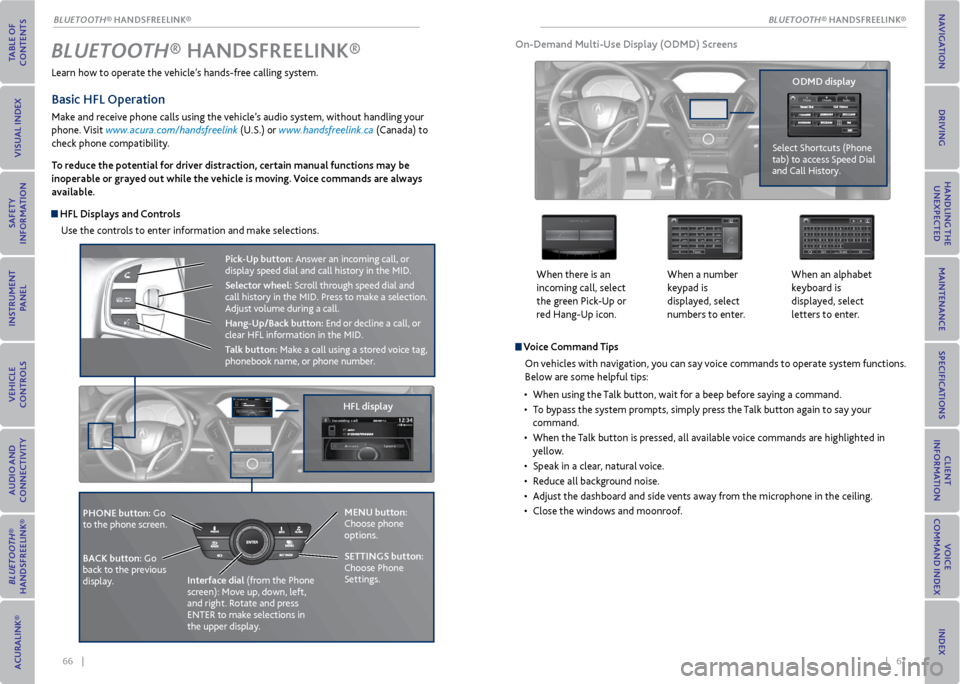
HFL Displays and Controls
Use the controls to enter information and make selections.
Bluetooth® HANDSFreeLINK ®
HFL display
PHoNe button: Go
to the phone screen.
BACK button: Go
back to the previous
display. Interface dial
(from the Phone
screen): Move up, down, left,
and right. Rotate and press
ENTER to make selections in
the upper display.
Pick-Up button: Answer an incoming call, or
display speed dial and call history in the MID.
Selector wheel: Scroll through speed dial and
call history in the MID. Press to make a selection.
Adjust volume during a call.
Hang-Up/Back button: End or decline a call, or
clear HFL information in the MID.
Talk button: Make a call using a stored voice tag,
phonebook name, or phone number.
v oice Command Tips
On vehicles with navigation, you can say voice commands to operate system functions.
Below are some helpful tips:
• When using the Talk button, wait for a beep before saying a command.
• To bypass the system prompts, simply press the Talk button again to say your
command.
• When the Talk button is pressed, all available voice commands are highlighted in
yellow.
• Speak in a clear, natural voice.
• Reduce all background noise.
• Adjust the dashboard and side vents away from the microphone in the ceiling.
• Close the windows and moonroof.
on-Demand multi-Use Display (oDmD) Screens
When there is an
incoming call, select
the green Pick-Up or
red Hang-Up icon. When a number
keypad is
displayed, select
numbers to enter.When an alphabet
keyboard is
displayed, select
letters to enter.
oDmD display
Select Shortcuts (Phone
tab) to access Speed Dial
and Call History.
meNU button:
Choose phone
options.
SeTTINGS button:
Choose Phone
Settings.
BLUeTooTH® HANDSFREELINK®
BLUeTooTH® HANDSFREELINK®
Page 42 of 79
76 || 77
NA
vIGATIoN
NA vIGATIoN
Learn how to enter a destination and operate the navigation system.
Basic Navigation operation
A real-time navigation system uses GPS and a map database to show your current location
and help guide you to a desired destination. You can operate the system using voice
commands or the system controls.
To reduce the potential for driver distraction, certain manual functions may be
inoperable or grayed out while the vehicle is moving. voice commands are always
available.
Steering Wheel Controls
Use the steering wheel controls to give voice commands.
Hang-Up/Back button: Press to cancel a command or
operation.
Talk button: Press to give navigation commands.
v oice Command Tips
• When using the Talk button, wait for a beep before saying a command.
• To bypass the system prompts, simply press the Talk button again to say your
command.
• When the Talk button is pressed, all available voice commands are highlighted in
yellow.
• Speak in a clear, natural voice.
• Reduce all background noise.
• Adjust the dashboard and side vents away from the microphone in the ceiling.
• Close the windows and moonroof.
Using the navigation system while driving can take your attention away from
the road, causing a crash in which you could be seriously injured or killed.
Only operate system controls when the conditions permit you to safely do so.
NA vIGATIoN*
WArNING
*if equipped
Back
button
Talk
button
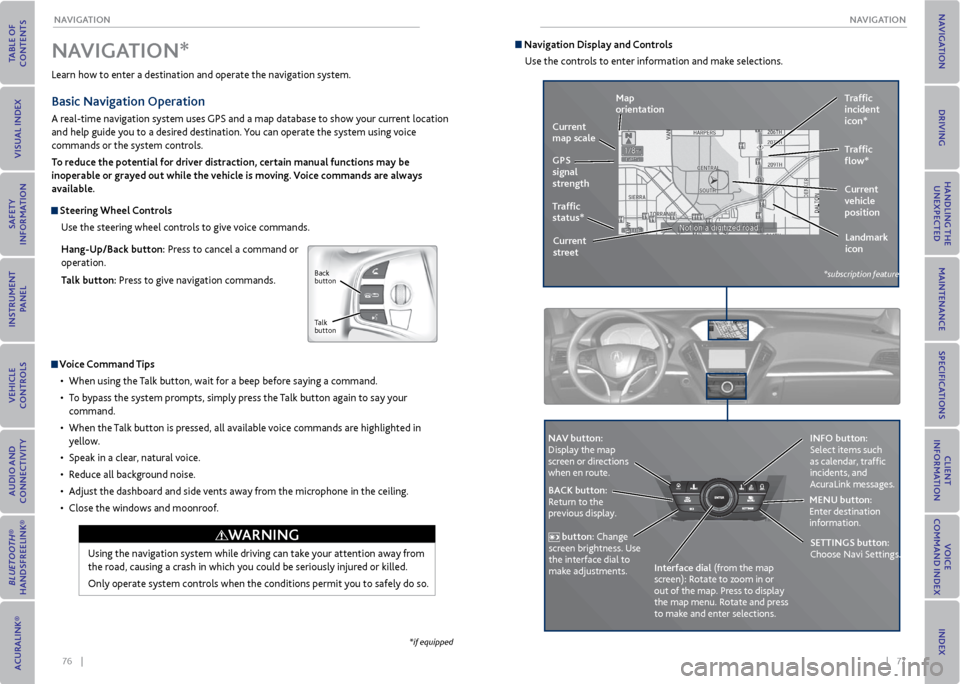
Navigation Display and Controls Use the controls to enter information and make selections.
REAR
REAR
AUDIO
FRON
T
AUDIO
NAVFFFFAAAAAAAAAREARAUDIOFAAFRON
TAUDIOAA
REAR
NAVNAVFRONT
AUDIOREAR
AU DIO
NA v button:
Display the map
screen or directions
when en route. INFo button:
Select items such
as calendar, traffic
incidents, and
AcuraLink messages.
BACK button:
Return to the
previous display. meNU button:
Enter destination
information.
button: Change
screen brightness. Use
the interface dial to
make adjustments. Interface dial (from the map
screen): Rotate to zoom in or
out of the map. Press to display
the map menu. Rotate and press
to make and enter selections.
GPS
signal
strength Traffic
incident
icon*
Traffic
status* Traffic
flow*
Current
map scale
Current
vehicle
position
map
orientation
Current
street Landmark
icon
*subscription feature
SeTTINGS button:
Choose Navi Settings.
Page 45 of 79
82 || 83
DrIvING
NA vIGATIoN
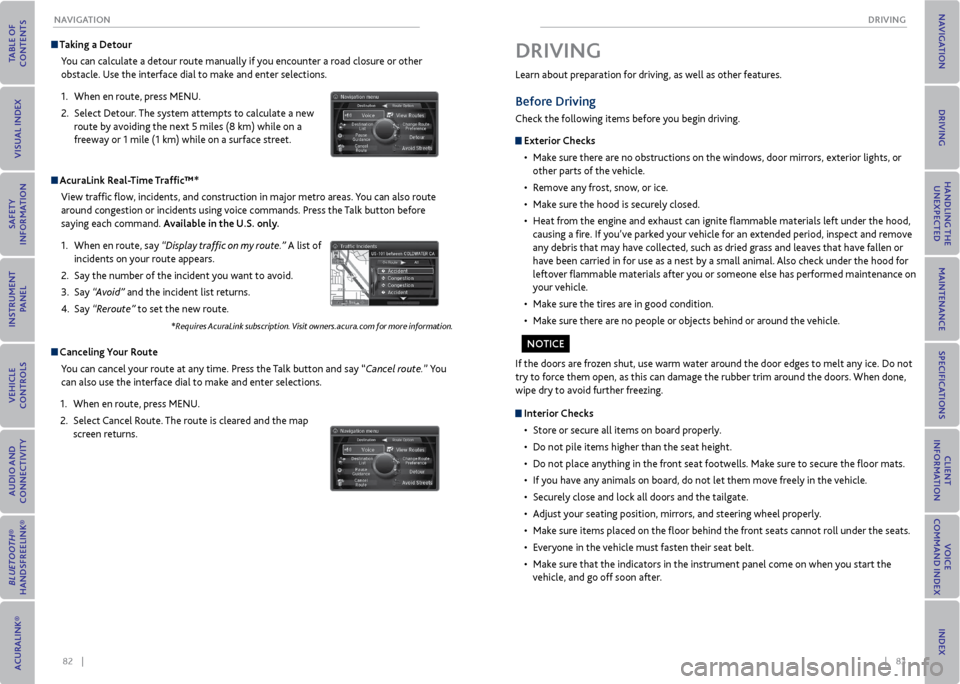
Taking a Detour
You can calculate a detour route manually if you encounter a road closure or other
obstacle. Use the interface dial to make and enter selections.
1. When en route, press MENU.
2. Select Detour. The system attempts to calculate a new
route by avoiding the next 5 miles (8 km) while on a
freeway or 1 mile (1 km) while on a surface street.
AcuraLink r eal-Time Traffic™*
View traffic flow, incidents, and construction in major metro areas. You can also route
around congestion or incidents using voice commands. Press the Talk button before
saying each command. Available in the U.S. only.
1. When en route, say “Display traffic on my route.” A list of
incidents on your route appears.
2. Say the number of the incident you want to avoid.
3. Say “Avoid” and the incident list returns.
4. Say “Reroute” to set the new route.
*Requires AcuraLink subscription. Visit owners.acura.com for more information.
Canceling y our route
You can cancel your route at any time. Press the Talk button and say “Cancel route.” You
can also use the interface dial to make and enter selections.
1. When en route, press MENU.
2. Select Cancel Route. The route is cleared and the map
screen returns.
Learn about preparation for driving, as well as other features.
Before Driving
Check the following items before you begin driving.
exterior Checks
• Make sure there are no obstructions on the windows, door mirrors, exterior lights, or
other parts of the vehicle.
• Remove any frost, snow, or ice.
• Make sure the hood is securely closed.
• Heat from the engine and exhaust can ignite flammable materials left under the hood,
causing a fire. If you’ve parked your vehicle for an extended period, inspect and remove
any debris that may have collected, such as dried grass and leaves that have fallen or
have been carried in for use as a nest by a small animal. Also check under the hood for
leftover flammable materials after you or someone else has performed maintenance on
your vehicle.
• Make sure the tires are in good condition.
• Make sure there are no people or objects behind or around the vehicle.
DrIvING
If the doors are frozen shut, use warm water around the door edges to melt any ice. Do not
try to force them open, as this can damage the rubber trim around the doors. When done,
wipe dry to avoid further freezing.
Interior Checks
• Store or secure all items on board properly.
• Do not pile items higher than the seat height.
• Do not place anything in the front seat footwells. Make sure to secure the floor mats.
• If you have any animals on board, do not let them move freely in the vehicle.
• Securely close and lock all doors and the tailgate.
• Adjust your seating position, mirrors, and steering wheel properly.
• Make sure items placed on the floor behind the front seats cannot roll under the seats.
• Everyone in the vehicle must fasten their seat belt.
• Make sure that the indicators in the instrument panel come on when you start the
vehicle, and go off soon after.
No TICe
Page 47 of 79
86 || 87
DrIvING
DrIvING
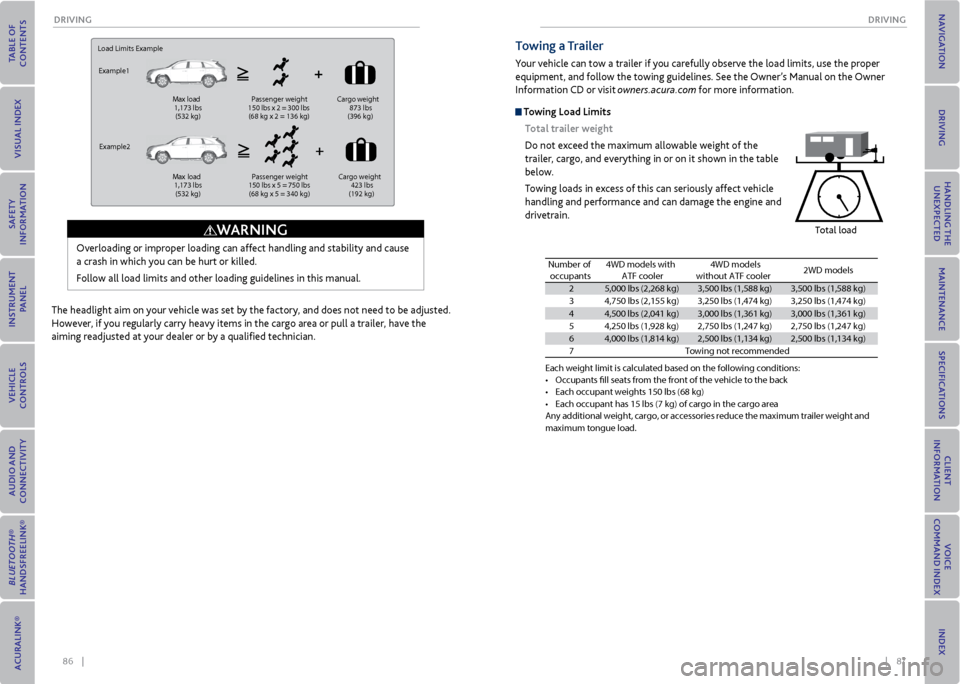
Load Limits Example
Example1
Max load
1,173 lbs
(532 kg ) Passenger weight
150 lbs x 2 = 300 lbs
(68 kg x 2 = 136 kg )Cargo
weight
873 lbs
(396 kg )
Example2 Max load
1,173 lbs
(532 kg ) Passenger weight
150 lbs x 5 = 750 lbs
(68 kg x 5 = 340 kg )Cargo
weight
423 lbs
(192 kg )
Overloading or improper loading can affect handling and stability and cause
a crash in which you can be hurt or killed.
Follow all load limits and other loading guidelines in this manual.
WArNING
The headlight aim on your vehicle was set by the factory, and does not need to be adjusted.
However, if you regularly carry heavy items in the cargo area or pull a trailer, have the
aiming readjusted at your dealer or by a qualified technician.
Towing a Trailer
Your vehicle can tow a trailer if you carefully observe the load limits, use the proper
equipment, and follow the towing guidelines. See the Owner’s Manual on the Owner
Information CD or visit owners.acura.com for more information.
Towing Load Limits
Total trailer weight
Do not exceed the maximum allowable weight of the
trailer, cargo, and everything in or on it shown in the table
below.
Towing loads in excess of this can seriously affect vehicle
handling and performance and can damage the engine and
drivetrain.
Total load
Each weight limit \fis calculated base\fd on the following \fconditions\f•Occupants fll seats\f f\bom the f\bont of th\fe vehicle to the b\fac k•Each occupant weigh\fts 150 lbs (68 kg)•Each occupant has 1\f5 lbs (7 kg) of ca\b\fgo in the ca\bgo a\be\faAny additional weight, ca\bgo, o\b accesso\bies \beduce the maximum t\baile\b weight and maximum tongue loa\fd.
Number of
occupant s4WD models with
ATF cooler4WD models
without ATF cooler2WD models
25,000 lbs (2,268 kg\f)3,500 lbs (1,588 kg)\f3,500 lbs (1,588 kg)\f
34,750 lbs (2,155 k\fg )3,250 lbs (1,474 k\fg)3,250 lbs (1,474 k\fg)
44,500 lbs (2,041 k\fg)3,000 lbs (1,361 k\fg)3,000 lbs (1,361 k\fg)
54,250 lbs (1,928 kg\f)2,750 lbs (1,247 k\fg)2,750 lbs (1,247 k\fg)
64,000 lbs (1,814 kg\f)2,500 lbs (1,134 k\fg)2,500 lbs (1,134 k\fg)
7Towing not \becommen\fded
Page 49 of 79
90 || 91
DrIvING
DrIvING
Pre-Tow Checklist
When preparing to tow, and before driving away, be sure to check the following:
• Avoid towing a trailer during your vehicle’s first 600 miles (1,000 km).
• The vehicle and trailer have been properly serviced and are in good condition. Lights
and brakes work properly, and the tires are properly inflated.
• All weights and loads are within limits. Never exceed the gross weight ratings.
• When towing more than 3,500 lbs (1,590 kg), use of gasoline with an octane rating of
91 or higher is recommended.
• Check if all loads are within limits at a public scale (see page 89). If a public scale is
not available, add the estimated weight of your cargo load to the weight of the trailer
(as quoted by the manufacturer) and the tongue load.
• The hitch, safety chains, and any other attachments are secure.
• All items in or on the trailer are properly secured and cannot shift while you drive.
Exceeding any load limit or improperly loading your vehicle and trailer can
cause a crash in which you can be seriously hurt or killed.
Check the loading of your vehicle and trailer carefully before starting to
drive.
WArNING
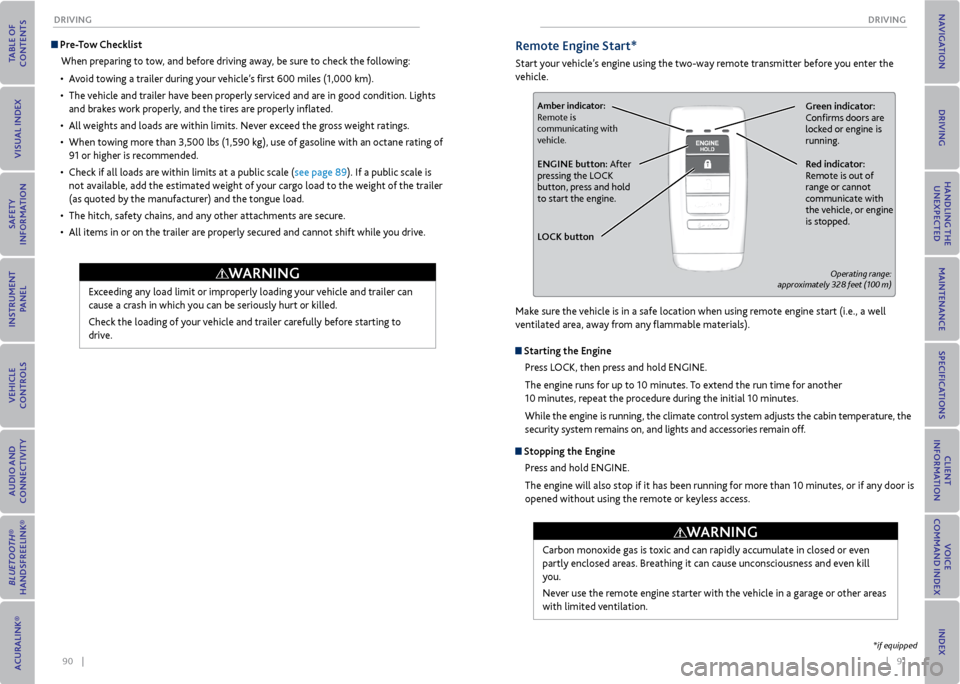
remote engine Start*
Start your vehicle’s engine using the two-way remote transmitter before you enter the
vehicle.
Green indicator:
Confirms doors are
locked or engine is
running.Amber indicator:
Remote is
communicating with
vehicle.
red indicator:
Remote is out of
range or cannot
communicate with
the vehicle, or engine
is stopped.eNGINe button: After
pressing the LOCK
button, press and hold
to start the engine.
L oCK button
Operating range:
approximately 328 feet (100 m)
Make sure the vehicle is in a safe location when using remote engine start (i.e., a well
ventilated area, away from any flammable materials).
Starting the engine
Press LOCK, then press and hold ENGINE.
The engine runs for up to 10 minutes. To extend the run time for another
10 minutes, repeat the procedure during the initial 10 minutes.
While the engine is running, the climate control system adjusts the cabin temperature, the
security system remains on, and lights and accessories remain off.
Stopping the engine
Press and hold ENGINE.
The engine will also stop if it has been running for more than 10 minutes, or if any door is
opened without using the remote or keyless access.
Carbon monoxide gas is toxic and can rapidly accumulate in closed or even
partly enclosed areas. Breathing it can cause unconsciousness and even kill
you.
Never use the remote engine starter with the vehicle in a garage or other areas
with limited ventilation.
WArNING
*if equipped
Page 50 of 79
92 || 93
DrIvING
DrIvING
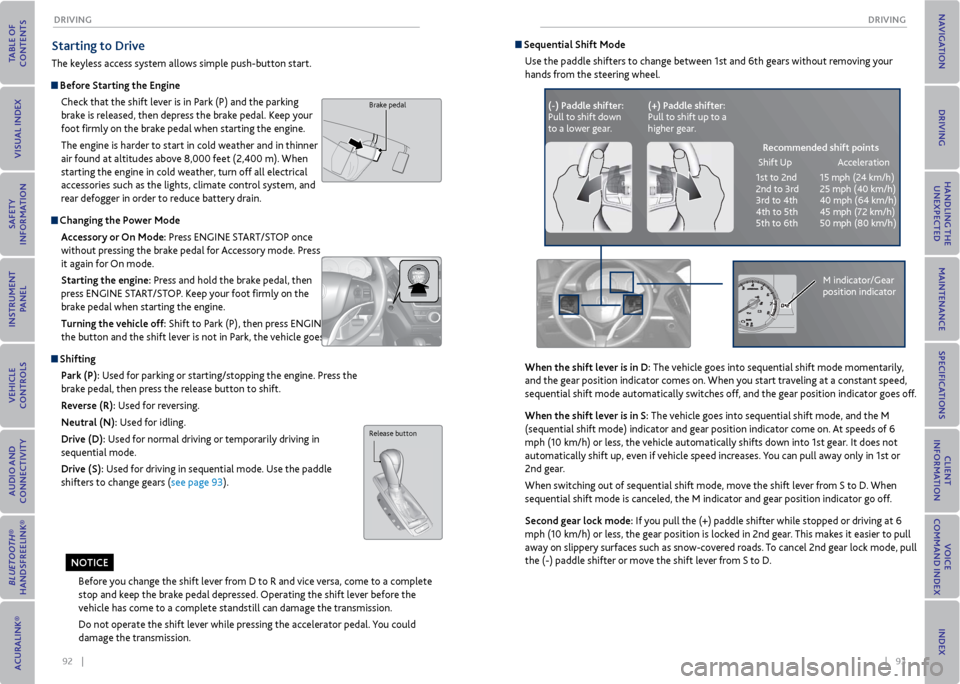
Starting to Drive
The keyless access system allows simple push-button start.
Before Starting the engine
Check that the shift lever is in Park (P) and the parking
brake is released, then depress the brake pedal. Keep your
foot firmly on the brake pedal when starting the engine.
The engine is harder to start in cold weather and in thinner
air found at altitudes above 8,000 feet (2,400 m). When
starting the engine in cold weather, turn off all electrical
accessories such as the lights, climate control system, and
rear defogger in order to reduce battery drain.
Changing the Power mode Accessory or on mode: Press ENGINE START/STOP once
without pressing the brake pedal for Accessory mode. Press
it again for On mode.
Starting the engine: Press and hold the brake pedal, then
press ENGINE START/STOP. Keep your foot firmly on the
brake pedal when starting the engine.
Turning the vehicle off: Shift to Park (P), then press ENGINE START/STOP. If you press
the button and the shift lever is not in Park, the vehicle goes into Accessory mode.
Shifting
Park (P): Used for parking or starting/stopping the engine. Press the
brake pedal, then press the release button to shift.
r everse (r): Used for reversing.
Neutral (N): Used for idling.
Drive (D): Used for normal driving or temporarily driving in
sequential mode.
Drive (S): Used for driving in sequential mode. Use the paddle
shifters to change gears (see page 93).
Brake pedal
Before you change the shift lever from D to R and vice versa, come to a complete
stop and keep the brake pedal depressed. Operating the shift lever before the
vehicle has come to a complete standstill can damage the transmission.
Do not operate the shift lever while pressing the accelerator pedal. You could
damage the transmission.
Release button
No TICe
Sequential Shift mode
Use the paddle shifters to change between 1st and 6th gears without removing your
hands from the steering wheel.
When the shift lever is in D: The vehicle goes into sequential shift mode momentarily,
and the gear position indicator comes on. When you start traveling at a constant speed,
sequential shift mode automatically switches off, and the gear position indicator goes off.
When the shift lever is in S: The vehicle goes into sequential shift mode, and the M
(sequential shift mode) indicator and gear position indicator come on. At speeds of 6
mph (10 km/h) or less, the vehicle automatically shifts down into 1st gear. It does not
automatically shift up, even if vehicle speed increases. You can pull away only in 1st or
2nd gear.
When switching out of sequential shift mode, move the shift lever from S to D. When
sequential shift mode is canceled, the M indicator and gear position indicator go off.
Second gear lock mode: If you pull the (+) paddle shifter while stopped or driving at 6
mph (10 km/h) or less, the gear position is locked in 2nd gear. This makes it easier to pull
away on slippery surfaces such as snow-covered roads. To cancel 2nd gear lock mode, pull
the (-) paddle shifter or move the shift lever from S to D.
(-) Paddle shifter:
Pull to shift down
to a lower gear. (+) Paddle shifter:
Pull to shift up to a
higher gear.
recommended shift points
Shift Up Acceleration
1st to 2nd 15 mph (24 km/h)
2nd to 3rd 25 mph (40 km/h)
3rd to 4th 40 mph (64 km/h)
4th to 5th 45 mph (72 km/h)
5th to 6th 50 mph (80 km/h)
M indicator/Gear
position indicator
Page 51 of 79
94 || 95
DrIvING
DrIvING
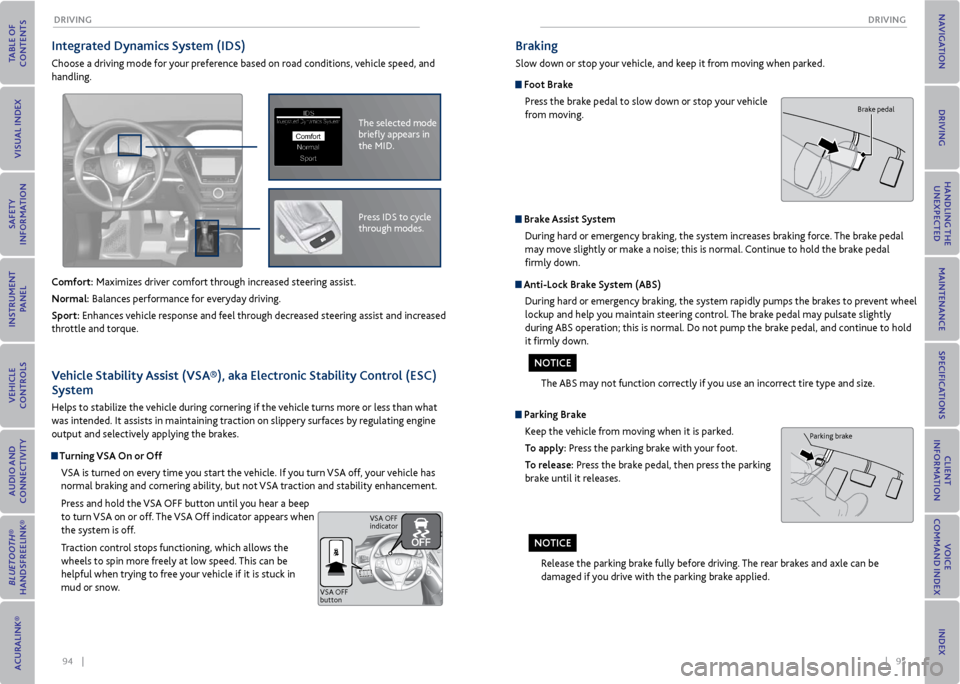
Integrated Dynamics System (IDS)
Choose a driving mode for your preference based on road conditions, vehicle speed, and
handling.
Comfort: Maximizes driver comfort through increased steering assist.
Normal: Balances performance for everyday driving.
Sport: Enhances vehicle response and feel through decreased steering assist and increased
throttle and torque.
The selected mode
briefly appears in
the MID.IDSIntegrated Dynamics System
NormalSport
Comfort
Press IDS to cycle
through modes.
v ehicle Stability Assist (vSA®), aka electronic Stability Control (eSC)
System
Helps to stabilize the vehicle during cornering if the vehicle turns more or less than what
was intended. It assists in maintaining traction on slippery surfaces by regulating engine
output and selectively applying the brakes.
Turning vSA on or off
VSA is turned on every time you start the vehicle. If you turn VSA off, your vehicle has
normal braking and cornering ability, but not VSA traction and stability enhancement.
Press and hold the VSA OFF button until you hear a beep
to turn VSA on or off. The VSA Off indicator appears when
the system is off.
Traction control stops functioning, which allows the
wheels to spin more freely at low speed. This can be
helpful when trying to free your vehicle if it is stuck in
mud or snow.
VSA OFF
button VSA OFF
indicator
Braking
Slow down or stop your vehicle, and keep it from moving when parked.
Foot Brake
Press the brake pedal to slow down or stop your vehicle
from moving.
Parking BrakeKeep the vehicle from moving when it is parked.
To apply: Press the parking brake with your foot.
To release: Press the brake pedal, then press the parking
brake until it releases.
Brake Assist SystemDuring hard or emergency braking, the system increases braking force. The brake pedal
may move slightly or make a noise; this is normal. Continue to hold the brake pedal
firmly down.
Anti-Lock Brake System (ABS)
During hard or emergency braking, the system rapidly pumps the brakes to prevent wheel
lockup and help you maintain steering control. The brake pedal may pulsate slightly
during ABS operation; this is normal. Do not pump the brake pedal, and continue to hold
it firmly down.
The ABS may not function correctly if you use an incorrect tire type and size.
Release the parking brake fully before driving. The rear brakes and axle can be
damaged if you drive with the parking brake applied.
Brake pedal
Parking brake
No TICe
NoTICe