warning Acura MDX 2015 Workshop Manual
[x] Cancel search | Manufacturer: ACURA, Model Year: 2015, Model line: MDX, Model: Acura MDX 2015Pages: 505, PDF Size: 18.62 MB
Page 183 of 505
uuInterior Lights/Interior Convenience Items uInterior Convenience Items
182Controls
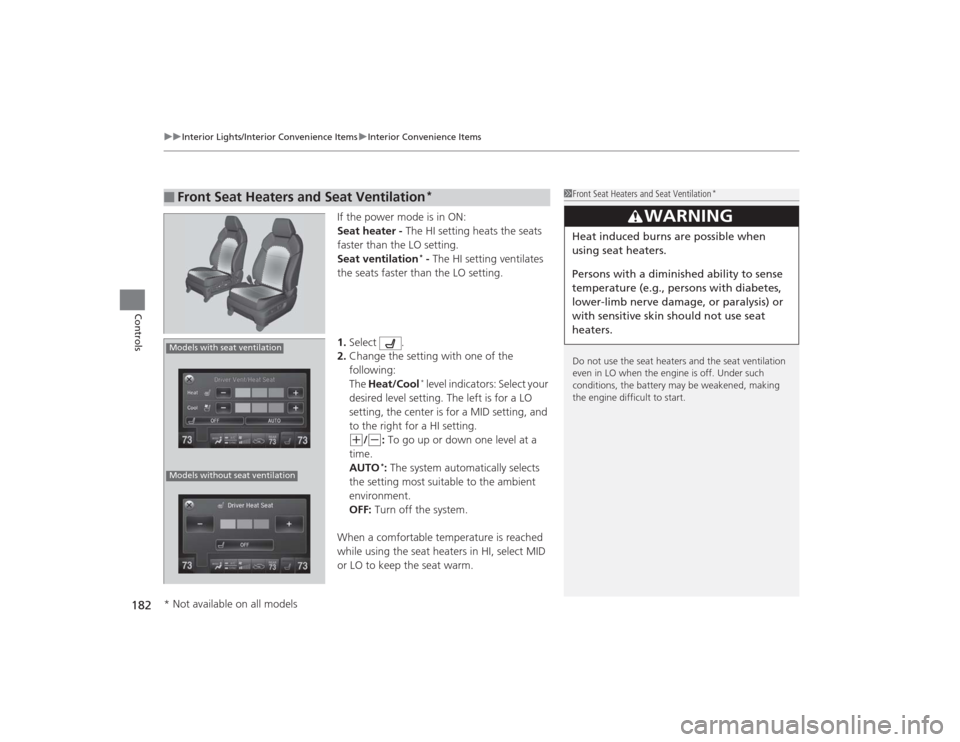
If the power mode is in ON:
Seat heater - The HI setting heats the seats
faster than the LO setting.
Seat ventilation
* - The HI setting ventilates
the seats faster than the LO setting.
1. Select .
2. Change the setting with one of the
following:
The Heat/Cool* level indicators: Select your
desired level setting. The left is for a LO
setting, the center is for a MID setting, and
to the right for a HI setting.
(+
/(-
: To go up or down one level at a
time.
AUTO*: The system automatically selects
the setting most suitable to the ambient
environment.
OFF: Turn off the system.
When a comfortable temperature is reached
while using the seat heaters in HI, select MID
or LO to keep the seat warm.
■
Front Seat Heaters and Seat Ventilation
*
1 Front Seat Heaters and Seat Ventilation
*
Do not use the seat heaters and the seat ventilation
even in LO when the engine is off. Under such
conditions, the battery may be weakened, making
the engine difficult to start.
3
WARNING
Heat induced burns are possible when
using seat heaters.
Persons with a diminished ability to sense
temperature (e.g., persons with diabetes,
lower-limb nerve damage, or paralysis) or
with sensitive skin should not use seat
heaters.
Models with seat ventilationModels without seat ventilation* Not available on all models
Page 184 of 505
Continued
183
uuInterior Lights/Interior Convenience Items uInterior Convenience Items
Controls
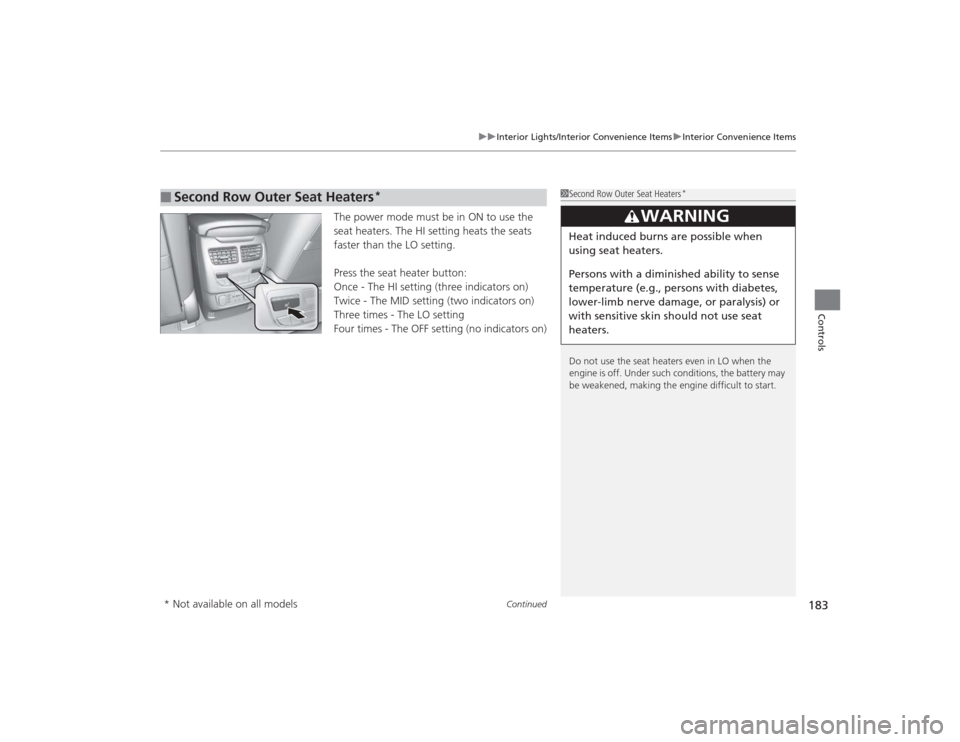
The power mode must be in ON to use the
seat heaters. The HI setting heats the seats
faster than the LO setting.
Press the seat heater button:
Once - The HI setting (three indicators on)
Twice - The MID setting (two indicators on)
Three times - The LO setting
Four times - The OFF setting (no indicators on)
■
Second Row Outer Seat Heaters
*
1Second Row Outer Seat Heaters
*
Do not use the seat heaters even in LO when the
engine is off. Under such conditions, the battery may
be weakened, making the engine difficult to start.
3
WARNING
Heat induced burns are possible when
using seat heaters.
Persons with a diminished ability to sense
temperature (e.g., persons with diabetes,
lower-limb nerve damage, or paralysis) or
with sensitive skin should not use seat
heaters.
* Not available on all models
Page 252 of 505
251
uuCustomized Features u
Continued
Features
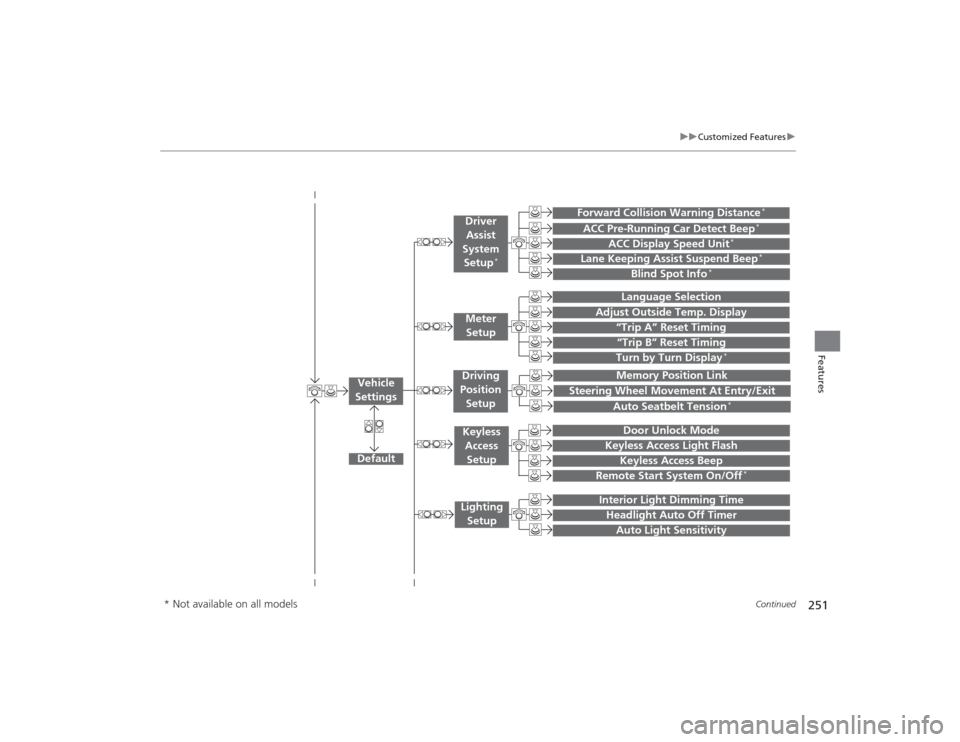
“Trip B” Reset TimingTurn by Turn Display
*
Adjust Outside Temp. Display
“Trip A” Reset Timing
Default
Memory Position Link
Keyless Access Light Flash
Keyless Access Beep
Interior Light Dimming TimeHeadlight Auto Off TimerAuto Light Sensitivity
Vehicle
Settings
Meter SetupKeyless Access
SetupLighting Setup
Remote Start System On/Off
*
Steering Wheel Movement At Entry/Exit
Driving
Position Setup
Door Unlock Mode
Lane Keeping Assist Suspend Beep
*
Blind Spot Info
*
ACC Pre-Running Car Detect Beep
*
ACC Display Speed Unit
*
Driver Assist
System Setup
*
Forward Collision Warning Distance
*
Language SelectionAuto Seatbelt Tension
*
* Not available on all models
Page 258 of 505
257
uuCustomized Features u
Continued
Features
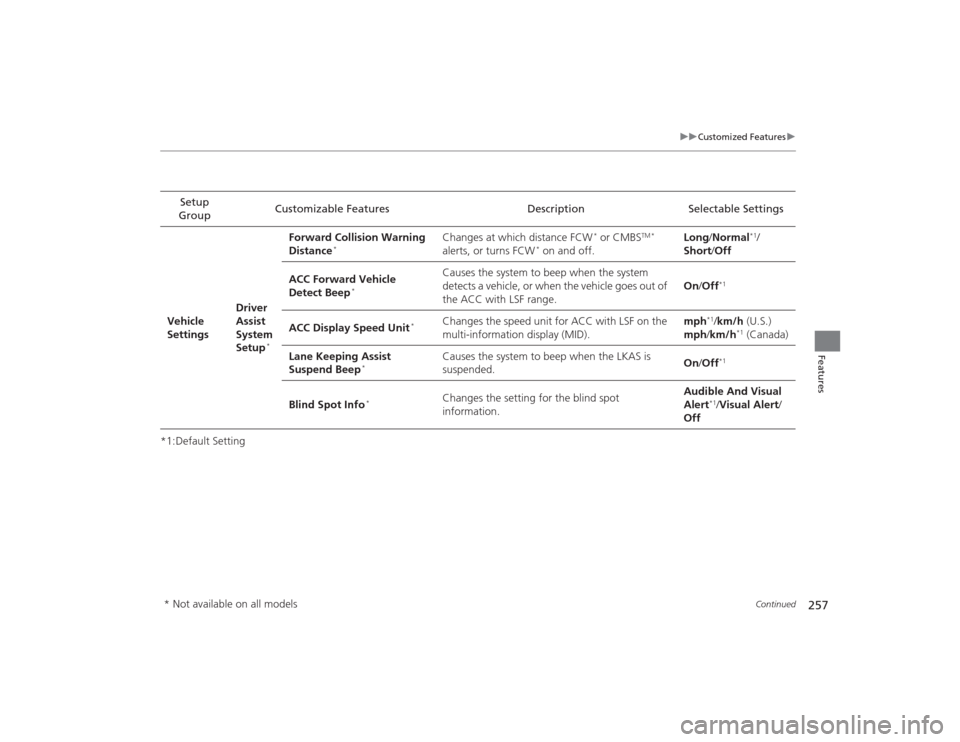
*1:Default SettingSetup
Group Customizable Features Description Selectable Settings
Vehicle
Settings Driver
Assist
System
Setup
*
Forward Collision Warning
Distance
*
Changes at which distance FCW
* or CMBS
TM *
alerts, or turns FCW
* on and off. Long
/Normal
*1/
Short/ Off
ACC Forward Vehicle
Detect Beep
*
Causes the system to beep when the system
detects a vehicle, or when the vehicle goes out of
the ACC with LSF range. On
/Off
*1
ACC Display Speed Unit
*
Changes the speed unit for ACC with LSF on the
multi-information display (MID). mph
*1/
km/h (U.S.)
mph /km/h
*1 (Canada)
Lane Keeping Assist
Suspend Beep
*
Causes the system to beep when the LKAS is
suspended. On
/Off
*1
Blind Spot Info
*
Changes the setting for the blind spot
information. Audible And Visual
Alert
*1/
Visual Alert /
Off
* Not available on all models
Page 306 of 505
305
Driving
This chapter discusses driving, refueling, and information on items such as accessories.
Before DrivingDriving Preparation .......................... 306
Maximum Load Limit........................ 309
Towing a Trailer ................................ 311
Off-Highway Driving Guidelines ..... 322
When Driving Starting the Engine .......................... 324
Precautions While Driving................. 329
Automatic Transmission ................... 330
Shifting ............................................ 331
Integrated Dynamics System (IDS)..... 335
Cruise Control ................................. 336
Adaptive Cruise Control (ACC) with Low Speed Follow (LSF)
*......................... 339 Forward Collision Warning (FCW)
*.. 350
Lane Departure Warning (LDW)
*..... 354
Lane Keeping Assist System (LKAS)*.. 357
Vehicle Stability Assist (VSA ®), aka Electronic
Stability Control (ESC), System ............. 362Agile Handling Assist System............ 364
Blind Spot Information (BSI) System
*... 365
Super Handling-All Wheel Drive
TM (SH-
AWD® )
*......................................... 367
Tire Pressure Monitoring System (TPMS) ... 367Tire Pressure Monitoring System (TPMS) -
Required Federal Explanation ......... 369
Braking Brake System ................................... 371 Anti-lock Brake System (ABS) ........... 373
Brake Assist System ......................... 374
Collision Mitigation Braking System
TM
(CMBS
TM)*..................................... 375
Parking Your Vehicle
When Stopped ................................ 381
Parking Sensor System
*................... 382
Multi-View Rear Camera*................ 386
Refueling Fuel Information .............................. 387
How to Refuel ................................. 388
Fuel Economy .................................... 389
Accessories and Modifications ........ 390
* Not available on all models
Page 310 of 505

309
uuBefore Driving uMaximum Load Limit
Continued
Driving
Maximum Load LimitThe maximum load for your vehicle is 1,173 lbs (532 kg).
See Tire and Loading Information label attached to the driver’s doorjamb.
This figure includes the total weight of all occupants, cargo, and
accessories, and the tongue lo ad if you are towing a trailer.
Steps for Determining Correct Load Limit -
(1) Locate the statement “The combined weight of occupants and
cargo should never exceed XXX kg or XXX lbs.” on your
vehicle’s placard.
(2) Determine the combined weight of the driver and passengers
that will be riding in your vehicle.
(3) Subtract the combined weight of the driver and passengers
from XXX kg or XXX lbs.
(4) The resulting figure equals th e available amount of cargo and
luggage load capacity. For example, if the “XXX” amount
equals 1,400 lbs. an d there will be five 150 lb. passengers in
your vehicle, the amount of available cargo and luggage load
capacity is 650 lbs.
(1,400 - 750 (5 x 150) = 650 lbs.)
1 Maximum Load Limit
Gross Vehicle Weight Rating (GVWR):
The maximum allowable weight of the vehicle, all
occupants, all accessories, all cargo, and the tongue
load.
2 Specifications P. 484
Gross Axle Weight Rating (GAWR):
The maximum allowable weight of the vehicle axle. 2 Specifications P. 484
3
WARNING
Overloading or improper loading
can affect handling and stability
and cause a crash in which you
can be hurt or killed.
Follow all load limits and other
loading guidelines in this manual.
Label Example
Page 312 of 505

311
Continued
Driving
Towing a TrailerTowing PreparationYour vehicle can tow a trailer if you carefully observe the load limits, use the proper
equipment, and follow the towing guidelines. Check the load limits before driving.
■Total trailer weight
Do not exceed the maximum allowable
weight of the trailer, cargo, and everything in
or on it shown in the table.
Towing loads in excess of this can seriously
affect vehicle handling and performance and
can damage the engine and drivetrain.
Each weight limit is calculated based on the following conditions:
• Occupants fill seats from the front of the vehicle to the back
• Each occupant weights 150 lbs (68 kg)
• Each occupant has 15 lbs (7 kg) of cargo in the cargo area
Any additional weight, cargo or accessories reduce the maximum trailer weight and
maximum tongue load.
■
Towing Load Limits
1 Towing Load Limits
Check if all loads are within limits at a public scale.
If a public scale is not available, add the estimated
weight of your cargo load to the weight of your
trailer (as quoted by the manufacturer), and then
measure the tongue load with an appropriate scale or
tongue gauge or estimate it based on cargo
distribution.
Refer to the trailer owner’s manual fo r additional
information.
Break-in Period
Avoid towing a trailer during your vehicle’s first 600
miles (1,000 km).
Never exceed the gross weight ratings.
Gross weight information
2 Vehicle Specifications P. 484
3
WARNING
Exceeding any load limit or improperly
loading your vehicle and trailer can cause a
crash in which you can be seriously hurt or
killed.
Check the loading of your vehicle and
trailer carefully before starting to drive.
Total Load
Number of occupants
4WD models with ATF cooler
4WD models
without ATF cooler
2WD models
2
5,000 lbs (2,268 kg)
3,500 lbs (1,588 kg)
3,500 lbs (1,588 kg)
3
4,750 lbs (2,155 kg)
3,250 lbs (1,474 kg)
3,250 lbs (1,474 kg)
4
4,500 lbs (2,041 kg)
3,000 lbs (1,361 kg)
3,000 lbs (1,361 kg)
5
4,250 lbs (1,928 kg)
2,750 lbs (1,247 kg)
2,750 lbs (1,247 kg)
6
4,000 lbs (1,814 kg)
2,500 lbs (1,134 kg)
2,500 lbs (1,134 kg)
7
Towing not recommended
Page 323 of 505

322Driving
Off-Highway Driving GuidelinesGeneral InformationYour vehicle has been designed primarily for use on pavement, however, its higher
ground clearance allows you to occasionally travel on unpaved roads. It is not
designed for trail-blazing, or other challenging off-road activities.
If you decide to drive on unpaved roads, you will find that it requires somewhat
different driving skills and that your vehicle will handle somewhat differently than it
does on pavement. Pay attention to the precautions and tips in this section, and get
acquainted with your vehicle before leaving the pavement.Important Safety PrecautionsTo avoid loss of control or rollover, be sure to follow all precautions and
recommendations:
•Be sure to store cargo properly and do not exceed your cargo load limits.
2Maximum Load Limit P. 309
•Whenever you drive, make sure you and your passengers always wear seat belts.
• Keep your speed low, and never go faster than the conditions allow.
• It’s up to you to continually assess the situation and drive within the limits.
1Off-Highway Driving Guidelines
Failure to operate your vehicle correctly might result
in a crash or a rollover.
2 Important Handling Information P. 28
2 Precautions While Driving P. 329
Spinning the tires can also damage the SH-AWD
system.
3
WARNING
Improperly operating this vehicle on or off
pavement can cause a crash or rollover in
which you and your passengers can be
seriously injured or killed.
• Follow all instructions and guidelines in
this owner’s manual.
• Keep your speed low, and don’t drive
faster than conditions permit.
Page 327 of 505

uuWhen Driving uStarting the Engine
326Driving
You can remotely start the engine using the two-way keyless access remote from
distances up to 328 feet (100 meters) from the vehicle.■To start the engine
The engine runs for up to 10 minutes without you starting the vehicle.
To extend the run time for another 10 minutes during the first run, press the
button, then press and hold the button. u The amber LED blinks, then the green LED comes back on if a 10-minute
extension request was transmitted successfully.
After pressing the (lock) button, wait for the green LED to blink. This indicates that
the all the doors and the tailgate are locked. ■
Remote Engine Start with Vehicle Feedback
*
1 Remote Engine Start with Vehicle Feedback
*
WARNING:
Carbon monoxide gas is toxic and can
rapidly accumulate in closed or even partly enclosed
areas.
Breathing it can cause unconsciousness and even kill
you.
Never use the remote engine starter with the vehicle
parked in a garage or other areas with limited
ventilation.
Operate the remote in an open space from distances
up to 328 feet (100 meters) from the vehicle. If there
are buildings and obstacles between your vehicle and
the remote, the range will be reduced.
This distance may vary by external electrical
interference.
The engine may not start by the remote engine start
if:
•You have disabled a remote engine start setting
using the multi-information display (MID).•The power mode is not in VEHICLE OFF (LOCK).•The shift lever is in a position other than
( P.
•The hood is open, or any door or the tailgate is
unlocked.•You have already used the remote twice to start
the engine.•Another registered keyless access remote is in the
vehicle.•There is any antenna failure.•Door is unlocked with the built-in key.
With the doors locked, Press the button,
then press and hold the button.
Amber LED: Blinks when any button is pressed.
Continues to blink
during a vehicle
self check until the
engine starts. Go within the range,
and try again.
Green LED: Comes on while
the engine is running. Red LED: Blinks when the
remote is out of the keyless
access system range.
* Not available on all models
Page 337 of 505

336
uuWhen Driving uCruise Control
Driving
Cruise ControlMaintains a constant vehicle speed without having to keep your foot on the
accelerator. Use cruise control on freeways or open roads where you can travel at a
constant speed with little acceleration or deceleration.
1Cruise Control
It may not be possible to maintain a constant speed
when driving uphill or downhill.
When not using cruise control:
Turn off cruise control by pressing the CRUISE
button.
3
WARNING
Improper use of the cruise control can lead
to a crash.
Use the cruise control only when traveling
on open highways in good weather.
■Shift positions for cruise control:
In ( D or
(S
When to use
Always keep sufficient distance
between you and the vehicle in
front of you.
■Vehicle speed for cruise control:
Desired speed in a range above
roughly 25 mph (40 km/h) ~How to use
CRUISE MAIN is on in
the instrument panel.Cruise control is ready to
use.
■Press the
CRUISE
button on
the steering wheel.