ECO mode Acura MDX 2015 Manual Online
[x] Cancel search | Manufacturer: ACURA, Model Year: 2015, Model line: MDX, Model: Acura MDX 2015Pages: 505, PDF Size: 18.62 MB
Page 364 of 505
363
uuWhen Driving uVehicle Stability Assist (VSA ®), aka Electronic Stability Control (ESC), System
Driving
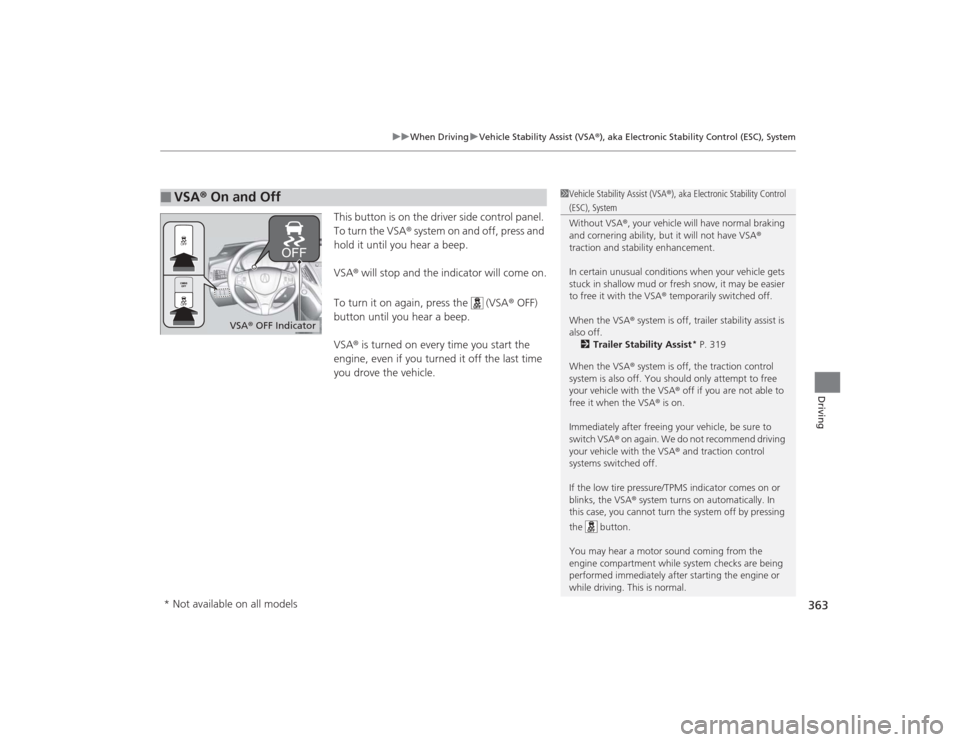
This button is on the driver side control panel.
To turn the VSA® system on and off, press and
hold it until you hear a beep.
VSA ® will stop and the indicator will come on.
To turn it on again, press the (VSA ® OFF)
button until you hear a beep.
VSA ® is turned on every time you start the
engine, even if you turned it off the last time
you drove the vehicle.
■
VSA ® On and Off
1 Vehicle Stability Assist (VSA ®), aka Electronic Stability Control (ESC), System
Without VSA ®, your vehicle will have normal braking
and cornering ability, but it will not have VSA ®
traction and stability enhancement.
In certain unusual conditions when your vehicle gets
stuck in shallow mud or fresh snow, it may be easier
to free it with the VSA ® temporarily switched off.
When the VSA ® system is off, trailer stability assist is
also off.
2 Trailer Stability Assist
* P. 319
When the VSA ® system is off, the traction control
system is also off. You should only attempt to free
your vehicle with the VSA ® off if you are not able to
free it when the VSA ® is on.
Immediately after freeing your vehicle, be sure to
switch VSA® on again. We do not recommend driving
your vehicle with the VSA ® and traction control
systems switched off.
If the low tire pressure/TPMS indicator comes on or
blinks, the VSA ® system turns on automatically. In
this case, you cannot turn the system off by pressing
the button.
You may hear a motor sound coming from the
engine compartment while system checks are being
performed immediatel y after starting the engine or
while driving. This is normal.
VSA ® OFF Indicator
* Not available on all models
Page 366 of 505

365
uuWhen Driving uBlind Spot Information (BSI) System
*
Continued
Driving
Blind Spot Information (BSI) System
*
Is designed to detect vehicles in specified alert zones adjacent to your vehicle,
particularly in harder to see areas common ly known as “blind spots.”
When the system detects vehicles approaching from behind in adjacent lanes, the
appropriate indicator comes on for a few seconds, providing assistance when you
change lanes.■How the system works
1 Blind Spot Information (BSI) System
*
Important Safety Reminder
Like all assistance systems, BSI has limitations. Over
reliance on BSI may result in a collision.
The system is for your convenience only. Even if an
object is within the alert zone, the following
situations may occur.•The BSI alert indi cator may not come on due to
obstruction (splashes, etc.) even without the Blind
Spot Not Available MID appearing.•The BSI alert indicator may come on even with the
message appearing.
The BSI alert indicator may not come on under the
following conditions:•A vehicle does not stay in the alert zone for more
than two seconds.•A vehicle is parked in a side lane.•The speed difference between your vehicle and the
vehicle you are passing is greater than 6 mph (10
km/h).•An object not detected by the radar sensors
approaches or passes your vehicle.
3
WARNING
Failure to visually confirm that it is safe to
change lanes before doing so may result in
a crash and serious injury or death.
Do not rely only on the blind spot
information system when changing lanes.
Always look in your mirrors, to either side
of your vehicle, and behind you for other
vehicles before changing lanes.
●The shift lever is in
( D.
●Your vehicle speed is
between 20 mph (32 km/h)
and 100 mph (160 km/h)
Alert zone range
A: Approx. 1.6 ft. (0.5 m)
B: Approx. 10 ft. (3 m)
C: Approx. 10 ft. (3 m) Radar Sensors:
underneath the
rear bumper
corners
Alert Zone
A
B
C
* Not available on all models
Page 368 of 505
367
uuWhen Driving uSuper Handling-All Wheel Drive
TM (SH-AWD ®)
*
Continued
Driving
Super Handling-All Wheel Drive
TM
(SH-AWD ®)
*
The system controls and transfers varying amounts of engine torque to each wheel
in accordance with the driving conditions.
SH-AWD ® helps to enhance driving stability, and le ts you handle situations like
slippery surfaces, such as snow, sand, mud, and steep hills, better than when driving
with two wheel drive. However, the system does not help to enhance braking. Be
precautious about the following:
• It is still your responsibility to drive safely when you steer, accelerate, and apply
brakes.
• Leave a sufficient margin when braking on slippery surfaces.Tire Pressure Monitoring System (TPMS)
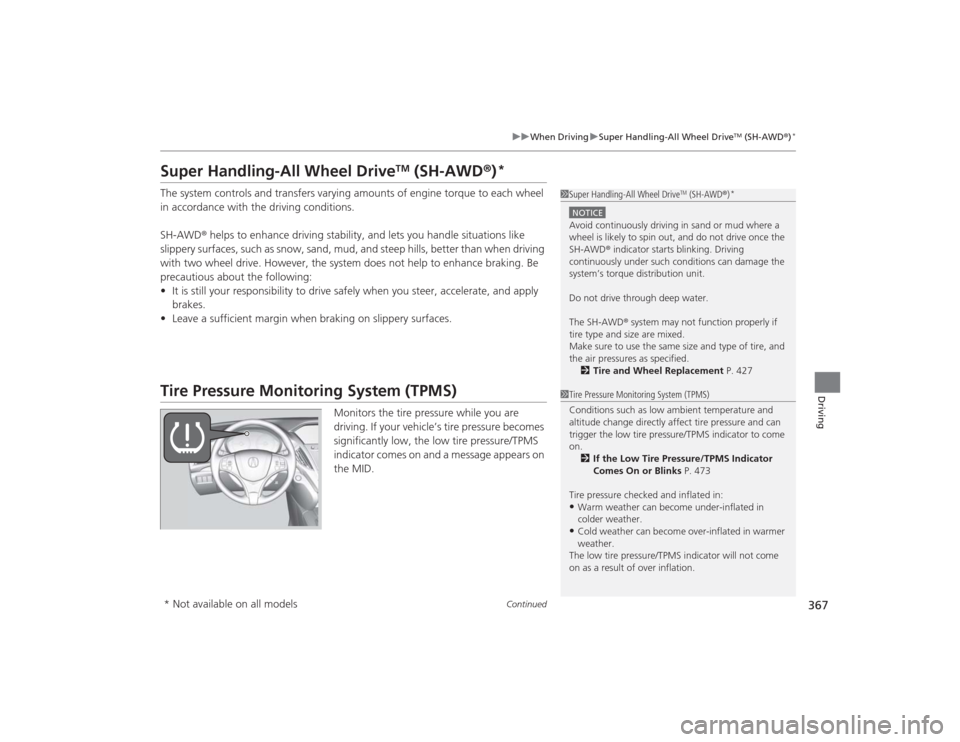
Monitors the tire pressure while you are
driving. If your vehicle’s tire pressure becomes
significantly low, the low tire pressure/TPMS
indicator comes on and a message appears on
the MID.
1Super Handling-All Wheel Drive
TM (SH-AWD ®)
*
NOTICEAvoid continuously driving in sand or mud where a
wheel is likely to spin out, and do not drive once the
SH-AWD ® indicator starts blinking. Driving
continuously under such conditions can damage the
system’s torque distribution unit.
Do not drive through deep water.
The SH-AWD ® system may not function properly if
tire type and size are mixed.
Make sure to use the same size and type of tire, and
the air pressures as specified. 2 Tire and Wheel Replacement P. 4271Tire Pressure Monitoring System (TPMS)
Conditions such as low ambient temperature and
altitude change di rectly affect tire pressure and can
trigger the low tire pr essure/TPMS indicator to come
on.
2 If the Low Tire Pressure/TPMS Indicator
Comes On or Blinks P. 473
Tire pressure checked and inflated in:•Warm weather can become under-inflated in
colder weather.•Cold weather can become over-inflated in warmer
weather.
The low tire pressure/TPMS indicator will not come
on as a result of over inflation.
* Not available on all models
Page 376 of 505

375
uuBraking uCollision Mitigation Braking System
TM (CMBS
TM)*
Continued
Driving
Collision Mitigation Braking System
TM
(CMBS
TM
)*
Can assist you when there is a possibility of your vehicle colliding with a vehicle
detected in front of yours. The CMBS
TM is designed to alert you when a potential
collision is determined, as well as to reduce your vehicle speed when a collision is
deemed unavoidable to help minimize collision severity.
■How the system works
1 Collision Mitigation Braking System
TM (CMBS
TM)*
Important Safety Reminder
The CMBS
TM is designed to reduce the severity of an
unavoidable collision. It does not prevent a collision
nor stop the vehicle automatically. It is still your
responsibility to operate the brake pedal and steering
wheel appropriately according to the driving
conditions.
The CMBSTM may not activate or may not detect a
vehicle in front of your vehicle under the following
conditions:
•The distance between your vehicle and the vehicle
ahead of you is too short.•A vehicle cuts in front of you at a slow speed, and
it brakes suddenly.•When you accelerate rapidly and approach the
vehicle ahead of you at high speed.•The vehicle ahead of you is a motorcycle or other
small vehicle.•A vehicle suddenly crosses in front of you.•When you drive on a curved or winding road that
makes it difficult for the sensor to properly detect a
vehicle in front of you.•When there are pedestrians or animals in front of
your vehicle.
A radar sensor starts to monitor if there is a vehicl e in front of you when your
vehicle speed is above about 10 mph (15 km/h).
The radar sensor is
in the front grille.
The CMBS
TM activates when the speed difference between your vehicle and a
vehicle detected in front of you becomes more than about 10 mph (15 km/h) with
a chance of a collision.
* Not available on all models
Page 380 of 505

Continued
379
uuBraking uCollision Mitigation Braking System
TM (CMBS
TM)*
Driving
Press this button for about one second to turn
on and off the system.
When the CMBS
TM is off:
• The beeper sounds.
• The CMBS
TM indicator in the instrument
panel comes on.
• A message on the MID reminds you that the
system is off.
The CMBS
TM is in the previously selected ON or
OFF setting each time you start the engine.
■
CMBS
TM On and Off
1 Collision Mitigation Braking System
TM (CMBS
TM)*
The CMBS
TM may automatically shut off, and the
CMBS
TM indicator will come and stay on when:
•You drive off-road or on a mountain road for an
extended period.•You drive with the parking brake applied.•You drive in bad weather (rain, fog, snow, etc.)•The radar sensor cover is blocked by dirt, mud, dry
leaves, wet snow, etc.•An abnormal tire condition is detected (wrong tire
size, flat tire, etc.)
Once the conditions that caused the CMBS
TM to shut
off improve, the system comes back on.
* Not available on all models
Page 385 of 505

384
uuParking Your Vehicle uParking Sensor System
*
Driving
■When the distance between your vehicle and obstacles behind becomes shorter
*1: At this stage, only the center sensors detect obstacles.
Length of the
intermittent beep
Distance between the Bumper and Obstacle
Indicator
Audio/information screen
Corner Sensors
Center Sensors
Moderate
—
Rear: About 43-24 in (110-60 cm)
Blinks in Yellow
*1
Short
About 24-18 in (60-45 cm)
About 24-18 in (60-45 cm)
Blinks in Amber
Very short
About 18-14 in
(45-35 cm)
About 18-14 in (45-35 cm)
Continuous
About 14 in
(35 cm) or less
About 14 in
(35 cm) or less
Blinks in Red
Indicators light where the
sensor detects an obstacle
Page 386 of 505

385
uuParking Your Vehicle uParking Sensor System
*
Driving
1. Make sure that the parking sensor system is not activated. Set the power mode to
VEHICLE OFF (LOCK).
2. Press and hold the parking sensor system button, and set the power mode to ON.
3. Keep pressing the button for 10 seconds. Release the button when the indicator
in the button flashes.
4. Press the button again. The indicator in the button goes off.
u The beeper sounds twice. The rear sensors are now turned off.
To turn the rear sensors on again, follow the above procedure. The beeper sounds
three times when the rear sensors come back on.■
Turning off All Rear Sensors
1 Turning off All Rear Sensors
When you shift to
(R, the indicator in the parking
sensor system button blinks as a reminder that the
rear sensors have been turned off.
Page 392 of 505
391
Maintenance
This chapter discusses basic maintenance.
Before Performing MaintenanceInspection and Maintenance ............ 392
Safety When Performing Maintenance ..393
Parts and Fluids Used in Maintenance Service ........................................... 394
Maintenance Minder
TM..................... 395
Maintenance Under the Hood Maintenance Items Under the Hood .. 399
Opening the Hood ........................... 400
Engine Compartment Cover ............. 401
Recommended Engine Oil ................ 402
Oil Check ......................................... 403
Adding Engine Oil ............................ 404 Changing the Engine Oil and Oil Filter... 405
Engine Coolant ................................ 407
Transmission Fluid ............................ 409
Brake Fluid ....................................... 410
Refilling Window Washer Fluid......... 410
Replacing Light Bulbs ....................... 411
Checking and Maintaining Wiper Blades
... 417
Checking and Maintaining Tires
Checking Tires ................................. 421
Tire and Loading Information Label .. 422
Tire Labeling .................................... 422DOT Tire Quality Grading (U.S. Vehicles).. 424Wear Indicators................................ 426 Tire Service Life ................................ 426
Tire and Wheel Replacement ........... 427
Tire Rotation .................................... 428
Winter Tires ..................................... 429
Battery ............................................... 430
Remote Transmitter Care
Replacing the Button Battery ........... 431
Remote Control and Wireless Headphone Care
*........................... 433
Climate Control System Maintenance
.. 435
Cleaning Interior Care .................................... 436
Exterior Care.................................... 438
* Not available on all models
Page 393 of 505
392Maintenance
Before Performing MaintenanceInspection and MaintenanceFor your safety, perform all listed inspections and maintenance to keep your vehicle
in good condition. If you become aware of any abnormality (noise, smell, insufficient
brake fluid, oil residue on the ground, etc.), have your vehicle inspected by a dealer.
(Note, however, that service at a dealer is not mandatory to keep your \
warranties in
effect.) Refer to the separate maintenance booklet for detailed maintenance and
inspection information.■Daily inspections
Perform inspections before long distance trips, when washing the vehicle, or when
refueling.■Periodic inspections
• Check the brake fluid level monthly.2 Checking the Brake Fluid P. 410
•Check the tire pressure monthly. Examine the tread for wear and foreign objects.
2 Checking and Maintaining Tires P. 421
•Check the operation of the exterior lights monthly.
2 Replacing Light Bulbs P. 411
•Check the condition of the wiper blades at least every six months.
2Checking and Maintaining Wiper Blades P. 417
■
Types of Inspection and Maintenance
1Inspection and Maintenance
Maintenance, replacement, or repair of
emissions control devices and systems may be
done by any automotive repair establishment or
individuals using parts that are “certified” to
EPA standards.
According to state and federal regulations, failure to
perform maintenance on the maintenance main
items marked with # will not void your emissions
warranties. However, all maintenance services should
be performed in accordance with the intervals
indicated by the multi-information display (MID).
2 Maintenance Service Items P. 397
If you want to perform complex maintenance tasks
that require mor e skills and tools, you can purchase a
subscription to the Service Express website at
www.techinfo.honda.com .
2 Authorized Manuals P. 493
If you want to perform maintenance yourself, make
sure that you have the necessa ry tools and skills first.
After performing maintenance, update the records in
the separate maintenance booklet.U.S. models
Page 398 of 505
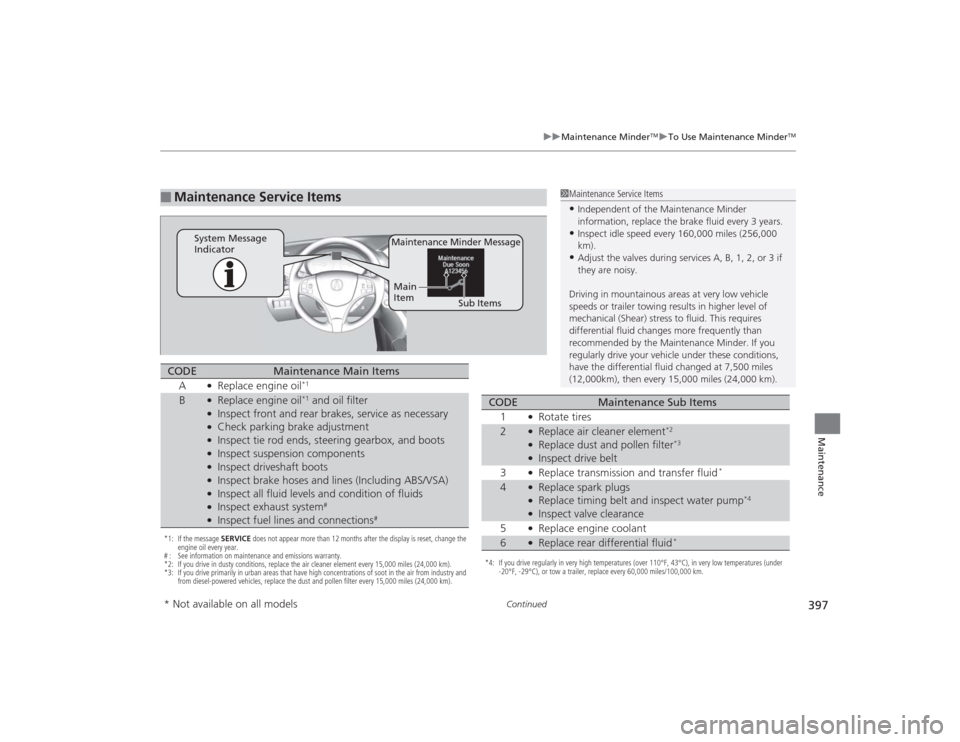
397
uuMaintenance Minder
TMuTo Use Maintenance Minder
TM
Continued
Maintenance
■
Maintenance Service Items
1Maintenance Service Items•Independent of the Maintenance Minder
information, replace the brake fluid every 3 years.•Inspect idle speed every 160,000 miles (256,000
km).•Adjust the valves during services A, B, 1, 2, or 3 if
they are noisy.
Driving in mountainous areas at very low vehicle
speeds or trailer towing results in higher level of
mechanical (Shear) stress to fluid. This requires
differential fluid changes more frequently than
recommended by the Maintenance Minder. If you
regularly drive your vehicle under these conditions,
have the differential fluid changed at 7,500 miles
(12,000km), then every 15,000 miles (24,000 km).
Maintenance Minder Message
System Message
Indicator
Sub Items
Main
Item
*1: If the message
SERVICE does not appear more than 12 months after the display is reset, change the
engine oil every year.
# : See information on maintenance and emissions warranty.
*2: If you drive in dusty conditions, replace the air cleaner element every 15,000 miles (24,000 km).
*3: If you drive primarily in urban areas that have high concentrations of soot in the air from industry and from diesel-powered vehicles, replace the dust and pollen filter every 15,000 miles (24,000 km).CODE
Maintenance Main Items
A
●Replace engine oil
*1
B
●Replace engine oil
*1 and oil filter
●Inspect front and rear brakes, service as necessary●Check parking brake adjustment●Inspect tie rod ends, steering gearbox, and boots●Inspect suspension components●Inspect driveshaft boots●Inspect brake hoses and lines (Including ABS/VSA)●Inspect all fluid levels and condition of fluids●Inspect exhaust system
#
●Inspect fuel lines and connections
#
*4: If you drive regularly in very high temperatures (over 110°F, 43°C), in very low temperatures (under -20°F, -29°C), or tow a trailer, replace every 60,000 miles/100,000 km.CODE
Maintenance Sub Items
1
●Rotate tires
2
●Replace air cleaner element
*2
●Replace dust and pollen filter
*3
●Inspect drive belt
3●Replace transmission and transfer fluid
*
4
●Replace spark plugs●Replace timing belt and inspect water pump
*4
●Inspect valve clearance
5●Replace engine coolant
6
●Replace rear differential fluid
*
* Not available on all models