navigation Acura MDX 2016 Workshop Manual
[x] Cancel search | Manufacturer: ACURA, Model Year: 2016, Model line: MDX, Model: Acura MDX 2016Pages: 84, PDF Size: 14.98 MB
Page 51 of 84
94 || 95 DRIVING DRIVING
TABLE OF
CONTENTS
INDEX
VISUAL INDEX
VOICE COMMAND
INDEX
SAFETY
INFORMATION
CLIENT
INFORMATION
INSTRUMENT
PANEL
SPECIFICATIONS
VEHICLE
CONTROLS
MAINTENANCE
AUDIO AND
CONNECTIVITY
HANDLING THE
UNEXPECTED
BLUETOOTH®
HANDSFREELINK®
DRIVING
ACURALINK®
NAVIGATION
When you change from D to R and vice versa, press the brake pedal and come
to a complete stop, then select the intended gear position while maintaining
brake pressure.
NOTICE
Shifting
Change your vehicle’s gears to begin driving.
Electronic Gear Selector
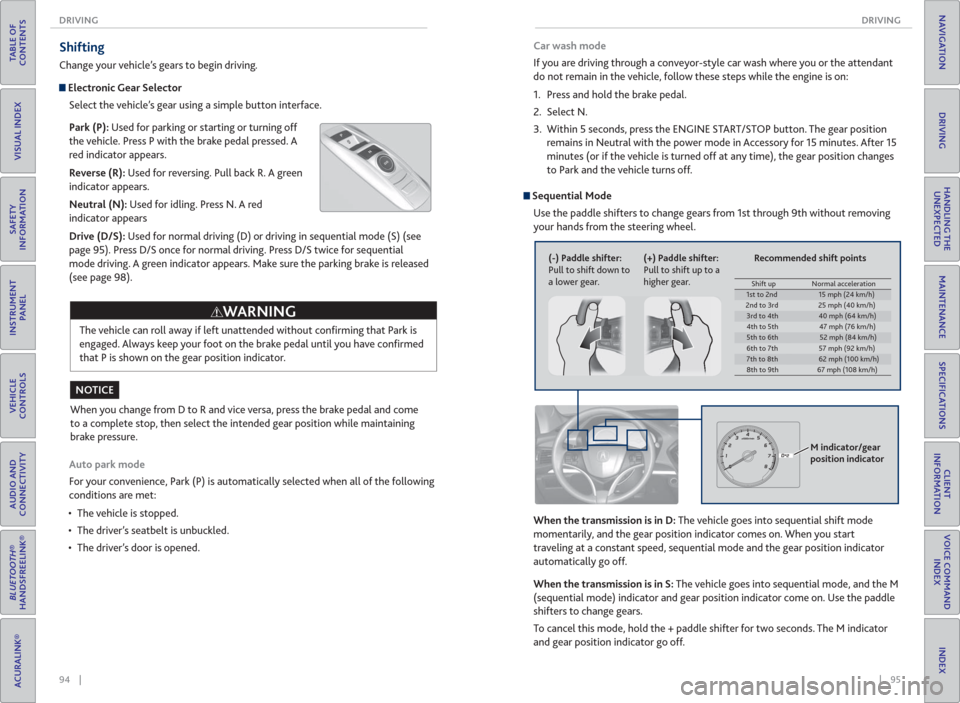
Select the vehicle’s gear using a simple button interface.
Park (P): Used for parking or starting or turning off
the vehicle. Press P with the brake pedal pressed. A
red indicator appears.
Reverse (R): Used for reversing. Pull back R. A green
indicator appears.
Neutral (N): Used for idling. Press N. A red
indicator appears
Drive (D/S): Used for normal driving (D) or driving in sequential mode (S) (see
page 95). Press D/S once for normal driving. Press D/S twice for sequential
mode driving. A green indicator appears. Make sure the parking brake is released
(see page 98).
Auto park mode
For your convenience, Park (P) is automatically selected when all of the following
conditions are met:
• The vehicle is stopped.
• The driver’s seatbelt is unbuckled.
• The driver’s door is opened.The vehicle can roll away if left unattended without confi rming that Park is
engaged. Always keep your foot on the brake pedal until you have confi rmed
that P is shown on the gear position indicator.
WARNING
Sequential Mode
Use the paddle shifters to change gears from 1st through 9th without removing
your hands from the steering wheel.
When the transmission is in D: The vehicle goes into sequential shift mode
momentarily, and the gear position indicator comes on. When you start
traveling at a constant speed, sequential mode and the gear position indicator
automatically go off.
When the transmission is in S: The vehicle goes into sequential mode, and the M
(sequential mode) indicator and gear position indicator come on. Use the paddle
shifters to change gears.
To cancel this mode, hold the + paddle shifter for two seconds. The M indicator
and gear position indicator go off.
(-) Paddle shifter:
Pull to shift down to
a lower gear.(+) Paddle shifter:
Pull to shift up to a
higher gear.
M indicator/gear
position indicator
Car wash mode
If you are driving through a conveyor-style car wash where you or the attendant
do not remain in the vehicle, follow these steps while the engine is on:
1. Press and hold the brake pedal.
2. Select N.
3. Within 5 seconds, press the ENGINE START/STOP button. The gear position
remains in Neutral with the power mode in Accessory for 15 minutes. After 15
minutes (or if the vehicle is turned off at any time), the gear position changes
to Park and the vehicle turns off.
Shift up Normal acceleration1st to 2nd15 mph (24 km/h)
2nd to 3rd 25 mph (40 km/h)
3rd to 4th40 mph (64 km/h)
4th to 5th 47 mph (76 km/h)
5th to 6th52 mph (84 km/h)
6th to 7th 57 mph (92 km/h)
7th to 8th62 mph (100 km/h)
8th to 9th 67 mph (108 km/h)
Recommended shift points
Page 52 of 84
96 || 97 DRIVING DRIVING
TABLE OF
CONTENTS
INDEX
VISUAL INDEX
VOICE COMMAND
INDEX
SAFETY
INFORMATION
CLIENT
INFORMATION
INSTRUMENT
PANEL
SPECIFICATIONS
VEHICLE
CONTROLS
MAINTENANCE
AUDIO AND
CONNECTIVITY
HANDLING THE
UNEXPECTED
BLUETOOTH®
HANDSFREELINK®
DRIVING
ACURALINK®
NAVIGATION
Auto Idle Stop*
Automatically stops and restarts the engine to help maximize fuel economy,
depending on environmental and vehicle conditions.
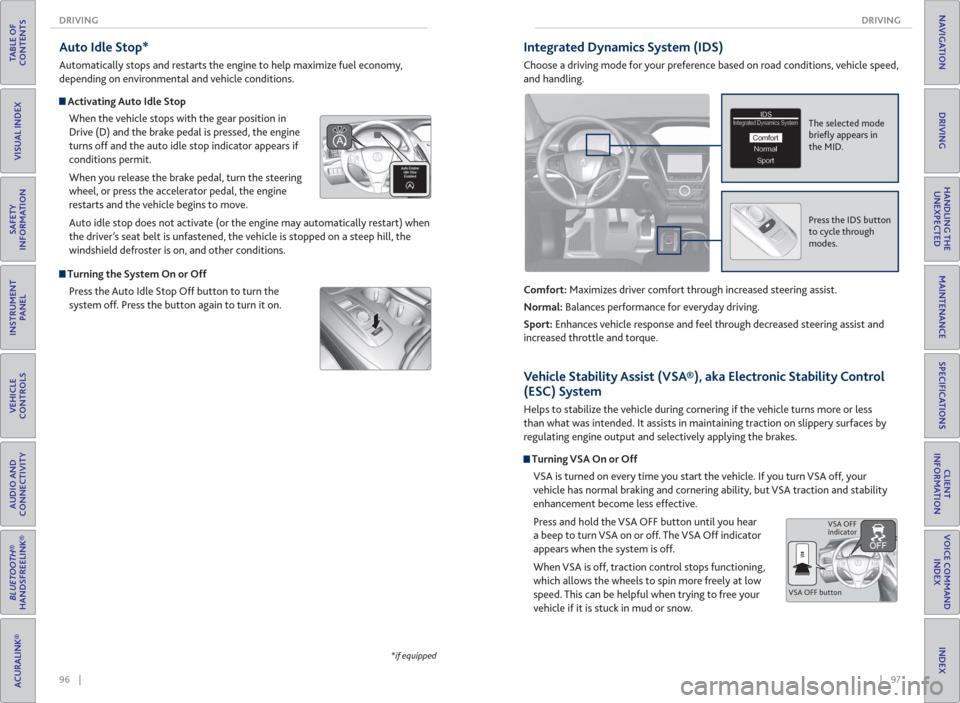
Activating Auto Idle Stop
When the vehicle stops with the gear position in
Drive (D) and the brake pedal is pressed, the engine
turns off and the auto idle stop indicator appears if
conditions permit.
When you release the brake pedal, turn the steering
wheel, or press the accelerator pedal, the engine
restarts and the vehicle begins to move.
Auto idle stop does not activate (or the engine may automatically restart) when
the driver’s seat belt is unfastened, the vehicle is stopped on a steep hill, the
windshield defroster is on, and other conditions.
Turning the System On or Off
Press the Auto Idle Stop Off button to turn the
system off. Press the button again to turn it on.
*if equipped
Integrated Dynamics System ( IDS)
Choose a driving mode for your preference based on road conditions, vehicle speed,
and handling.
Comfort: Maximizes driver comfort through increased steering assist.
Normal: Balances performance for everyday driving.
Sport: Enhances vehicle response and feel through decreased steering assist and
increased throttle and torque.
The selected mode
briefl y appears in
the MID.IDSIDSIntegrated Dynamics SystemIntegrated Dynamics System
NormalNormalSportSport
Comfort
Press the IDS button
to cycle through
modes.
Vehicle Stability Assist ( VSA®), aka Electronic Stability Control
( ESC) System
Helps to stabilize the vehicle during cornering if the vehicle turns more or less
than what was intended. It assists in maintaining traction on slippery surfaces by
regulating engine output and selectively applying the brakes.
Turning VSA On or Off
VSA is turned on every time you start the vehicle. If you turn VSA off, your
vehicle has normal braking and cornering ability, but VSA traction and stability
enhancement become less effective.
Press and hold the VSA OFF button until you hear
a beep to turn VSA on or off. The VSA Off indicator
appears when the system is off.
When VSA is off, traction control stops functioning,
which allows the wheels to spin more freely at low
speed. This can be helpful when trying to free your
vehicle if it is stuck in mud or snow.
VSA OFF buttonVSA OFF
indicator
Page 53 of 84
98 || 99 DRIVING DRIVING
TABLE OF
CONTENTS
INDEX
VISUAL INDEX
VOICE COMMAND
INDEX
SAFETY
INFORMATION
CLIENT
INFORMATION
INSTRUMENT
PANEL
SPECIFICATIONS
VEHICLE
CONTROLS
MAINTENANCE
AUDIO AND
CONNECTIVITY
HANDLING THE
UNEXPECTED
BLUETOOTH®
HANDSFREELINK®
DRIVING
ACURALINK®
NAVIGATION
Braking
Slow down or stop your vehicle, and keep it from moving when parked.
Foot Brake
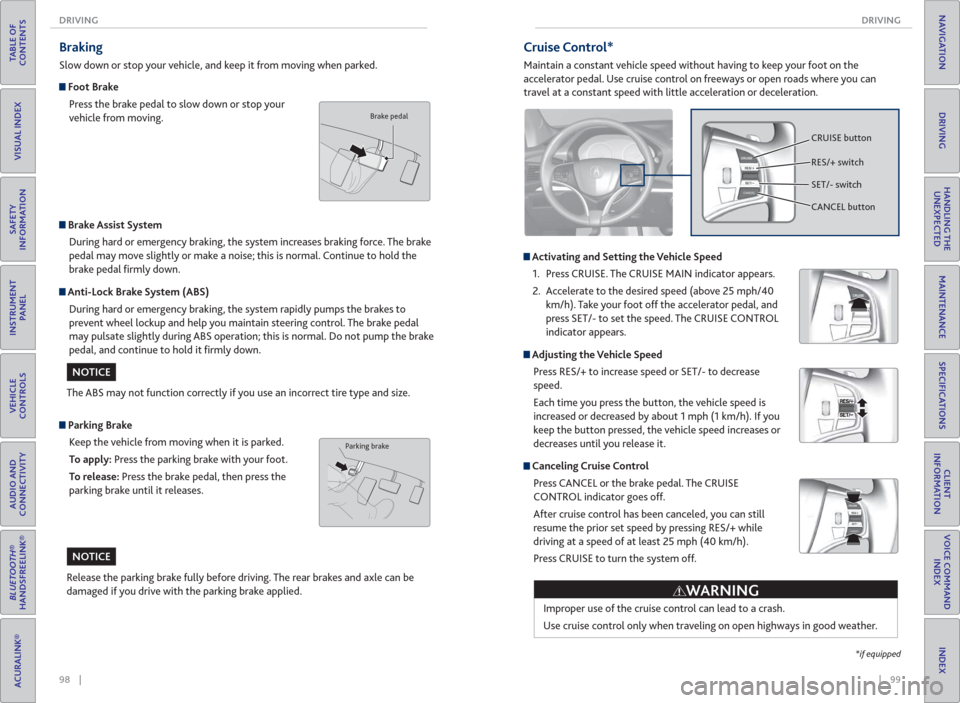
Press the brake pedal to slow down or stop your
vehicle from moving.
Parking Brake
Keep the vehicle from moving when it is parked.
To apply: Press the parking brake with your foot.
To release: Press the brake pedal, then press the
parking brake until it releases.
Brake Assist System
During hard or emergency braking, the system increases braking force. The brake
pedal may move slightly or make a noise; this is normal. Continue to hold the
brake pedal fi rmly down.
Anti-Lock Brake System ( ABS)
During hard or emergency braking, the system rapidly pumps the brakes to
prevent wheel lockup and help you maintain steering control. The brake pedal
may pulsate slightly during ABS operation; this is normal. Do not pump the brake
pedal, and continue to hold it fi rmly down.
The ABS may not function correctly if you use an incorrect tire type and size.
Release the parking brake fully before driving. The rear brakes and axle can be
damaged if you drive with the parking brake applied.
Brake pedal
Parking brake
NOTICE
NOTICE
Cruise Control*
Maintain a constant vehicle speed without having to keep your foot on the
accelerator pedal. Use cruise control on freeways or open roads where you can
travel at a constant speed with little acceleration or deceleration.
Activating and Setting the Vehicle Speed
1. Press CRUISE. The CRUISE MAIN indicator appears.
2. Accelerate to the desired speed (above 25 mph/40
km/h). Take your foot off the accelerator pedal, and
press SET/- to set the speed. The CRUISE CONTROL
indicator appears.
Adjusting the Vehicle Speed
Press RES/+ to increase speed or SET/- to decrease
speed.
Each time you press the button, the vehicle speed is
increased or decreased by about 1 mph (1 km/h). If you
keep the button pressed, the vehicle speed increases or
decreases until you release it.
Canceling Cruise Control
Press CANCEL or the brake pedal. The CRUISE
CONTROL indicator goes off.
After cruise control has been canceled, you can still
resume the prior set speed by pressing RES/+ while
driving at a speed of at least 25 mph (40 km/h).
Press CRUISE to turn the system off.
CRUISE button
RES/+ switch
SET/- switch
CANCEL button
Improper use of the cruise control can lead to a crash.
Use cruise control only when traveling on open highways in good weather.
WARNING
*if equipped
Page 54 of 84
100 || 101 DRIVING DRIVING
TABLE OF
CONTENTS
INDEX
VISUAL INDEX
VOICE COMMAND
INDEX
SAFETY
INFORMATION
CLIENT
INFORMATION
INSTRUMENT
PANEL
SPECIFICATIONS
VEHICLE
CONTROLS
MAINTENANCE
AUDIO AND
CONNECTIVITY
HANDLING THE
UNEXPECTED
BLUETOOTH®
HANDSFREELINK®
DRIVING
ACURALINK®
NAVIGATION
Adaptive Cruise Control ( ACC) with Low Speed Follow*
Helps maintain a constant vehicle speed and a set following interval behind a
vehicle detected ahead of yours.
CANCEL
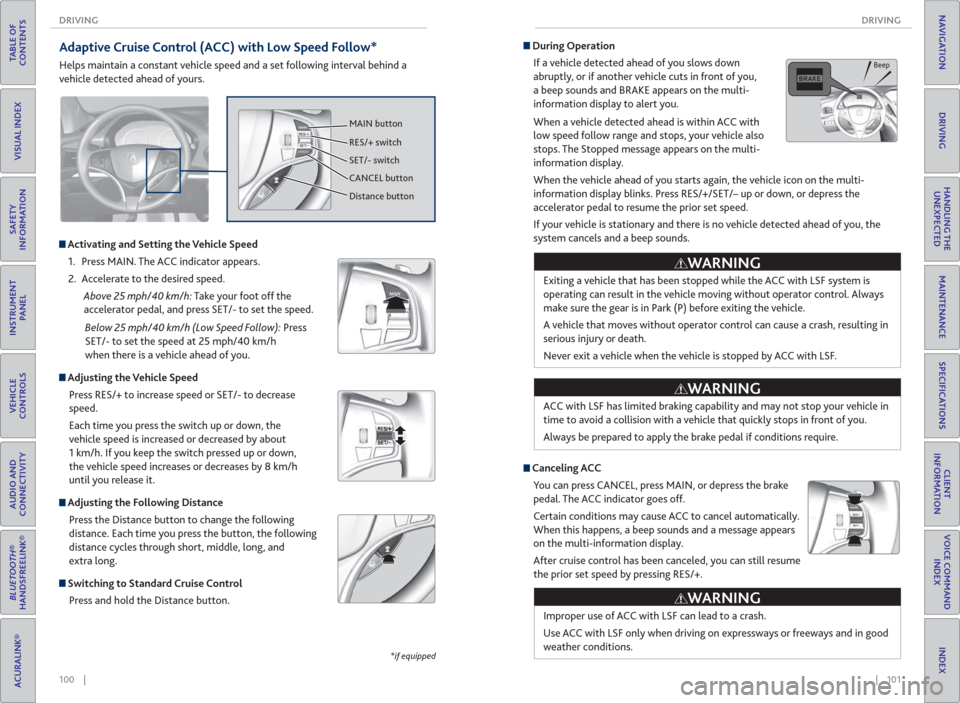
MAIN button
RES/+ switch
SET/- switch
CANCEL button
Distance button
Activating and Setting the Vehicle Speed
1. Press MAIN. The ACC indicator appears.
2. Accelerate to the desired speed.
Above 25 mph/40 km/h: Take your foot off the
accelerator pedal, and press SET/- to set the speed.
Below 25 mph/40 km/h (Low Speed Follow): Press
SET/- to set the speed at 25 mph/40 km/h
when there is a vehicle ahead of you.
Adjusting the Vehicle Speed
Press RES/+ to increase speed or SET/- to decrease
speed.
Each time you press the switch up or down, the
vehicle speed is increased or decreased by about
1 km/h. If you keep the switch pressed up or down,
the vehicle speed increases or decreases by 8 km/h
until you release it.
Adjusting the Following Distance
Press the Distance button to change the following
distance. Each time you press the button, the following
distance cycles through short, middle, long, and
extra long.
Switching to Standard Cruise Control
Press and hold the Distance button.
*if equipped
Exiting a vehicle that has been stopped while the ACC with LSF system is
operating can result in the vehicle moving without operator control. Always
make sure the gear is in Park (P) before exiting the vehicle.
A vehicle that moves without operator control can cause a crash, resulting in
serious injury or death.
Never exit a vehicle when the vehicle is stopped by ACC with LSF.
ACC with LSF has limited braking capability and may not stop your vehicle in
time to avoid a collision with a vehicle that quickly stops in front of you.
Always be prepared to apply the brake pedal if conditions require.
During Operation
If a vehicle detected ahead of you slows down
abruptly, or if another vehicle cuts in front of you,
a beep sounds and BRAKE appears on the multi-
information display to alert you.
When a vehicle detected ahead is within ACC with
low speed follow range and stops, your vehicle also
stops. The Stopped message appears on the multi-
information display.
When the vehicle ahead of you starts again, the vehicle icon on the multi-
information display blinks. Press RES/+/SET/– up or down, or depress the
accelerator pedal to resume the prior set speed.
If your vehicle is stationary and there is no vehicle detected ahead of you, the
system cancels and a beep sounds.
Canceling ACC
You can press CANCEL, press MAIN, or depress the brake
pedal. The ACC indicator goes off.
Certain conditions may cause ACC to cancel automatically.
When this happens, a beep sounds and a message appears
on the multi-information display.
After cruise control has been canceled, you can still resume
the prior set speed by pressing RES/+.
WARNING
WARNING
Improper use of ACC with LSF can lead to a crash.
Use ACC with LSF only when driving on expressways or freeways and in good
weather conditions.
WARNING
Beep
Page 55 of 84
102 || 103 DRIVING DRIVING
TABLE OF
CONTENTS
INDEX
VISUAL INDEX
VOICE COMMAND
INDEX
SAFETY
INFORMATION
CLIENT
INFORMATION
INSTRUMENT
PANEL
SPECIFICATIONS
VEHICLE
CONTROLS
MAINTENANCE
AUDIO AND
CONNECTIVITY
HANDLING THE
UNEXPECTED
BLUETOOTH®
HANDSFREELINK®
DRIVING
ACURALINK®
NAVIGATION
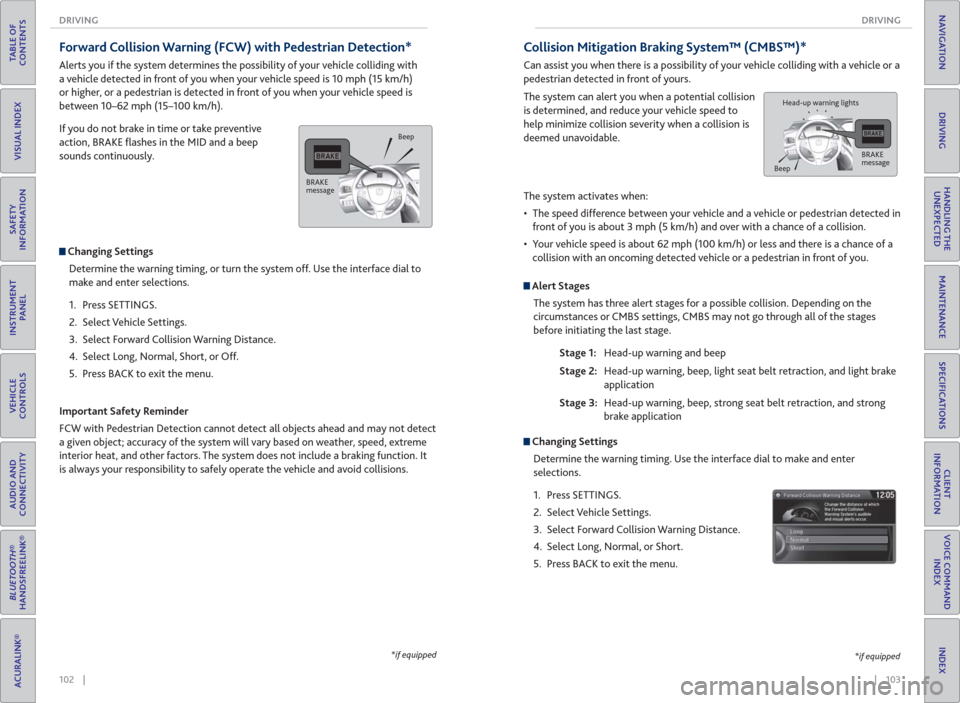
Forward Collision Warning ( FCW) with Pedestrian Detection*
Alerts you if the system determines the possibility of your vehicle colliding with
a vehicle detected in front of you when your vehicle speed is 10 mph (15 km/h)
or higher, or a pedestrian is detected in front of you when your vehicle speed is
between 10–62 mph (15–100 km/h).
If you do not brake in time or take preventive
action, BRAKE fl ashes in the MID and a beep
sounds continuously.
Changing Settings
Determine the warning timing, or turn the system off. Use the interface dial to
make and enter selections.
1. Press SETTINGS.
2. Select Vehicle Settings.
3. Select Forward Collision Warning Distance.
4. Select Long, Normal, Short, or Off.
5. Press BACK to exit the menu.
Important Safety Reminder
FCW with Pedestrian Detection cannot detect all objects ahead and may not detect
a given object; accuracy of the system will vary based on weather, speed, extreme
interior heat, and other factors. The system does not include a braking function. It
is always your responsibility to safely operate the vehicle and avoid collisions.
*if equipped
BRAKE
messageBeep
Collision Mitigation Braking System™ ( CMBS™)*
Can assist you when there is a possibility of your vehicle colliding with a vehicle or a
pedestrian detected in front of yours.
The system can alert you when a potential collision
is determined, and reduce your vehicle speed to
help minimize collision severity when a collision is
deemed unavoidable.
The system activates when:
• The speed difference between your vehicle and a vehicle or pedestrian detected in
front of you is about 3 mph (5 km/h) and over with a chance of a collision.
• Your vehicle speed is about 62 mph (100 km/h) or less and there is a chance of a
collision with an oncoming detected vehicle or a pedestrian in front of you.
Alert Stages
The system has three alert stages for a possible collision. Depending on the
circumstances or CMBS settings, CMBS may not go through all of the stages
before initiating the last stage.
Stage 1: Head-up warning and beep
Stage 2: Head-up warning, beep, light seat belt retraction, and light brake
application
Stage 3: Head-up warning, beep, strong seat belt retraction, and strong
brake application
*if equipped
BRAKE
message
BeepHead-up warning lights
Changing Settings
Determine the warning timing. Use the interface dial to make and enter
selections.
1. Press SETTINGS.
2. Select Vehicle Settings.
3. Select Forward Collision Warning Distance.
4. Select Long, Normal, or Short.
5. Press BACK to exit the menu.
Page 56 of 84
104 || 105 DRIVING DRIVING
TABLE OF
CONTENTS
INDEX
VISUAL INDEX
VOICE COMMAND
INDEX
SAFETY
INFORMATION
CLIENT
INFORMATION
INSTRUMENT
PANEL
SPECIFICATIONS
VEHICLE
CONTROLS
MAINTENANCE
AUDIO AND
CONNECTIVITY
HANDLING THE
UNEXPECTED
BLUETOOTH®
HANDSFREELINK®
DRIVING
ACURALINK®
NAVIGATION
Turning CMBS On or Off
Press and hold CMBS OFF. A beep sounds and a
message appears in the MID. The CMBS indicator
appears when the system is off.
Important Safety Reminder
CMBS is designed to reduce the severity of an unavoidable collision. It does not
prevent collisions nor stop the vehicle automatically. It is still your responsibility to
operate the brake pedal and steering wheel appropriately according to the driving
conditions.
*if equipped
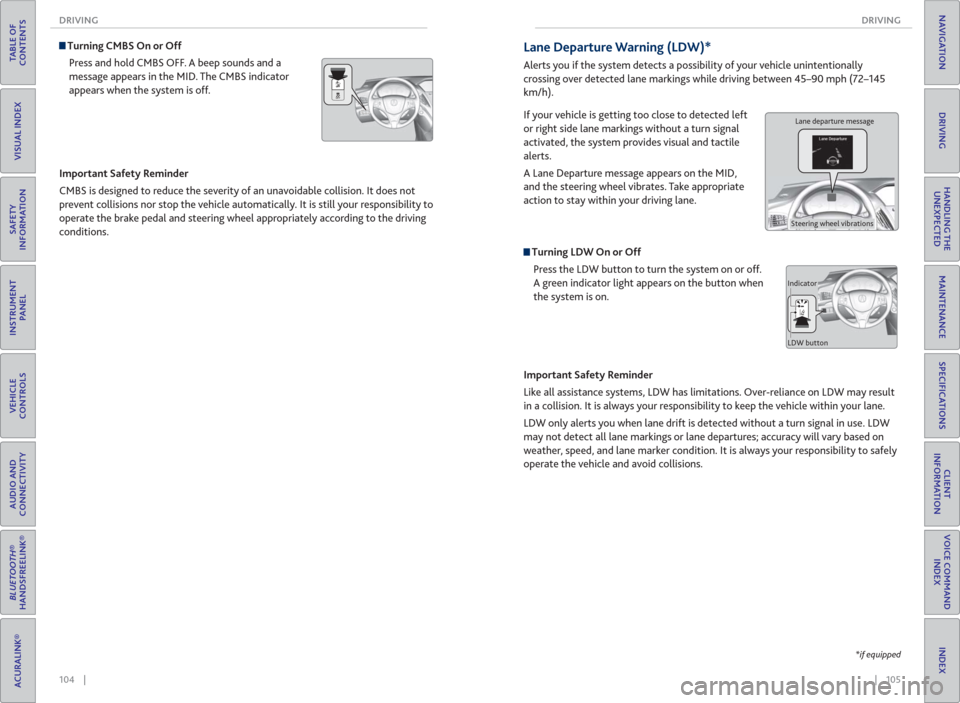
Lane Departure Warning ( LDW)*
Alerts you if the system detects a possibility of your vehicle unintentionally
crossing over detected lane markings while driving between 45–90 mph (72–145
km/h).
If your vehicle is getting too close to detected left
or right side lane markings without a turn signal
activated, the system provides visual and tactile
alerts.
A Lane Departure message appears on the MID,
and the steering wheel vibrates. Take appropriate
action to stay within your driving lane.
Turning LDW On or Off
Press the LDW button to turn the system on or off.
A green indicator light appears on the button when
the system is on.
Important Safety Reminder
Like all assistance systems, LDW has limitations. Over-reliance on LDW may result
in a collision. It is always your responsibility to keep the vehicle within your lane.
LDW only alerts you when lane drift is detected without a turn signal in use. LDW
may not detect all lane markings or lane departures; accuracy will vary based on
weather, speed, and lane marker condition. It is always your responsibility to safely
operate the vehicle and avoid collisions.
Lane departure message
Steering wheel vibrations
Indicator
LDW button
Page 57 of 84
106 || 107 DRIVING DRIVING
TABLE OF
CONTENTS
INDEX
VISUAL INDEX
VOICE COMMAND
INDEX
SAFETY
INFORMATION
CLIENT
INFORMATION
INSTRUMENT
PANEL
SPECIFICATIONS
VEHICLE
CONTROLS
MAINTENANCE
AUDIO AND
CONNECTIVITY
HANDLING THE
UNEXPECTED
BLUETOOTH®
HANDSFREELINK®
DRIVING
ACURALINK®
NAVIGATION
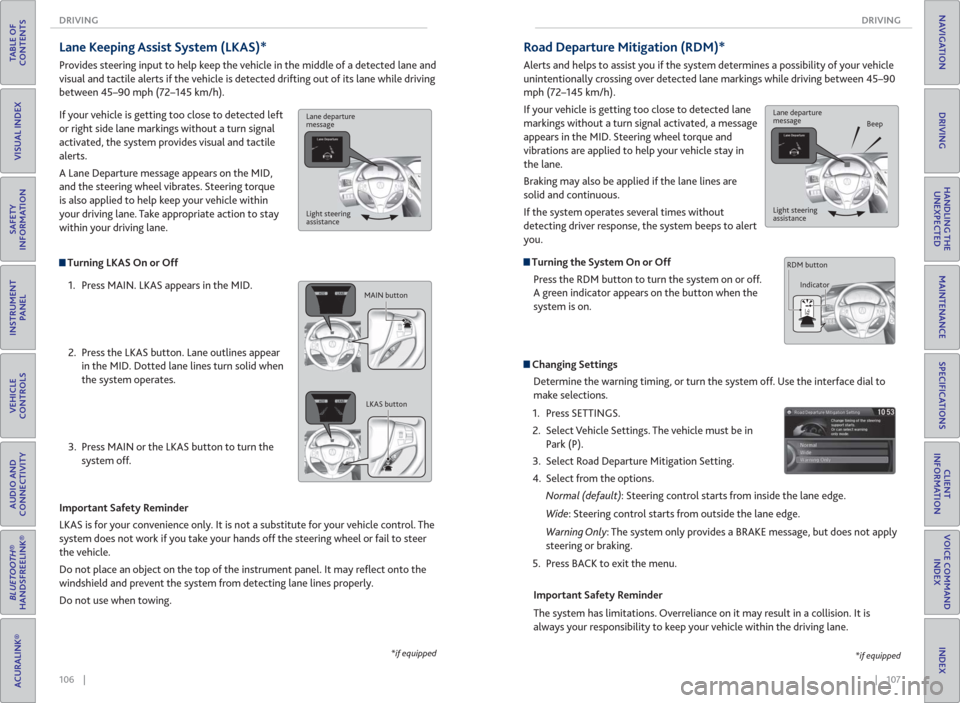
Turning LKAS On or Off
1. Press MAIN. LKAS appears in the MID.
2. Press the LKAS button. Lane outlines appear
in the MID. Dotted lane lines turn solid when
the system operates.
3. Press MAIN or the LKAS button to turn the
system off.
Lane Keeping Assist System ( LKAS)*
Provides steering input to help keep the vehicle in the middle of a detected lane and
visual and tactile alerts if the vehicle is detected drifting out of its lane while driving
between 45–90 mph (72–145 km/h).
If your vehicle is getting too close to detected left
or right side lane markings without a turn signal
activated, the system provides visual and tactile
alerts.
A Lane Departure message appears on the MID,
and the steering wheel vibrates. Steering torque
is also applied to help keep your vehicle within
your driving lane. Take appropriate action to stay
within your driving lane.
Important Safety Reminder
LKAS is for your convenience only. It is not a substitute for your vehicle control. The
system does not work if you take your hands off the steering wheel or fail to steer
the vehicle.
Do not place an object on the top of the instrument panel. It may refl ect onto the
windshield and prevent the system from detecting lane lines properly.
Do not use when towing.
*if equipped
Lane departure
message
Light steering
assistance
MAIN button
LKAS button
Road Departure Mitigation (RDM)*
Alerts and helps to assist you if the system determines a possibility of your vehicle
unintentionally crossing over detected lane markings while driving between 45–90
mph (72–145 km/h).
If your vehicle is getting too close to detected lane
markings without a turn signal activated, a message
appears in the MID. Steering wheel torque and
vibrations are applied to help your vehicle stay in
the lane.
Braking may also be applied if the lane lines are
solid and continuous.
If the system operates several times without
detecting driver response, the system beeps to alert
you.
Turning the System On or Off
Press the RDM button to turn the system on or off.
A green indicator appears on the button when the
system is on.
Steering vibrations
Changing Settings
Determine the warning timing, or turn the system off. Use the interface dial to
make selections.
1. Press SETTINGS.
2. Select Vehicle Settings. The vehicle must be in
Park (P).
3. Select Road Departure Mitigation Setting.
4. Select from the options.
Normal (default): Steering control starts from inside the lane edge.
Wide: Steering control starts from outside the lane edge.
Warning Only: The system only provides a BRAKE message, but does not apply
steering or braking.
5. Press BACK to exit the menu.
Important Safety Reminder
The system has limitations. Overreliance on it may result in a collision. It is
always your responsibility to keep your vehicle within the driving lane.
*if equipped
Lane departure
message
Beep
Light steering
assistance
Indicator RDM button
Page 58 of 84
108 || 109 DRIVING DRIVING
TABLE OF
CONTENTS
INDEX
VISUAL INDEX
VOICE COMMAND
INDEX
SAFETY
INFORMATION
CLIENT
INFORMATION
INSTRUMENT
PANEL
SPECIFICATIONS
VEHICLE
CONTROLS
MAINTENANCE
AUDIO AND
CONNECTIVITY
HANDLING THE
UNEXPECTED
BLUETOOTH®
HANDSFREELINK®
DRIVING
ACURALINK®
NAVIGATION
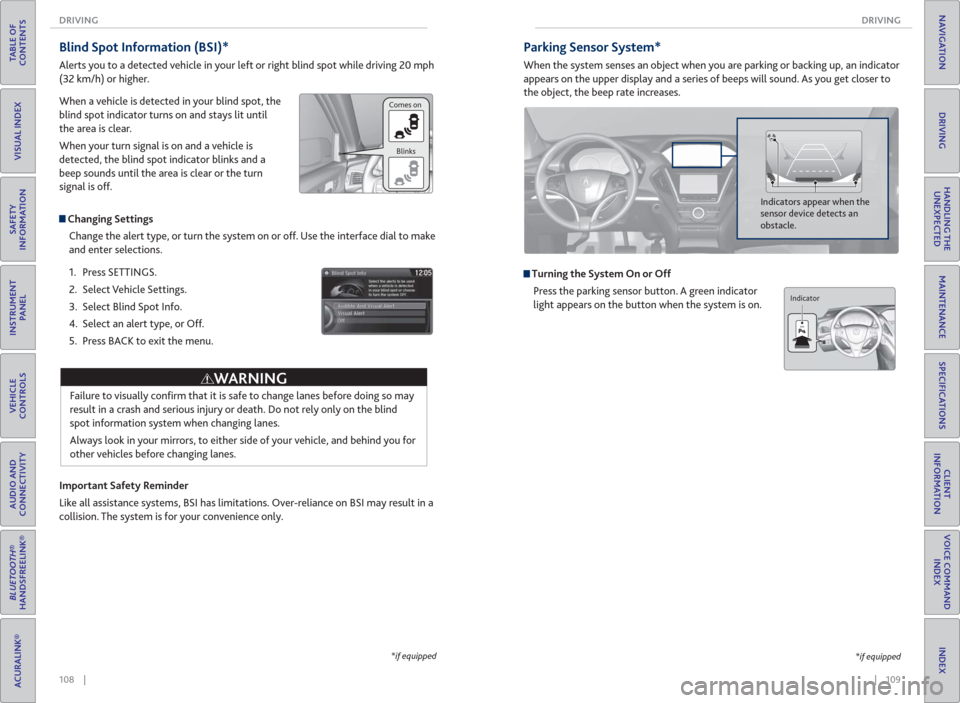
Blind Spot Information ( BSI)*
Alerts you to a detected vehicle in your left or right blind spot while driving 20 mph
(32 km/h) or higher.
When a vehicle is detected in your blind spot, the
blind spot indicator turns on and stays lit until
the area is clear.
When your turn signal is on and a vehicle is
detected, the blind spot indicator blinks and a
beep sounds until the area is clear or the turn
signal is off.
Changing Settings
Change the alert type, or turn the system on or off. Use the interface dial to make
and enter selections.
1. Press SETTINGS.
2. Select Vehicle Settings.
3. Select Blind Spot Info.
4. Select an alert type, or Off.
5. Press BACK to exit the menu.
Important Safety Reminder
Like all assistance systems, BSI has limitations. Over-reliance on BSI may result in a
collision. The system is for your convenience only.
Failure to visually confi rm that it is safe to change lanes before doing so may
result in a crash and serious injury or death. Do not rely only on the blind
spot information system when changing lanes.
Always look in your mirrors, to either side of your vehicle, and behind you for
other vehicles before changing lanes.
WARNING
*if equipped
Comes on
Blinks
Parking Sensor System*
When the system senses an object when you are parking or backing up, an indicator
appears on the upper display and a series of beeps will sound. As you get closer to
the object, the beep rate increases.
Turning the System On or Off
Press the parking sensor button. A green indicator
light appears on the button when the system is on.
Indicators appear when the
sensor device detects an
obstacle.
*if equipped
Indicator
Page 59 of 84
110 || 111 DRIVING DRIVING
TABLE OF
CONTENTS
INDEX
VISUAL INDEX
VOICE COMMAND
INDEX
SAFETY
INFORMATION
CLIENT
INFORMATION
INSTRUMENT
PANEL
SPECIFICATIONS
VEHICLE
CONTROLS
MAINTENANCE
AUDIO AND
CONNECTIVITY
HANDLING THE
UNEXPECTED
BLUETOOTH®
HANDSFREELINK®
DRIVING
ACURALINK®
NAVIGATION
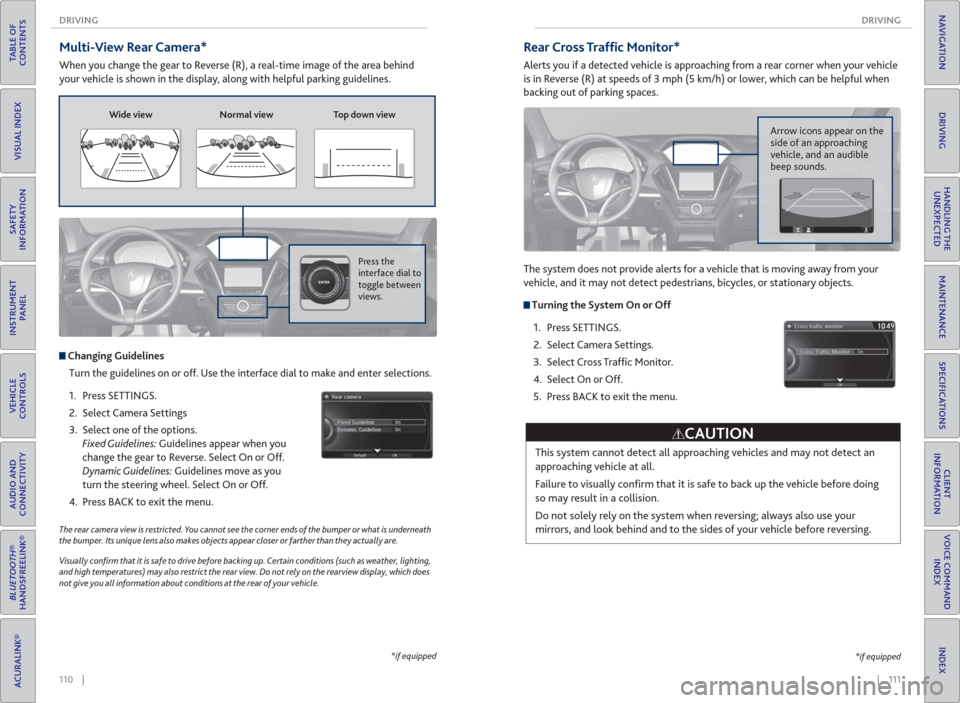
Multi-View Rear Camera*
When you change the gear to Reverse (R), a real-time image of the area behind
your vehicle is shown in the display, along with helpful parking guidelines.
The rear camera view is restricted. You cannot see the corner ends of the bumper or what is underneath
the bumper. Its unique lens also makes objects appear closer or farther than they actually are.
Visually con� rm that it is safe to drive before backing up. Certain conditions (such as weather, lighting,
and high temperatures) may also restrict the rear view. Do not rely on the rearview display, which does
not give you all information about conditions at the rear of your vehicle.
Wide view Normal view Top down view
Press the
interface dial to
toggle between
views.
Changing Guidelines
Turn the guidelines on or off. Use the interface dial to make and enter selections.
1. Press SETTINGS.
2. Select Camera Settings
3. Select one of the options.
Fixed Guidelines: Guidelines appear when you
change the gear to Reverse. Select On or Off.
Dynamic Guidelines: Guidelines move as you
turn the steering wheel. Select On or Off.
4. Press BACK to exit the menu.
*if equipped
Rear Cross Traf� c Monitor*
Alerts you if a detected vehicle is approaching from a rear corner when your vehicle
is in Reverse (R) at speeds of 3 mph (5 km/h) or lower, which can be helpful when
backing out of parking spaces.
The system does not provide alerts for a vehicle that is moving away from your
vehicle, and it may not detect pedestrians, bicycles, or stationary objects.
Turning the System On or Off
1. Press SETTINGS.
2. Select Camera Settings.
3. Select Cross Traffi c Monitor.
4. Select On or Off.
5. Press BACK to exit the menu.
This system cannot detect all approaching vehicles and may not detect an
approaching vehicle at all.
Failure to visually confi rm that it is safe to back up the vehicle before doing
so may result in a collision.
Do not solely rely on the system when reversing; always also use your
mirrors, and look behind and to the sides of your vehicle before reversing.
CAUTION
Arrow icons appear on the
side of an approaching
vehicle, and an audible
beep sounds.
*if equipped
Page 60 of 84
112 || 113 DRIVING DRIVING
TABLE OF
CONTENTS
INDEX
VISUAL INDEX
VOICE COMMAND
INDEX
SAFETY
INFORMATION
CLIENT
INFORMATION
INSTRUMENT
PANEL
SPECIFICATIONS
VEHICLE
CONTROLS
MAINTENANCE
AUDIO AND
CONNECTIVITY
HANDLING THE
UNEXPECTED
BLUETOOTH®
HANDSFREELINK®
DRIVING
ACURALINK®
NAVIGATION
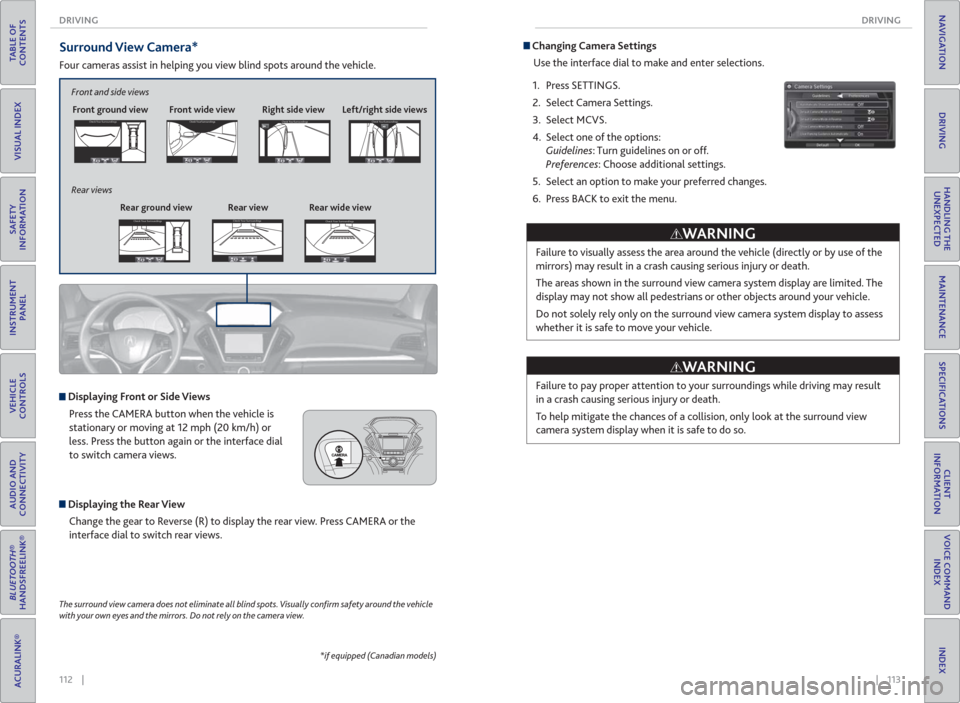
Surround View Camera*
Four cameras assist in helping you view blind spots around the vehicle.
*if equipped (Canadian models) The surround view camera does not eliminate all blind spots. Visually con� rm safety around the vehicle
with your own eyes and the mirrors. Do not rely on the camera view.
Front ground view Front wide view Right side viewCheck Your Surroundings
Displaying Front or Side Views
Press the CAMERA button when the vehicle is
stationary or moving at 12 mph (20 km/h) or
less. Press the button again or the interface dial
to switch camera views.
Displaying the Rear View
Change the gear to Reverse (R) to display the rear view. Press CAMERA or the
interface dial to switch rear views.
Left/right side views Front and side views
Rear ground view
Rear view Rear wide view Rear viewsCheck Your SurroundingsCheck Your SurroundingsCheck Your Surroundings
Check Your SurroundingsCheck Your SurroundingsCheck Your Surroundings
Changing Camera Settings
Use the interface dial to make and enter selections.
1. Press SETTINGS.
2. Select Camera Settings.
3. Select MCVS.
4. Select one of the options:
Guidelines: Turn guidelines on or off.
Preferences: Choose additional settings.
5. Select an option to make your preferred changes.
6. Press BACK to exit the menu.
Failure to visually assess the area around the vehicle (directly or by use of the
mirrors) may result in a crash causing serious injury or death.
The areas shown in the surround view camera system display are limited. The
display may not show all pedestrians or other objects around your vehicle.
Do not solely rely only on the surround view camera system display to assess
whether it is safe to move your vehicle.
WARNING
Failure to pay proper attention to your surroundings while driving may result
in a crash causing serious injury or death.
To help mitigate the chances of a collision, only look at the surround view
camera system display when it is safe to do so.
WARNING