change wheel Acura MDX 2017 Navigation Manual
[x] Cancel search | Manufacturer: ACURA, Model Year: 2017, Model line: MDX, Model: Acura MDX 2017Pages: 369, PDF Size: 29.59 MB
Page 223 of 369

222
Bluetooth
Âź HandsFreeLink
Âź
BluetoothÂź HandsFreeLinkÂź
BluetoothÂź HandsFreeLinkÂź (HFL) allows you to place and receive phone calls using
your vehicleâs navigation system, without handling your cell phone.
Using HFL
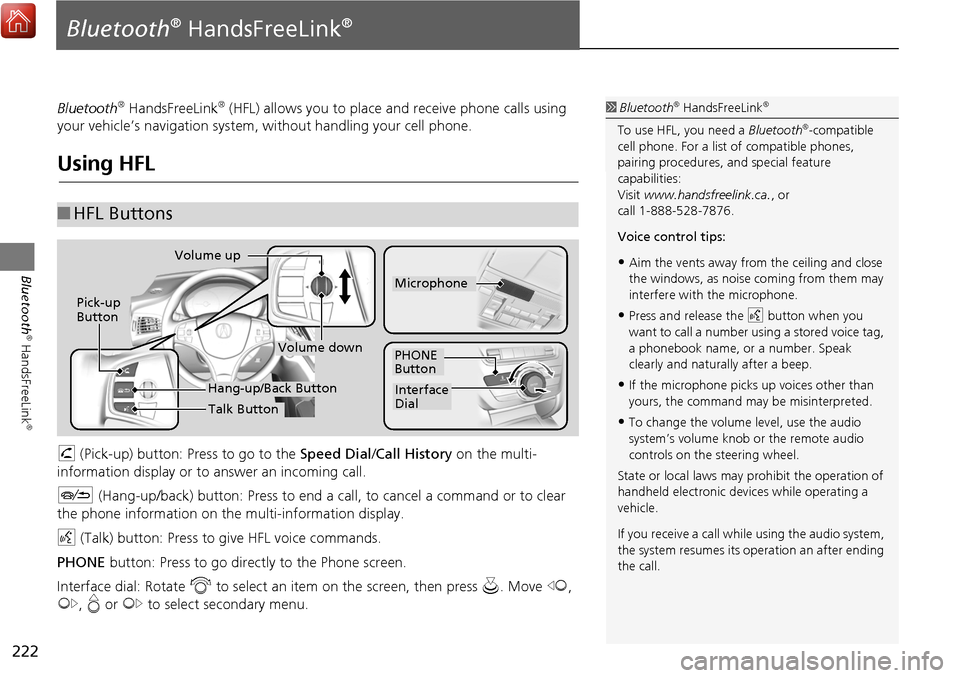
h (Pick-up) button: Press to go to the Speed Dial/ Call History on the multi-
information display or to answer an incoming call.
J (Hang-up/back) button: Press to end a call, to cancel a command or to clear
the phone information on th e multi-information display.
d (Talk) button: Press to give HFL voice commands.
PHONE button: Press to go dire ctly to the Phone screen.
Interface dial: Rotate i to select an item on the screen, then press u. Move w,
y , e or y to select secondary menu.
â HFL Buttons
1 BluetoothÂź HandsFreeLinkÂź
To use HFL, you need a BluetoothÂź-compatible
cell phone. For a list of compatible phones,
pairing procedures, and special feature
capabilities:
Visit www.handsfreelink.ca. , or
call 1-888-528-7876.
Voice control tips:
âąAim the vents away from the ceiling and close
the windows, as noise coming from them may
interfere with the microphone.
âąPress and release the d button when you
want to call a number using a stored voice tag,
a phonebook name, or a number. Speak
clearly and naturally after a beep.
âąIf the microphone picks up voices other than
yours, the command may be misinterpreted.
âąTo change the volume level, use the audio
systemâs volume knob or the remote audio
controls on the steering wheel.
State or local laws may prohibit the operation of
handheld electronic devices while operating a
vehicle.
If you receive a call whil e using the audio system,
the system resumes its operation an after ending
the call.
Volume down
Volume up
Pick-up
Button
PHONE
Button
Interface
Dial
Microphone
Hang-up/Back Button
Talk Button
Page 321 of 369

320
ï”ï”Surround View Camera*ï”Checking for Obstacles at the Rear of the Vehicle
Other Features
Checking for Obstacles at the Rear of the Vehicle
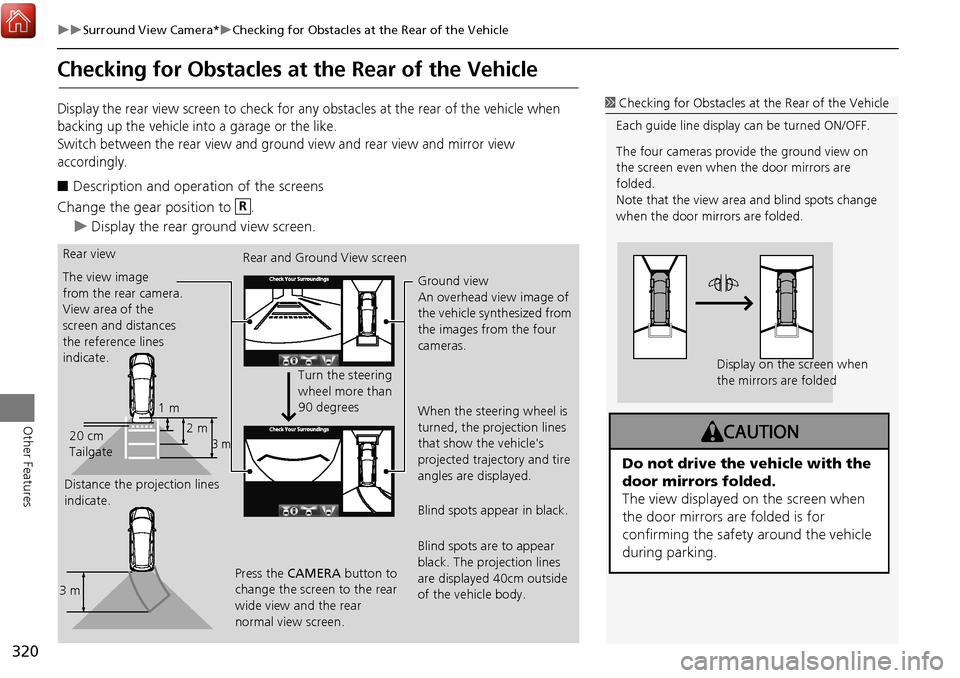
Display the rear view screen to check for any obstacles at the rear of the vehicle when
backing up the vehicle into a garage or the like.
Switch between the rear view and ground view and rear view and mirror view
accordingly.
â Description and operation of the screens
Change the gear position to .
ï”Display the rear ground view screen.
1 Checking for Obstacles at the Rear of the Vehicle
Each guide line display can be turned ON/OFF.
The four cameras provide the ground view on
the screen even when the door mirrors are
folded.
Note that the view area and blind spots change
when the door mirrors are folded.
Display on the screen when
the mirrors are folded
Do not drive the vehicle with the
door mirrors folded.
The view displayed on the screen when
the door mirrors are folded is for
confirming the safety around the vehicle
during parking.
R
Rear view
The view image
from the rear camera.
View area of the
screen and distances
the reference lines
indicate.
Distance the projection lines
indicate. Rear and Ground View screen
Turn the steering
wheel more than
90 degrees
Press the CAMERA button to
change the screen to the rear
wide view and the rear
normal view screen. Ground view
An overhead view image of
the vehicle synthesized from
the images from the four
cameras.
When the steering wheel is
turned, the projection lines
that show the vehicle's
projected trajectory and tire
angles are displayed.
Blind spots appear in black.
Blind spots are to appear
black. The projection lines
are displayed 40cm outside
of the vehicle body.
1 m
3 m2 m
20 cm
Tailgate
3 m
Page 323 of 369

322
ï”ï”Surround View Camera*ï”Checking for Obstacles in Front of the Vehicle
Other Features
Checking for Obstacles in Front of the Vehicle
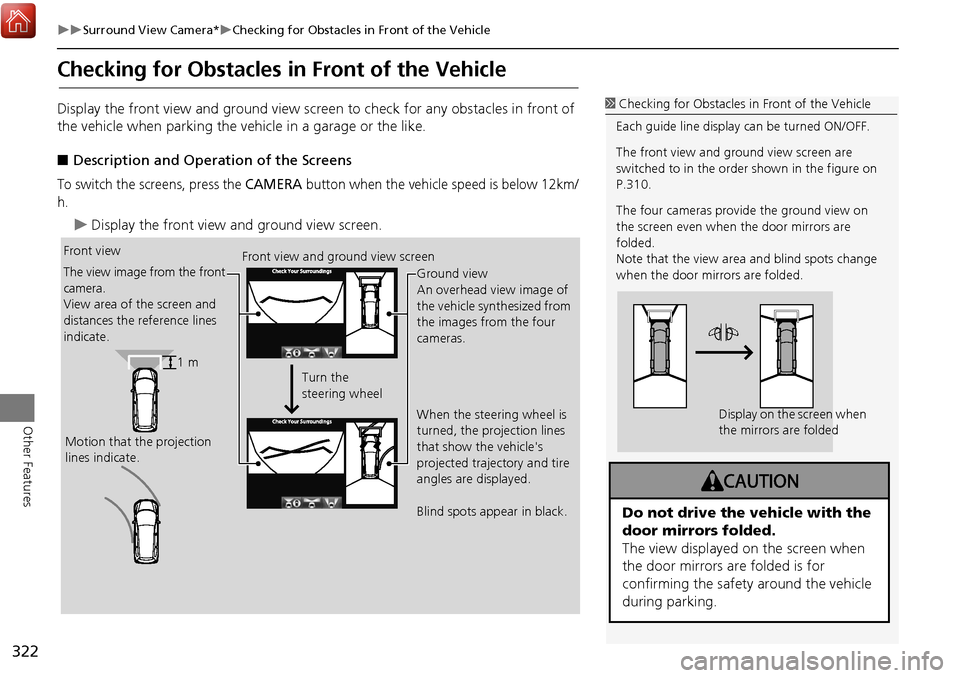
Display the front view and ground view screen to check for any obstacles in front of
the vehicle when parking the vehi cle in a garage or the like.
â Description and Operation of the Screens
To switch the screens, press the CAMERA button when the vehicle speed is below 12km/
h.
ï”Display the front view and ground view screen.
1 Checking for Obstacles in Front of the Vehicle
Each guide line display can be turned ON/OFF.
The front view and ground view screen are
switched to in the order shown in the figure on
P.310.
The four cameras provide the ground view on
the screen even when the door mirrors are
folded.
Note that the view area and blind spots change
when the door mirrors are folded.
Display on the screen when
the mirrors are folded
Do not drive the vehicle with the
door mirrors folded.
The view displayed on the screen when
the door mirrors are folded is for
confirming the safety around the vehicle
during parking.
Front view
Motion that the projection
lines indicate. Front view and ground view screen
Ground view
An overhead view image of
the vehicle synthesized from
the images from the four
cameras.
When the steering wheel is
turned, the projection lines
that show the vehicle's
projected trajectory and tire
angles are displayed.
Blind spots appear in black.
The view image from the front
camera.
View area of the screen and
distances the reference lines
indicate.
Turn the
steering wheel
1 m