change time Acura MDX 2017 Owner's Guide
[x] Cancel search | Manufacturer: ACURA, Model Year: 2017, Model line: MDX, Model: Acura MDX 2017Pages: 170, PDF Size: 12.43 MB
Page 37 of 170
30 |
I
NSTRUMENT PANEL
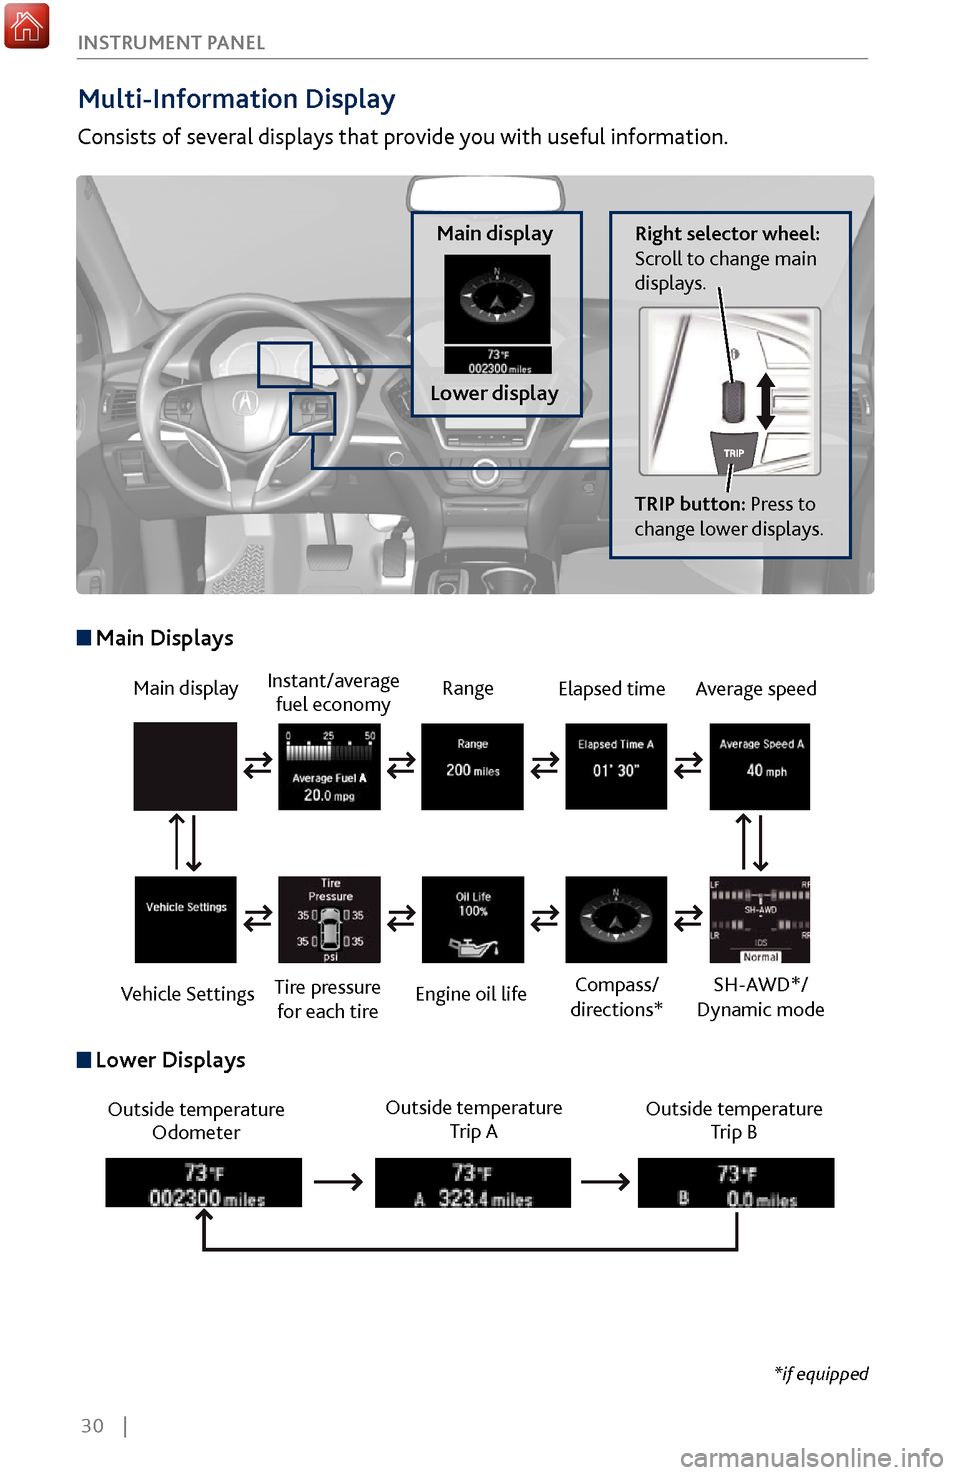
Multi-Information Display
Consists of several displays that provide you with useful information.
Right selector wheel:
Scroll to change main
displays.Main display
Lower display
TRIP button: Press to
change lower displays.
Main display
Vehicle Settings Instant/average
fuel economy
Tire pressure for each tire Range
Engine oil life
Main Displays
Outside temperature Odometer Outside temperature
Trip A Outside temperature
Trip B
Lower Displays
Elapsed time
Compass/
directions*Average speed
SH-AWD*/
Dynamic mode
*if equipped
Page 62 of 170
| 55
V
EHICLE CONTROLS
*if equipped
Customized Features
You can easily customize many features of your vehicle. The customized settings
are recalled every time you unlock the driver’s door with the remote (Driver 1 or
Driver 2). Settings are unique to each remote.
How to
Change a Setting
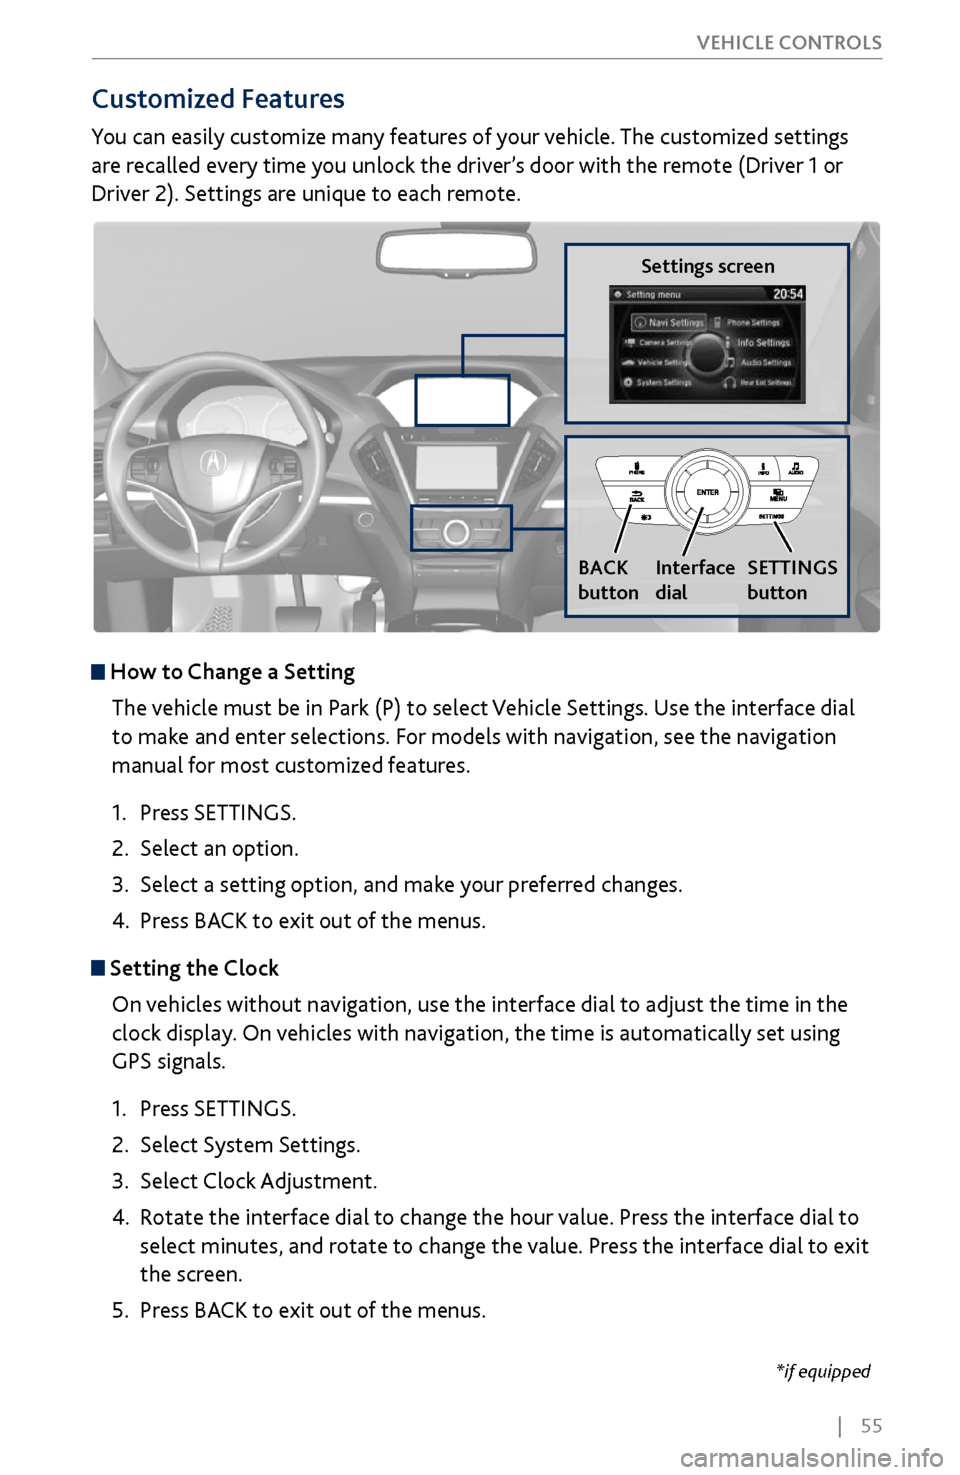
The vehicle must be in Park (P) to select Vehicle Settings. Use the interface dial
to make and enter selections. For models with navigation, see the navigation
manual for most customized features.
1.
Press SETTINGS.
2.
Select an option.
3.
Select a setting option, and make
your preferred changes.
4.
Press BA
CK to exit out of the menus.
Setting the Clock
On vehicles without navigation, use the interface dial to adjust the time in the
clock display. On vehicles with navigation, the time is automatically set using
GPS signals.
1.
Press SETTINGS.
2.
Select System Settings.
3.
Select Clock Adjustment
.
4.
Rotate the interface dial to
change the hour value. Press the interface dial to
select minutes, and rotate to change the value. Press the interface dial to exit
the screen.
5.
Press BA
CK to exit out of the menus.
Settings screen
BACK
button
Interface
dial SETTINGS
button
Page 106 of 170
| 99
DRIVING
Sequential Mode
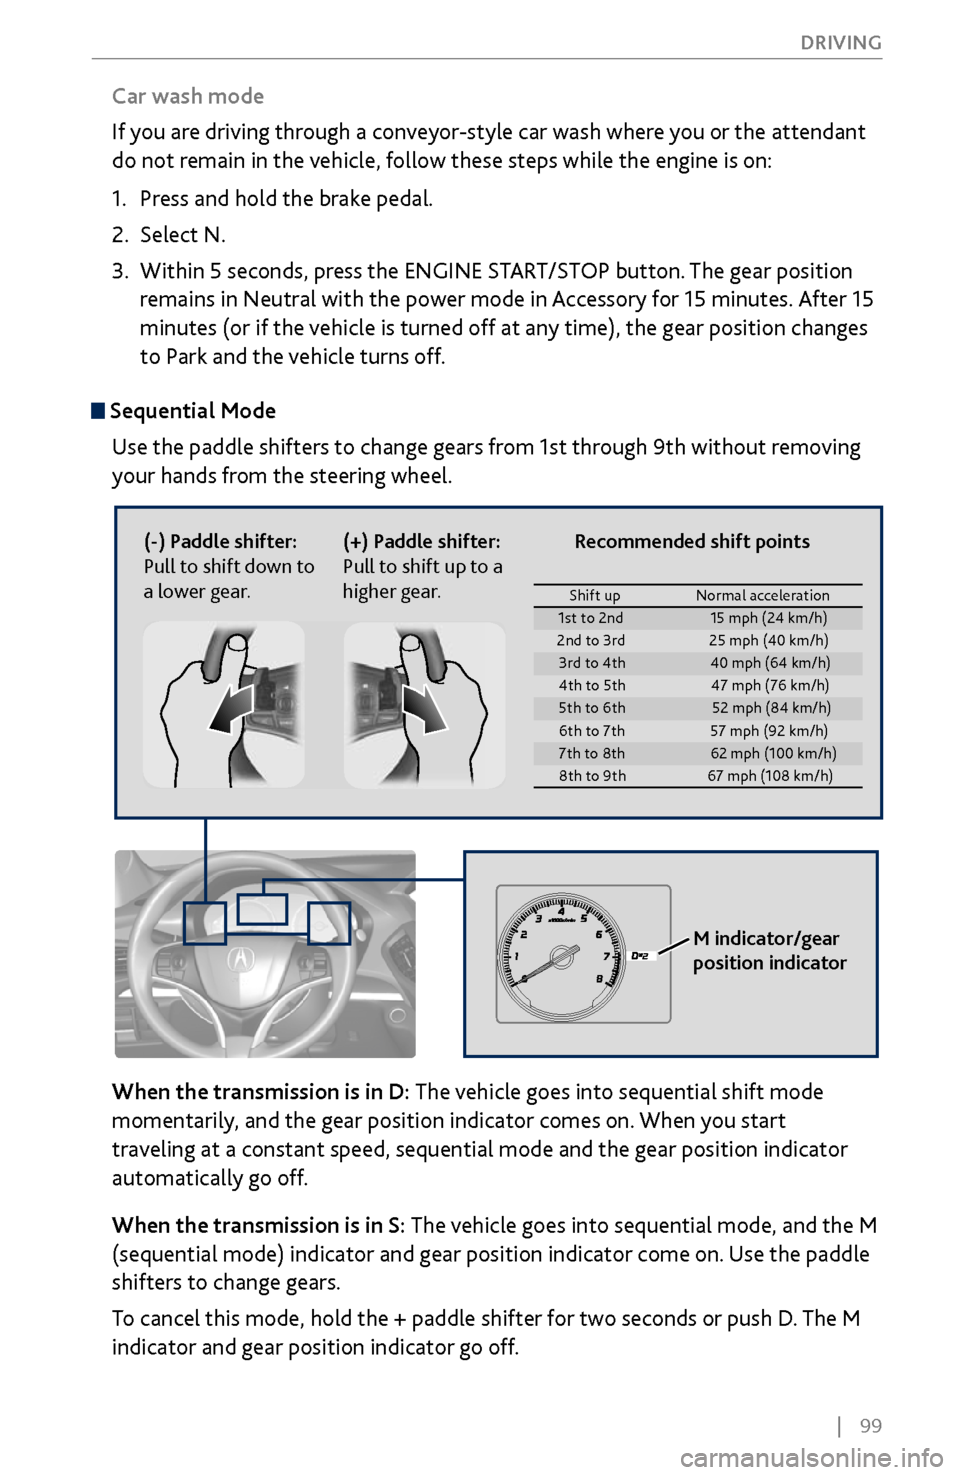
Use the paddle shifters to change gears from 1st through 9th without removing
your hands from the steering wheel.
When the transmission is in D: The vehicle goes into sequential shift mode
momentarily, and the gear position indicator comes on. When you start
traveling at a constant speed, sequential mode and the gear position indicator
automatically go off.
When the transmission is in S: The vehicle goes into sequential mode, and the M
(sequential mode) indicator and gear position indicator come on. Use the paddle
shifters to change gears.
To cancel this mode, hold the + paddle shifter for two seconds or push D. The M
indicator and gear position indicator go off.
(-) Paddle shifter:
Pull to shift down to
a lower gear. (+) Paddle shifter:
Pull to shift up to a
higher gear.
M indicator/gear
position indicator
Car wash mode
If you are driving through a conveyor-style car wash where you or the attendant
do not remain in the vehicle, follow these steps while the engine is on:
1.
Press and hold the brak
e pedal.
2.
Select N.
3.
Within 5 seconds, press the ENGINE
START/STOP button. The gear position
remains in Neutral with the power mode in Accessory for 15 minutes. After 15
minutes (or if the vehicle is turned off at any time), the gear position changes
to Park and the vehicle turns off.
Shift up Normal acceleration1st to 2n d15 mph (24 km/h)
2nd to 3rd 25 mph (40 km/h)
3rd to 4th40 mph (64 km/h)
4th to 5t h4 7 mph (76 km/h )
5th to 6th52 mph (84 km/h)
6th to 7t h5 7 mph (92 km/h )
7th to 8th62 mph (100 km/h)
8th to 9th 67 mph (108 km/h)
Recommended shift points
Page 112 of 170
| 105
DRIVING
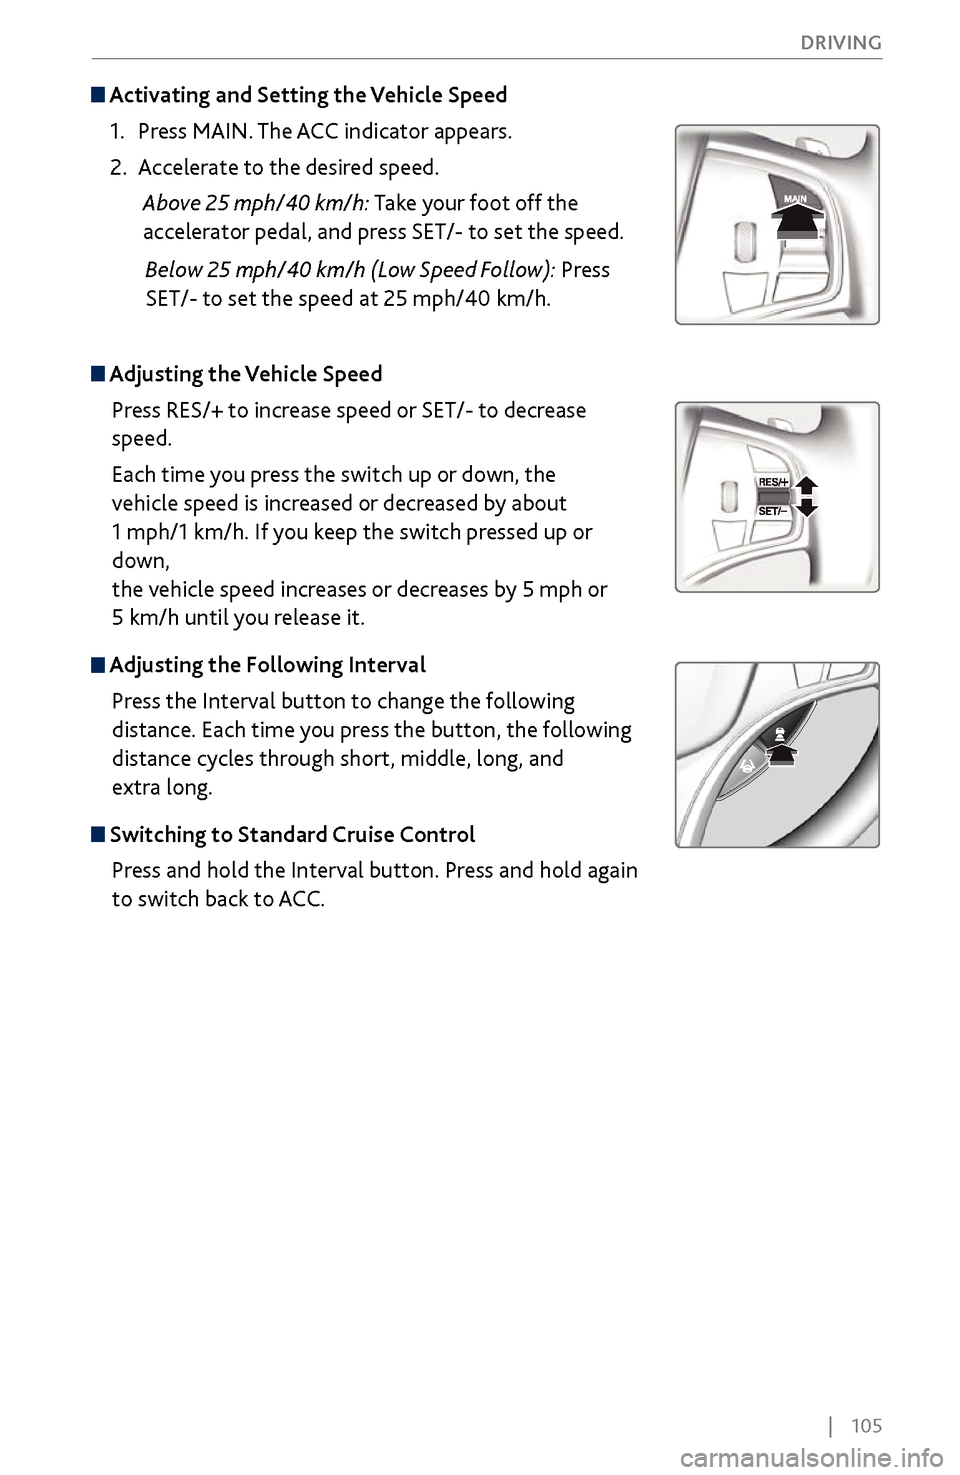
Activating and Setting the Vehicle Speed
1.
Press MAIN. The
ACC indicator appears.
2.
Accelerate to the desired
speed.
Above 25 mph/40 km/h:
Take your foot off the
accelerator pedal, and press SET/-
to set the speed.
Below 25 mph/40 km/h (Lo
w Speed Follow): Press
SET/- to set the speed at 25 mph/40 km/h.
Adjusting the Vehicle Speed
Press RES/+ to increase speed or SET/- to decrease
speed.
Each time you press the switch up or down, the
vehicle speed is increased
or decreased by about
1 mph/1 km/h. If you keep the switch pressed up or
down,
the vehicle speed increases or decreases by 5 mph or
5 km/h until you release it.
Adjusting the Following Interval
Press the Interval button to change the following
distance. Each time you press the button, the following
distance cycles through short, middle, long, and
extra long.
Switching to Standard Cruise ControlPress and hold the Interval button. Press and hold again
to switch back to ACC.
Page 122 of 170
| 115
DRIVING
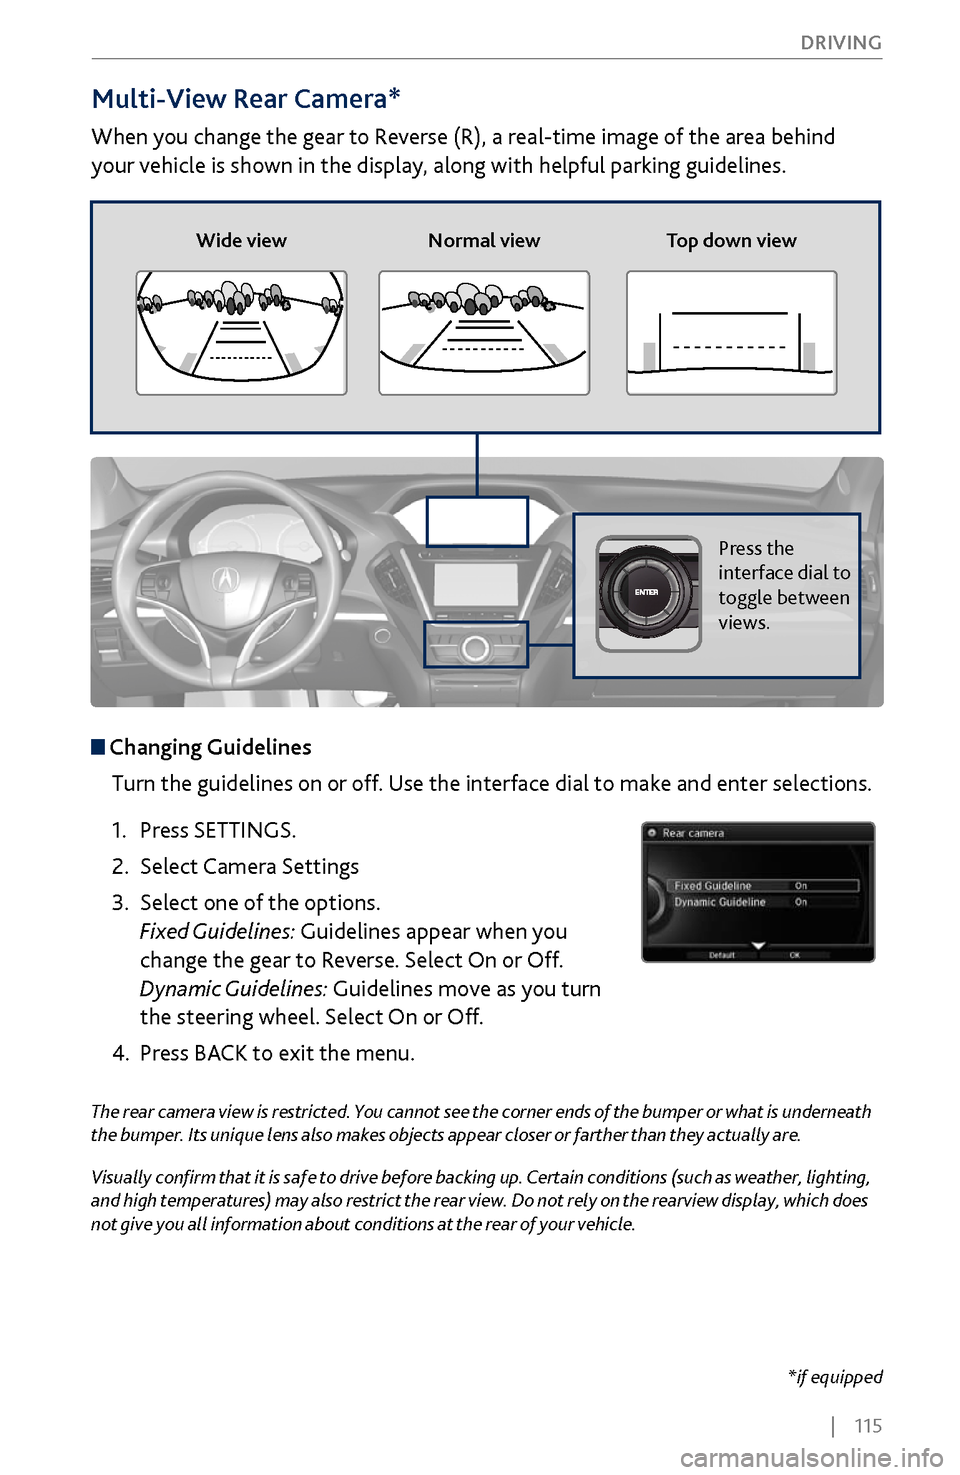
Multi-View Rear Camera*
When you change the gear to Reverse (R), a real-time image of the area behind
your vehicle is shown in the display, along with helpful parking guidelines.
The rear camera view is restricted. You cannot see the corner ends of the bumper or what is underneath
the bumper. Its unique lens also makes objects appear closer or farther than they actually are.
Visually confirm that it is safe to drive before backing up. Certain conditions (such as weather, lighting,
and high temperatures) may also restrict the rear view. Do not rely on the rearview display, which does
not give you all information about conditions at the rear of your vehicle.
Wide view
Normal view Top down view
Press the
interface dial to
toggle between
views.
Changing Guidelines
Turn the guidelines on or off. Use the interface dial to make and enter selections.
1.
Press SETTINGS.
2.
Select Camera Settings
3.
Select one of the options.
Fixed Guidelines:
Guidelines appear when you
change the gear to Reverse. Select On or Off.
Dynamic Guidelines: Guidelines move as you turn
the steering wheel. Select On or Off.
4.
Press BACK
to exit the menu.
*if equipped
Page 128 of 170
| 121
HANDLING THE UNEXPECTED
After the Engine Starts
Once your vehicle’s engine has started, remove the jumper cables in the following
order:
1.
Disconnect the jumper cable fr
om your vehicle’s ground.
2.
Disconnect the other end
of the jumper cable from the booster battery (-)
terminal.
3.
Disconnect the jumper cable fr
om your vehicle’s battery (+) terminal.
4.
Disconnect the other end
of the jumper cable from the booster battery (+)
terminal.
5.
Have y
our vehicle inspected by a nearby service station or a dealer.
A battery can explode if you do not follow the correct procedure, seriously
injuring anyone nearby.
Keep all sparks, open flames, and smoking materials away from the battery.
WARNING
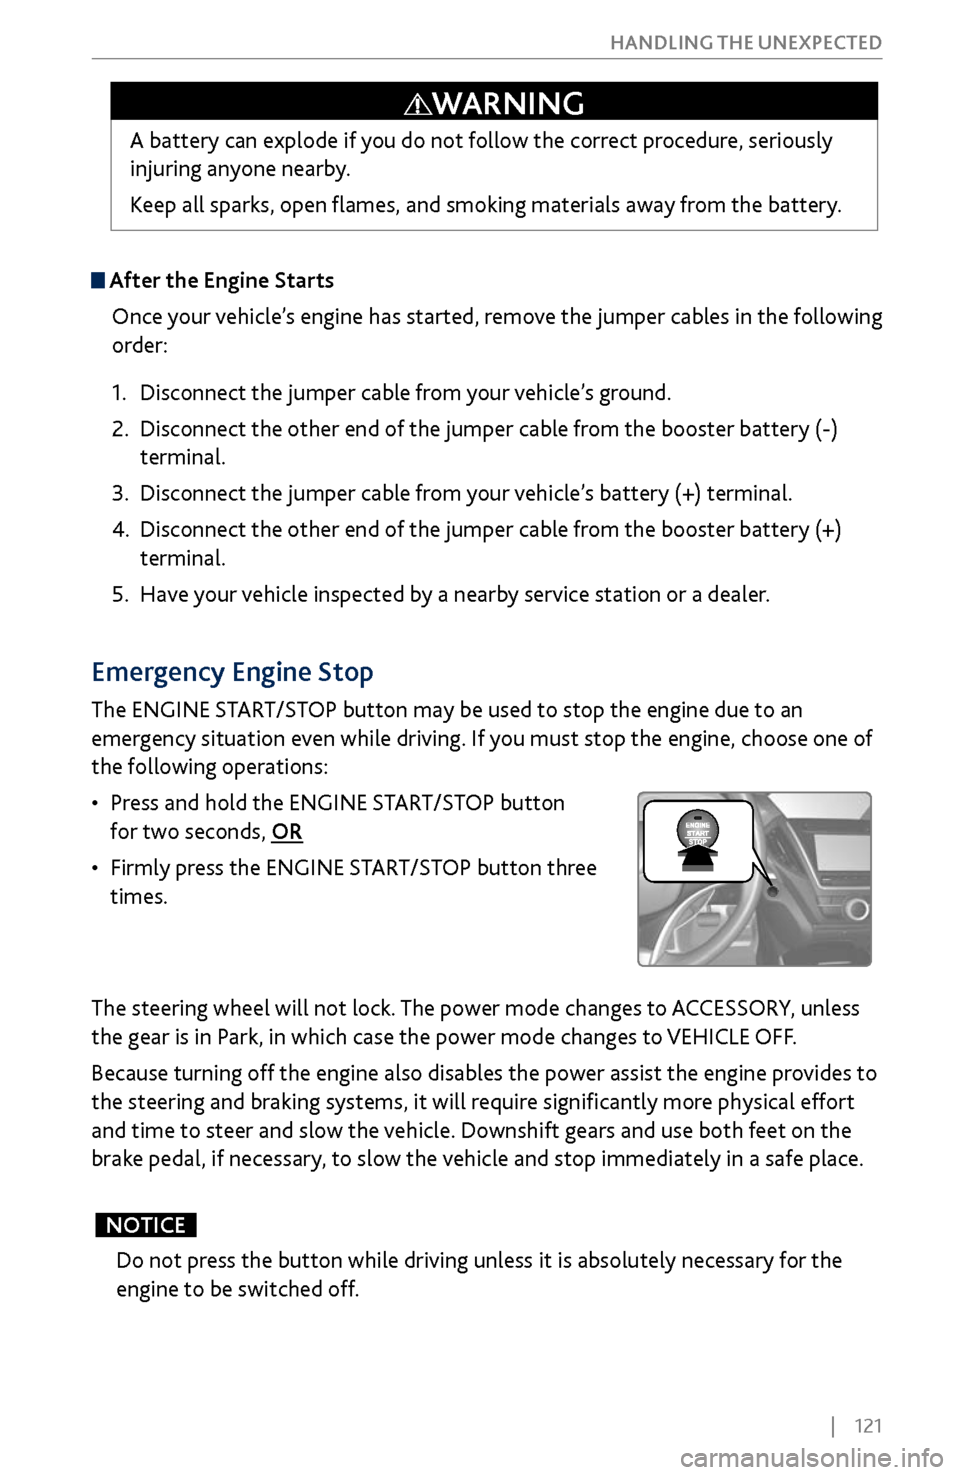
Emergency Engine Stop
The ENGINE START/STOP button may be used to stop the engine due to an
emergency situation even while driving. If you must stop the engine, choose one of
the following operations:
•
Press and hold the ENGINE
START/STOP button
for two seconds, OR
•
Firmly press
the ENGINE START/STOP button three
times.
The steering wheel will not lock. The power mode changes to ACCESSORY, unless
the gear is in Park, in which case the power mode changes to VEHICLE OFF.
Because turning off the engine also disables the power assist the engine provides to
the steering and braking systems, it will require significantly more physical effort
and time to steer and slow the vehicle. Downshift gears and use both feet on the
brake pedal, if necessary, to slow the vehicle and stop immediately in a safe place.
Do not press the button while driving unless it is absolutely necessary for the
engine to be switched off.
NOTICE
Page 144 of 170
| 137
MAINTENANCE
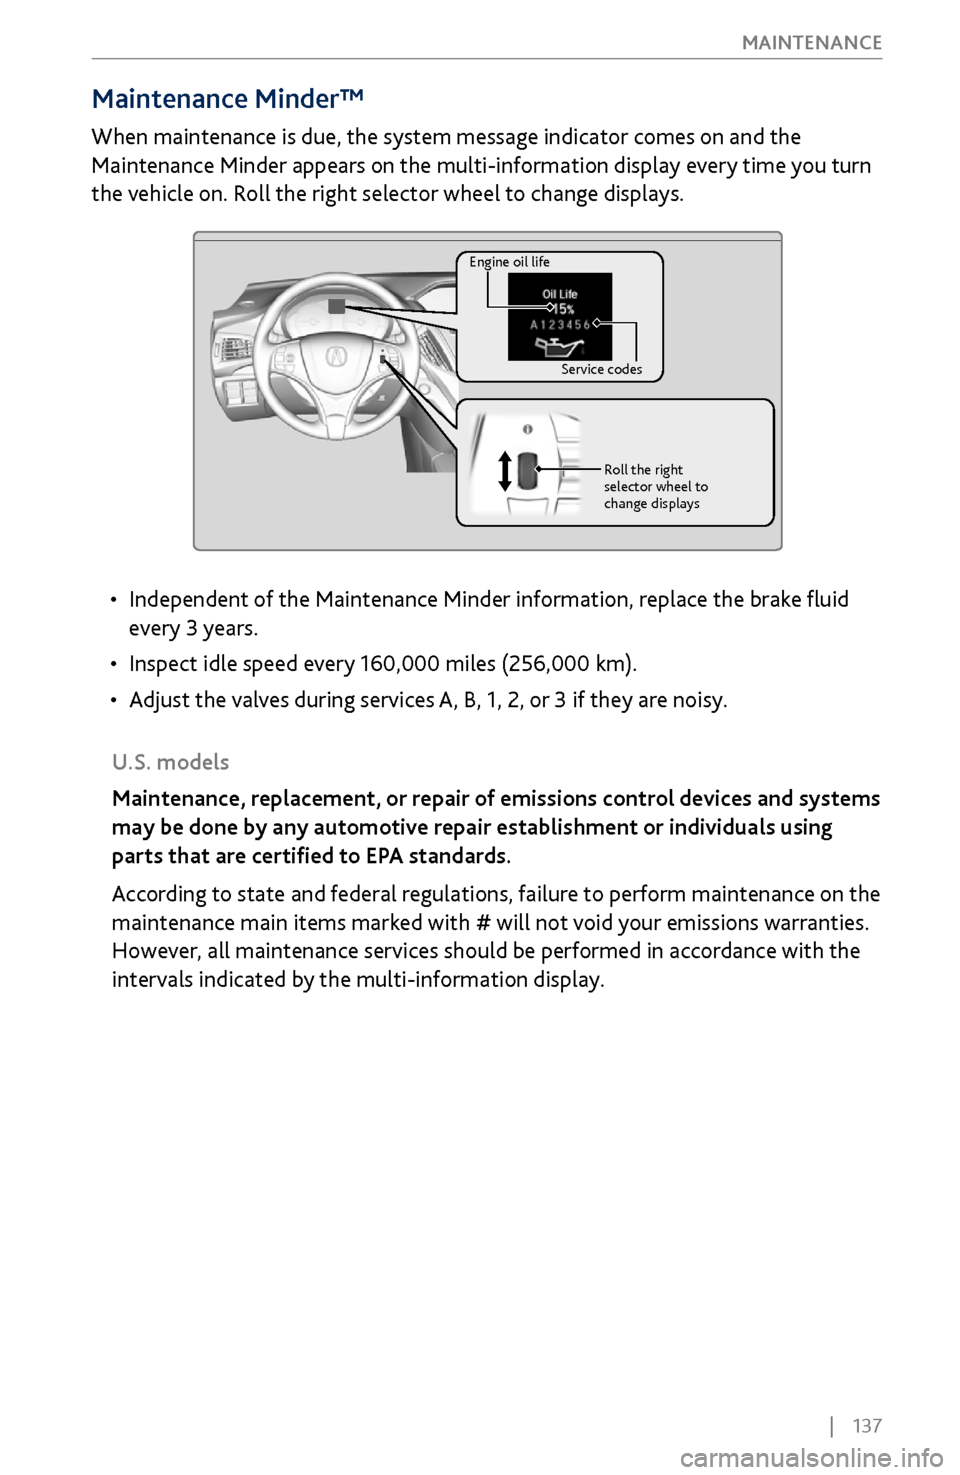
Maintenance Minder™
When maintenance is due, the system message indicator comes on and the
Maintenance Minder appears on the multi-information display every time you turn
the vehicle on. Roll the right selector wheel to change displays.
U.S. models
Maintenance, replacement, or repair of emissions control devices and systems
may be done by any automotive repair establishment or individuals using
parts that are certified to EPA standards.
According to state and federal regulations, failure to perform maintenance on the
maintenance main items marked with # will not void your emissions warranties.
However, all maintenance services should be performed in accordance with the
intervals indicated by the multi-information display.
Engine oil life Service codesRoll the right
selector wheel to
change displays
• Independent of the Maintenance Minder information, r eplace the brake fluid
every 3 years.
•
Inspect idle speed every 160,000 miles (256,000 km).
•
Adjust the
valves during services A, B, 1, 2, or 3 if they are noisy.
Page 154 of 170
| 147
MAINTENANCE
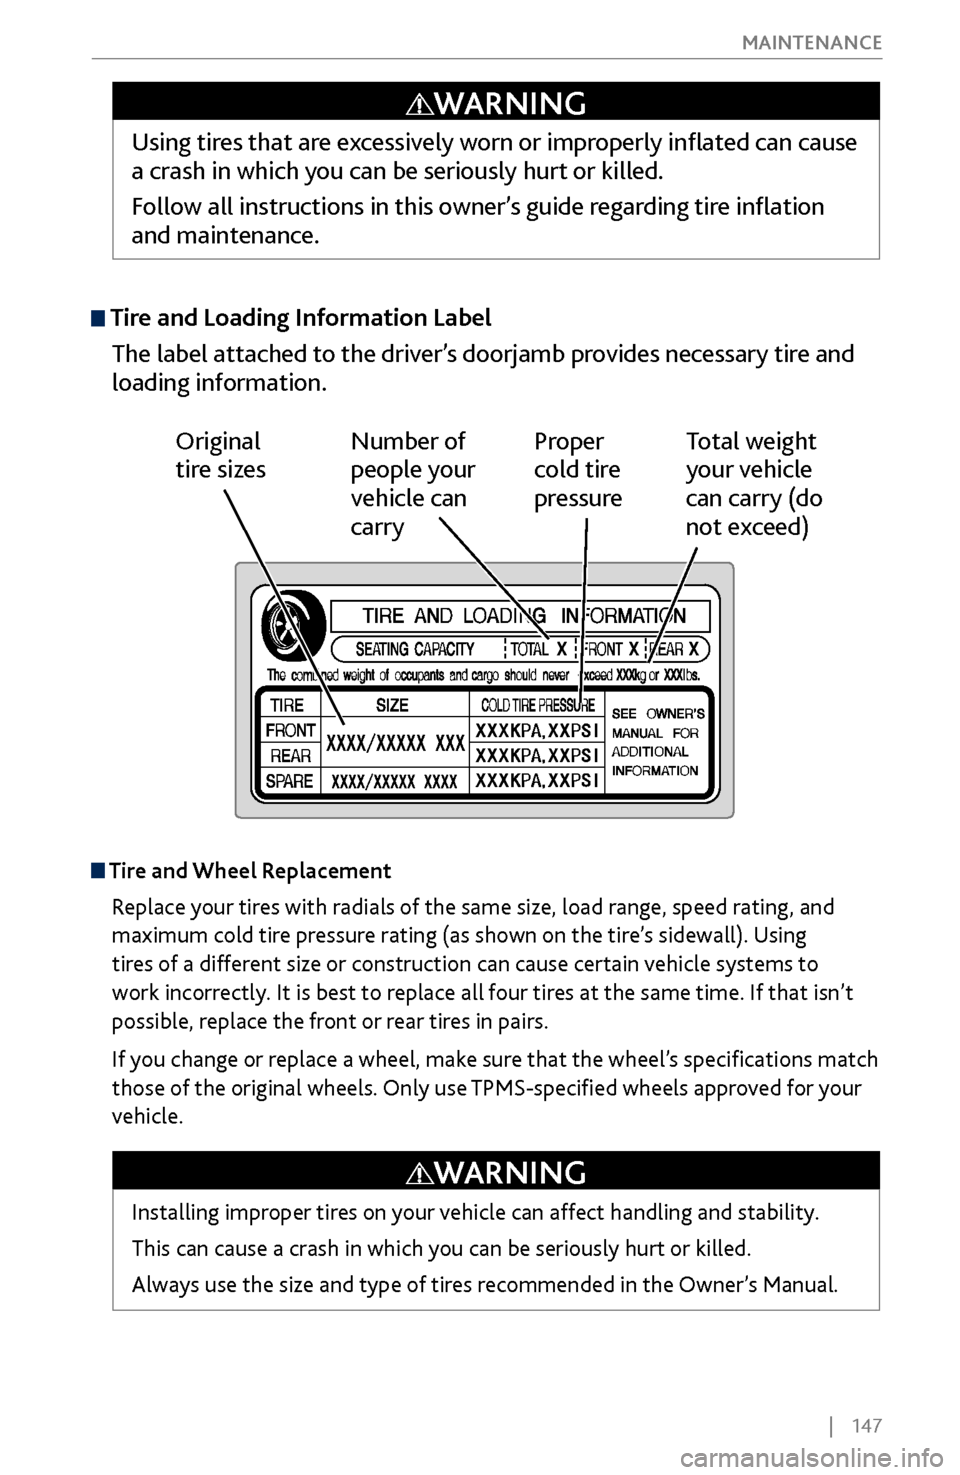
Tire and Loading Information Label
The label attached to the driver’s doorjamb provides necessary tire and
loading information.
Original
tire sizes Number of
people your
vehicle can
carry Proper
cold tire
pressure
Total weight
your vehicle
can carry (do
not exceed)
Tire and Wheel Replacement
Replace your tires with radials of the same size, load range, speed rating, and
maximum cold tire pressure rating (as shown on the tire’s sidewall). Using
tires of a different size or construction can cause certain vehicle systems to
work incorrectly. It is best to replace all four tires at the same time. If that isn’t
possible, replace the front or rear tires in pairs.
If you change or replace a wheel, make sure that the wheel’s specifications match
those of the original wheels. Only use TPMS-specified wheels approved for your
vehicle.
Using tires that are excessively worn or improperly inflated can cause
a crash in which you can be seriously hurt or killed.
Follow all instructions in this owner’s guide regarding tire inflation
and maintenance.
WARNING
Installing improper tires on your vehicle can affect handling and stability.
This can cause a crash in which you can be seriously hurt or killed.
Always use the size and type of tires recommended in the Owner’s Manual.
WARNING
Page 160 of 170
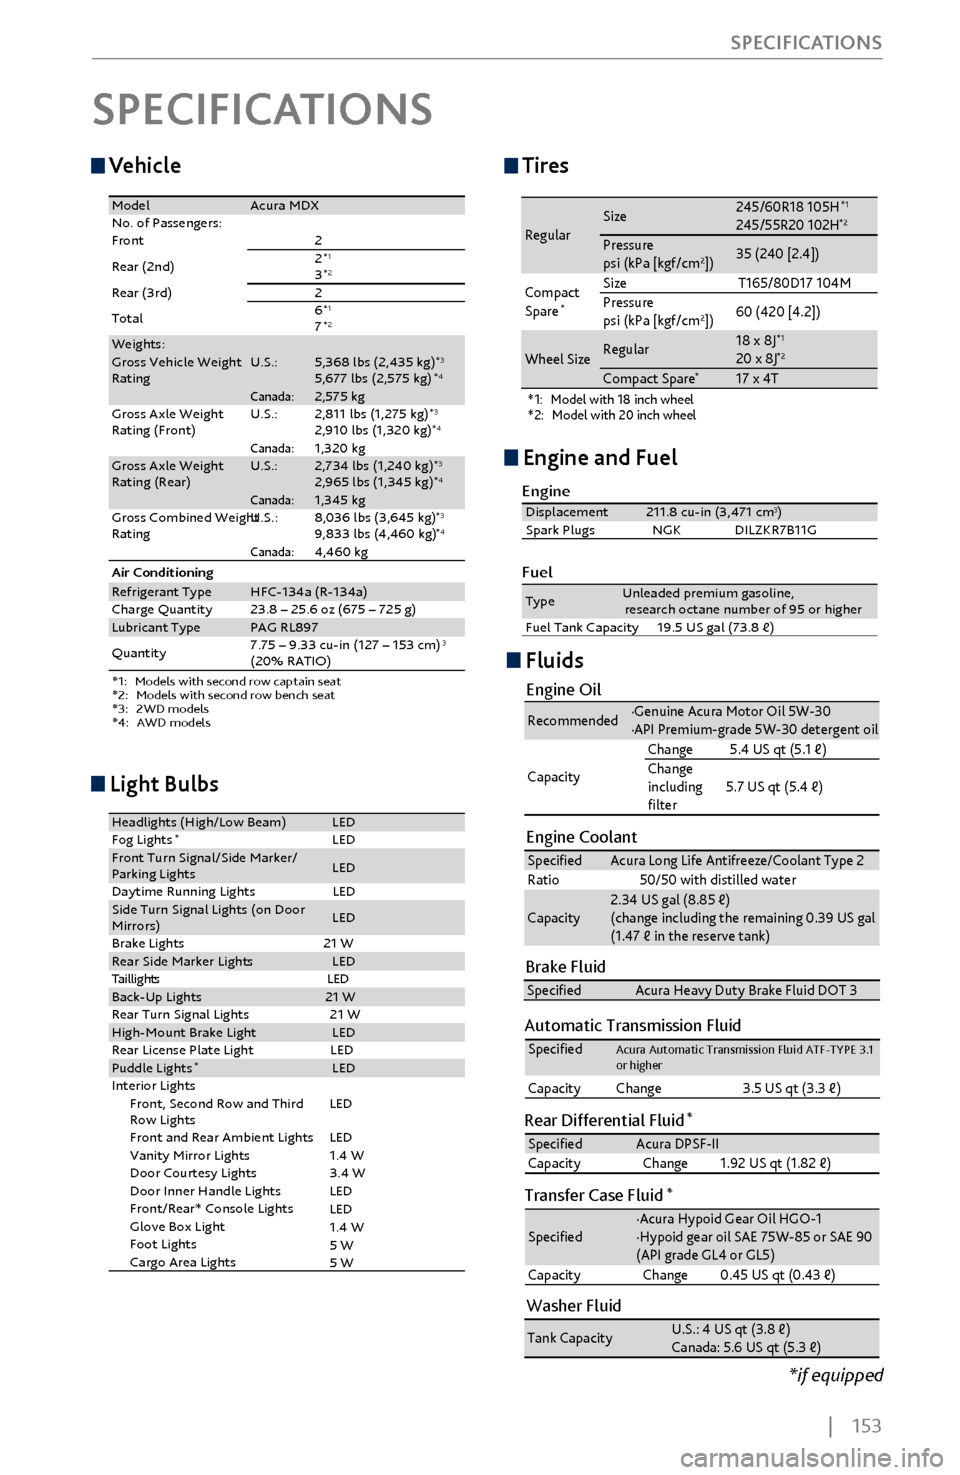
| 153
SPECIFICATIONS
Vehicle
*
*
1: Models with second row captain seat
* 2: Models with second row bench seat
* 3: 2WD models
4: AWD models
ModelAcura MDX
Front No. of Passengers: 2
12*
2Rear (2nd) 3*2
Rear (3rd)1Tota l 6*
27*Weights:
RatingGross Vehicle Weight U.S.:5,368 lbs (2,435 kg)*3
Gross Axle Weight 5,677 lbs (2,575 kg
)
*4Canada:2,575 kg
Rating (Front)U.S.: 2,811 lbs (1,275 kg)*3
Gross Axle Weight 2,910 lbs (1,320 kg
)
*4Canada:1,320 kg
Rating (Rear)U.S.: 2,734 lbs (1,240 kg)*3
Gross Combined Weight
Rating U.S.
: 2,965 lbs (1,345 kg)
*4Canada
:1,345 kg
8,036 lbs (3,645 kg )*39,833 lbs (4,460 kg)*4Canada:4,460 kg
Refrigerant Type
Charge Quantity
Lubricant TypeQuantity
HFC-134a (R-134a )
23.8 – 25.6 oz (675 – 725 g )
PAG RL89 7
7.75 – 9.33 cu-in (127 – 153 cm
3)
(20% RATIO )
Air Conditioning Fluids
Engine Oi
l
Engine Coolan t
Recommended·Genuine Acura Motor Oil 5W-3 0
·API Premium-grade 5W-30 detergent oi l
Capacity Change
5.4 US qt (5.1 �)
Change
including
�lter 5.7 US qt (5.4 �)
Speci�e
dAcura Long Life Antifreeze/Coolant Type 2
Ratio 50/50 with distilled wate r
Capacity2.34 US gal (8.85 �)
(change including the remaining 0.39 US gal
(1.47 � in the reserve tank )
Washer Fluid
Tank CapacityU.S.: 4 US qt (3.8 �)
Canada: 5.6 US qt (5.3 �)
Brake FluidSpeci�edAcura Heavy Duty Brake Fluid DOT 3
Automatic Transmission Fluid
Rear Differential Fluid*
Transfer Case Fluid*
Speci�edAcura Automatic Transmission Fluid ATF-TYPE 3. 1
or higher
Capacity Change 3.5 US qt (3.3 �)
Speci�edAcura DPSF-II
Capacity Chang e1.92 US qt (1.82 �)
Speci�e d·Acura Hypoid Gear Oil HGO-1
·Hypoid gear oil SAE 75W-85 or SAE 90
(API grade GL4 or GL5)
Capacity Chang e0.45 US qt (0.43 �)
SPECIFICATIONS
Tires
*1:Model with 18 inch wheel*2: Model with 20 inch wheel
RegularSize245/60R18 105H*1245/55R20 102 H*2Pressure
psi (kPa [kgf/cm2])35 (240 [2.4])
Compact
Spar e
*Size T165/80D17 104M
Pressure
psi (kPa [kgf/cm
2]) 60 (420 [4.2])
Wheel SizeRegula
r18 x 8J*120 x 8J*2Compact Spar e*17 x 4T
Engine and Fuel
Engine
FuelDisplacement211.8 cu-in (3,471 cm3)
Spark Plugs NGKD ILZKR7B11G
TypeUnleaded premium gasoline,
research octane number of 95 or higher
Fuel Tank Capacity 19.5 US gal (73.8 �)
Light Bulbs
Headlights (High/Low Beam )LED
Fog Lights*LE DFront Turn Signal/Side Marker /
Parking Lights
Daytime Running Lights LEDSide Turn Signal Lights (on Door
Mirrors )LED
Brake Lights 21 W
Rear Side Marker Light sLED
DEL
sthgilliaT
Back-Up Lights21 W
Rear Turn Signal Lights 21 W
High-M ount Brake Ligh tLED
Rear License Plate Light LED
Puddle Lights*LED
In teri or Lights
Front, Second Row and Third
Row Lights
Front and Rear Ambient Lights
Vanity Mirror Lights
Door Courtesy Lights
Door Inner Handle Lights
Front/Rear* Console Lights
Glove Box Ligh t
Foot Lights
Cargo Area Lights
LE D
1.4 W
3.4 W LE D
LE
D
LED 1.4 W
5 W
5 W
LE
D
*if equipped