maintenance Acura MDX 2017 Owner's Guide
[x] Cancel search | Manufacturer: ACURA, Model Year: 2017, Model line: MDX, Model: Acura MDX 2017Pages: 170, PDF Size: 12.43 MB
Page 7 of 170
*if equipped
DRIVING
................................................................
88
Before Driving ......................................................... 88
Maximum Load Limit ............................................ 90
Towing
a Trailer
......................................................
92
Remote
Engine Start*
...........................................
96
Starting to Driv
e
......................................................
97
Shifting ..................................................................... 98
Auto Idle Stop* ..................................................... 100
Integrated Dynamics S
ystem
..............................101
Vehicle Stability Assist (VSA®)
........................... 101
Braking ................................................................... 102
Adaptiv
e Cruise Control (ACC)
with Low Speed
F
ollow
.............................................................
104
Forwar
d Collision Warning (FCW) with
Pedestrian Detection
.................................... 107
Collision Mitigation Braking
System™
(CMBS™)
....................................................... 108
Lane Departure
Warning (LDW)
.........................
110
Lane Keeping
Assist System (LKAS)
...................
111
Road Departur
e Mitigation (RDM)
....................
112
Blind Spot Information (BSI)*
............................. 113
Parking Sensor System*
....................................... 114
Multi-View
Rear Camera*
...................................
115
Cross T
raffic Monitor*
..........................................
116
Surround View
Camera*
......................................
117
Refueling ................................................................. 119
HANDLING THE UNEXPECTED ........................
120
Keyless Access Remote Battery Strength
........ 120
Jump Starting ........................................................ 120
Emergency
Engine Stop
.......................................
121
Overheating ........................................................... 122
Tire Pr
essure Monitoring System (TPMS)
........
123
Handling a Flat Tir
e
..............................................
126
Changing a Flat Tir
e*
...........................................
126
Tire R
epair Kit*
.....................................................
130
Fuse Locations ....................................................... 131
Emer
gency Towing
...............................................
135MAINTENANCE
..................................................
136
Safety Precautions ............................................... 136
Maintenance Minder™ ......................................... 137
Under the
Hood
.................................................... 139
Engine Oil
.............................................................. 140
Engine Coolant ..................................................... 142
Window Washer
Fluid
.........................................
143
Checking the Battery ........................................... 143
Changing Wiper Blades ....................................... 144
Tire Information ................................................... 146
Tire Labeling .......................................................... 149
DOT
Tire Quality Grading
...................................
150
Testing
of Readiness Codes
.................................
152
SPECIFICATIONS
................................................ 153
CLIENT INFORMATION
..................................... 154
Fr
equently Asked Questions/Troubleshooting
154
Contact Us .............................................................. 155
Acura
Total Luxury Care Roadside Assistance
156
Warranty Co
verages
............................................
156
EPA C
ontact Information
....................................
156
INDEX...................................................................
159
Page 21 of 170
14 |
S
AFETY
10 An indicator on the dashboard that alerts you that the front passenger’s front
airbag has been turned off.
11 An indicator on the instrument panel that alerts you to a possible problem with the airbag system or seat belt tensioners.
12 Safing sensor
13 A rollover sensor that can detect if your vehicle is about to roll over and signal the control unit to deploy both side curtain airbags.
Airbag Care
You do not need to, and should not, perform any maintenance on or replace
any airbag system components yourself. However, you should have your vehicle
inspected by a dealer in the following situations:
When the airbags have deployed
If an airbag has inflated, the control unit and other related parts must be
replaced. Similarly, once an automatic seat belt tensioner has been activated, it
must be replaced.
When the vehicle has been in a moderate-to-severe collision
Even if the airbags did not inflate, have your dealer inspect the following: the
driver’s seat position sensor, weight sensors in the passenger’s seat, front seat
belt tensioners, and each seat belt that was worn during the crash.
Do not remove or modify a front seat without first consulting a dealer
This would likely disable or affect the driver’s seat position sensor or the weight
sensors in the passenger’s seat. If it is necessary to remove or modify a front seat
to accommodate a person with disabilities, contact an Acura dealer. For U.S.
vehicles, call Acura Client Relations at (800) 382-2238. For Canadian vehicles,
call Acura Client Services at (888) 922-8729.
Page 86 of 170
| 79
Learn about Acura’s advanced connectivity services.
AcuraLink Messages
Receive messages on vehicle features, safety and emissions recall campaigns,
maintenance reminders, and diagnostic information.
Some message features require a phone connection. Visit www.acura.com/
handsfreelink (U.S.) or www.handsfreelink.ca (Canada) to check phone
compatibility.
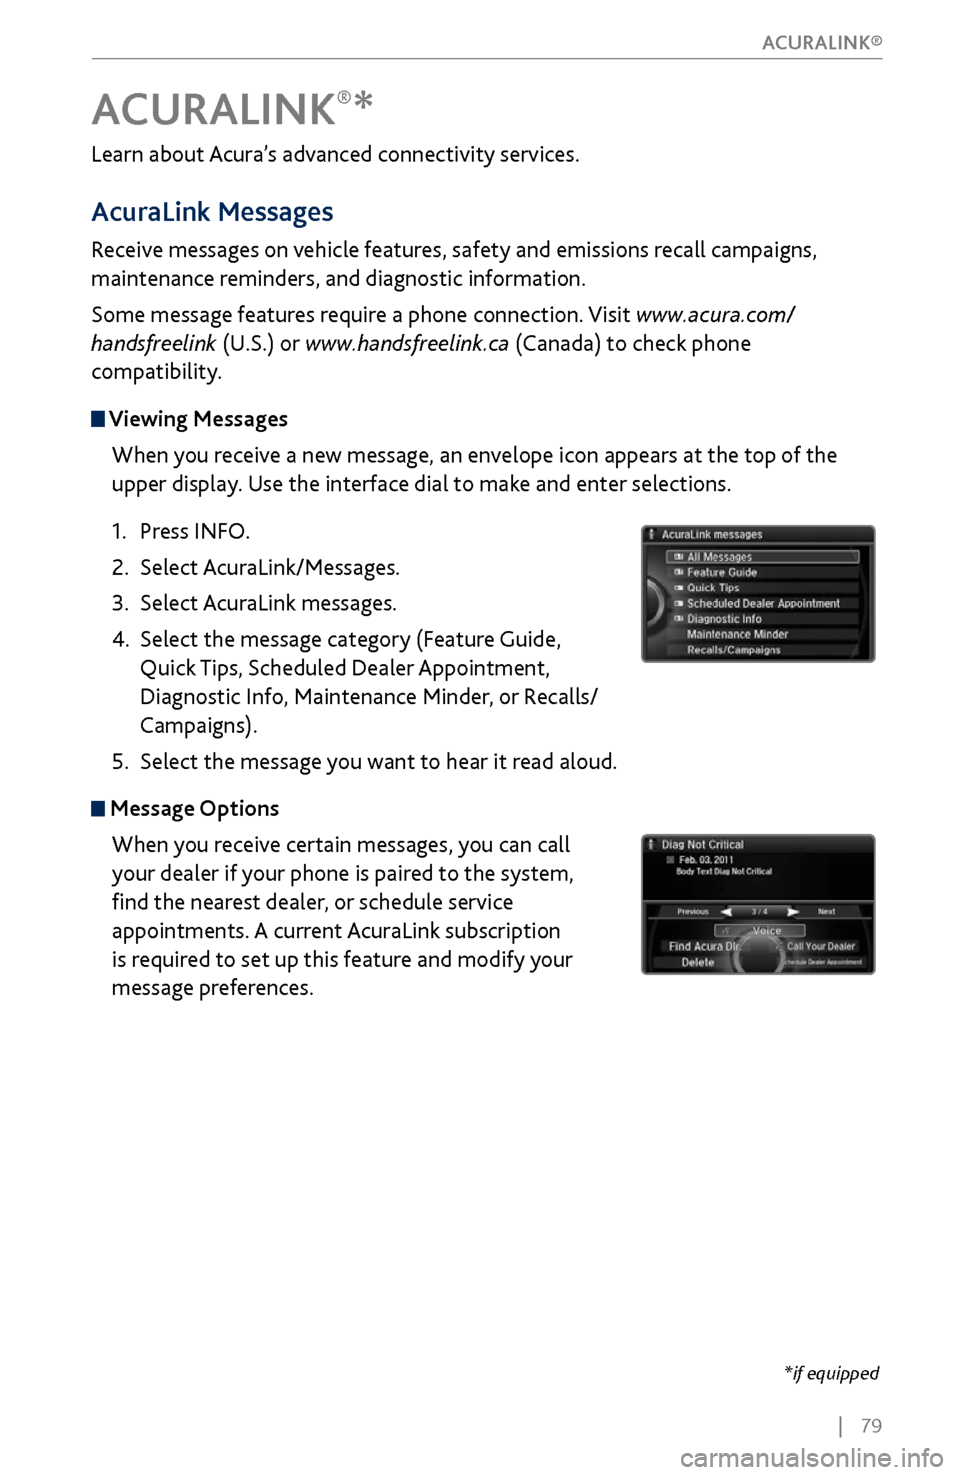
Viewing Messages
When you receive a new message, an envelope icon appears at the top of the
upper display. Use the interface dial to make and enter selections.
1.
Press INFO.
2.
Select AcuraLink/Messages.
3.
Select AcuraLink messages.
4.
Select the message category (Featur
e Guide,
Quick Tips, Scheduled Dealer Appointment,
Diagnostic Info, Maintenance Minder, or Recalls/
Campaigns).
5.
Select the message y
ou want to hear it read aloud.
Message OptionsWhen you receive certain messages, you can call
your dealer if your phone is paired to the system,
find the nearest dealer, or schedule service
appointments. A current AcuraLink subscription
is required to set up this feature and modify your
message preferences.
ACURALINK®*
*if equipped
ACURALINK®
Page 95 of 170
88 |
DRIVING
Learn about preparation for driving, as well as other features.
Before Driving
Check the following items before you begin driving.
Exterior Checks
•
Make sur
e there are no obstructions on the windows, door mirrors, exterior
lights, or other parts of the vehicle.
•
Remov
e any frost, snow, or ice.
•
Make sure
the hood is securely closed.
•
Heat from
the engine and exhaust can ignite flammable materials left under
the hood, causing a fire. If you’ve parked your vehicle for an extended period,
inspect and remove any debris that may have collected, such as dried grass
and leaves that have fallen or have been carried in for use as a nest by a small
animal. Also check under the hood for leftover flammable materials after you
or someone else has performed maintenance on your vehicle.
•
Make sure
the tires are in good condition.
•
Make sure
there are no people or objects behind or around the vehicle.
DRIVING
Interior Checks•
Store or secur
e all items on board properly.
•
Do not pile items higher than the seat height
.
•
Do not place anything in the
front seat footwells. Make sure to secure the floor
mats.
•
If you hav
e any animals on board, do not let them move freely in the vehicle.
•
Securely close and lock all
doors and the tailgate.
•
Adjust y
our seating position, mirrors, and steering wheel properly.
•
Make sure items placed
on the floor behind the front seats cannot roll under
the seats.
•
Everyone in
the vehicle must fasten their seat belt.
•
Make sure
that the indicators in the instrument panel come on when you start
the vehicle, and go off soon after.
If the doors are frozen shut, use warm water around the door edges to melt any
ice. Do not try to force them open, as this can damage the rubber trim around the
doors. When done, wipe dry to avoid further freezing.
NOTICE
Page 131 of 170
124 |
HANDLING THE UNEXPECTED
Tire Pressure Monitoring System (TPMS) - Required Federal Explanation
Each tire, including the spare (if provided), should be checked monthly
when cold and inflated to the inflation pressure recommended by the
vehicle manufacturer on the vehicle placard or tire inflation pressure
label.
(If your vehicle has tires of a different size than the size indicated on the
vehicle placard or tire inflation pressure label, you should determine the
proper tire inflation pressure for those tires.)
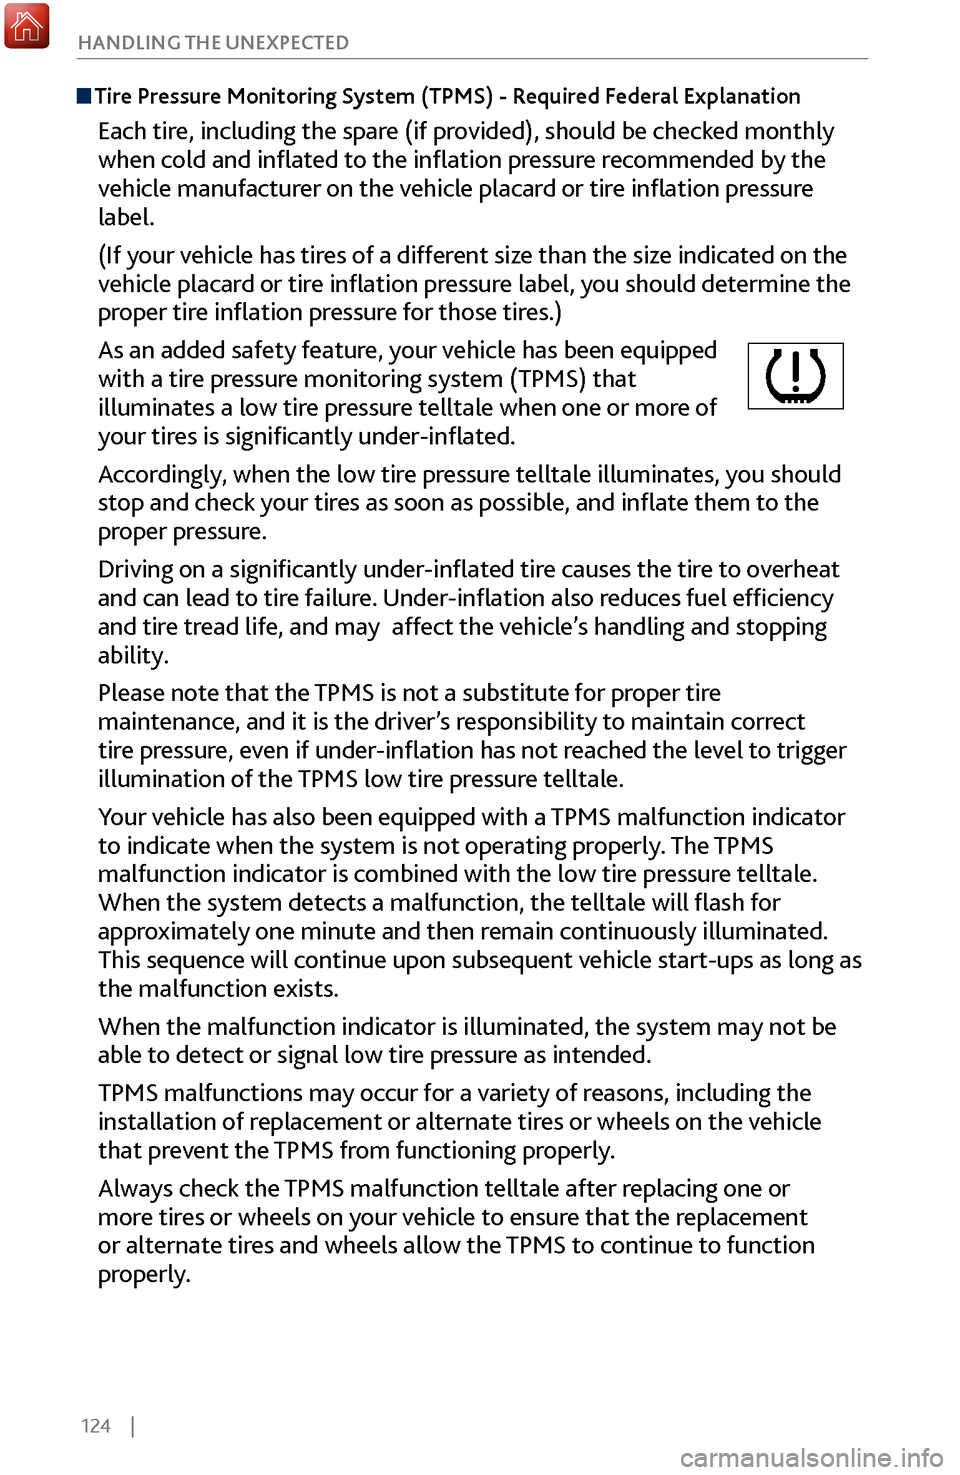
As an added safety feature, your vehicle has been equipped
with a tire pressure monitoring system (TPMS) that
illuminates a low tire pressure telltale when one or more of
your tires is significantly under-inflated.
Accordingly, when the low tire pressure telltale illuminates, you should
stop and check your tires as soon as possible, and inflate them to the
proper pressure.
Driving on a significantly under-inflated tire causes the tire to overheat
and can lead to tire failure. Under-inflation also reduces fuel efficiency
and tire tread life, and may affect the vehicle’s handling and stopping
ability.
Please note that the TPMS is not a substitute for proper tire
maintenance, and it is the driver’s responsibility to maintain correct
tire pressure, even if under-inflation has not reached the level to trigger
illumination of the TPMS low tire pressure telltale.
Your vehicle has also been equipped with a TPMS malfunction indicator
to indicate when the system is not operating properly. The TPMS
malfunction indicator is combined with the low tire pressure telltale.
When the system detects a malfunction, the telltale will flash for
approximately one minute and then remain continuously illuminated.
This sequence will continue upon subsequent vehicle start-ups as long as
the malfunction exists.
When the malfunction indicator is illuminated, the system may not be
able to detect or signal low tire pressure as intended.
TPMS malfunctions may occur for a variety of reasons, including the
installation of replacement or alternate tires or wheels on the vehicle
that prevent the TPMS from functioning properly.
Always check the TPMS malfunction telltale after replacing one or
more tires or wheels on your vehicle to ensure that the replacement
or alternate tires and wheels allow the TPMS to continue to function
properly.
Page 143 of 170

136 |
MAINTENANCE
Learn about basic maintenance that you can perform on the vehicle yourself, as
well as information about how to best maintain the vehicle.
Safety Precautions
Some of the most important safety precautions are listed below; however,
we cannot warn you of every conceivable hazard that can arise in performing
maintenance. Only you can decide whether or not you should perform a given task.
Maintenance Safety
•
To reduce
the possibility of fire or explosion, keep cigarettes, sparks, and flames
away from the battery and all fuel-related parts.
•
Never leav
e rags, towels, or other flammable objects under the hood. Heat
from the engine and exhause can ignite them, causing a fire.
•
To clean parts, use a commerciall
y available degreaser or parts cleaner, not
gasoline.
•
Wear eye pr
otection and protective clothing when working with the battery or
compressed air.
•
Do not run the engine in confined spaces wher
e carbon monoxide gas can
accumulate.
Vehicle Safety
•
The vehicle must be stationary
, and parked on level ground with the parking
brake set and the engine off.
•
Be aware that hot parts can burn
you.
•
Be aware that mo
ving parts can injure you.
MAINTENANCE
Improperly maintaining this vehicle or failing to correct a problem before
driving can cause a crash in which you can be seriously hurt or killed.
Always follow the inspection and maintenance recommendations according
to the schedules in this guide.
WARNING
Failure to properly follow maintenance instructions and precautions can
cause you to be seriously hurt or killed.
Always follow the procedures and precautions in this guide.
WARNING
Page 144 of 170
| 137
MAINTENANCE
Maintenance Minder™
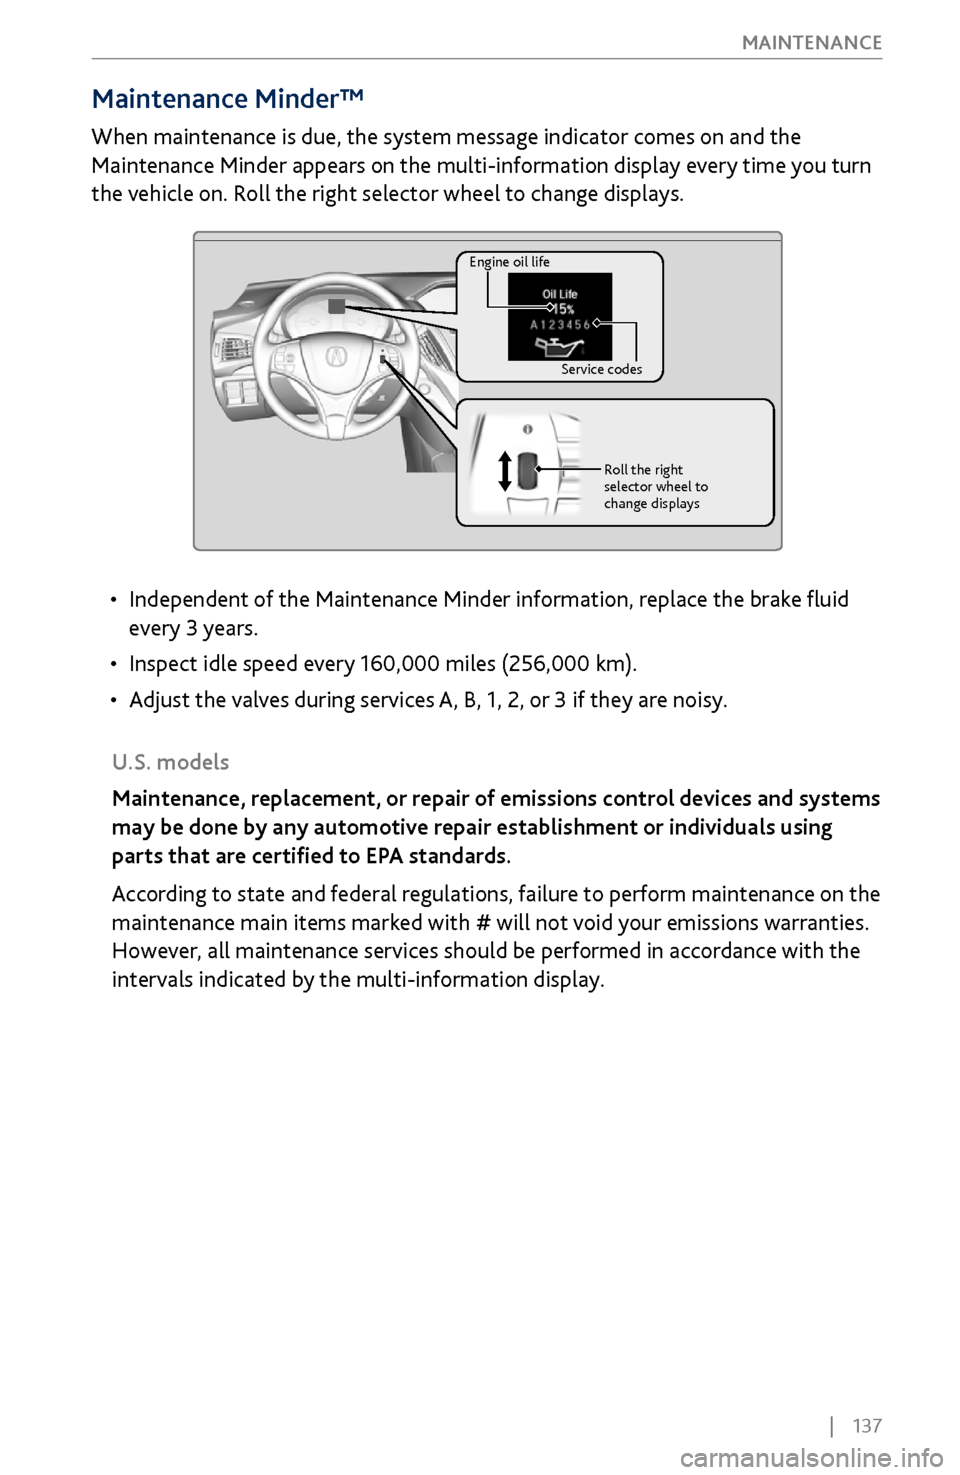
When maintenance is due, the system message indicator comes on and the
Maintenance Minder appears on the multi-information display every time you turn
the vehicle on. Roll the right selector wheel to change displays.
U.S. models
Maintenance, replacement, or repair of emissions control devices and systems
may be done by any automotive repair establishment or individuals using
parts that are certified to EPA standards.
According to state and federal regulations, failure to perform maintenance on the
maintenance main items marked with # will not void your emissions warranties.
However, all maintenance services should be performed in accordance with the
intervals indicated by the multi-information display.
Engine oil life Service codesRoll the right
selector wheel to
change displays
• Independent of the Maintenance Minder information, r eplace the brake fluid
every 3 years.
•
Inspect idle speed every 160,000 miles (256,000 km).
•
Adjust the
valves during services A, B, 1, 2, or 3 if they are noisy.
Page 145 of 170
138 |
MAINTENANCE
*if equipped
Maintenance Minder
Service Codes
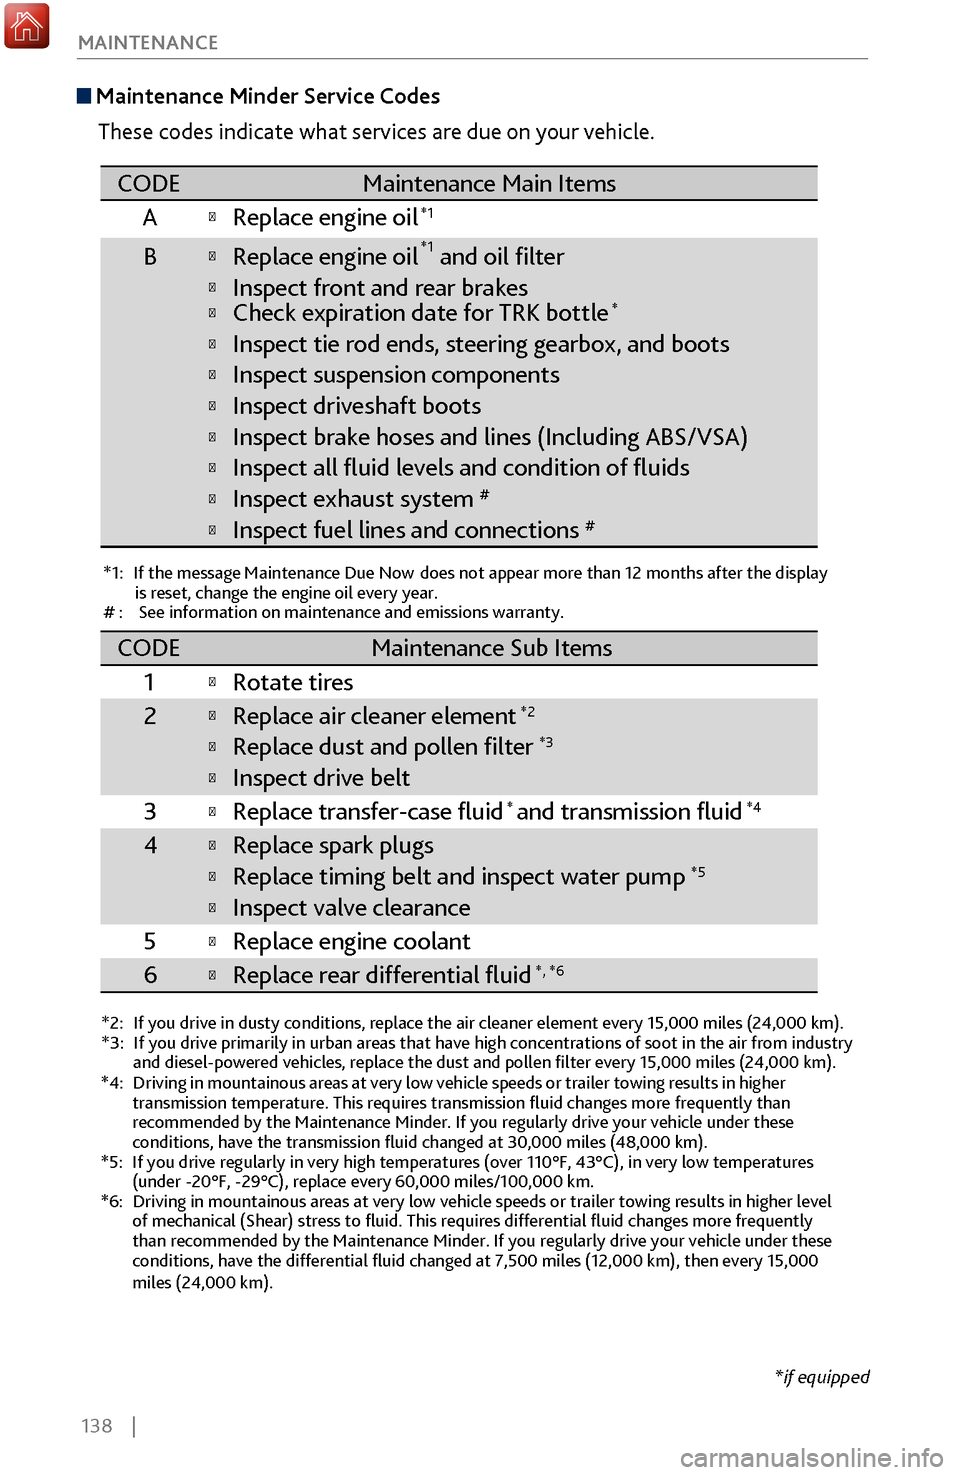
These codes indicate what services are due on your vehicle.
*1: If the message Maintenance Due Now does not appear more than 12 months after the display is reset, change the engine oil every year.
#: See information on maintenance and emissions warranty.
*2:If you drive in dusty conditions, replace the air cleaner element every \
15,000 miles (24,000 km).*3:If you drive primarily in urban areas that have high concentrations of s\
oot in the air from industry and diesel-powered vehicles, replace the dust and pollen �lter every \
15,000 miles (24,000 km).
CODEMaintenance Main Items
A
�Replace engine oi l*1
B�Replace engine oil*1 and oil �lter
�Inspect front and rear brakes�Check expiration date for TRK bottle*
�Inspect tie rod ends, steering gearbox, and boots
�Inspect suspension component s
�Inspect driveshaft boots
�Inspect brake hoses and lines (Including ABS/VSA)
�Inspect all �uid levels and condition of �uids
�Inspect exhaust system#
�Inspect fuel lines and connections#
*4:Driving in mountainous areas at very low vehicle speeds or trailer towing results in higher
transmission temperature. This requires transmission �uid changes mor\
e frequently than
recommended by the Maintenance Minder. If you regularly drive your vehic\
le under these
conditions, have the transmission �uid changed at 30,000 miles (48,0\
00 km).
*5:If you drive regularly in very high temperatures (over 110°F, 43°\
C), in very low temperatures
(under -20°F, -29°C), replace every 60,000 miles/100,000 km.
*6:Driving in mountainous areas at very low vehicle speeds or trailer towin\
g results in higher level
of mechanical (Shear) stress to �uid. This requires differential �\
uid changes more frequently
than recommended by the Maintenance Minder. If you regularly drive your \
vehicle under these
conditions, have the differential �uid changed at 7,500 miles (12,00\
0 km), then every 15,000
miles (24,000 km).
CODEMaintenance Sub Items
1
�Rotate tires
2�Replace air cleaner element*2
�Replace dust and pollen �lter*3
�Inspect drive belt
3
�Replace transfer-case �uid and transmission �ui d*4
4�Replace spark plugs
�Replace timing belt and inspect water pum p*5
�Inspect valve clearance
5
�Replace engine coolant
6�Replace rear differential �uid*, *6
*
Page 146 of 170
| 139
MAINTENANCE
Under the Hood
Brake Fluid
Washer Fluid
Radiator Cap
Engine Coolant
Reserve Tan
k Batter
y
Engine Oil Dipstick
(Orange) Engine Oil Fill Ca
p
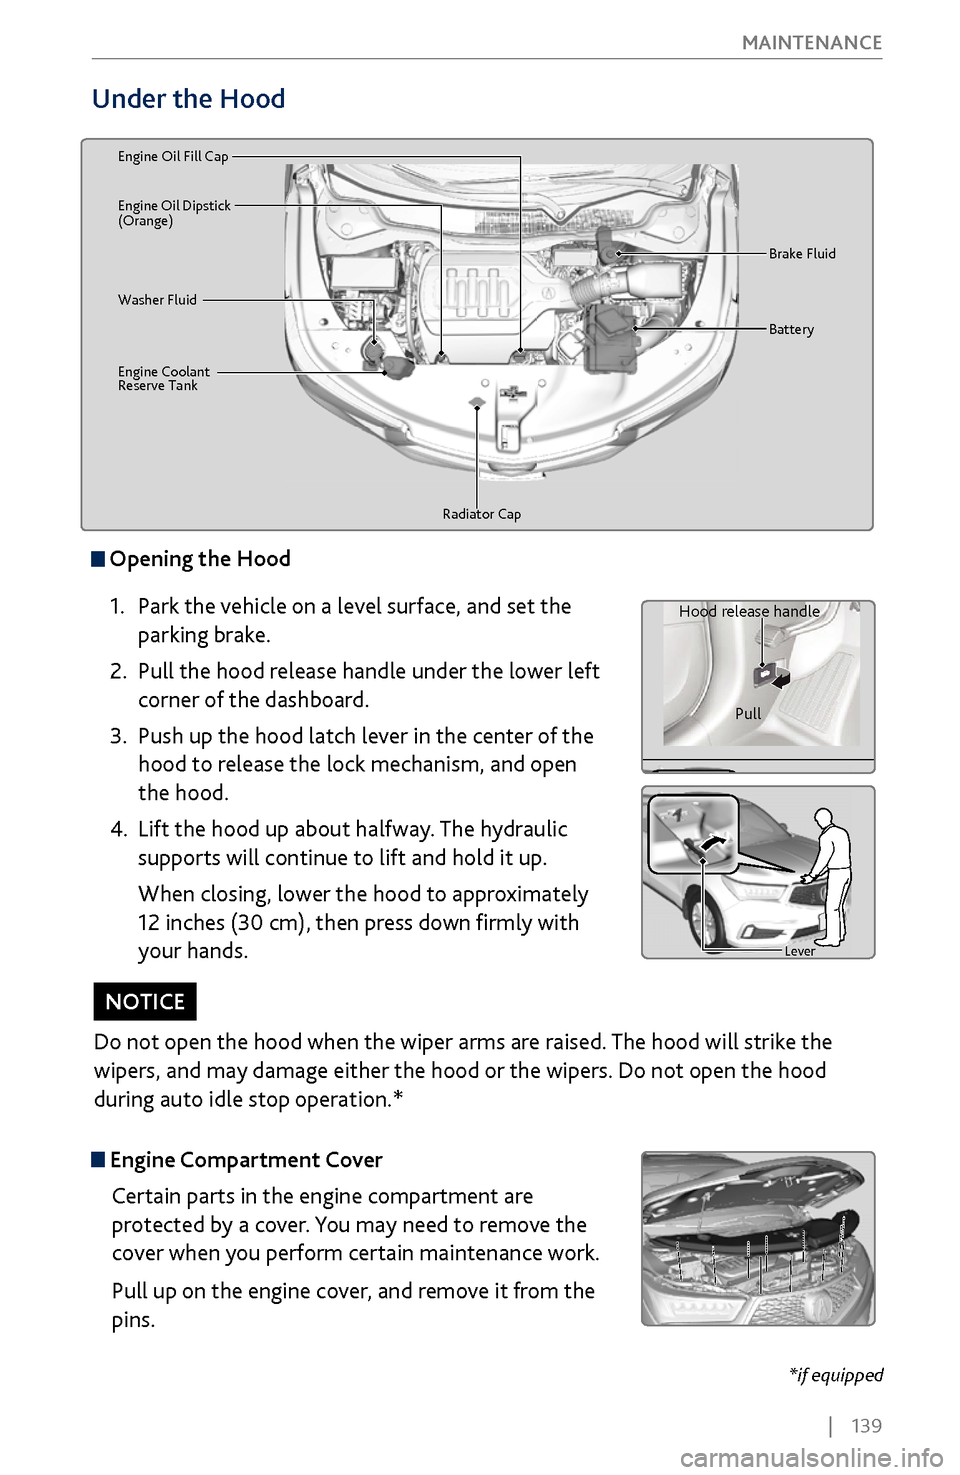
Opening the Hood
1.
Park the
vehicle on a level surface, and set the
parking brake.
2.
Pull the hood release handle under
the lower left
corner of the dashboard.
3.
Push up the hood latch lever in
the center of the
hood to release the lock mechanism, and open
the hood.
4.
Lift the hood up about halfway.
The hydraulic
supports will continue to lift and hold it up.
When closing, lower the hood to approximately
12 inches (30 cm), then press down firmly with
your hands.
Lever
Hood release handle
Pull
Lever
Engine Compartment CoverCertain parts in the engine compartment are
protected by a cover. You may need to remove the
cover when you perform certain maintenance work.
Pull up on the engine cover, and remove it from the
pins.
Do not open the hood when the wiper arms are raised. The hood will strike the
wipers, and may damage either the hood or the wipers. Do not open the hood
during auto idle stop operation.*
NOTICE
*if equipped
Page 147 of 170
140 |
MAINTENANCE
Engine Oil
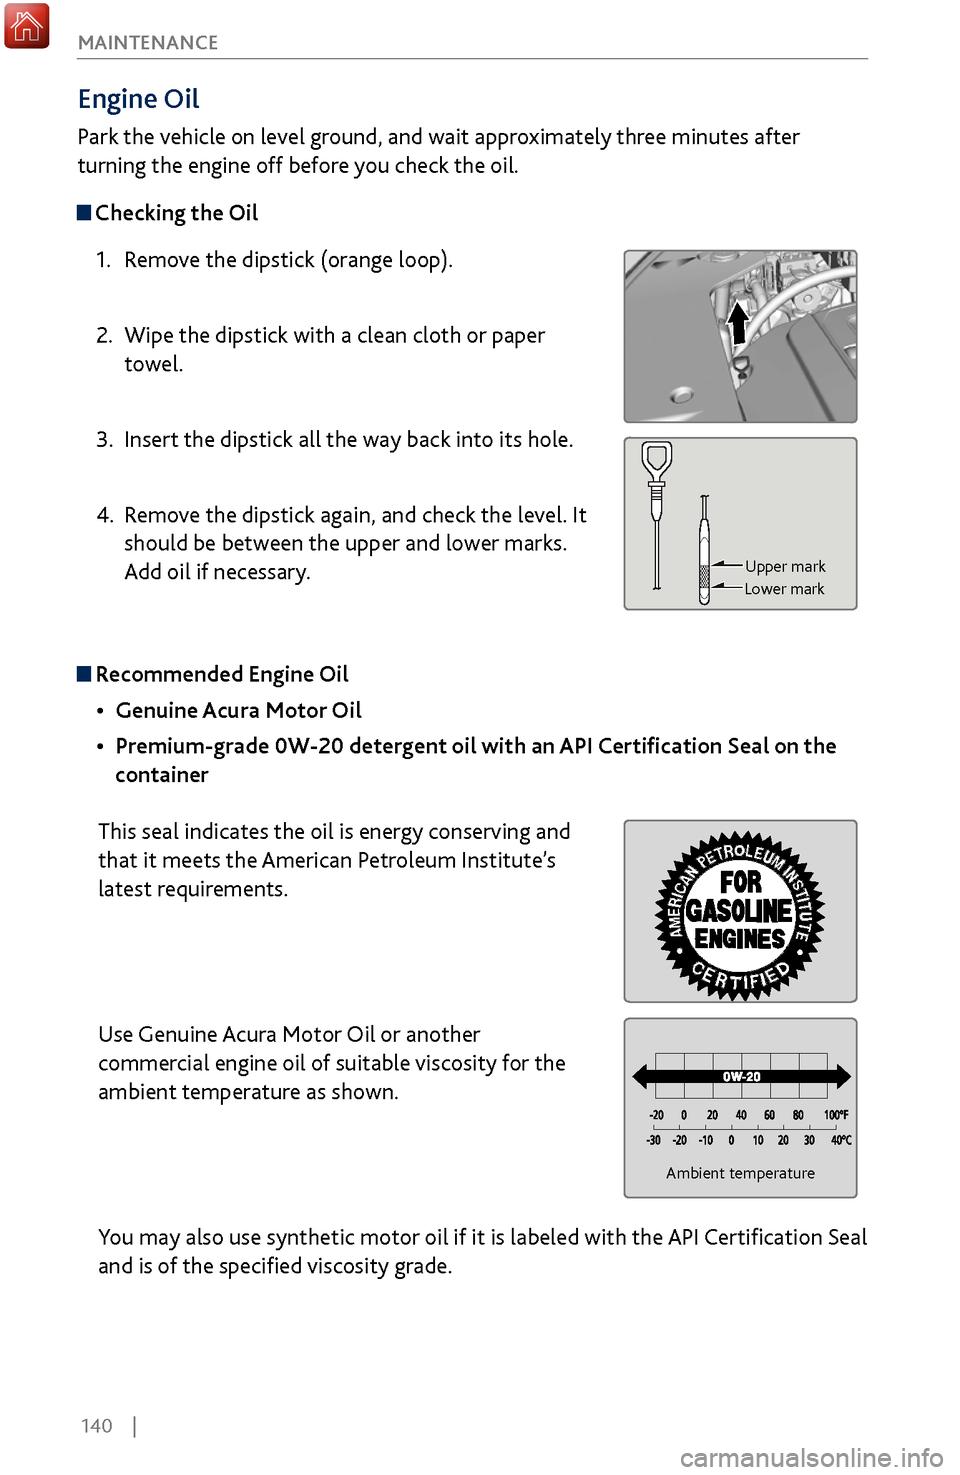
Park the vehicle on level ground, and wait approximately three minutes after
turning the engine off before you check the oil.
Checking the Oil
1.
Remov
e the dipstick (orange loop).
2.
Wipe the dipstick
with a clean cloth or paper
towel.
3.
Insert the dipstick all
the way back into its hole.
4.
Remov
e the dipstick again, and check the level. It
should be between the upper and lower marks.
Add oil if necessary.
Upper mark
Lower mark
Recommended Engine Oil
•
Genuine Acura Motor
Oil
•
Premium-grade 0W-20 deter
gent oil with an API Certification Seal on the
container
This seal indicates the oil is energy conserving and
that it meets the American Petroleum Institute’s
latest requirements.
Use Genuine Acura Motor Oil or another
commercial engine oil of suitable viscosity for the
ambient temperature as shown.
You may also use synthetic motor oil if it is labeled with the API Certification Seal
and is of the specified viscosity grade.
Ambient temperature