warning light Acura MDX 2017 Owner's Guide
[x] Cancel search | Manufacturer: ACURA, Model Year: 2017, Model line: MDX, Model: Acura MDX 2017Pages: 170, PDF Size: 12.43 MB
Page 9 of 170
2 |
V
ISUAL INDEX
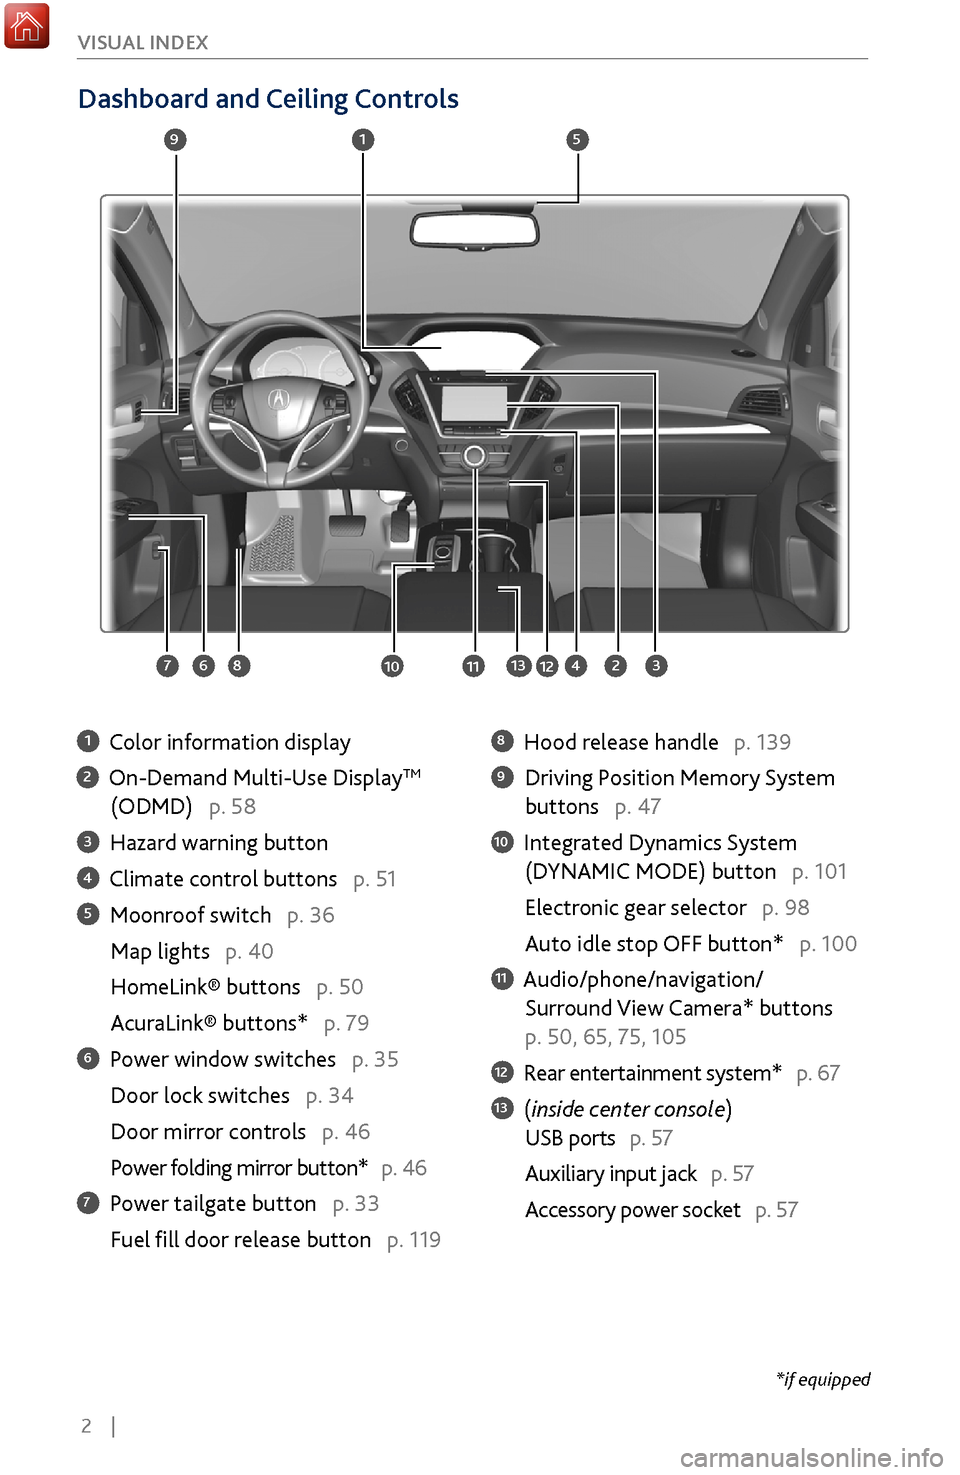
Dashboard and Ceiling Controls
1 Color information display
2 On-Demand Multi-Use DisplayTM
(ODMD) p. 58
3 Hazard warning button
4 Climate control buttons p. 51
5 Moonroof switch p. 36
Map lights p. 40
HomeLink® buttons p. 50
AcuraLink® buttons* p. 79
6 Power window switches p. 35
Door lock switches p. 34
Door mirror controls
p. 46
Power folding mirr
or button* p. 46
7 Power tailgate button p. 33
Fuel fill door r
elease button p. 119
8 Hood release handle p. 139
9 Driving Position Memory System
buttons p. 47
10 Integrated Dynamics System
(D
YNAMIC MODE) button p. 101
Electronic gear selector p. 98
Auto idle stop OFF button* p. 100
11 Audio/phone/navigation/
Surround View Camera*
buttons
p. 50, 65, 75, 105
12 Rear entertainment system* p. 67
13 (inside center console)
USB ports p. 57
Auxiliary input jack p. 57
Accessory power socket
p. 57
1
2834
5
67
9
101112
*if equipped
13
Page 42 of 170
| 35
V
EHICLE CONTROLS
Power
Window Operation
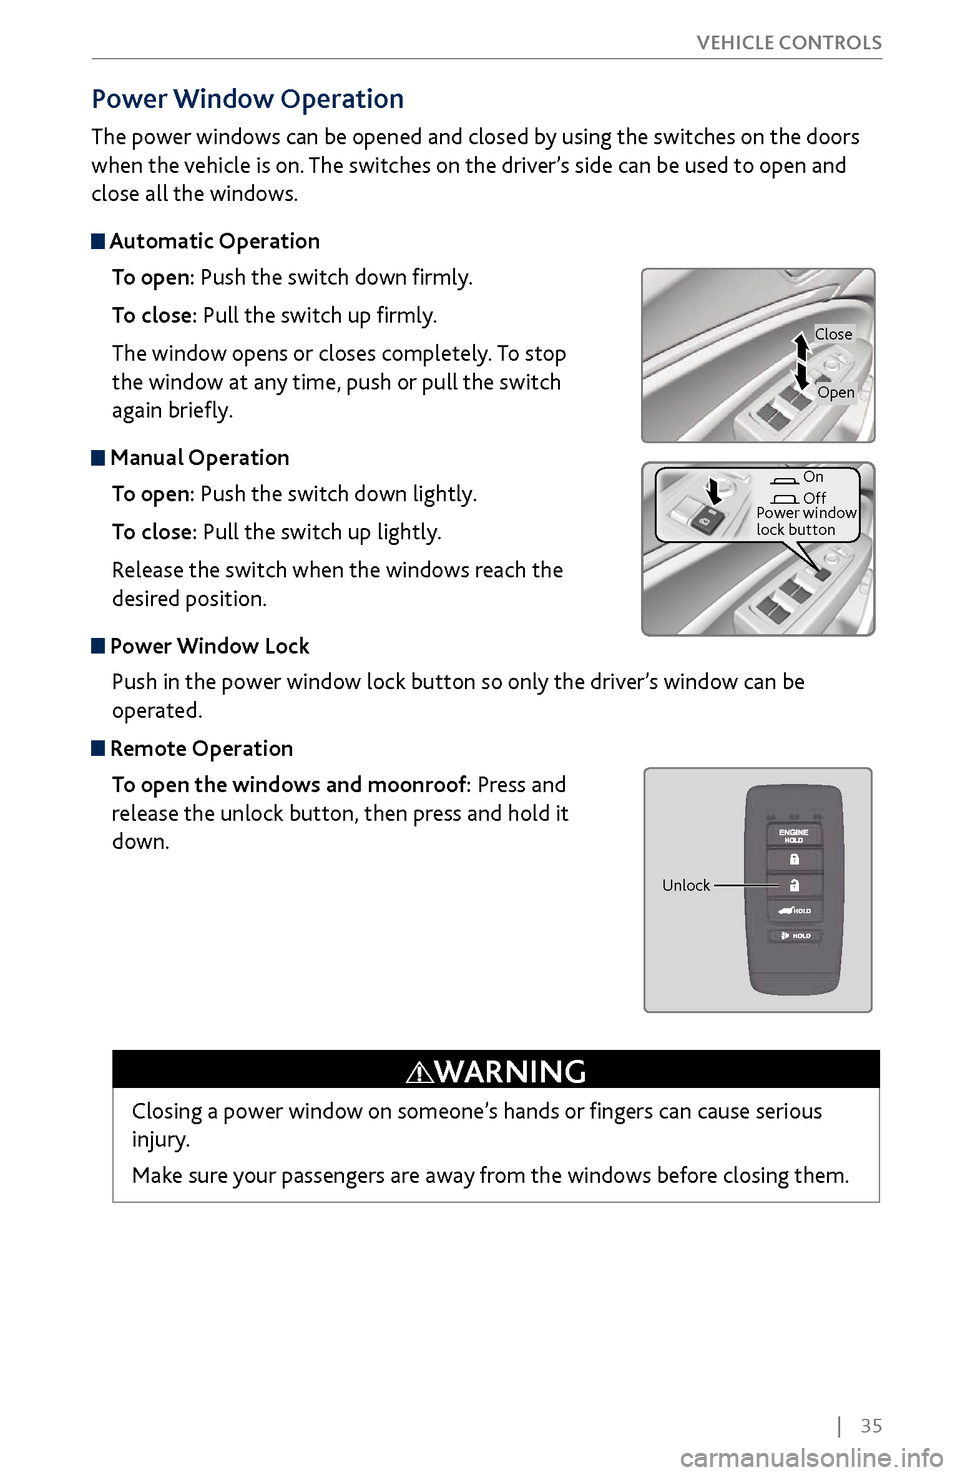
The power windows can be opened and closed by using the switches on the doors
when the vehicle is on. The switches on the driver’s side can be used to open and
close all the windows.
Automatic Operation
To open: Push the switch down firmly.
To close: Pull the switch up firmly.
The window opens or closes completely. To stop
the window at any time, push or pull the switch
again briefly.
Manual OperationTo open: Push the switch down lightly.
To close: Pull the switch up lightly.
Release the switch when the windows reach the
desired position.
Power Window LockPush in the power window lock button so only the driver’s window can be
operated.
Remote OperationTo open the windows and moonroof: Press and
release the unlock button, then press and hold it
down.
Closing a power window on someone’s hands or fingers can cause serious
injury.
Make sure your passengers are away from the windows before closing them.
WARNING
Close
On
Off
Power window
lock button
Open
Unlock
Page 98 of 170

| 91
DRIVING
Load Limits Example
Example1
Max load
1,173 lbs
(532 kg) Passenger weight
150 lbs x 2 = 300 lbs
(68 kg x 2 = 136 kg )Cargo weight
873 lbs
(396 kg)
Example2 Max load
1,173 lbs
(532 kg) Passenger weight
150 lbs x 5 = 750 lbs
(68 kg x 5 = 340 kg) Cargo weight
423 lbs
(192 kg)
Overloading or improper loading can affect handling and stability and cause
a crash in which you can be hurt or killed.
Follow all load limits and other loading guidelines in this manual.
WARNING
The headlight aim on your vehicle was set by the factory, and does not need to be
adjusted. However, if you regularly carry heavy items in the cargo area or pull a
trailer, have the aiming readjusted at your dealer or by a qualified technician.
Page 102 of 170
| 95
DRIVING
Pre-Tow Checklist
When preparing to tow, and before driving away, be sure to check the following:
•
Avoid
towing a trailer during your vehicle’s first 600 miles (1,000 km).
•
The vehicle and
trailer have been properly serviced and are in good condition.
Lights and brakes work properly, and the tires are properly inflated.
•
All weights and loads are
within limits. Never exceed the gross weight ratings.
•
When towing more
than 3,500 lbs (1,590 kg), use of gasoline with an octane
rating of 91 or higher is recommended.
•
Check if all loads are within limits at a public scale (see page 94). If a pu
blic
scale is not available, add the estimated weight of your cargo load to the
weight of the trailer (as quoted by the manufacturer) and the tongue load.
•
The hitch, safety chains, and any other attachments ar
e secure.
•
All items in or on
the trailer are properly secured and cannot shift while you
drive.
Exceeding any load limit or improperly loading your vehicle and trailer can
cause a crash in which you can be seriously hurt or killed.
Check the loading of your vehicle and trailer carefully before starting to
drive.
WARNING
Page 103 of 170
96 |
DRIVING
Remote Engine Start*
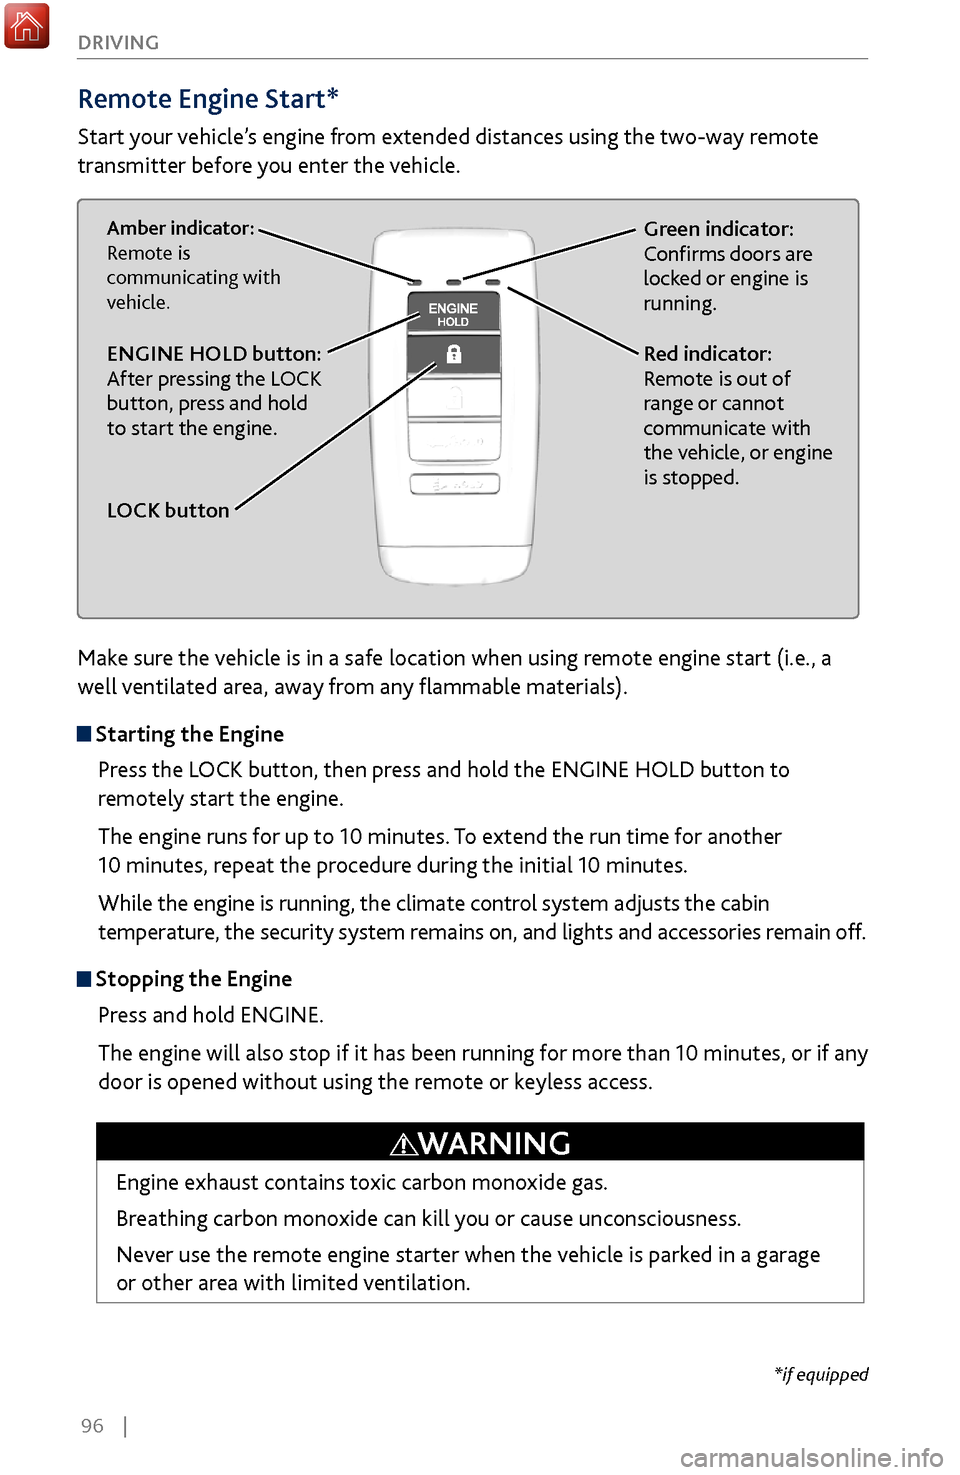
Start your vehicle’s engine from extended distances using the two-way remote
transmitter before you enter the vehicle.
Green indicator:
Confirms doors are
locked or engine is
running.Amber indicator:
Remote is
communicating with
vehicle.
Red indicator:
Remote is out of
range or cannot
communicate with
the vehicle, or engine
is stopped.ENGINE HOLD button:
After pressing the LOCK
button, press and hold
to start the engine.
LOCK button
Make sure the vehicle is in a safe location when using remote engine start (i.e., a
well ventilated area, away from any flammable materials).
Starting the Engine
Press the LOCK button, then press and hold the ENGINE HOLD button to
remotely start the engine.
The engine runs for up to 10 minutes. To extend the run time for another
10 minutes, repeat the procedure during the initial 10 minutes.
While the engine is running, the climate control system adjusts the cabin
temperature, the security system remains on, and lights and accessories remain off.
Stopping the Engine Press and hold ENGINE.
The engine will also stop if it has been running for more than 10 minutes, or if any
door is opened without using the remote or keyless access.
Engine exhaust contains toxic carbon monoxide gas.
Breathing carbon monoxide can kill you or cause unconsciousness.
Never use the remote engine starter when the vehicle is parked in a garage
or other area with limited ventilation.
WARNING
*if equipped
Page 115 of 170
108 |
DRIVING
Collision Mitigation Braking System™ (CMBS™)
Can assist you when there is a possibility of your vehicle colliding with a vehicle or a
pedestrian detected in front of yours.
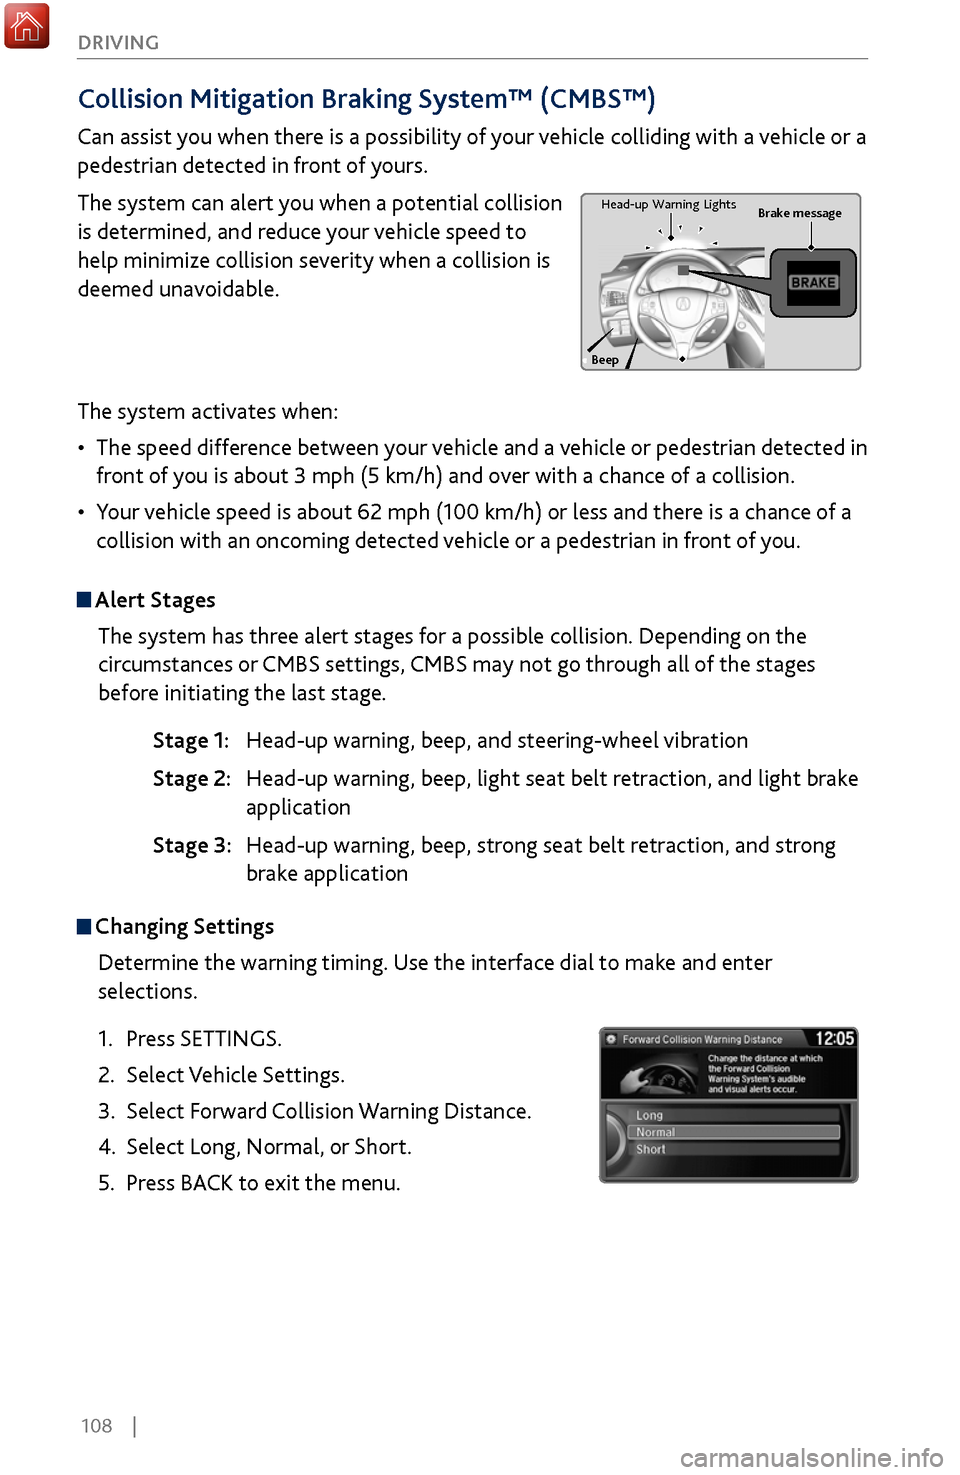
The system can alert you when a potential collision
is determined, and reduce your vehicle speed to
help minimize collision severity when a collision is
deemed unavoidable.
The system activates when:
•
The speed difference between
your vehicle and a vehicle or pedestrian detected in
front of you is about 3 mph (5 km/h) and over with a chance of a collision.
•
Your v
ehicle speed is about 62 mph (100 km/h) or less and there is a chance of a
collision with an oncoming detected vehicle or a pedestrian in front of you.
Alert Stages
The system has three alert stages for a possible collision. Depending on the
circumstances or CMBS settings, CMBS may not go through all of the stages
before initiating the last stage.
Stage 1: Head-up warning, beep
, and steering-wheel vibration
Stage 2: Head-up warning, beep
, light seat belt retraction, and light brake
application
Stage 3:
Head-up warning, beep
, strong seat belt retraction, and strong
brake application
Beep Brake message
Head-up
Warning Lights
Changing Settings
Determine the warning timing. Use the interface dial to make and enter
selections.
1.
Press SETTINGS.
2.
Select Vehicle Settings.
3.
Select Forward
Collision Warning Distance.
4.
Select Long, Normal, or
Short.
5.
Press BACK
to exit the menu.
Page 117 of 170
110 |
DRIVING
Lane Departure Warning (LDW)
Alerts you if the system detects a possibility of your vehicle unintentionally
crossing over detected lane markings while driving between 45–90 mph (72–145
km/h).
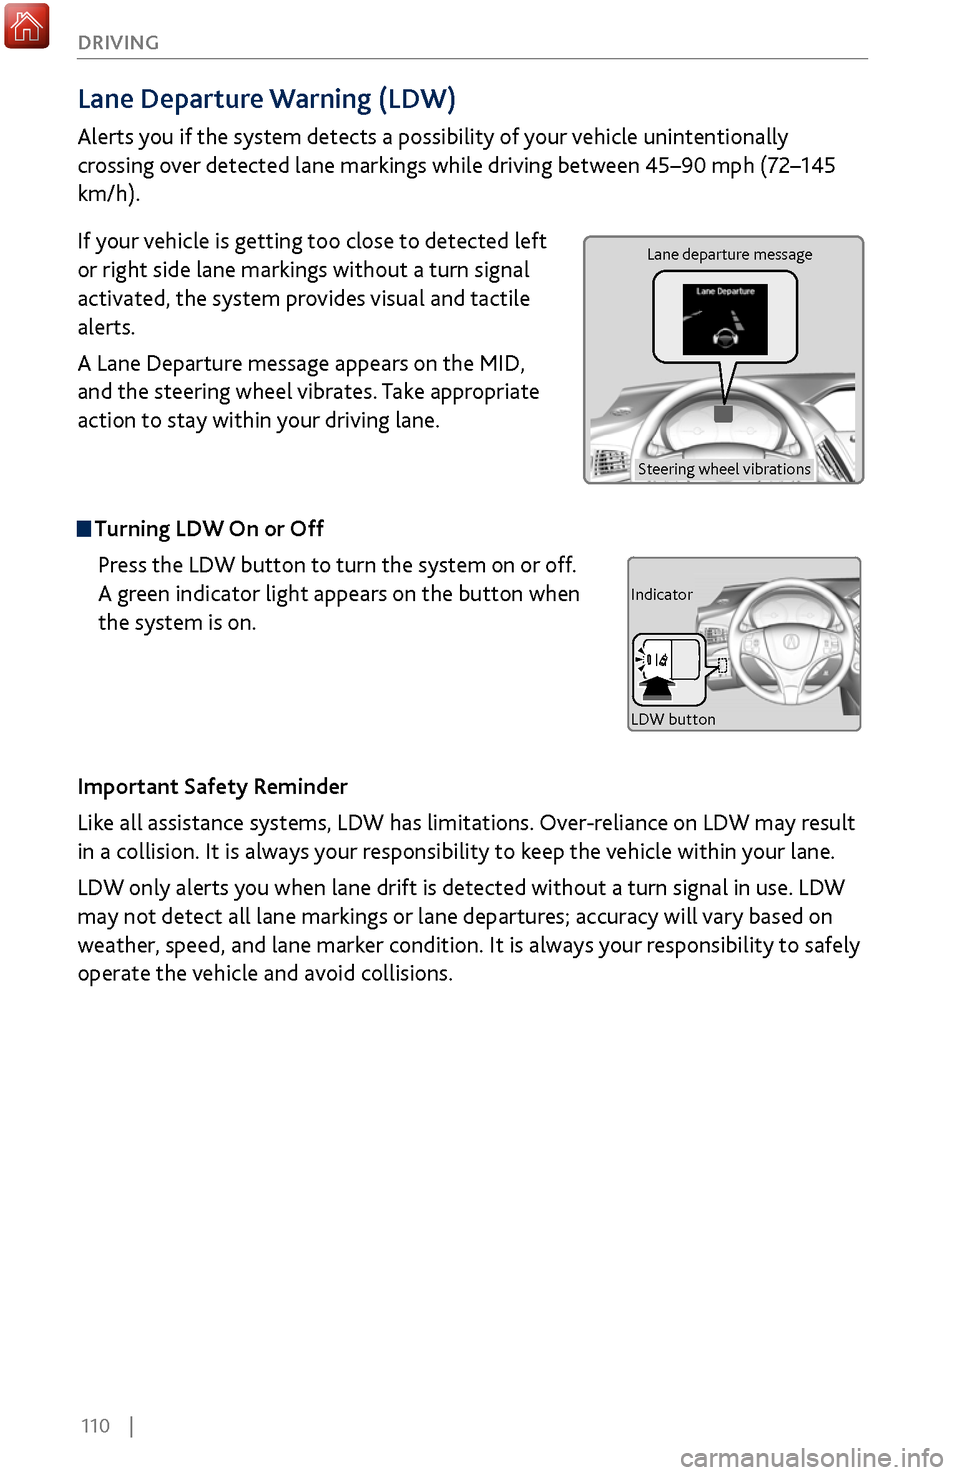
If your vehicle is getting too close to detected left
or right side lane markings without a turn signal
activated, the system provides visual and tactile
alerts.
A Lane Departure message appears on the MID,
and the steering wheel vibrates. Take appropriate
action to stay within your driving lane.
Turning LDW On or Off
Press the LDW button to turn the system on or off.
A green indicator light appears on the button when
the system is on.
Important Safety Reminder
Like all assistance systems, LDW has limitations. Over-reliance on LDW may result
in a collision. It is always your responsibility to keep the vehicle within your lane.
LDW only alerts you when lane drift is detected without a turn signal in use. LDW
may not detect all lane markings or lane departures; accuracy will vary based on
weather, speed, and lane marker condition. It is always your responsibility to safely
operate the vehicle and avoid collisions.
Lane departure message
Steering wheel vibrations
Indicator
LDW button
Page 119 of 170
112 |
DRIVING
Road Departure Mitigation (RDM)
Alerts and helps to assist you if the system determines a possibility of your vehicle
unintentionally crossing over detected lane markings while driving between 45–90
mph (72–145 km/h).
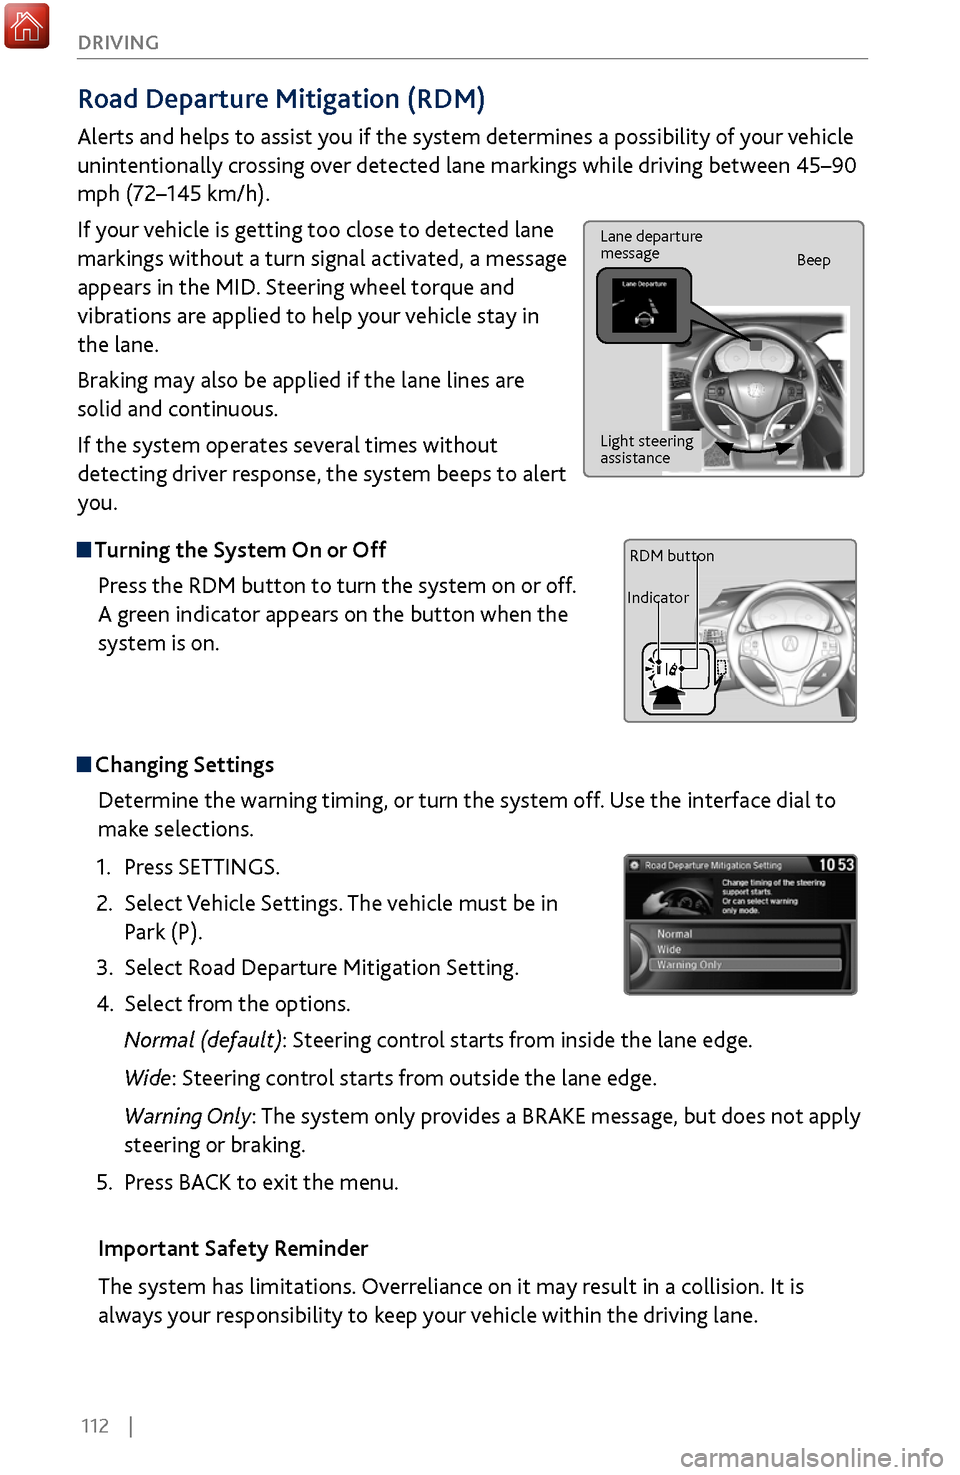
If your vehicle is getting too close to detected lane
markings without a turn signal activated, a message
appears in the MID. Steering wheel torque and
vibrations are applied to help your vehicle stay in
the lane.
Braking may also be applied if the lane lines are
solid and continuous.
If the system operates several times without
detecting driver response, the system beeps to alert
you.
Turning the System On or Off
Press the RDM button to turn the system on or off.
A green indicator appears on the button when the
system is on.
Steering vibrations
Changing SettingsDetermine the warning timing, or turn the system off. Use the interface dial to
make selections.
1.
Press SETTINGS.
2.
Select Vehicle
Settings. The vehicle must be in
Park (P).
3.
Select Road Departure Mitigation
Setting.
4.
Select from the options.
Normal (def
ault): Steering control starts from inside the lane edge.
Wide: Steering control starts from outside the lane edge.
Warning Only: The system only provides a BRAKE message, but does not apply
steering or braking.
5.
Press BACK
to exit the menu.
Important Safety Reminder
The system has limitations. Overreliance on it may result in a collision. It is
always your responsibility to keep your vehicle within the driving lane.
Lane departure
message Beep
Light steering
assistance
IndicatorRDM button
Page 127 of 170
120 |
HANDLING THE UNEXPECTED
Jump Starting
Turn off the power to all electric devices, including audio and lights. Turn off the
engine, then open the hood (see page 139).
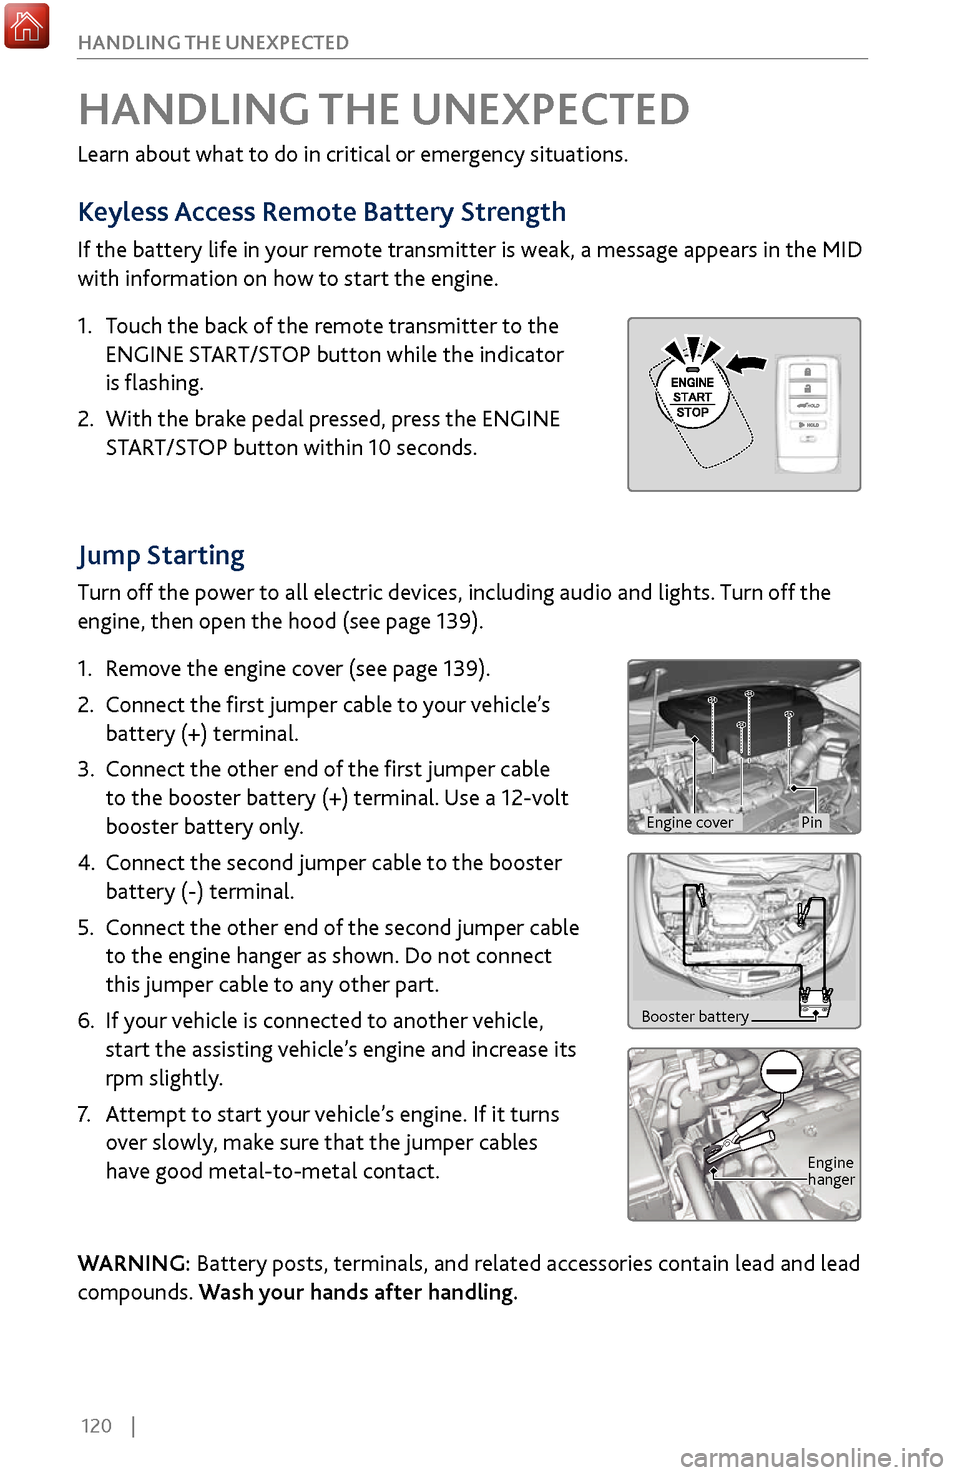
1.
Remov
e the engine cover (see page 139).
2.
Connect the first
jumper cable to your vehicle’s
battery (+) terminal.
3.
Connect the other end of the
first jumper cable
to the booster battery (+) terminal. Use a 12-volt
booster battery only.
4.
Connect the second jumper cable
to the booster
battery (-) terminal.
5.
Connect the other end of the
second jumper cable
to the engine hanger as shown. Do not connect
this jumper cable to any other part.
6.
If your
vehicle is connected to another vehicle,
start the assisting vehicle’s engine and increase its
rpm slightly.
7.
Attempt to start
your vehicle’s engine. If it turns
over slowly, make sure that the jumper cables
have good metal-to-metal contact.
WARNING: Battery posts, terminals, and related accessories contain lead and lead
compounds. Wash your hands after handling.
HANDLING THE UNEXPECTED
Learn about what to do in critical or emergency situations.
Keyless Access Remote Battery Strength
If the battery life in your remote transmitter is weak, a message appears in the MID
with information on how to start the engine.
1.
Touch the back of the
remote transmitter to the
ENGINE START/STOP button while the indicator
is flashing.
2.
With the brake pedal pr
essed, press the ENGINE
START/STOP button within 10 seconds.
Booster battery
Engine
hanger
Engine coverPin
Page 129 of 170
122 |
HANDLING THE UNEXPECTED
Overheating
If you see the multi-information display (MID) message “Stop Driving When Safe.
Engine Temperature Too Hot,” your engine is overheating. You may also notice the
temperature gauge is at the H mark, the engine suddenly loses power, or steam or
spray comes out from under the hood.
1.
Immediately park the
vehicle in a safe place. Turn
off all accessories and turn on the hazard warning
lights.
2. If no steam or spray is present: Keep the engine
running and open the hood (see page 139).
If steam or spray is present
: Turn off the engine
and wait until it subsides. Then, open the hood.
3.
Check that the cooling
fan is operating. If it is not, immediately stop the engine.
Otherwise, idle the engine until the MID message goes off.
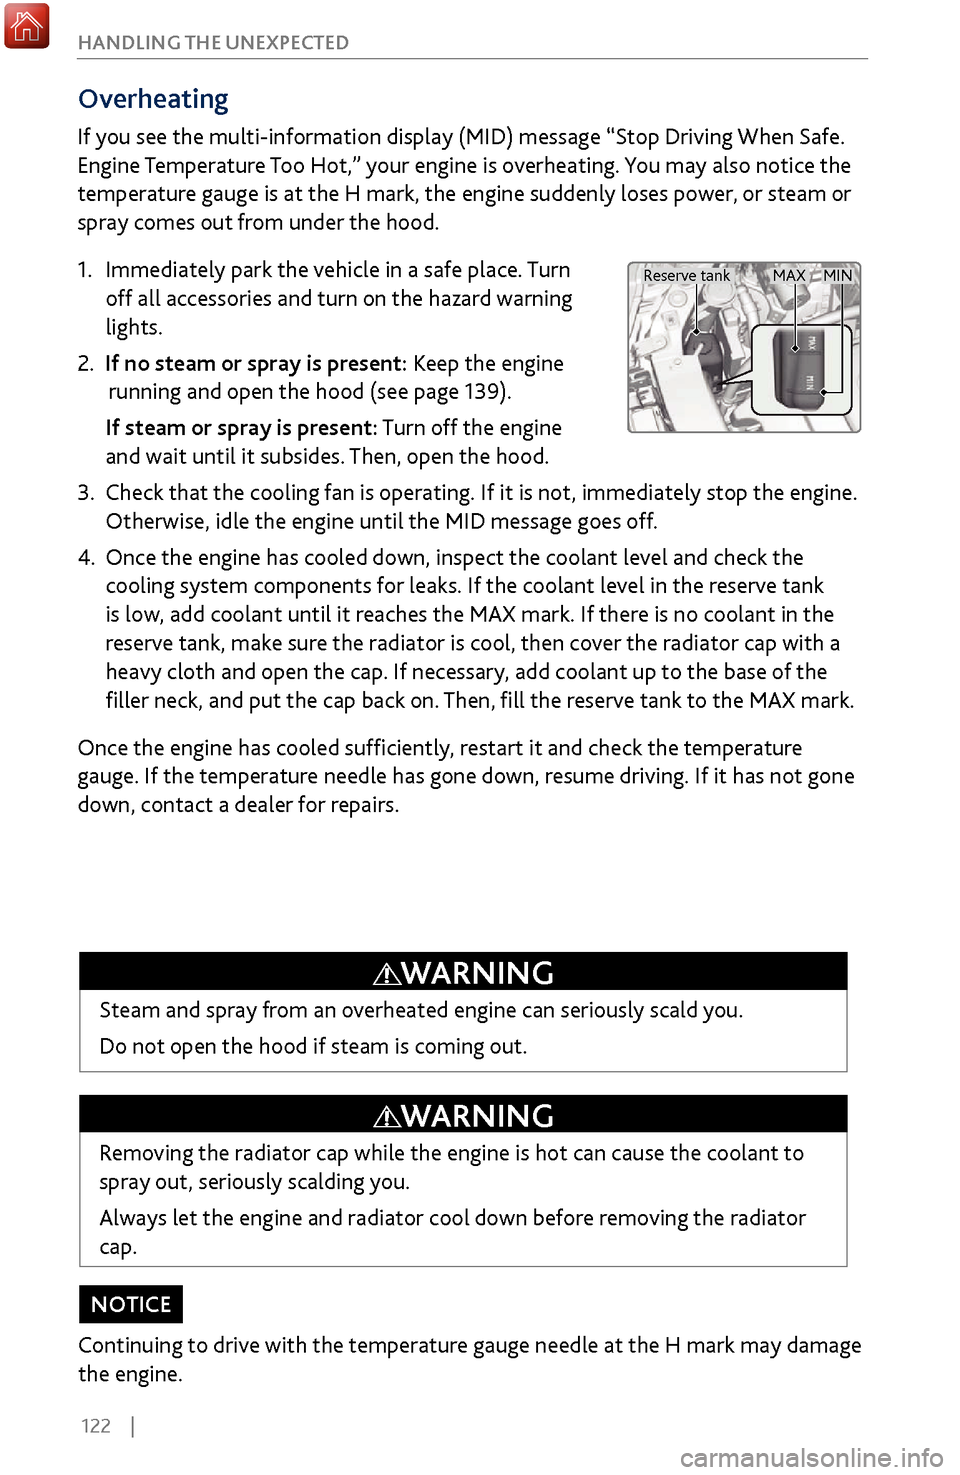
4. Once the engine has cooled down, inspect
the coolant level and check the
cooling system components for leaks. If the coolant level in the reserve tank
is low, add coolant until it reaches the MAX mark. If there is no coolant in the
reserve tank, make sure the radiator is cool, then cover the radiator cap with a
heavy cloth and open the cap. If necessary, add coolant up to the base of the
filler neck, and put the cap back on. Then, fill the reserve tank to the MAX mark.
Once the engine has cooled sufficiently, restart it and check the temperature
gauge. If the temperature needle has gone down, resume driving. If it has not gone
down, contact a dealer for repairs.
Removing the radiator cap while the engine is hot can cause the coolant to
spray out, seriously scalding you.
Always let the engine and radiator cool down before removing the radiator
cap.
WARNING
Steam and spray from an overheated engine can seriously scald you.
Do not open the hood if steam is coming out.
WARNING
Continuing to drive with the temperature gauge needle at the H mark may damage
the engine.
NOTICE
MAX MIN
Reserve tank