start Acura MDX 2019 Service Manual
[x] Cancel search | Manufacturer: ACURA, Model Year: 2019, Model line: MDX, Model: Acura MDX 2019Pages: 701, PDF Size: 38.75 MB
Page 186 of 701

185
uuOperating the Switches Around the Steering Wheel uRear Defogger/Heated Door Mirror Button
Controls
Rear Defogger/Heated Door Mirror Button
Press the rear defogger and heated door mirror button to defog the rear window
and mirrors when the power mode is in ON.
The rear defogger and heated door mirrors
automatically switch off after 10-30 minutes
depending on the outside temperature.
Heated Windshield Button*
Press the heated windshield button to deice
the windshield when the power mode is in
ON.
1 Rear Defogger/Heated Door Mirror Button
This system consumes a lot of power, so turn it off
when the window has been defogged. Also, do not
use the system for a long ti me while the engine is
idling. This may weaken the battery, making it
difficult to start the engine.
When the power mode is se t to ON and the outside
temperature is below 41°F (5°C), the heated door
mirror may automatically activate for 10 minutes.
1 Heated Windshield Button*
This system consumes a lot of power, so turn it off
when the window has been deiced. Also, do not use
the system for a long peri od when the engine is
idling. This may weaken the battery, making it
difficult to start the engine.
When the outside temperature is below 39°F (4°C),
the heated windshield may automatically activate.
The system deactivates itself once the outside
temperature reaches 43°F (6°C).
* Not available on all models
19 ACURA MDX-31TZ56510.book 185 ページ 2018年12月11日 火曜日 午後4時47分
Page 190 of 701

189
Controls
Adjusting the Mirrors
Interior Rearview Mirror
Adjust the angle of the rearview mirror when you are sitting in the correct driving
position.
When you are driving after dark, the
automatic dimming rearview mirror and
power door mirrors
* reduce the glare from
headlights behind you, based on inputs from
the mirror sensor. This feature is always active.
■Automatic Dimming Rearview Mirror and Power Door
Mirrors
*
1 Adjusting the Mirrors
Keep the inside and out side mirrors clean and
adjusted for best visibility.
Adjust the mirrors befo re you start driving.
2 Front Seats P. 192
1Automatic Dimming Rearview Mirror and Power Door Mirrors*
The auto dimming function cancels when the
transmission is in
(R.
* Not available on all models
19 ACURA MDX-31TZ56510.book 189 ページ 2018年12月11日 火曜日 午後4時47分
Page 192 of 701

191
uuAdjusting the Mirrors uPower Door Mirrors
Controls
■Folding the door mirrors
Lock all doors from outside the vehicle. u The mirrors start folding automatically.
2 Locking and Unlocking the Doors P. 139
■Unfolding the door mirrors
Unlock the driver’s or all doors from outside the vehicle.
u The mirrors start unfo lding automatically.
2Locking and Unlocking the Doors P. 139
■Automatic Folding Door Mirror Function*1Automatic Folding Door Mirror Function*
Door mirrors will not unfol d automatically if fold
button is pressed.
2 Folding door mirrors
* P. 190
You can turn the automa tic folding door mirror
function on and off. 2 Customized Features P. 126, 360
Door mirrors will not fold automatically when locking
from inside the vehicle usi ng lock tab or master door
lock switch.
* Not available on all models
19 ACURA MDX-31TZ56510.book 191 ページ 2018年12月11日 火曜日 午後4時47分
Page 218 of 701
Continued217
uuInterior Lights/Interior Convenience Items uInterior Convenience Items
Controls
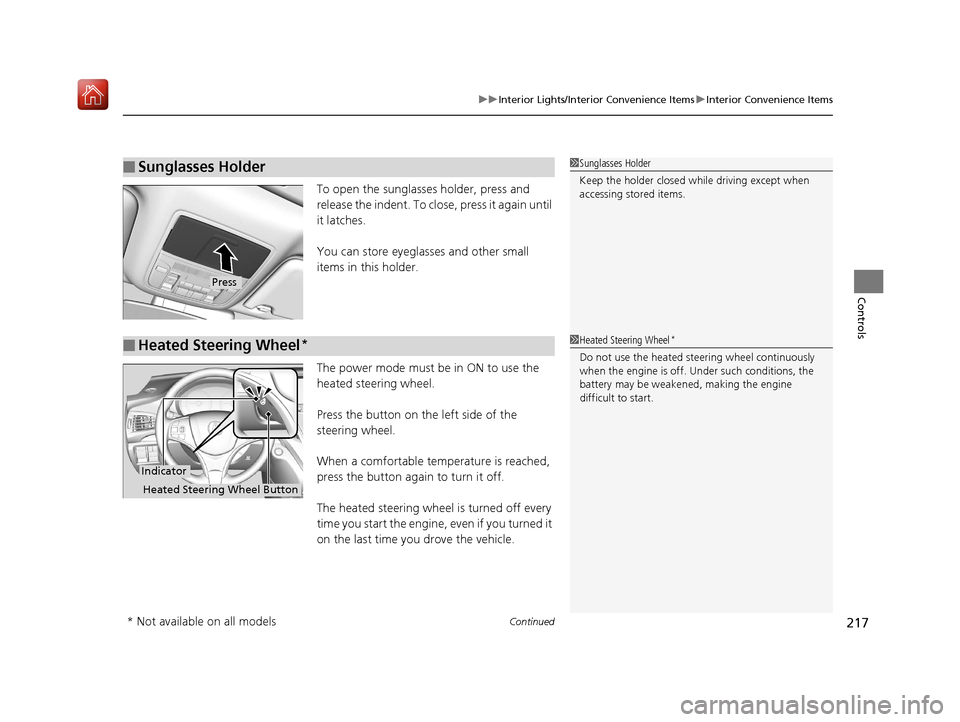
To open the sunglasses holder, press and
release the indent. To close, press it again until
it latches.
You can store eyeglasses and other small
items in this holder.
The power mode must be in ON to use the
heated steering wheel.
Press the button on the left side of the
steering wheel.
When a comfortable temperature is reached,
press the button again to turn it off.
The heated steering wheel is turned off every
time you start the engine, even if you turned it
on the last time yo u drove the vehicle.
■Sunglasses Holder1Sunglasses Holder
Keep the holder closed wh ile driving except when
accessing stored items.
Press
■Heated Steering Wheel*1 Heated Steering Wheel*
Do not use the heated steering wheel continuously
when the engine is off. Under such conditions, the
battery may be weaken ed, making the engine
difficult to start.
Indicator
Heated Steering Wheel Button
* Not available on all models
19 ACURA MDX-31TZ56510.book 217 ページ 2018年12月11日 火曜日 午後4時47分
Page 219 of 701
uuInterior Lights/Interior Convenience Items uInterior Convenience Items
218
Controls
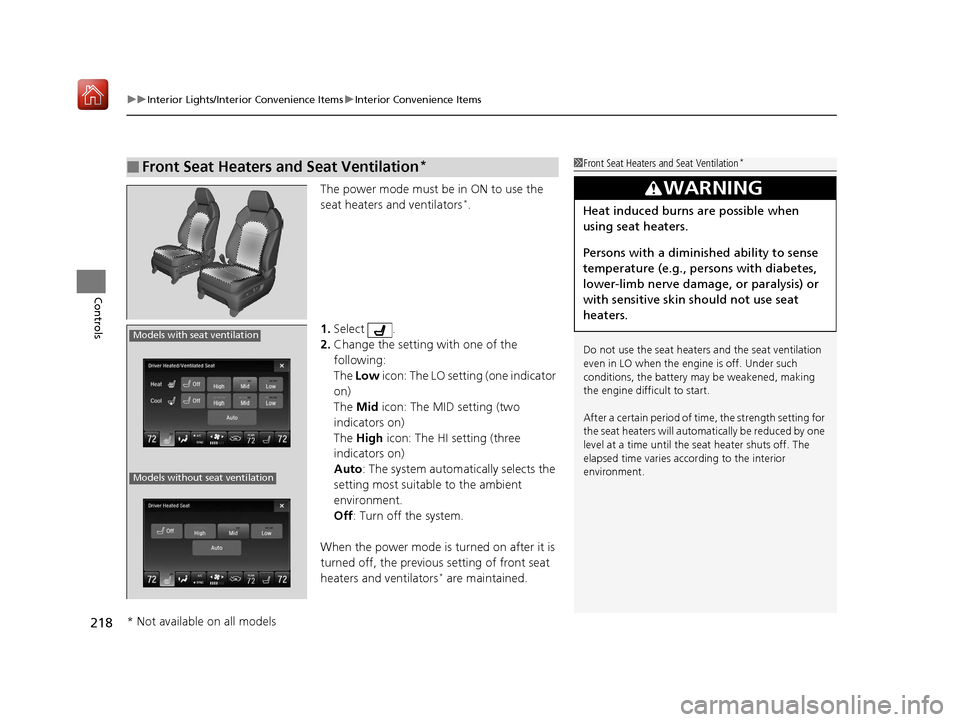
The power mode must be in ON to use the
seat heaters and ventilators*.
1. Select .
2. Change the setting with one of the
following:
The Low icon: The LO setting (one indicator
on)
The Mid icon: The MID setting (two
indicators on)
The High icon: The HI setting (three
indicators on)
Auto : The system automatically selects the
setting most suitable to the ambient
environment.
Off : Turn off the system.
When the power mode is turned on after it is
turned off, the previous setting of front seat
heaters and ventilators
* are maintained.
■Front Seat Heaters and Seat Ventilation*1 Front Seat Heaters and Seat Ventilation*
Do not use the seat heater s and the seat ventilation
even in LO when the engine is off. Under such
conditions, the battery ma y be weakened, making
the engine difficult to start.
After a certain period of time, the strength setting for
the seat heaters will automatically be reduced by one
level at a time until the seat heater shuts off. The
elapsed time varies according to the interior
environment.
3WARNING
Heat induced burns are possible when
using seat heaters.
Persons with a diminished ability to sense
temperature (e.g., persons with diabetes,
lower-limb nerve damage, or paralysis) or
with sensitive skin should not use seat
heaters.
Models with seat ventilation
Models without seat ventilation
* Not available on all models
19 ACURA MDX-31TZ56510.book 218 ページ 2018年12月11日 火曜日 午後4時47分
Page 220 of 701
219
uuInterior Lights/Interior Convenience Items uInterior Convenience Items
Controls
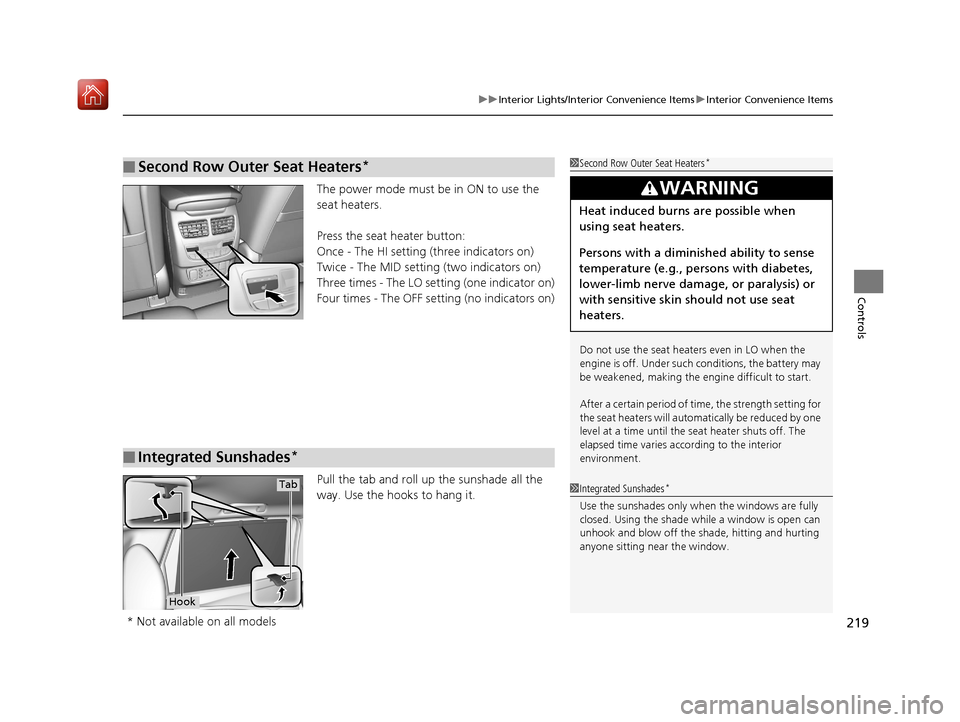
The power mode must be in ON to use the
seat heaters.
Press the seat heater button:
Once - The HI setting (three indicators on)
Twice - The MID setting (two indicators on)
Three times - The LO setting (one indicator on)
Four times - The OFF setting (no indicators on)
Pull the tab and roll up the sunshade all the
way. Use the hooks to hang it.
■Second Row Outer Seat Heaters*1Second Row Outer Seat Heaters*
Do not use the seat heaters even in LO when the
engine is off. Under such conditions, the battery may
be weakened, making the engine difficult to start.
After a certain period of time, the strength setting for
the seat heaters will automatically be reduced by one
level at a time until the seat heater shuts off. The
elapsed time varies according to the interior
environment.
3WARNING
Heat induced burns are possible when
using seat heaters.
Persons with a diminished ability to sense
temperature (e.g., persons with diabetes,
lower-limb nerve damage, or paralysis) or
with sensitive skin should not use seat
heaters.
■Integrated Sunshades*
1Integrated Sunshades*
Use the sunshades only when the windows are fully
closed. Using the shade while a window is open can
unhook and blow off the sh ade, hitting and hurting
anyone sitting near the window.
Tab
Hook
* Not available on all models
19 ACURA MDX-31TZ56510.book 219 ページ 2018年12月11日 火曜日 午後4時47分
Page 223 of 701

uuClimate Control System uUsing Automatic Climate Control
222
Controls
1. Select the driver’s or passenger’s side
temperature control icon.
2. Change the temperature setting from the
following:
Temperature bar: Select a point where your
desired temperature setting is.
Farther to the left is for a lower, and to the
right for a higher setting.
(+/(-: To raise or lower the temperature
setting one degree at a time.
While you select and hold
(+/(-, the
temperature decreases or increases.
Max Cool: To rapidly cool down the interior.
u The A/C indicator comes on. The setting
returns to the previo usly selected value
when you select it again.
Max Heat: To rapidly warm up the interior.
u The A/C indicator goe s off. The setting
returns to the previo usly selected value
when you select it again.
■Changing the Interior Temperature Setting1 Using Automatic Climate Control
If you select the Max Cool or Max Heat during Auto
Idle Stop, the engine restarts automatically.
The side you selected.
Temperature Bar
19 ACURA MDX-31TZ56510.book 222 ページ 2018年12月11日 火曜日 午後4時47分
Page 227 of 701
uuClimate Control System uUsing Automatic Climate Control
226
Controls
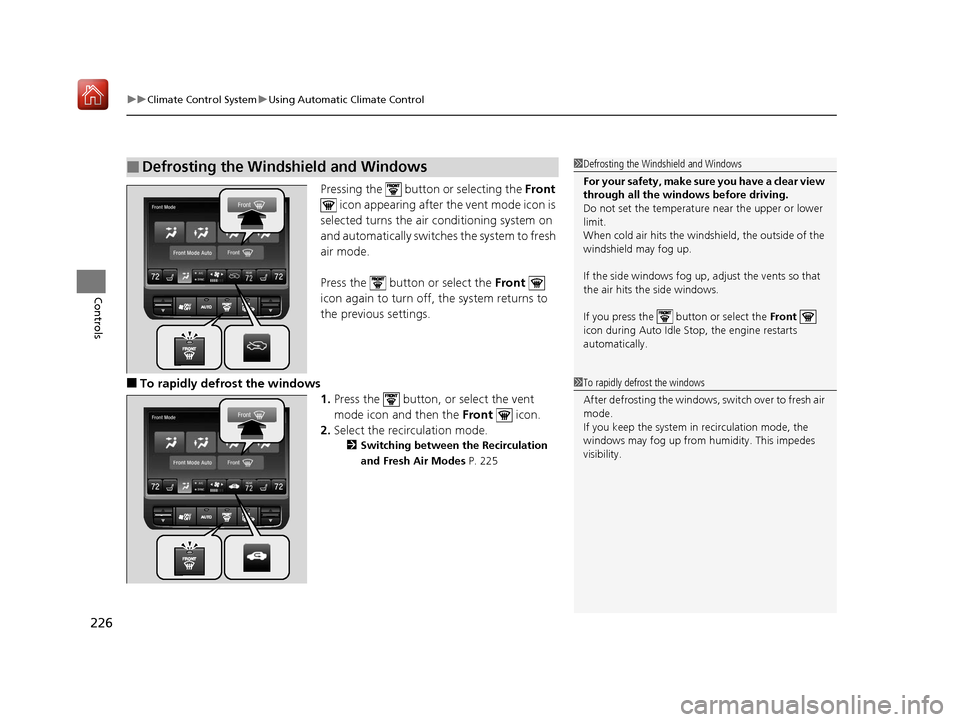
Pressing the button or selecting the Front
icon appearing after the vent mode icon is
selected turns the air conditioning system on
and automatically switches the system to fresh
air mode.
Press the button or select the Front
icon again to turn off, the system returns to
the previous settings.
■To rapidly defrost the windows
1.Press the button, or select the vent
mode icon and then the Front icon.
2. Select the recirculation mode.
2 Switching between the Recirculation
and Fresh Air Modes P. 225
■Defrosting the Windshield and Windows1Defrosting the Windshield and Windows
For your safety, make sure you have a clear view
through all the windows before driving.
Do not set the temperatur e near the upper or lower
limit.
When cold air hits the windshield, the outside of the
windshield may fog up.
If the side windows fog up, adjust the vents so that
the air hits th e side windows.
If you press the button or select the Front
icon during Auto Idle Stop, the engine restarts
automatically.
1 To rapidly defrost the windows
After defrosting the windows, switch over to fresh air
mode.
If you keep the system in recirculation mode, the
windows may fog up from humidity. This impedes
visibility.
19 ACURA MDX-31TZ56510.book 226 ページ 2018年12月11日 火曜日 午後4時47分
Page 250 of 701
Continued249
uuAudio System Basic Operation uInformation Screen
Features
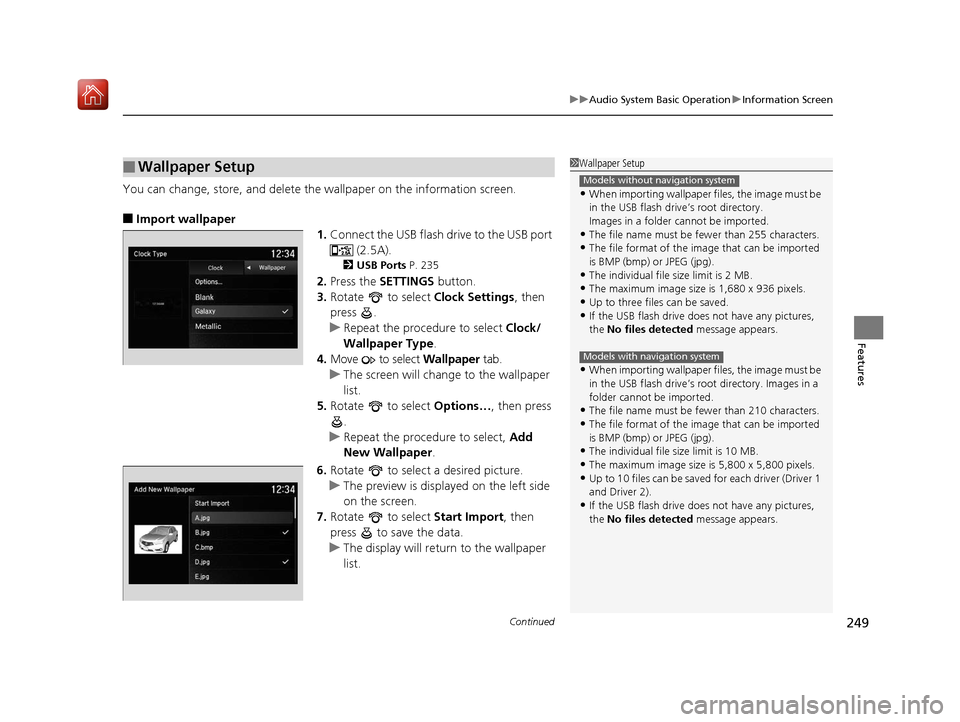
You can change, store, and delete the wallpaper on the information screen.
■Import wallpaper
1.Connect the USB flash drive to the USB port
(2.5A).
2USB Ports P. 235
2.Press the SETTINGS button.
3. Rotate to select Clock Settings, then
press .
u Repeat the procedure to select Clock/
Wallpaper Type .
4. Move to select Wallpaper tab.
u The screen will change to the wallpaper
list.
5. Rotate to select Options…, then press
.
u Repeat the procedure to select, Add
New Wallpaper .
6. Rotate to select a desired picture.
u The preview is displayed on the left side
on the screen.
7. Rotate to select Start Import, then
press to save the data.
u The display will return to the wallpaper
list.
■Wallpaper Setup1Wallpaper Setup
•When importing wallpaper files, the image must be
in the USB flash drive’s root directory.
Images in a folder cannot be imported.
•The file name must be fewer than 255 characters.
•The file format of the im age that can be imported
is BMP (bmp) or JPEG (jpg).
•The individual file size limit is 2 MB.
•The maximum image size is 1,680 x 936 pixels.
•Up to three files can be saved.•If the USB flash drive doe s not have any pictures,
the No files detected message appears.
•When importing wallpaper files, the image must be
in the USB flash drive’s root directory. Images in a
folder cannot be imported.
•The file name must be fewer than 210 characters.
•The file format of the im age that can be imported
is BMP (bmp) or JPEG (jpg).
•The individual file size limit is 10 MB.
•The maximum image size is 5,800 x 5,800 pixels.
•Up to 10 files can be saved for each driver (Driver 1
and Driver 2).
•If the USB flash drive doe s not have any pictures,
the No files detected message appears.
Models without navigation system
Models with navigation system
19 ACURA MDX-31TZ56510.book 249 ページ 2018年12月11日 火曜日 午後4時47分
Page 261 of 701

uuAudio System Basic Operation uPlaying SiriusXM ® Radio
260
Features
1. Select the SiriusXM® mode.
2 Audio Remote Controls P. 239
2 On Demand Multi-Use DisplayTM P. 242
2.Select a channel using the , ic ons or the preset numbers (1-12 ) on the preset
mode screen.
■SiriusXM ® channel manual tune screen
1.Select Tune.
2. Enter the desired channel number using the
numeric keypad.
3. Select OK to tune into the channel.
You can also tune into the channel of your
choice following the procedures below
instead of inputting its channel number.
1. Touch the desired channel number on the
channel bar.
2. Select and hold the channel indicator, then
slide it to the desired channel number on
the channel bar.
■To Play SiriusXM ® Radio1 Playing SiriusXM ® Radio
You can control the SiriusXM ® radio using voice
commands
*.
2 Voice Control Operation P. 253
In the channel mode, all available channels are
selectable. In the categor y mode, you can select a
channel within a ca tegory (Jazz, Rock, Classical, etc.).
There may be instances when SiriusXM ® Radio does
not broadcast all the data fi elds (artist name, title).
This does not indicate a problem with your audio
system.
SiriusXM ® Radio stations load in ascending order,
which can take about a minute. Once they have
loaded you will be able to scroll up or down to make
your selections.
Tune Start:
When you change a channel, a song being played on
that channel restarts from the beginning with this
function. This can be turned on or off from the Play
the Song from the Beginning setting.
2 Customized Features P. 360
1SiriusXM ® channel manual tune screen
Channel icons:
Select or to the prev ious or next channel.
Select and hold to rapidly sk ip 10 channels at a time.
Channel Indicator Channel Bar
Numeric Keypad
* Not available on all models
19 ACURA MDX-31TZ56510.book 260 ページ 2018年12月11日 火曜日 午後4時47分