warning Acura MDX 2020 Owner's Manual
[x] Cancel search | Manufacturer: ACURA, Model Year: 2020, Model line: MDX, Model: Acura MDX 2020Pages: 701, PDF Size: 38.91 MB
Page 632 of 701
Continued631
uuIf a Tire Goes Flat uChanging a Flat Tire
Handling the Unexpected
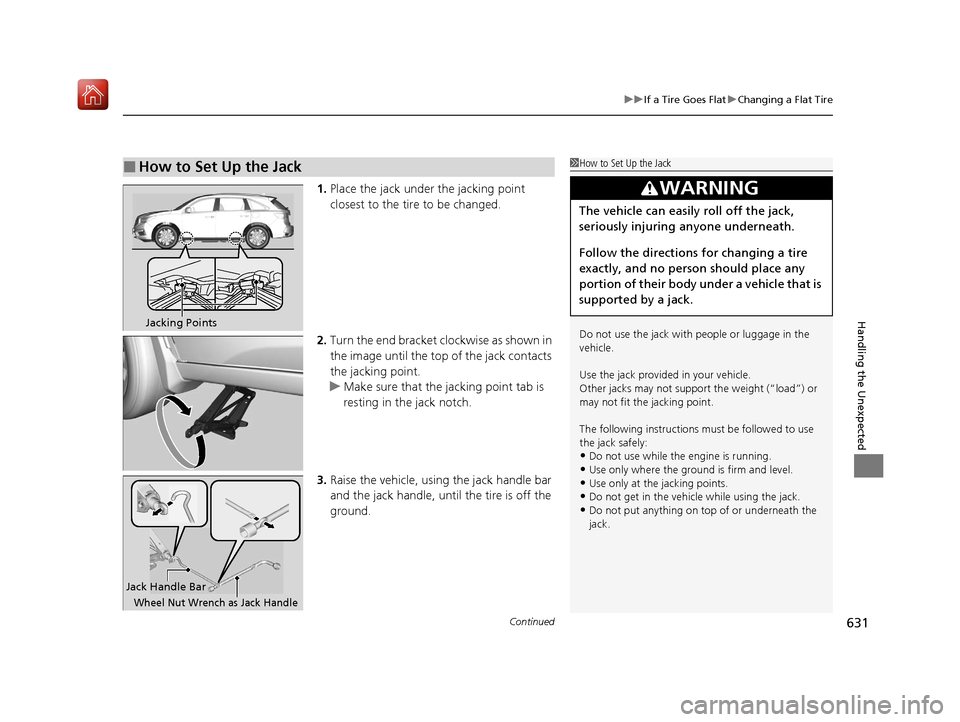
1. Place the jack under the jacking point
closest to the tire to be changed.
2. Turn the end bracket cl ockwise as shown in
the image until the top of the jack contacts
the jacking point.
u Make sure that the jacking point tab is
resting in the jack notch.
3. Raise the vehicle, using the jack handle bar
and the jack handle, until the tire is off the
ground.
■How to Set Up the Jack1How to Set Up the Jack
Do not use the jack with people or luggage in the
vehicle.
Use the jack provided in your vehicle.
Other jacks may not support the weight (“load”) or
may not fit the jacking point.
The following instructions must be followed to use
the jack safely:
•Do not use while the engine is running.
•Use only where the ground is firm and level.•Use only at the jacking points.
•Do not get in the vehicl e while using the jack.
•Do not put anything on top of or underneath the
jack.
3WARNING
The vehicle can easily roll off the jack,
seriously injuring anyone underneath.
Follow the directions for changing a tire
exactly, and no person should place any
portion of their body under a vehicle that is
supported by a jack.
Jacking Points
Jack Handle Bar
Wheel Nut Wrench as Jack Handle
20 ACURA MDX-31TZ56600.book 631 ページ 2019年4月24日 水曜日 午後5時44分
Page 634 of 701
Continued633
uuIf a Tire Goes Flat uChanging a Flat Tire
Handling the Unexpected
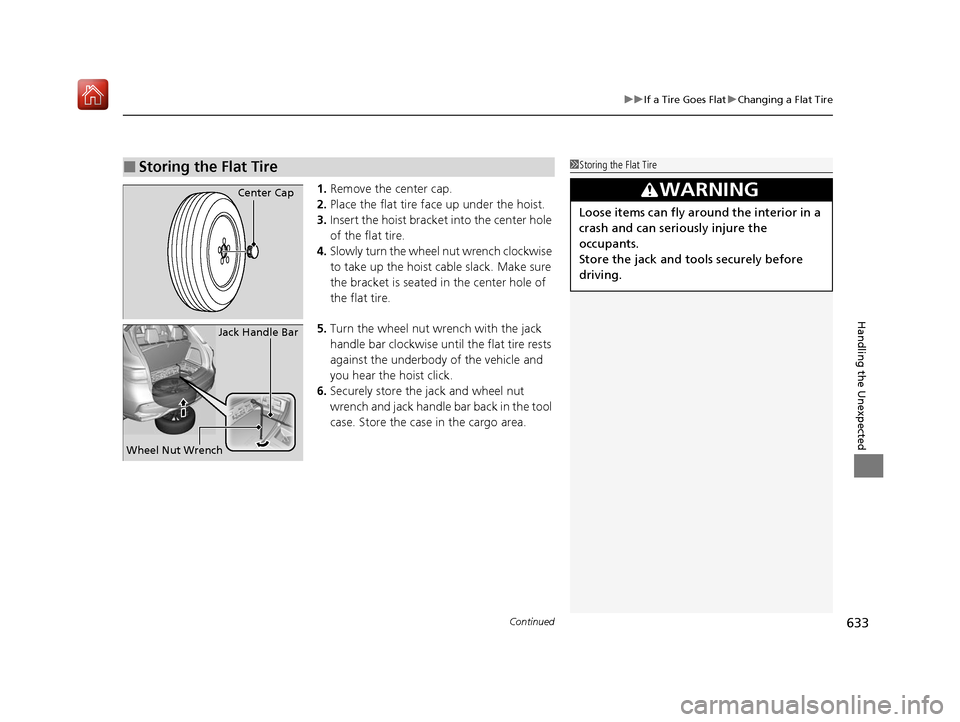
1. Remove the center cap.
2. Place the flat tire face up under the hoist.
3. Insert the hoist bracke t into the center hole
of the flat tire.
4. Slowly turn the wheel nut wrench clockwise
to take up the hoist cable slack. Make sure
the bracket is seated in the center hole of
the flat tire.
5. Turn the wheel nut wrench with the jack
handle bar clockwise until the flat tire rests
against the underbody of the vehicle and
you hear the hoist click.
6. Securely store the jack and wheel nut
wrench and jack handle bar back in the tool
case. Store the case in the cargo area.
■Storing the Flat Tire1Storing the Flat Tire
3WARNING
Loose items can fly around the interior in a
crash and can seriously injure the
occupants.
Store the jack and tools securely before
driving.
Center Cap
Wheel Nut Wrench Jack Handle Bar
20 ACURA MDX-31TZ56600.book 633 ページ 2019年4月24日 水曜日 午後5時44分
Page 635 of 701

uuIf a Tire Goes Flat uChanging a Flat Tire
634
Handling the Unexpected
If you replace a flat tire with the spare tire, the low tire pressure/TPMS indicator
comes on while you are driving. Afte r driving for a few miles (kilometers), Tire
Pressure Monitor Problem will appear on the multi-information display and the
indicator will start blinking for a short time and then stay on; however, this is normal
and is no cause for concern.
If you replace the tire with a full-size tire, the warning message on the multi-
information display and the low tire pressu re/TPMS indicator will go off after a few
miles (kilometers).
■TPMS and the Compact Spare Tire1 TPMS and the Compact Spare Tire
The system cannot monitor th e pressure of the spare
tire. Manually check the spare tire pressure to be sure
that it is correct.
Use the TPMS specific whee ls. Each is equipped with
a tire pressure sensor mount ed inside the tire behind
the valve stem.
20 ACURA MDX-31TZ56600.book 634 ページ 2019年4月24日 水曜日 午後5時44分
Page 636 of 701
635
uuIf a Tire Goes Flat uTemporarily Repairing a Flat Tire
Continued
Handling the Unexpected
Temporarily Repairing a Flat Tire
If the tire has a large cut or is otherwise severely damaged, you will need to have the
vehicle towed. If the tire only has a small puncture, from a nail for instance, you can
use the temporary tire repair kit so that you can drive to the nearest service station
for a more permanent repair.
If a tire goes flat while driving, grasp the steering wheel firmly, and brake gradually
to reduce speed. Then stop in a safe place.
1. Park the vehicle on a firm, level, and n on-slippery surface and apply the parking
brake.
2. Put the transmission into
(P.
3. Turn on the hazard warning lights an d set the power mode to VEHICLE OFF
(LOCK).
Models with temporary tire repair kit
1 Temporarily Repairing a Flat Tire
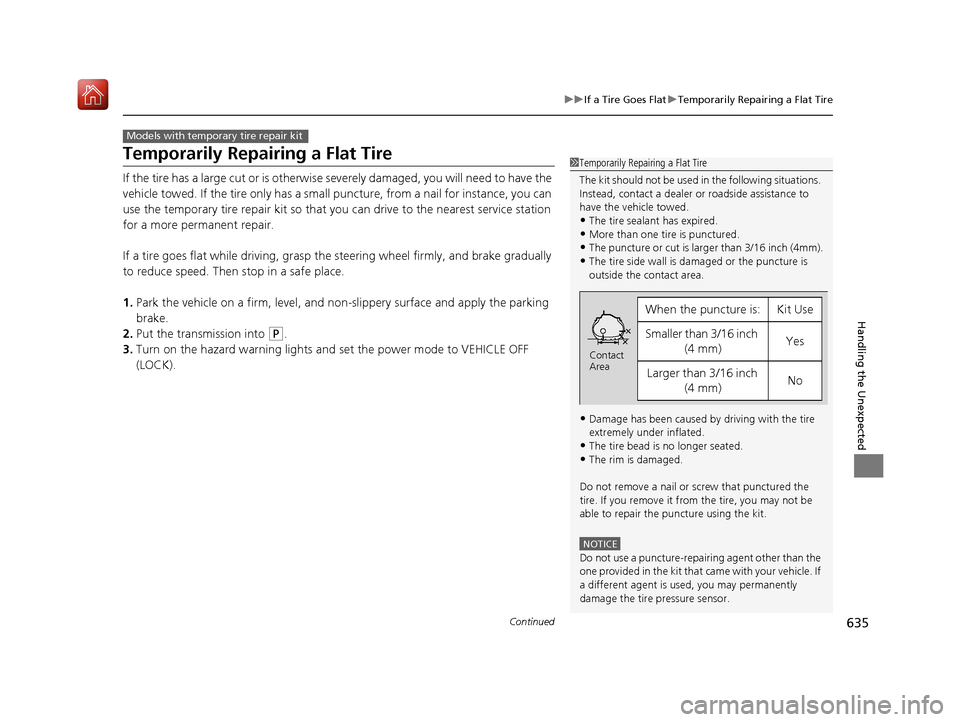
The kit should not be used in the following situations.
Instead, contact a dealer or roadside assistance to
have the vehicle towed.
•The tire sealant has expired.
•More than one tire is punctured.•The puncture or cut is larger than 3/16 inch (4mm).
•The tire side wall is da maged or the puncture is
outside the contact area.
•Damage has been caused by driving with the tire
extremely under inflated.
•The tire bead is no longer seated.
•The rim is damaged.
Do not remove a nail or screw that punctured the
tire. If you remove it from the tire, you may not be
able to repair the puncture using the kit.
NOTICE
Do not use a puncture-repairing agent other than the
one provided in the kit that came with your vehicle. If
a different agent is used, you may permanently
damage the tire pressure sensor.
When the puncture is:Kit Use
Smaller than 3/16 inch (4 mm)Yes
Larger than 3/16 inch (4 mm)No
Contact
Area
20 ACURA MDX-31TZ56600.book 635 ページ 2019年4月24日 水曜日 午後5時44分
Page 639 of 701

uuIf a Tire Goes Flat uTemporarily Repairing a Flat Tire
638
Handling the Unexpected
1. Remove the valve cap from the tire valve
stem.
2. Remove the sealant/air hose from the
packaging.
3. Attach the sealant/air hose onto the tire
valve stem. Screw it until it is tight.
■Injecting Sealant and Air1Injecting Sealant and Air
In cold temperatures, the sealant may not flow easily.
In this situation, warm it up for five minutes before
using.
The sealant can permanentl y stain clothing and other
materials. Be careful duri ng handling and wipe away
any spills immediately.
3WARNING
Tire sealant contains substances that are
harmful and can be fatal if swallowed.
If accidentally swallowed, do not induce
vomiting. Drink plenty of water and get
medical attention immediately.
For skin or eye contact, flush with cool
water and get medical attention if
necessary.
Valve Stem
Valve Cap
Sealant/Air Hose
Valve Stem
Sealant/Air Hose
20 ACURA MDX-31TZ56600.book 638 ページ 2019年4月24日 水曜日 午後5時44分
Page 640 of 701
Continued639
uuIf a Tire Goes Flat uTemporarily Repairing a Flat Tire
Handling the Unexpected
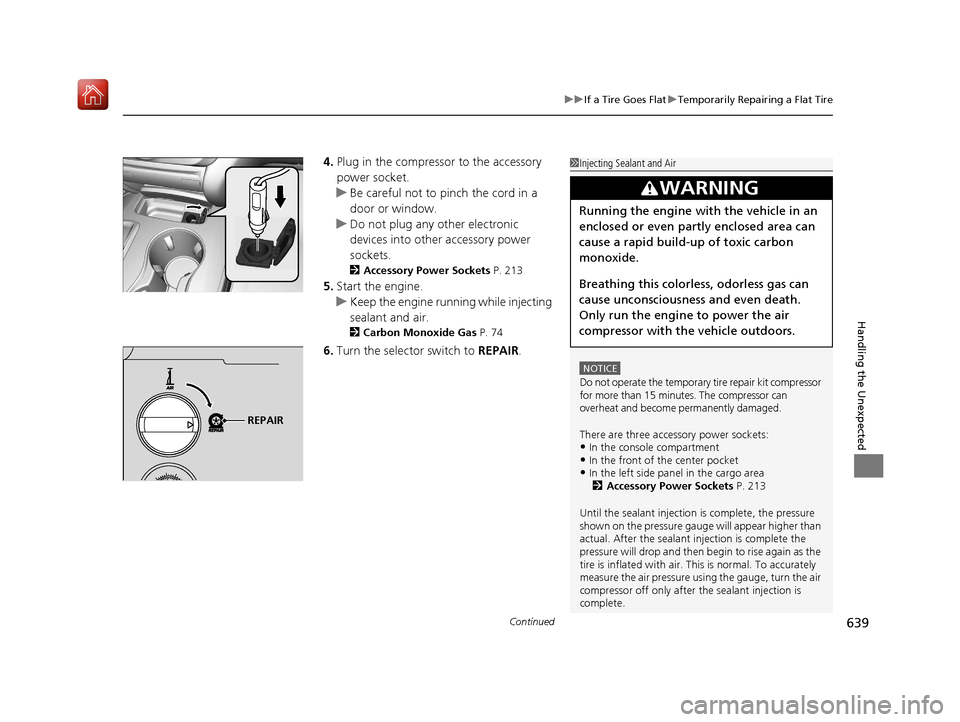
4. Plug in the compressor to the accessory
power socket.
u Be careful not to pinch the cord in a
door or window.
u Do not plug any other electronic
devices into other accessory power
sockets.
2 Accessory Power Sockets P. 213
5.Start the engine.
u Keep the engine running while injecting
sealant and air.
2 Carbon Monoxide Gas P. 74
6.Turn the selector switch to REPAIR.
1Injecting Sealant and Air
NOTICE
Do not operate the temporary tire repair kit compressor
for more than 15 minu tes. The compressor can
overheat and become permanently damaged.
There are three accessory power sockets:
•In the console compartment•In the front of the center pocket•In the left side panel in the cargo area 2 Accessory Power Sockets P. 213
Until the sealant injection is complete, the pressure
shown on the pressure gauge will appear higher than
actual. After the sealant injection is complete the
pressure will drop and then begin to rise again as the
tire is inflated with air. This is normal. To accurately
measure the air pressure usin g the gauge, turn the air
compressor off only after the sealant injection is
complete.
3WARNING
Running the engine with the vehicle in an
enclosed or even partly enclosed area can
cause a rapid build-up of toxic carbon
monoxide.
Breathing this colorless, odorless gas can
cause unconsciousness and even death.
Only run the engine to power the air
compressor with th e vehicle outdoors.
REPAIR
20 ACURA MDX-31TZ56600.book 639 ページ 2019年4月24日 水曜日 午後5時44分
Page 645 of 701
uuIf a Tire Goes Flat uTemporarily Repairing a Flat Tire
644
Handling the Unexpected
• Greater than 25 psi (175 kPa), but less
than front: 35 psi (240 kPa)/rear: 32 psi
(220 kPa):
Turn the air compressor on to inflate the
tire until the tire pressure reaches front: 35
psi (240 kPa)/rear: 32 psi (220 kPa).
• Greater than 25 psi (175 kPa), but less
than 35 psi (240 kPa):
Turn the air compressor on to inflate the
tire until the tire pressure reaches 35 psi
(240 kPa).
2 Inflating an Under-inflated Tire P. 646
Then drive carefully for 10 more minutes or
until you reach the nearest service station,
whichever is sooner. Do not exceed 50 mph
(80 km/h). If you have not reached a service
station, stop and check the tire pressure.
u You should repeat this procedure as long
as the air pressure is within this range.
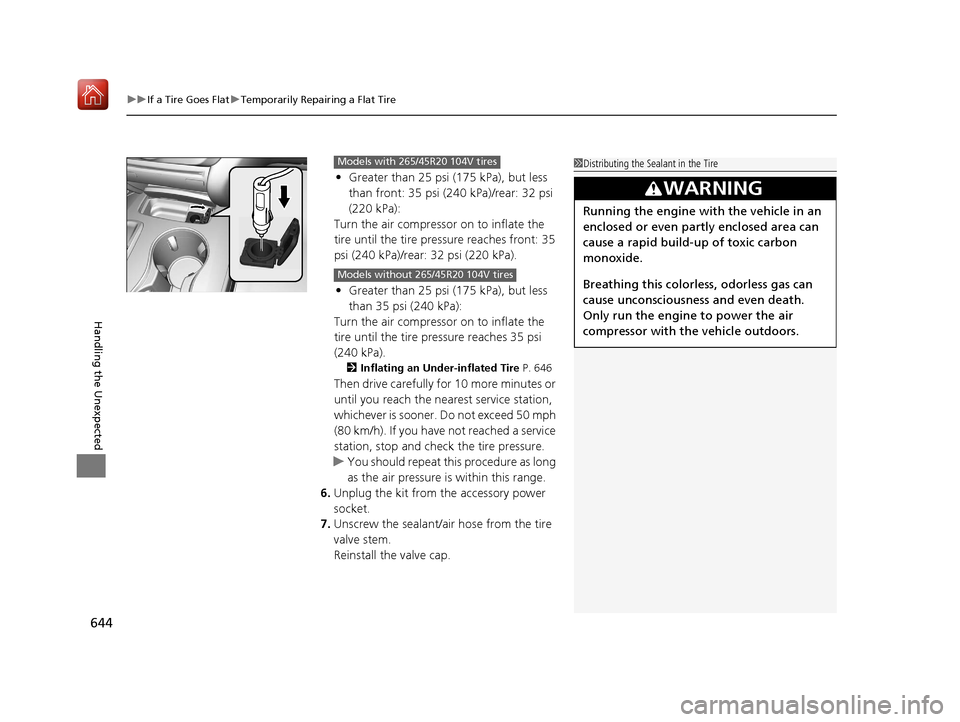
6. Unplug the kit from the accessory power
socket.
7. Unscrew the sealant/ai r hose from the tire
valve stem.
Reinstall the valve cap.
Models with 265/45R20 104V tires
Models without 265/45R20 104V tires
1 Distributing the Sealant in the Tire
3WARNING
Running the engine with the vehicle in an
enclosed or even partly enclosed area can
cause a rapid build-up of toxic carbon
monoxide.
Breathing this colorless, odorless gas can
cause unconsciousness and even death.
Only run the engine to power the air
compressor with th e vehicle outdoors.
20 ACURA MDX-31TZ56600.book 644 ページ 2019年4月24日 水曜日 午後5時44分
Page 648 of 701
Continued647
uuIf a Tire Goes Flat uTemporarily Repairing a Flat Tire
Handling the Unexpected
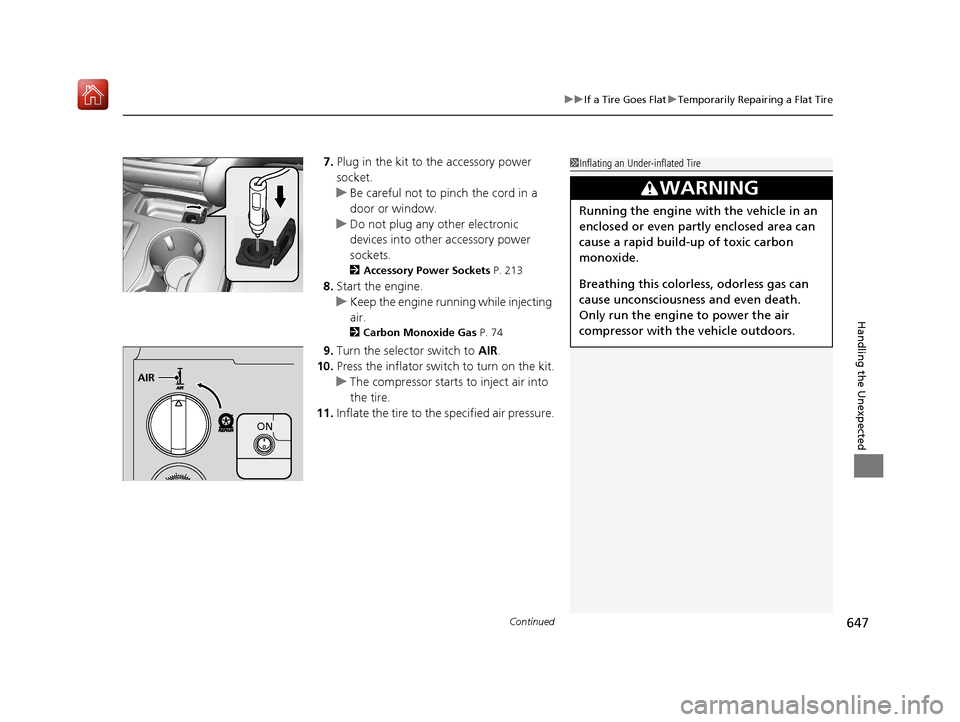
7. Plug in the kit to the accessory power
socket.
u Be careful not to pinch the cord in a
door or window.
u Do not plug any other electronic
devices into other accessory power
sockets.
2 Accessory Power Sockets P. 213
8.Start the engine.
u Keep the engine running while injecting
air.
2 Carbon Monoxide Gas P. 74
9.Turn the selector switch to AIR.
10. Press the inflator switch to turn on the kit.
u The compressor starts to inject air into
the tire.
11. Inflate the tire to the specified air pressure.
1Inflating an Under-inflated Tire
3WARNING
Running the engine with the vehicle in an
enclosed or even partly enclosed area can
cause a rapid build-up of toxic carbon
monoxide.
Breathing this colorless, odorless gas can
cause unconsciousness and even death.
Only run the engine to power the air
compressor with th e vehicle outdoors.
AIR
ON
20 ACURA MDX-31TZ56600.book 647 ページ 2019年4月24日 水曜日 午後5時44分
Page 653 of 701
652
Handling the Unexpected
Jump Starting
Turn off the power to electric devices, such as audio and lights. Turn off the engine,
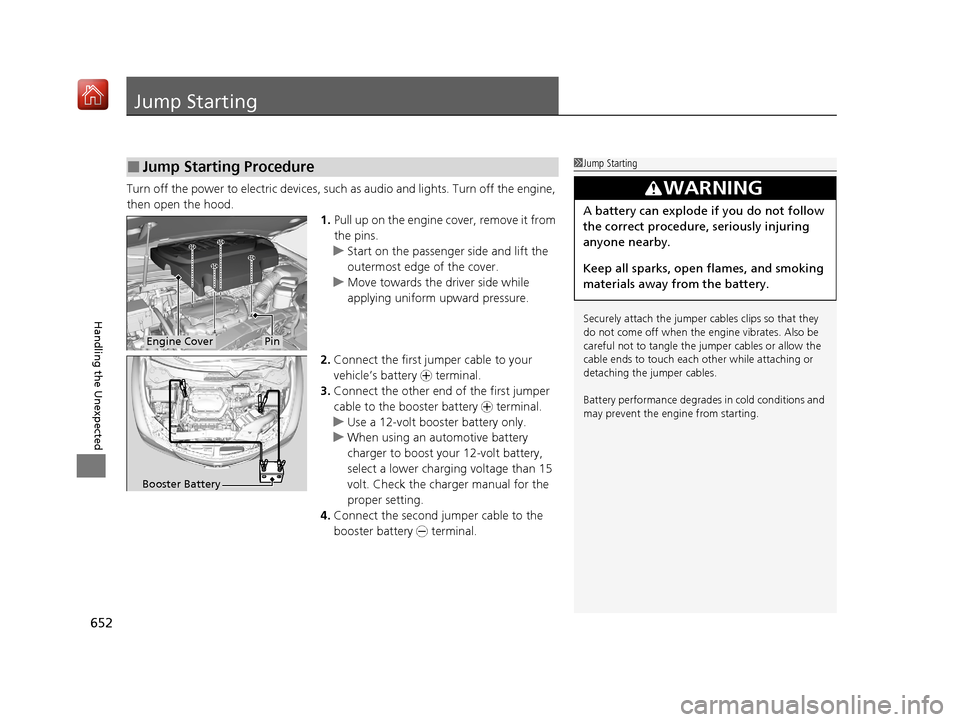
then open the hood. 1.Pull up on the engine cover, remove it from
the pins.
u Start on the passenger side and lift the
outermost edge of the cover.
u Move towards the driver side while
applying uniform upward pressure.
2. Connect the first jump er cable to your
vehicle’s battery + terminal.
3. Connect the other end of the first jumper
cable to the booster battery + terminal.
u Use a 12-volt booster battery only.
u When using an automotive battery
charger to boost your 12-volt battery,
select a lower charging voltage than 15
volt. Check the charger manual for the
proper setting.
4. Connect the second jumper cable to the
booster battery - terminal.
■Jump Starting Procedure1Jump Starting
Securely attach the jumper cables clips so that they
do not come off when the e ngine vibrates. Also be
careful not to tangle the ju mper cables or allow the
cable ends to touch each other while attaching or
detaching the jumper cables.
Battery performance degrades in cold conditions and
may prevent the engi ne from starting.
3WARNING
A battery can explode if you do not follow
the correct procedure, seriously injuring
anyone nearby.
Keep all sparks, open flames, and smoking
materials away from the battery.
Engine CoverPin
Booster Battery
20 ACURA MDX-31TZ56600.book 652 ページ 2019年4月24日 水曜日 午後5時44分
Page 655 of 701
654
Handling the Unexpected
Overheating
How to Handle Overheating
Overheating symptoms are as follows:
•The temperature gauge needle is at th e mark or the engine suddenly loses
power.
• The Stop Driving When Safe. Engine Temperature Too Hot message appears
on the multi-information display (MID).
• Steam or spray comes out of the engine compartment.
■First thing to do
1. Immediately park the vehicle in a safe place.
2. Turn off all accessories and turn on the hazard warning lights.
u No steam or spray present: Keep the engine running and open the hood.
u Steam or spray is present: Turn off the engine and wait until it subsides.
Then, open the hood.
1 How to Handle Overheating
NOTICE
Continuing to drive with the temperature gauge
needle at the mark may damage the engine.
Continuing to drive with the Stop Driving When
Safe. Engine Temperature Too Hot message on
the multi-information display may damage the
engine.
3WARNING
Steam and spray from an overheated
engine can seri ously scald you.
Do not open the hood if steam is coming
out.
H
H
20 ACURA MDX-31TZ56600.book 654 ページ 2019年4月24日 水曜日 午後5時44分