remote control Acura MDX 2020 Service Manual
[x] Cancel search | Manufacturer: ACURA, Model Year: 2020, Model line: MDX, Model: Acura MDX 2020Pages: 701, PDF Size: 38.91 MB
Page 259 of 701
uuAudio System Basic Operation uPlaying SiriusXM ® Radio
258
Features
1. Select the SiriusXM® mode.
2 Audio Remote Controls P. 237
2 On Demand Multi-Use DisplayTM P. 240
2.Select a channel using the , icons or the preset numbers ( 1-12) on the preset
mode screen.
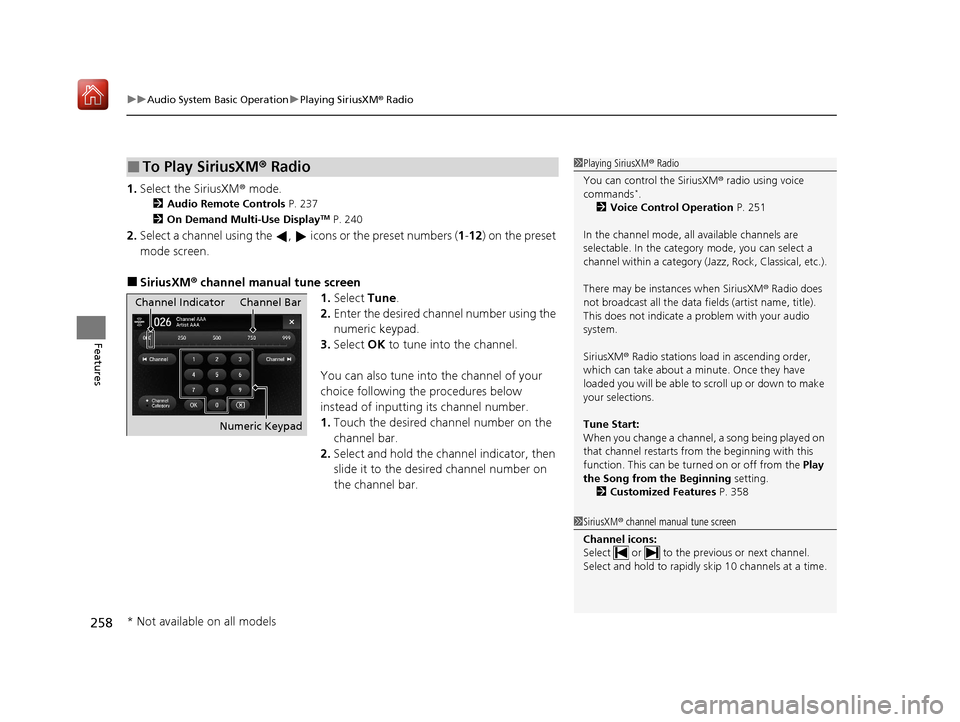
■SiriusXM® channel manual tune screen
1.Select Tune.
2. Enter the desired channel number using the
numeric keypad.
3. Select OK to tune into the channel.
You can also tune into the channel of your
choice following the procedures below
instead of inputting its channel number.
1. Touch the desired channel number on the
channel bar.
2. Select and hold the channel indicator, then
slide it to the desired channel number on
the channel bar.
■To Play SiriusXM ® Radio1 Playing SiriusXM ® Radio
You can control the SiriusXM ® radio using voice
commands
*.
2 Voice Control Operation P. 251
In the channel mode, all available channels are
selectable. In the category mode, you can select a
channel within a ca tegory (Jazz, Rock, Classical, etc.).
There may be instances when SiriusXM ® Radio does
not broadcast all the data fi elds (artist name, title).
This does not indicate a problem with your audio
system.
SiriusXM ® Radio stations load in ascending order,
which can take about a minute. Once they have
loaded you will be able to scroll up or down to make
your selections.
Tune Start:
When you change a channel, a song being played on
that channel restarts from the beginning with this
function. This can be turned on or off from the Play
the Song from the Beginning setting.
2 Customized Features P. 358
1SiriusXM ® channel manual tune screen
Channel icons:
Select or to the previous or next channel.
Select and hold to rapidly sk ip 10 channels at a time.
Channel Indicator Channel Bar
Numeric Keypad
* Not available on all models
20 ACURA MDX-31TZ56600.book 258 ページ 2019年4月24日 水曜日 午後5時44分
Page 336 of 701
335
Features
Rear Entertainment System (RES)*
Allows the rear passengers to enjoy a different entertainment source, such as DVD,
CD, and radio, than the front passengers.
Wireless Headphones
The rear seat passengers can listen to audio from the rear entertainment system by
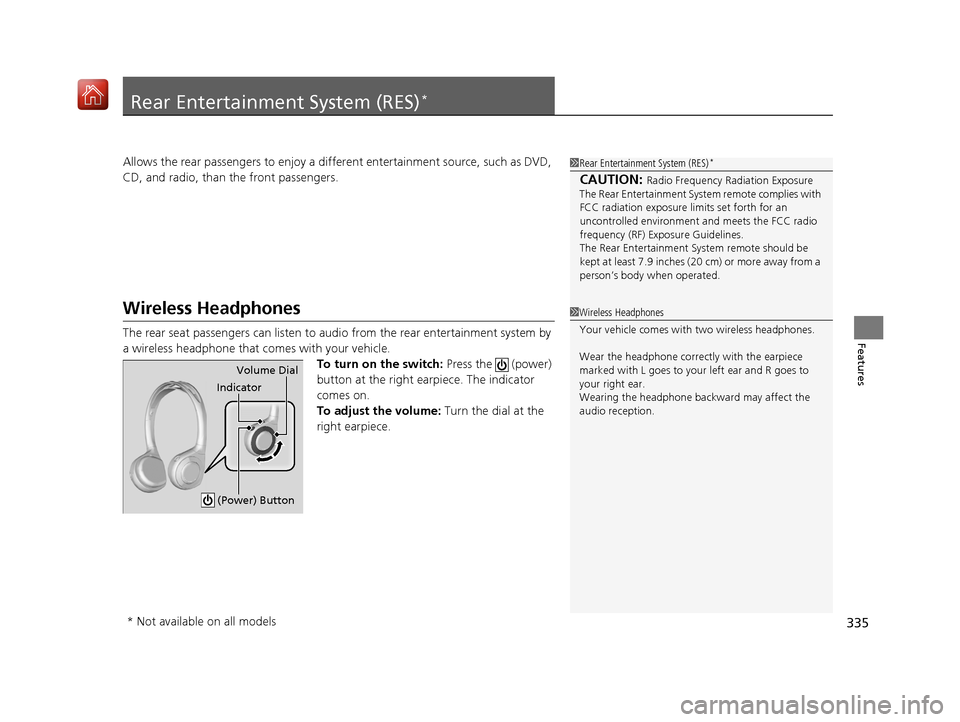
a wireless headphone that comes with your vehicle.
To turn on the switch: Press the (power)
button at the right earpiece. The indicator
comes on.
To adjust the volume: Turn the dial at the
right earpiece.
1 Rear Entertainment System (RES)*
CAUTION: Radio Frequency Radiation Exposure
The Rear Entertainment Syst em remote complies with
FCC radiation exposure lim its set forth for an
uncontrolled environment and meets the FCC radio
frequency (RF) Exposure Guidelines.
The Rear Entertainment Sy stem remote should be
kept at least 7.9 inches ( 20 cm) or more away from a
person’s body when operated.
1 Wireless Headphones
Your vehicle comes with two wireless headphones.
Wear the headphone correctly with the earpiece
marked with L goes to y our left ear and R goes to
your right ear.
Wearing the headphone back ward may affect the
audio reception.
Indicator Volume Dial
(Power) Button
* Not available on all models
20 ACURA MDX-31TZ56600.book 335 ページ 2019年4月24日 水曜日 午後5時44分
Page 339 of 701
338
uuRear Entertainment System (RES)*uOverhead Screen
Features
Overhead Screen
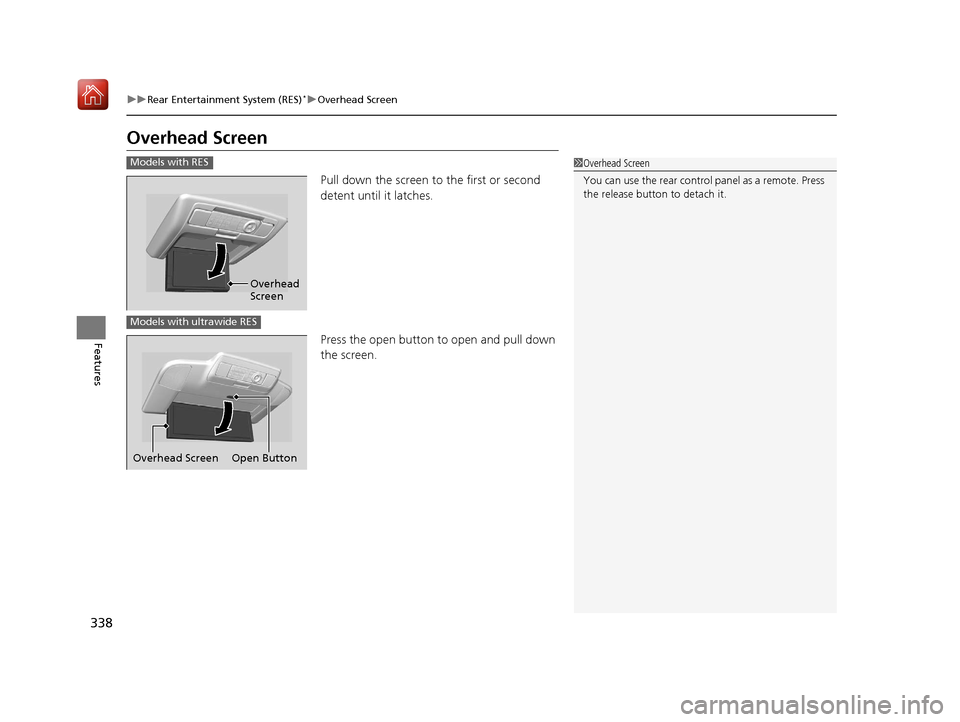
Pull down the screen to the first or second
detent until it latches.
Press the open button to open and pull down
the screen.
1 Overhead Screen
You can use the rear control panel as a remote. Press
the release button to detach it.Models with RES
Overhead
Screen
Models with ultrawide RES
Open Button
Overhead Screen
20 ACURA MDX-31TZ56600.book 338 ページ 2019年4月24日 水曜日 午後5時44分
Page 343 of 701

uuRear Entertainment System (RES)*uRear Control Panel Operation
342
Features
1. Press the REAR (power) button on the front control panel.
2. Press the audio source button on the rear control panel.
u You can also change the audio source by the front control panel.
2 Front Control Panel Operation P. 352
3.Select a station, channel, tr ack, or chapter using the CH/FOLDER , TUNE/SKIP , or
CATEGORY bars.
2Rear Control Panel Operation P. 340
1.Press the REAR (power) button on the
front control panel.
2. Press the SOURCE button on the rear
control panel.
3. Select the audio source. Press the ENTER
button.
u You can also change the audio source by
the front control panel.
2 Front Control Panel Operation P. 352
4.Select a station, channel, track, or chapter
using the CH/FOLDER , TUNE/SKIP , or
CATEGORY bars.
■Selecting the Audio Source1Rear Control Panel Operation
In the procedures of this section, “select” means the
following actions:
The rear control panel ca n be detached from the
ceiling unit and used as a remote control.
2 Overhead Screen P. 338
In this section, screen illu strations from the standard
RES are used for the explanation unless otherwise
noted.
The screen is displayed on the overhead screen.
Models with RES
Models with ultrawide RES
Press the cursor
buttons on the rear
control panel.
Rotate the interface
dial or press the
directional buttons on
the rear control panel.
Models with RES
Models with ultrawide RES
20 ACURA MDX-31TZ56600.book 342 ページ 2019年4月24日 水曜日 午後5時44分
Page 391 of 701

390
Features
HomeLink® Universal Transceiver
The HomeLink ® Universal Transceiver can be pr ogrammed to operate up to three
remote controlled devices around your home, such as garage doors, lighting, or
home security systems.
Refer to the safety information that came wi th your garage door opener to test that
the safety features are functioning properly. If you do not have the safety
information, contact the manufacturer.
Before programming HomeLink, make sure that people and objects are out of the
way of the garage or gate to prevent potential injury or damage.
When programming a garage door opener, park just outside the garage door’s
path.
■Important Safety Precautions
1 HomeLink ® Universal Transceiver
Before programming HomeLi nk to operate a garage
door opener, confirm that the opener has an external
entrapment protection system, such as an “electronic
eye,” or other safety and reverse stop features. If it
does not, HomeLink may not be able to operate it.
20 ACURA MDX-31TZ56600.book 390 ページ 2019年4月24日 水曜日 午後5時44分
Page 393 of 701

uuHomeLink ® Universal Transceiver uTraining HomeLink
392
Features
■Training a Button1Training HomeLink
Retraining a Button
If you want to retrain a programmed button for a
new device, you do not ha ve to erase all button
memory. You can replace the existing memory code
using this procedure:
1. Press and hold the desired HomeLink button
until the HomeLink indi cator begins to blink.
2.
Quickly release the Home Link button and follow
steps 1 - 3 under “Training a Button.” You do not
need to press and rele ase the HomeLink button
again in step 2.
Indicator remains on
for about 25 secs.
Standard transmitter
Indicator remains on for
about 25 secs.
Rolling code transmitter
Erasing Codes
To erase all the codes, press and hold the two outside
buttons until the HomeLink i ndicator begins to blink
(about 10 to 20 secs). You should erase all codes
before selling the vehicle.
If you have any problems, see the device’s
instructions, visit www.homelink.com , or call
HomeLink at (800) 355-3515.
HomeLink® is a registered tra demark of Gentex
Corporation.4.
3.
2.
5.A.
B.
1. Position the remote transmitter you wish to link 1 to 3 inches (3 - 8 cm) from the
HomeLink button you want to program.
Press and release the desi red HomeLink button. Hold the button on the remote
transmitter. Does the HomeLink indicato r (LED) change from slowly blinking to
constantly on or rapidly blinking? The pr ocess should take less than 60 seconds.
Press and hold the
programmed HomeLink
button for about a sec.
Does the device (garage
door opener) work? Press and release the Ho
meLink button. Press
and release the button on the remote every 2
secs.
Does the HomeLink indicator (LED) change from
slowly blinking to constantly on or rapidly
blinking ? The process should take less than 60
seconds.
Training
Complete Press and hold the HomeLink button again.
Press and hold the HomeLink
button again.
The remote-controlled device
should operate.
Training Complete The remote has a ro
lling code. Press the
“learn” button on the remote-controlled
device (e.g. garage door opener).
Within 30 secs, press and hold the
programmed HomeLink button for 2 secs.
HomeLink indicator rapidly blinks.HomeLink LED is
constantly on.
YESNO
YES
YESNONO
20 ACURA MDX-31TZ56600.book 392 ページ 2019年4月24日 水曜日 午後5時44分
Page 465 of 701
464
Driving
When Driving
Starting the Engine
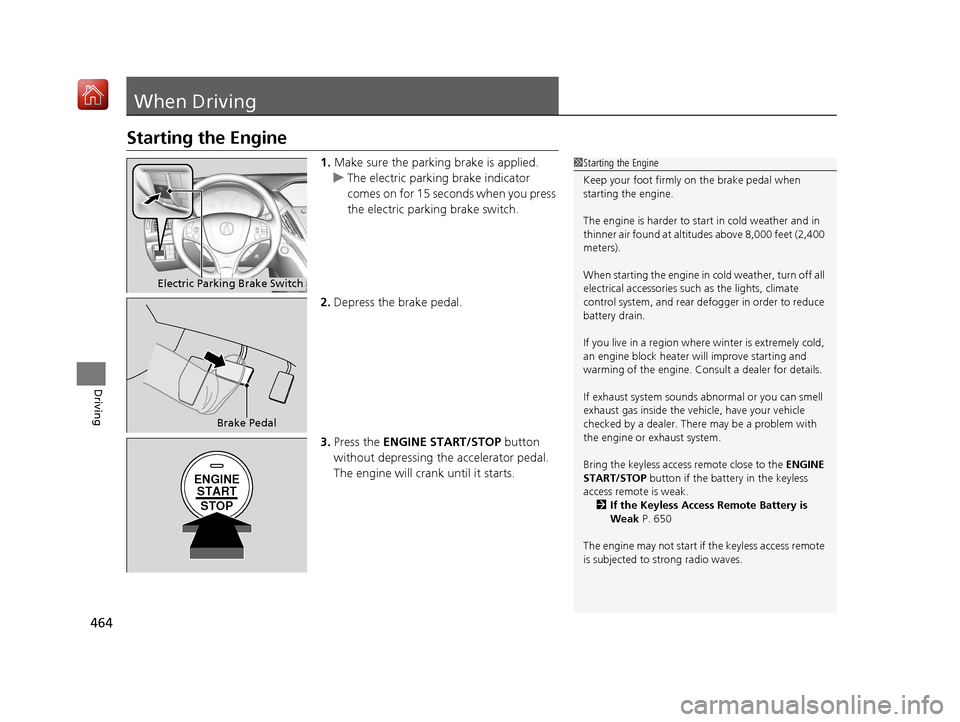
1.Make sure the parking brake is applied.
u The electric parking brake indicator
comes on for 15 seconds when you press
the electric parking brake switch.
2. Depress the brake pedal.
3. Press the ENGINE START/STOP button
without depressing the accelerator pedal.
The engine will crank until it starts.1 Starting the Engine
Keep your foot firmly on the brake pedal when
starting the engine.
The engine is harder to st art in cold weather and in
thinner air found at altit udes above 8,000 feet (2,400
meters).
When starting the engine in cold weather, turn off all
electrical accessories such as the lights, climate
control system, and rear de fogger in order to reduce
battery drain.
If you live in a region where winter is extremely cold,
an engine block heater will improve starting and
warming of the engine. Cons ult a dealer for details.
If exhaust system sounds abnormal or you can smell
exhaust gas inside the vehi cle, have your vehicle
checked by a dealer. There may be a problem with
the engine or exhaust system.
Bring the keyless access remote close to the ENGINE
START/STOP button if the batte ry in the keyless
access remote is weak. 2 If the Keyless Access Remote Battery is
Weak P. 650
The engine may not start if the keyless access remote
is subjected to strong radio waves.
Electric Parking Brake Switch
Brake Pedal
ENGINE START
STOP
20 ACURA MDX-31TZ56600.book 464 ページ 2019年4月24日 水曜日 午後5時44分
Page 469 of 701
uuWhen Driving uStarting the Engine
468
Driving
1Remote Engine Start with Vehicle Feedback*
While the engine is running, the vehicle will
automatically preconditi on inside the vehicle.
When it is warm outside:
•The climate control system is activated in
recirculation mode.
•The seat ventilation* is activated.
When it is cold outside:
•The defroster is activated at a moderately warm
temperature.
•The rear defogger and door mirror heaters are
activated.
•The seat heaters and heated steering wheel are
activated*.
2 Heated Steering Wheel* P. 216
2 Front Seat Heaters and Seat
Ventilation
* P. 217, 218
* Not available on all models
20 ACURA MDX-31TZ56600.book 468 ページ 2019年4月24日 水曜日 午後5時44分
Page 574 of 701
573
Maintenance
This chapter discusses basic maintenance.
Before Performing MaintenanceInspection and Maintenance ............ 574
Safety When Performing Maintenance ..575
Parts and Fluids Used in Maintenance Service...576Maintenance MinderTM..................... 577
Maintenance Under the Hood
Maintenance Items Under the Hood .. 581
Opening the Hood ........................... 582
Engine Compartment Cover ............. 583
Recommended Engine Oil ................ 584
Oil Check ......................................... 585
Adding Engine Oil ............................ 586
Changing the Engine Oil and Oil Filter ...587 Engine Coolant ................................ 589
Transmission Fluid ............................ 591
Brake Fluid ....................................... 592
Refilling Window Washer Fluid......... 592
Replacing Light Bulbs ....................... 593Checking and Maintaining Wiper Blades... 598Checking and Maintaining Tires
Checking Tires ................................. 602
Tire and Loading Information Label .. 603
Tire Labeling .................................... 603
DOT Tire Quality Grading (U.S. Vehicles).. 605Wear Indicators................................ 607
Tire Service Life ................................ 607 Tire and Wheel Replacement ........... 608
Tire Rotation .................................... 609
Winter Tires ..................................... 610
Battery ............................................... 611
Remote Transmitter Care Replacing the Button Battery ........... 613
Remote Control and Wireless Headphone Care
*........................... 615Climate Control System Maintenance.. 617Cleaning Interior Care .................................... 618
Exterior Care.................................... 620
Accessories and Modifications ........ 623
* Not available on all models
20 ACURA MDX-31TZ56600.book 573 ページ 2019年4月24日 水曜日 午後5時44分
Page 614 of 701

613Continued
Maintenance
Remote Transmitter Care
Replacing the Button Battery
If the indicator does not come on when the button is pressed, replace the battery.
1. Remove the built-in key.
2. Remove the upper half of the cover by
carefully prying on the edge with a coin.
u Wrap a coin with a cloth to prevent
scratching the transmitter.
u Remove carefully to avoid losing the
buttons.
3. Make sure to replace the battery with the
correct polarity.
1Replacing the Button Battery
NOTICE
An improperly disposed of battery can damage the
environment. Always conf irm local regulations for
battery disposal.
Replacement batteries are commercially available or
at a dealer.
3WARNING
CHEMICAL BURN HAZARD
The battery that powers the remote
transmitter can cause severe internal burns
and can even lead to death if swallowed.
Keep new and used batteries away from
children.
If you suspect that a child has swallowed
the battery, seek medical attention
immediately.
Models without remote control engine start system
Battery type: CR2032
Battery
20 ACURA MDX-31TZ56600.book 613 ページ 2019年4月24日 水曜日 午後5時44分