key Acura MDX HYBRID 2018 Owner's Guide
[x] Cancel search | Manufacturer: ACURA, Model Year: 2018, Model line: MDX HYBRID, Model: Acura MDX HYBRID 2018Pages: 685, PDF Size: 41.38 MB
Page 173 of 685

172
Controls
Operating the Switches Around the Steering Wheel
POWER Button
■Changing the Power Mode1POWER Button
POWER Button Operating Range
You can start the power system when the keyless
access remote is inside the vehicle.
The power system may also start if the keyless access
remote is close to the door or window, even if it is
outside the vehicle.
If the battery of the keyless access remote is getting
low, the power system may not start when you press
the POWER button. If the power system does not
start, refer to the following link.
2 If the Keyless Access Remote Battery is
Weak P. 635
Do not leave the power mode in ACCESSORY or ON
when you get out.
Operating Range
VEHICLE OFF (LOCK)
Indicator in the button is off.
The power to all electrical components is turned off.
ACCESSORY
The button blinks (in red).
Operate the audio system and other accessories in this
position.
ON
The button blinks (in red).
All electrical components can be used.
Press the button.
Indicator
Without
pressing the
brake pedal
18 ACURA MDX E-AWD-31TRX6100.book 172 ページ 2018年3月27日 火曜日 午後8時6分
Page 175 of 685

uuOperating the Switches Around the Steering Wheel uPOWER Button
174
Controls
Warning buzzers may sound from inside and/
or outside the vehicle to remind you that the
keyless access remote is out of the vehicle. If
the buzzer continues even after the remote is
put back inside, place it to be within its
operational range.
■When the power mode is in ON
If the keyless access remote is taken out of the
vehicle, and the driver’s door is closed, a
warning buzzer sounds from both inside and
outside the vehicle. A warning message on
the MID notifies the driver inside that the
remote outside of the vehicle.
■When the power mode is in
ACCESSORY
If the keyless access remote is taken out of the
vehicle, and the driver’s door is closed, a
warning buzzer sounds from outside the
vehicle.
■Keyless Access Remote Reminder1 Keyless Access Remote Reminder
When the keyless access remote is within the
system’s operational range, and the driver’s door is
closed, the warni ng function cancels.
If the keyless access remote is taken out of the vehicle
after the power system has been turned on, you can
no longer change the POWER button mode or
restart the power system. Always make sure if the
remote is in your vehi cle when you operate the
POWER button.
Removing the keyless access remote from the vehicle
through a window does not activate the warning
buzzer.
Do not put the keyless access remote on the
dashboard or in the glove box. It may cause the
warning buzzer to go off. Under some other
conditions that can prevent the vehicle from locating
the remote, the warning buzzer may also go off even
if the remote is within the system’s operational
range.
18 ACURA MDX E-AWD-31TRX6100.book 174 ページ 2018年3月27日 火曜日 午後8時6分
Page 190 of 685

189
uuOperating the Switches Around the Steering Wheel uDriving Position Memory System
Continued
Controls
Driving Position Memory System
You can store two driver’s seat (except for power lumbar), steering wheel and door
mirror positions with the driv ing position memory system.
When you unlock and open the driver’s door with a remote transmitter, or keyless
access system, door mirrors adjust to one of the two preset positions and the seat
adjusts to retracted positions of one of the two preset positions automatically.
The steering wheel and the seat will move to the stored position when you set the
power mode to ACCESSORY.
When you enter the vehicle, the MID br iefly shows you which remote transmitter
you used to unlock the vehicle.
• DRIVER 1 transmitter is linked to memory button 1.
• DRIVER 2 transmitter is linked to memory button 2.
The driver’s seat moves rearward and steering
wheel fully up depending on the set seating
position once you
•Stop the vehicle.
• Put the transmission in
(P.
• Turn the power system off.
• Then open the driver’s door.
Once the power mode is in the ACCESSORY
position, the driver’s s eat and steering wheel
moves to the DRIVER 1 or 2 preset position.
1 Driving Position Memory System
Using the information screen or MID, you can disable
the automatic seat, steeri ng wheel and door mirrors
adjustment function. 2 Customized Features P. 131, 362
The driver’s seat easy exit feature can be turned ON/
OFF. 2 Customized Features P. 131, 362
System Operation
The system will not operate if:
•The vehicle speed is above 3 mph (5 km/h).•Either memory position button is pressed while the
seat or steering wheel is in motion.
•The seat or steering wheel position is adjusted
while in operation.
•The memory 1 or 2 position is set fully to the rear.
DRIVER 1 DRIVER 2
18 ACURA MDX E-AWD-31TRX6100.book 189 ページ 2018年3月27日 火曜日 午後8時6分
Page 212 of 685
211
uuInterior Lights/Interior Convenience Items uInterior Convenience Items
Continued
Controls
Interior Convenience Items
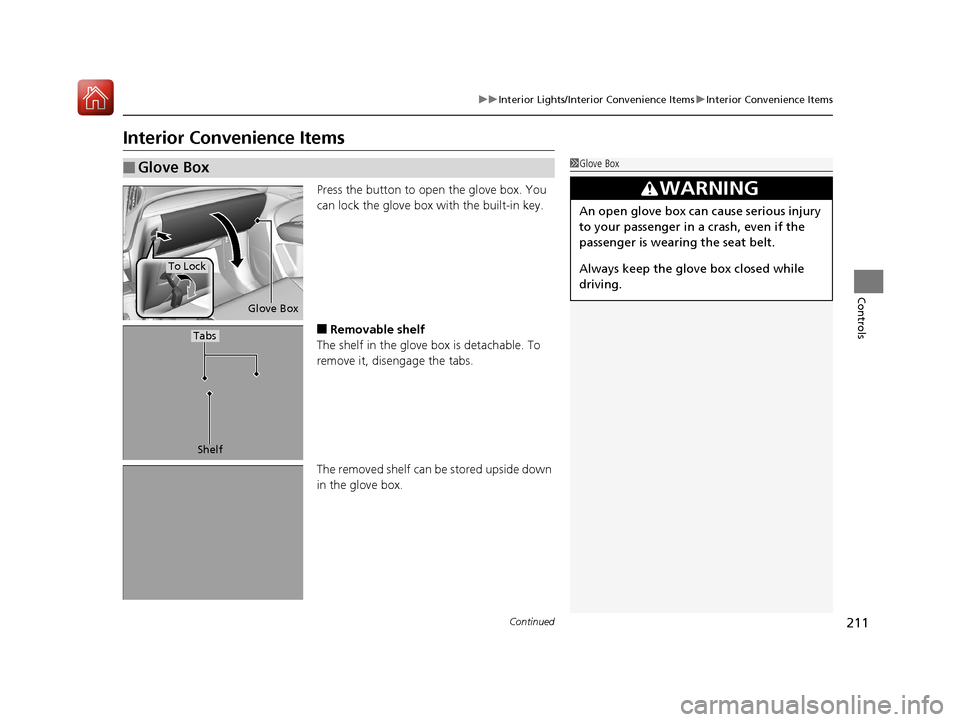
Press the button to open the glove box. You
can lock the glove box with the built-in key.
■Removable shelf
The shelf in the glove box is detachable. To
remove it, disengage the tabs.
The removed shelf can be stored upside down
in the glove box.
■Glove Box1 Glove Box
3WARNING
An open glove box can cause serious injury
to your passenger in a crash, even if the
passenger is wearing the seat belt.
Always keep the glove box closed while
driving.
Glove Box
To Lock
Shelf
Tabs
18 ACURA MDX E-AWD-31TRX6100.book 211 ページ 2018年3月27日 火曜日 午後8時6分
Page 248 of 685
247
uuAudio System Basic Operation uOn Demand Multi-Use DisplayTM
Features
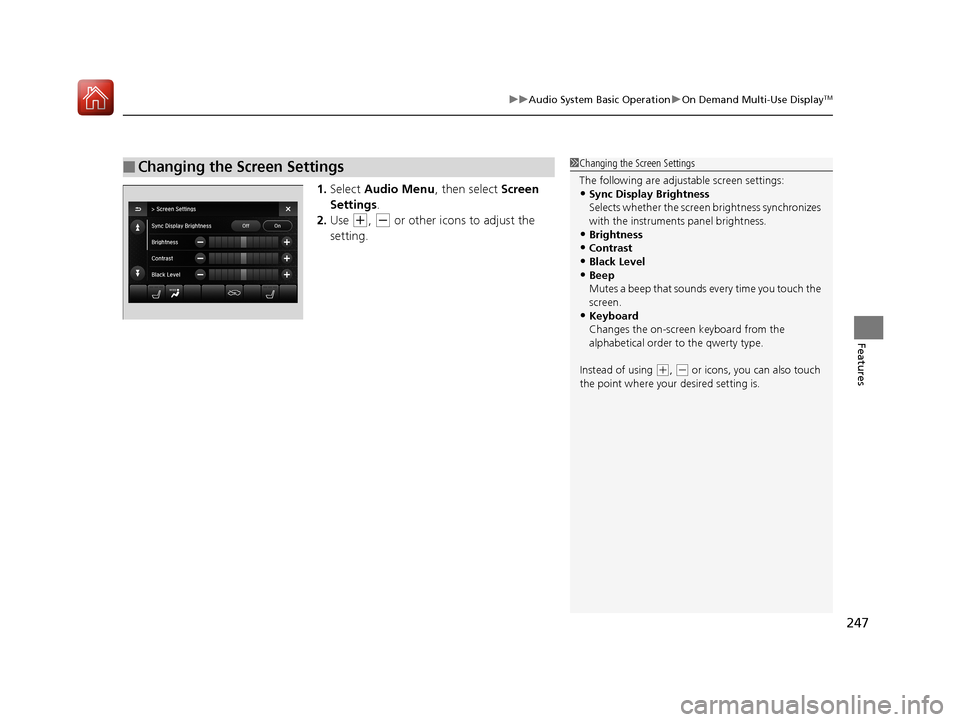
1. Select Audio Menu , then select Screen
Settings .
2. Use
(+, (- or other icons to adjust the
setting.
■Changing the Screen Settings1 Changing the Screen Settings
The following are adjustable screen settings:
•Sync Display Brightness
Selects whether the screen brightness synchronizes
with the instruments panel brightness.
•Brightness
•Contrast
•Black Level•Beep
Mutes a beep that sounds every time you touch the
screen.
•Keyboard
Changes the on-screen keyboard from the
alphabetical order to the qwerty type.
Instead of using
( +, (- or icons, you can also touch
the point where your desired setting is.
18 ACURA MDX E-AWD-31TRX6100.book 247 ページ 2018年3月27日 火曜日 午後8時6分
Page 264 of 685
263
uuAudio System Basic Operation uPlaying AM/FM Radio
Features
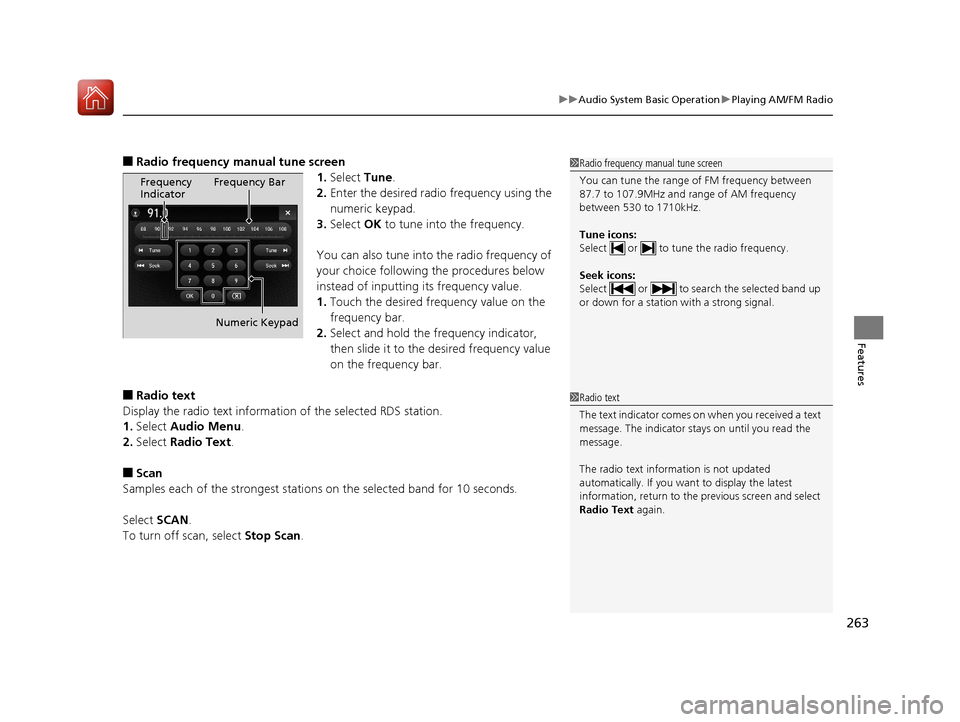
■Radio frequency manual tune screen
1.Select Tune.
2. Enter the desired radio frequency using the
numeric keypad.
3. Select OK to tune into the frequency.
You can also tune into the radio frequency of
your choice following the procedures below
instead of inputting its frequency value.
1. Touch the desired frequency value on the
frequency bar.
2. Select and hold the frequency indicator,
then slide it to the desired frequency value
on the frequency bar.
■Radio text
Display the radio text information of the selected RDS station.
1. Select Audio Menu .
2. Select Radio Text .
■Scan
Samples each of the strongest stations on the selected band for 10 seconds.
Select SCAN.
To turn off scan, select Stop Scan.
1Radio frequency manual tune screen
You can tune the range of FM frequency between
87.7 to 107.9MHz and range of AM frequency
between 530 to 1710kHz.
Tune icons:
Select or to tune the radio frequency.
Seek icons:
Select or to search the selected band up
or down for a station with a strong signal.
Frequency
Indicator Frequency Bar
Numeric Keypad
1 Radio text
The text indicator comes on when you received a text
message. The indicator stays on until you read the
message.
The radio text inform ation is not updated
automatically. If you want to display the latest
information, return to the previous screen and select
Radio Text again.
18 ACURA MDX E-AWD-31TRX6100.book 263 ページ 2018年3月27日 火曜日 午後8時6分
Page 266 of 685
Continued265
uuAudio System Basic Operation uPlaying SiriusXM ® Radio
Features
1. Select the SiriusXM ® mode.
2Audio Remote Controls P. 241
2 On Demand Multi-Use DisplayTM P. 244
2.Select a channel using the , icons or the preset numbers (1 -12) on the preset
mode screen.
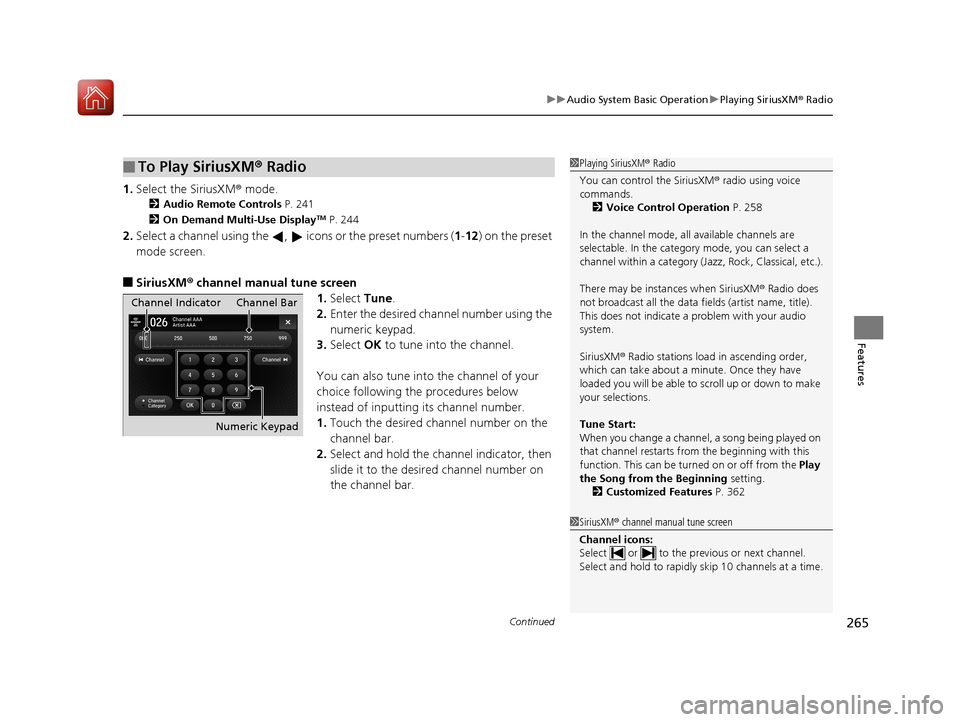
■SiriusXM ® channel manual tune screen
1.Select Tune.
2. Enter the desired channel number using the
numeric keypad.
3. Select OK to tune into the channel.
You can also tune into the channel of your
choice following the procedures below
instead of inputting its channel number.
1. Touch the desired channel number on the
channel bar.
2. Select and hold the channel indicator, then
slide it to the desire d channel number on
the channel bar.
■To Play SiriusXM ® Radio1 Playing SiriusXM ® Radio
You can control the SiriusXM ® radio using voice
commands.
2 Voice Control Operation P. 258
In the channel mode, all available channels are
selectable. In the categor y mode, you can select a
channel within a ca tegory (Jazz, Rock, Classical, etc.).
There may be instances when SiriusXM ® Radio does
not broadcast all the data fi elds (artist name, title).
This does not indicate a problem with your audio
system.
SiriusXM ® Radio stations load in ascending order,
which can take about a minute. Once they have
loaded you will be able to scroll up or down to make
your selections.
Tune Start:
When you change a channel, a song being played on
that channel restarts from the beginning with this
function. This can be turned on or off from the Play
the Song from the Beginning setting.
2 Customized Features P. 362
1SiriusXM ® channel manual tune screen
Channel icons:
Select or to the prev ious or next channel.
Select and hold to rapidly sk ip 10 channels at a time.
Channel Indicator Channel Bar
Numeric Keypad
18 ACURA MDX E-AWD-31TRX6100.book 265 ページ 2018年3月27日 火曜日 午後8時6分
Page 285 of 685
uuAudio System Basic Operation uPlaying Hard Disk Drive (HDD) Audio
284
Features
Change the playlist name, album name, ge nre, and track order of the current
playlist. You can also delete tracks, playlists, and albums.
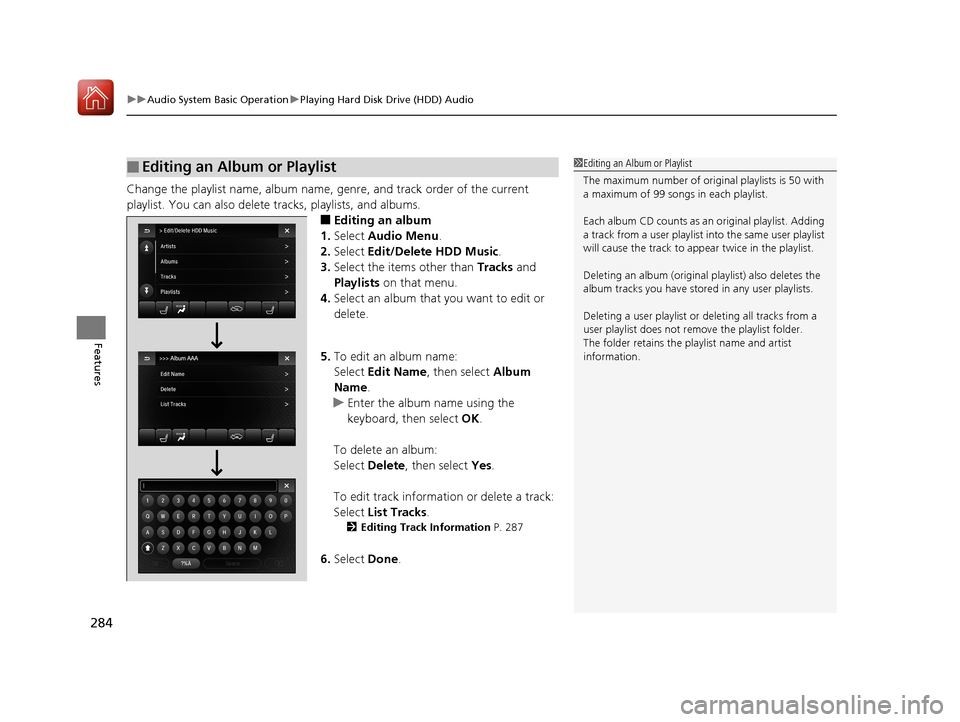
■Editing an album
1. Select Audio Menu .
2. Select Edit/Delete HDD Music.
3. Select the items other than Tracks and
Playlists on that menu.
4. Select an album that you want to edit or
delete.
5. To edit an album name:
Select Edit Name , then select Album
Name.
u Enter the album name using the
keyboard, then select OK.
To delete an album:
Select Delete, then select Yes.
To edit track information or delete a track:
Select List Tracks .
2Editing Track Information P. 287
6.Select Done.
■Editing an Album or Playlist1Editing an Album or Playlist
The maximum number of original playlists is 50 with
a maximum of 99 songs in each playlist.
Each album CD counts as an original playlist. Adding
a track from a user playlist into the same user playlist
will cause the track to appear twice in the playlist.
Deleting an album (original playlist) also deletes the
album tracks you have stor ed in any user playlists.
Deleting a user playlist or deleting all tracks from a
user playlist does not remove the playlist folder.
The folder retains the playlist name and artist
information.
18 ACURA MDX E-AWD-31TRX6100.book 284 ページ 2018年3月27日 火曜日 午後8時6分
Page 286 of 685
285
uuAudio System Basic Operation uPlaying Hard Disk Drive (HDD) Audio
Continued
Features
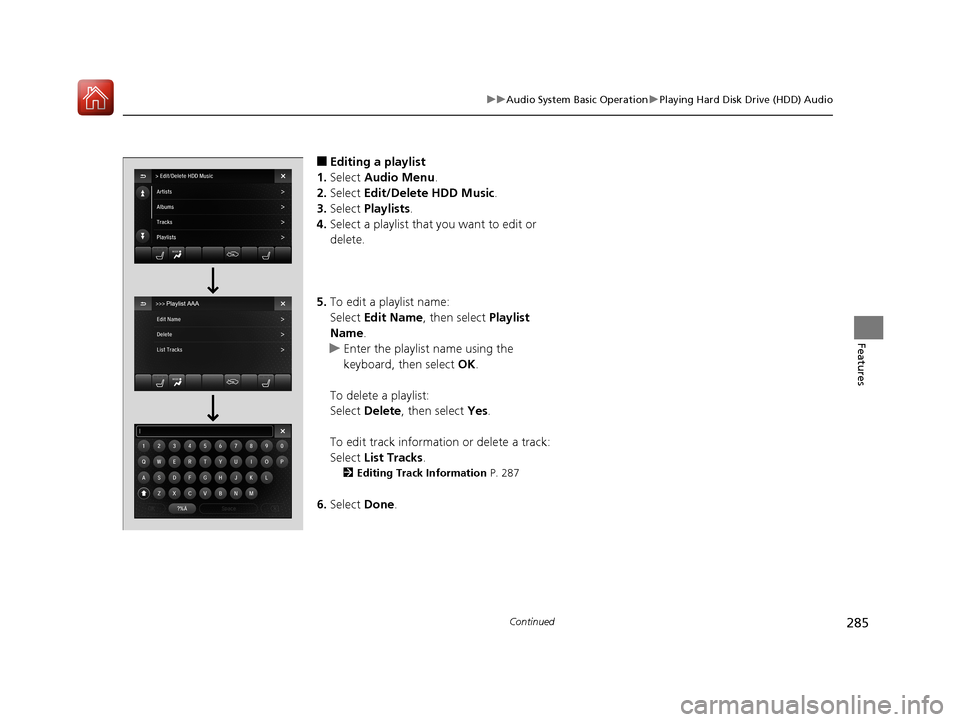
■Editing a playlist
1. Select Audio Menu .
2. Select Edit/Delete HDD Music .
3. Select Playlists .
4. Select a playlist that you want to edit or
delete.
5. To edit a playlist name:
Select Edit Name , then select Playlist
Name.
u Enter the playlist name using the
keyboard, then select OK.
To delete a playlist:
Select Delete , then select Yes.
To edit track information or delete a track:
Select List Tracks .
2Editing Track Information P. 287
6.Select Done.
18 ACURA MDX E-AWD-31TRX6100.book 285 ページ 2018年3月27日 火曜日 午後8時6分
Page 287 of 685
286
uuAudio System Basic Operation uPlaying Hard Disk Drive (HDD) Audio
Features
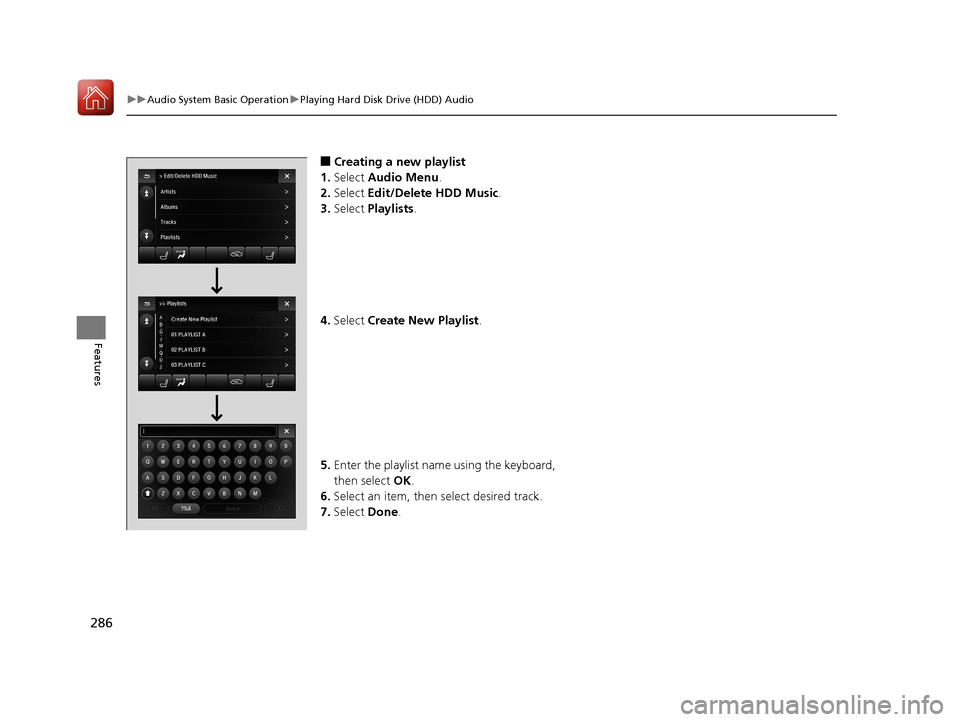
■Creating a new playlist
1. Select Audio Menu .
2. Select Edit/Delete HDD Music.
3. Select Playlists .
4. Select Create New Playlist .
5. Enter the playlist name using the keyboard,
then select OK.
6. Select an item, then select desired track.
7. Select Done.
18 ACURA MDX E-AWD-31TRX6100.book 286 ページ 2018年3月27日 火曜日 午後8時6分