torque ACURA NSX 1991 Service Repair Manual
[x] Cancel search | Manufacturer: ACURA, Model Year: 1991, Model line: NSX, Model: ACURA NSX 1991Pages: 1640, PDF Size: 60.48 MB
Page 45 of 1640
Service Precaution s
Handling o f Specia l Nut s an d Bolt s
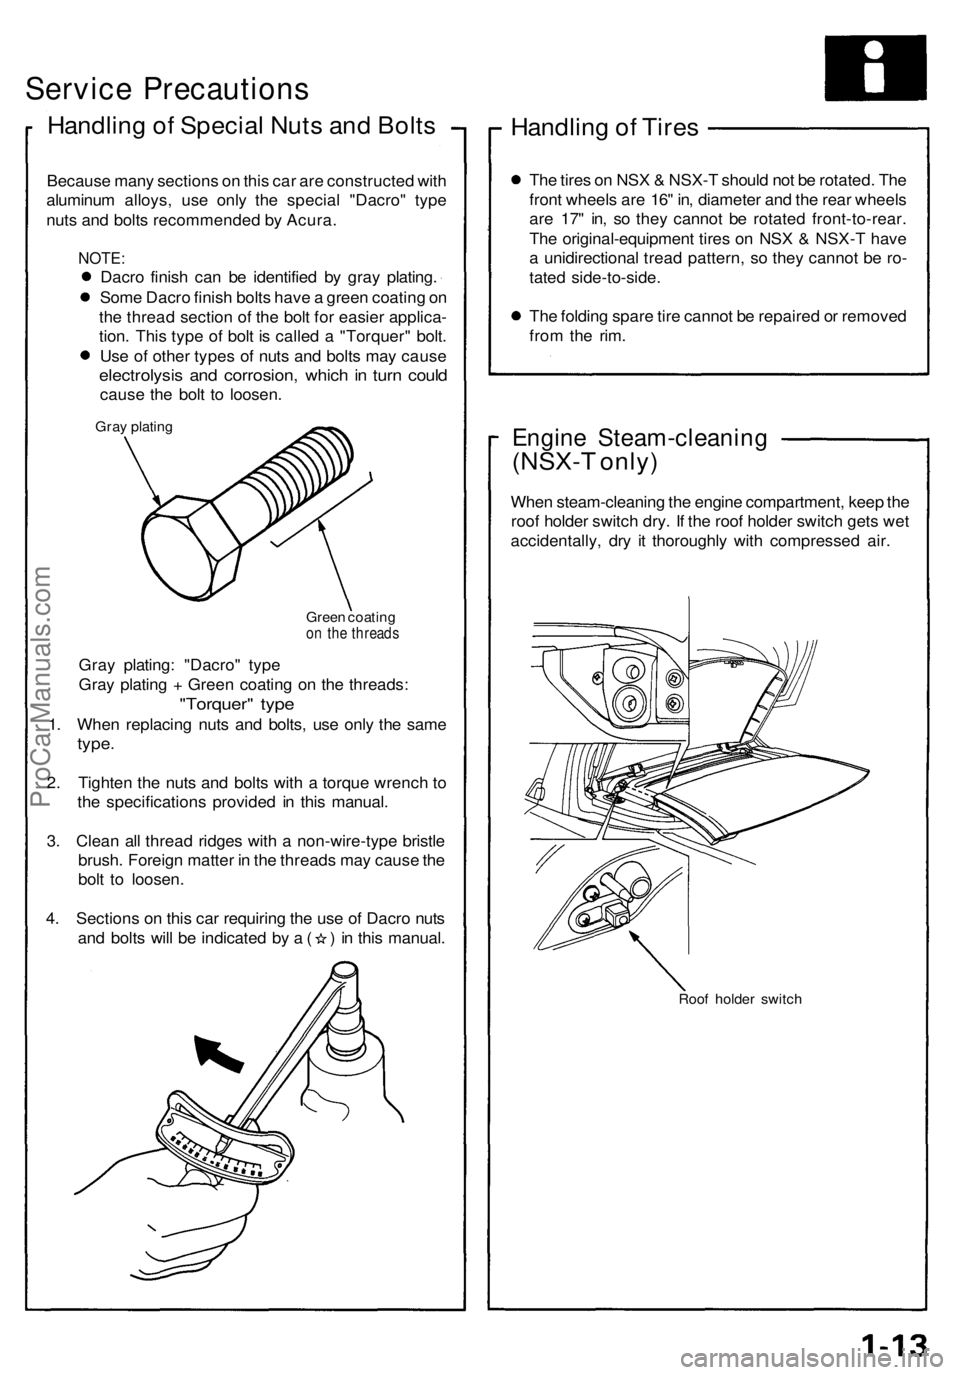
Becaus e man y section s o n thi s ca r ar e constructe d wit h
aluminu m alloys , us e onl y th e specia l "Dacro " typ e
nut s an d bolt s recommende d b y Acura .
NOTE:
Dacro finis h ca n b e identifie d b y gra y plating .
Som e Dacr o finis h bolt s hav e a gree n coatin g o n
th e threa d sectio n of the bol t fo r easie r applica -
tion . Thi s typ e of bol t i s calle d a "Torquer " bolt .
Us e o f othe r type s of nut s an d bolt s ma y caus e
electrolysi s an d corrosion , whic h in tur n coul d
caus e th e bol t t o loosen .
Gray platin g
Green coatin g
on th e thread s
Gray plating : "Dacro " typ e
Gra y platin g + Gree n coatin g o n th e threads :
"Torquer " typ e
1. Whe n replacin g nut s an d bolts , us e onl y th e sam e
type.
2. Tighte n th e nut s an d bolt s with a torqu e wrenc h t o
th e specification s provide d i n thi s manual .
3 . Clea n al l threa d ridge s wit h a non-wire-typ e bristl e
brush . Foreig n matte r i n th e thread s ma y caus e th e
bol t t o loosen .
4 . Section s o n thi s ca r requirin g th e us e o f Dacr o nut s
and bolt s wil l b e indicate d b y a ( ) in thi s manual .
Handling o f Tire s
The tire s o n NS X & NSX- T shoul d no t b e rotated . Th e
fron t wheel s ar e 16 " in , diamete r an d th e rea r wheel s
ar e 17 " in , s o the y canno t b e rotate d front-to-rear .
Th e original-equipmen t tire s o n NS X & NSX- T hav e
a unidirectiona l trea d pattern , s o the y canno t b e ro -
tate d side-to-side .
Th e foldin g spar e tir e canno t b e repaire d o r remove d
fro m th e rim .
Engin e Steam-cleanin g
(NSX-T only )
When steam-cleanin g th e engin e compartment , kee p th e
roo f holde r switc h dry . I f th e roo f holde r switc h get s we t
accidentally , dr y i t thoroughl y wit h compresse d air .
Roo f holde r switc h
ProCarManuals.com
Page 89 of 1640
Timing Belt
Inspection
1. Remove the ignition coil covers and harness clamps.
2. Disconnect the connectors, then remove the ignition
coils.
3. Remove the cylinder head covers,
4. Inspect the timing belt for cracks and coolant or oil soaking.
NOTE:
Replace the belt if coolant or oil soaked.
Remove any oil or solvent that gets on the belt.
Inspect this area
for wear.
Rotate pulley and
Inspect belt.
Tension Adjustment
CAUTION:
Always adjust timing belt tension with the engine cold
Do not rotate the crankshaft when the adjusting bolt
is loose (the timing belt will skid over the teeth of
the rear intake caimshaft pulley).
Adjust the belt tension only when the belt has been
removed and reinstalled or replaced.
NOTE:
Tensioner is spring-loaded to apply proper tension to
the belt automatically after making the following ad-
justment. Inspect the timing belt before adjusting the belt
tension.
Always rotate the crankshaft clockwise. Rotating it
counterclockwise may result in improper adjustment
of the belt tension or cause the belt to jump a tooth
on the camshaft pulleys.
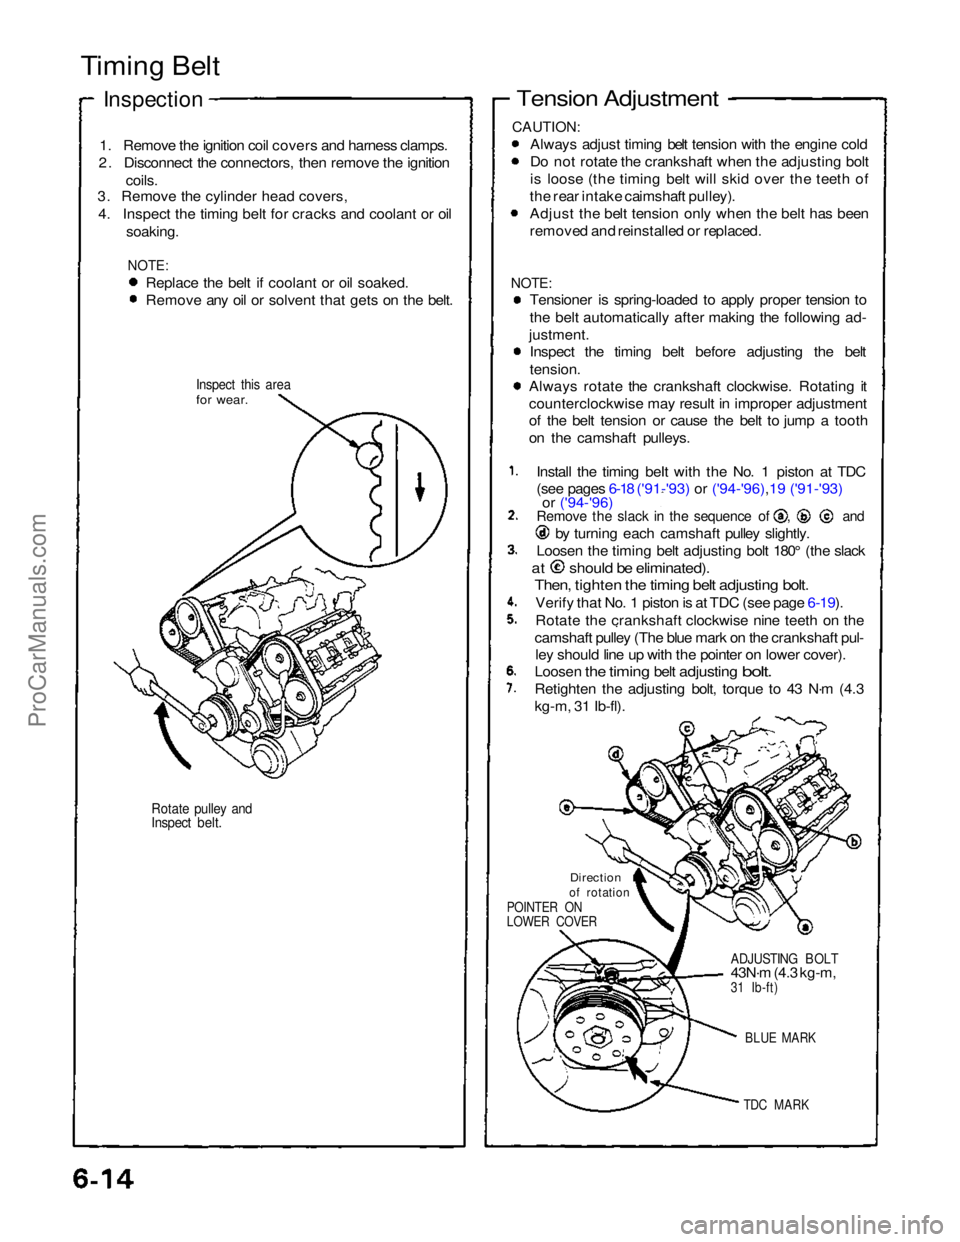
Install the timing beIt with the No. 1 piston at TDC
(see pages 6-18 ('91-'93) or ('94-'96),19 ('91-'93)
or ('94-'96) Remove the slack in the sequence of , and
by turning each camshaft pulley slightly.
Loosen the timing belt adjusting bolt 180° (the slack
at should be eliminated).
Then, tighten the timing belt adjusting bolt.
Verify that No. 1 piston is at TDC (see page 6-19).
Rotate the crankshaft clockwise nine teeth on the
camshaft pulley (The blue mark on the crankshaft pul- ley should line up with the pointer on lower cover).
Loosen
the
timing
belt
adjusting
bolt.
Retighten the adjusting bolt, torque to 43 N·m (4.3
kg-m, 31 Ib-fl).
Direction
of rotation
POINTER ON
LOWER COVER
ADJUSTING BOLT
43N·m (4.3 kg-m,
31 Ib-ft)
BLUE MARK
TDC MARK
ProCarManuals.com
Page 109 of 1640
Camshafts
Inspection
NOTE:
• D o no t rotat e th e camshaf t durin g inspection .
• Remov e th e rocke r arm s an d rocke r shafts .
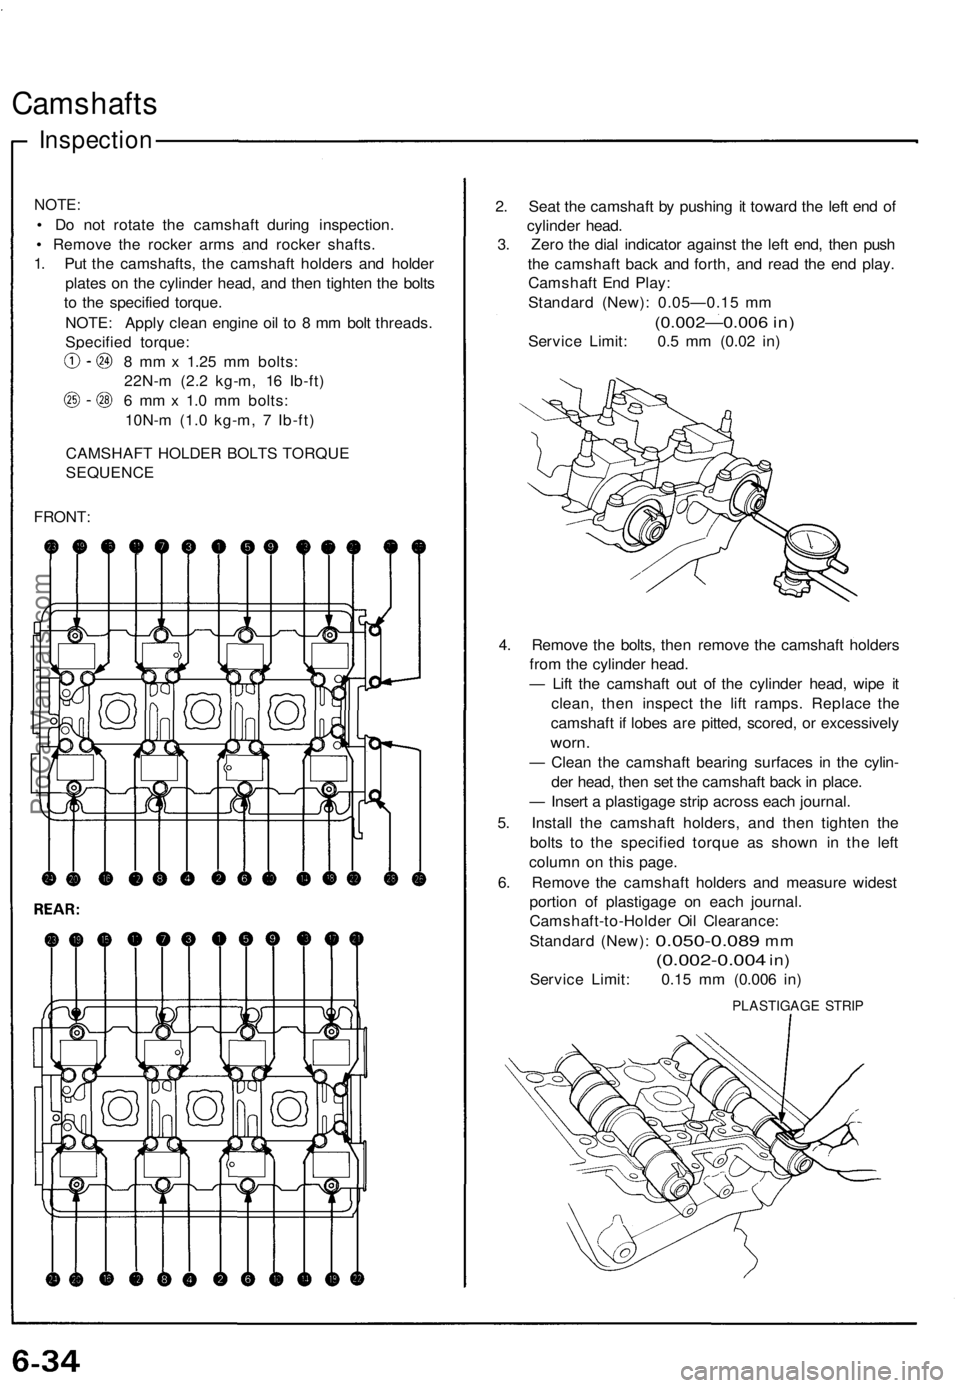
1 . Pu t th e camshafts , th e camshaf t holder s an d holde r
plate s o n th e cylinde r head , an d the n tighte n th e bolt s
t o th e specifie d torque .
NOTE : Appl y clea n engin e oi l t o 8 m m bol t threads .
Specifie d torque :
8 m m x 1.2 5 m m bolts :
22N- m (2. 2 kg-m , 1 6 Ib-ft )
6 m m x 1. 0 m m bolts :
10N- m (1. 0 kg-m , 7 Ib-ft )
CAMSHAF T HOLDE R BOLT S TORQU E
SEQUENCE
FRONT :
2. Sea t th e camshaf t b y pushin g i t towar d th e lef t en d o f
cylinde r head .
3 . Zer o th e dia l indicato r agains t th e lef t end , the n pus h
th e camshaf t bac k an d forth , an d rea d th e en d play .
Camshaf t En d Play :
Standar d (New) : 0.05—0.1 5 m m
(0.002—0.006 in)
Servic e Limit : 0. 5 m m (0.0 2 in )
4 . Remov e th e bolts , the n remov e th e camshaf t holder s
fro m th e cylinde r head .
— Lif t th e camshaft out o f th e cylinde r head , wip e i t
clean , the n inspec t th e lif t ramps . Replac e th e
camshaft if lobe s ar e pitted , scored , o r excessivel y
worn.
— Clea n th e camshaf t bearin g surface s i n th e cylin -
de r head , the n se t th e camshaf t bac k in place .
— Inser t a plastigag e stri p acros s eac h journal.
5 . Instal l th e camshaf t holders , an d the n tighte n th e
bolt s t o th e specifie d torqu e a s show n i n th e lef t
colum n o n thi s page .
6 . Remov e th e camshaf t holder s an d measur e wides t
portio n o f plastigag e o n eac h journal .
Camshaft-to-Holde r Oi l Clearance :
Standar d (New) :
0.050-0.08 9 mm
(0.002-0.00 4 in)
Servic e Limit : 0.1 5 m m (0.00 6 in )
PLASTIGAG E STRI P
ProCarManuals.com
Page 123 of 1640
Camshafts
Installation
5. Apply liquid gasket to the head mating surfaces of
the No. 1 and the No. 4 camshaft holders.
- Apply liquid gasket to the shaded areas.
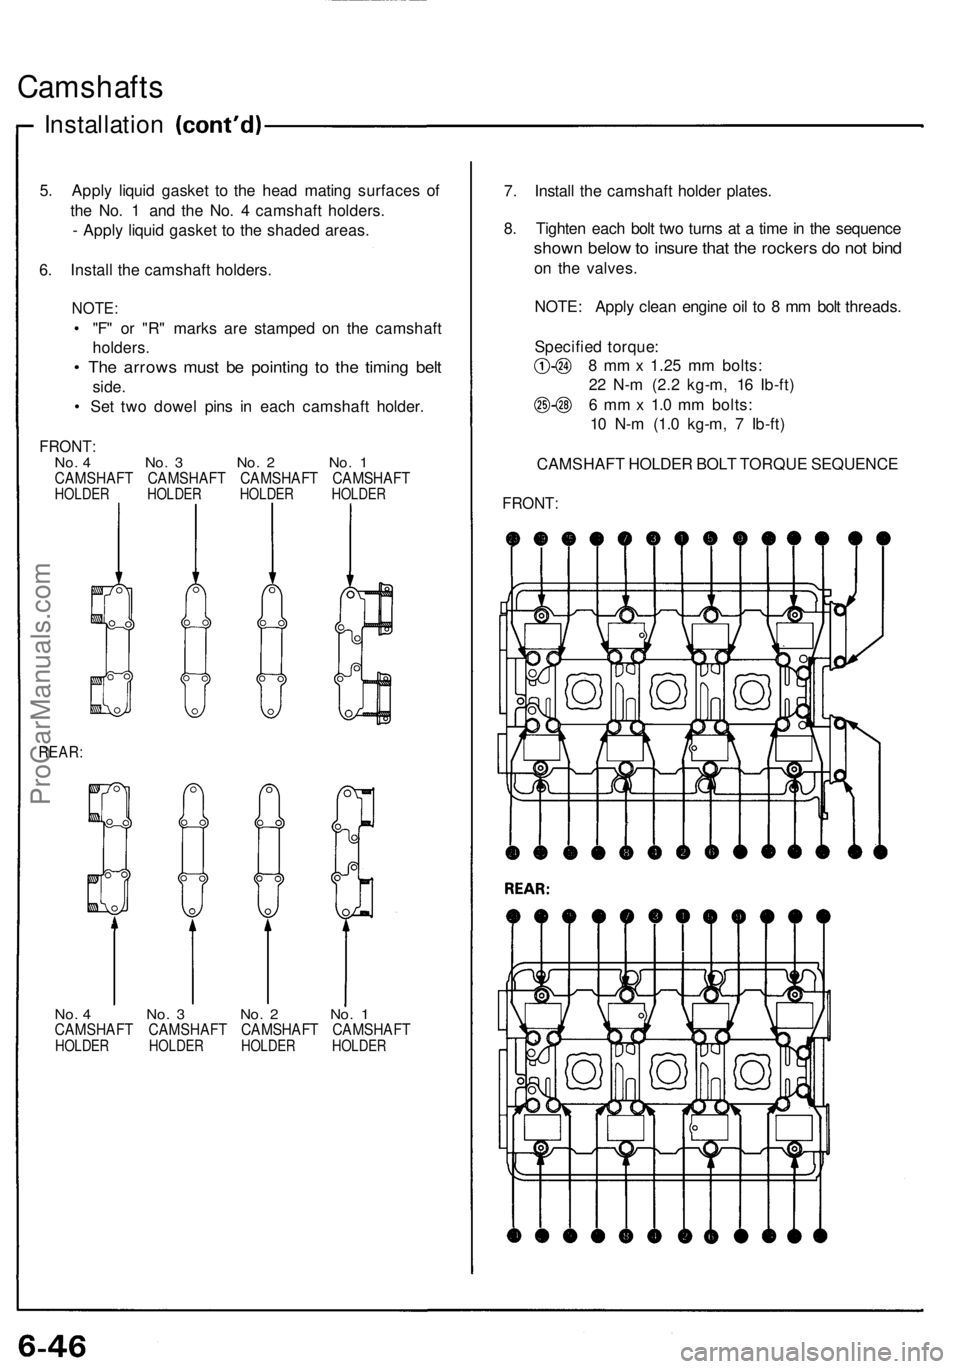
6. Install the camshaft holders.
NOTE:
• "F" or "R" marks are stamped on the camshaft
holders.
• The arrows must be pointing to the timing belt
side.
• Set two dowel pins in each camshaft holder.
FRONT:
No. 4 No. 3 No. 2 No. 1
CAMSHAFT CAMSHAFT CAMSHAFT CAMSHAFT
HOLDER HOLDER HOLDER HOLDER
REAR:
No. 4 No. 3 No. 2 No. 1
CAMSHAFT CAMSHAFT CAMSHAFT CAMSHAFT
HOLDER HOLDER HOLDER HOLDER
7. Install the camshaft holder plates.
8. Tighten each bolt two turns at a time in the sequence
shown below to insure that the rockers do not bind
on the valves.
NOTE: Apply clean engine oil to 8 mm bolt threads.
Specified torque:
8 mm x 1.25 mm bolts:
22 N-m (2.2 kg-m, 16 Ib-ft)
6 mm x 1.0 mm bolts:
10 N-m (1.0 kg-m, 7 Ib-ft)
CAMSHAFT HOLDER BOLT TORQUE SEQUENCE
FRONT:ProCarManuals.com
Page 124 of 1640
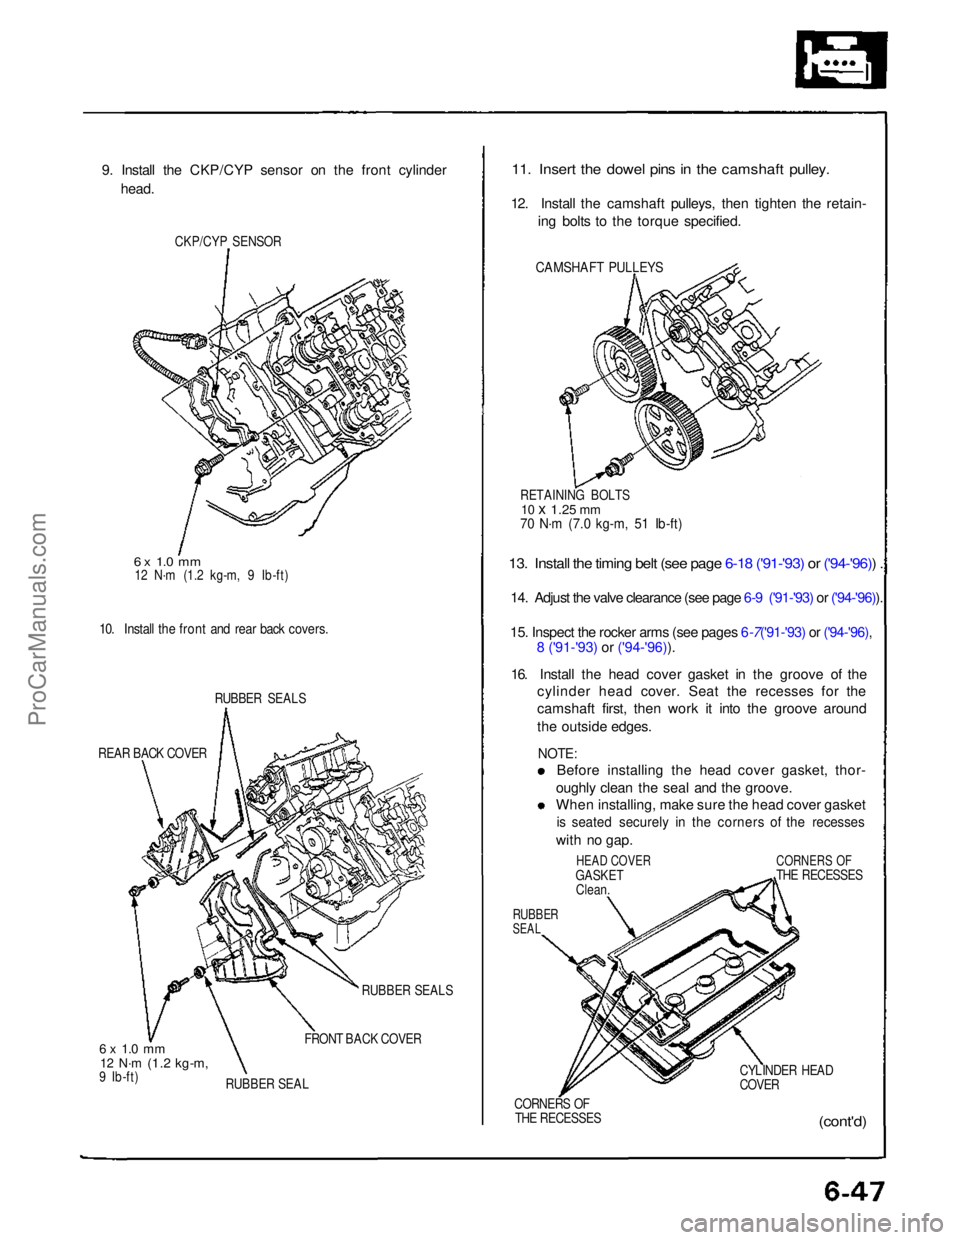
9. Install the CKP/CYP sensor on the front cylinder
head.
CKP/CYP SENSOR
6 x 1.0 mm
12 N·m (1.2 kg-m, 9 Ib-ft)
10. Install the front and rear back covers.
RUBBER SEALS
REAR BACK COVER
6 x 1.0 mm
12 N·m
(1.2 kg-m,
9 Ib-ft) RUBBER SEALS
FRONT BACK COVER
RUBBER SEAL
11. Insert the dowel pins in the camshaft pulley.
12. Install the camshaft pulleys, then tighten the retain- ing bolts to the torque specified.
CAMSHAFT PULLEYS
13. Install the timing belt (see page 6-18 ('91-'93) or ('94-'96)) .
14. Adjust the valve clearance (see page 6-9 ('91-'93) or ('94-'96)).
15. Inspect the rocker arms (see pages
6-7('91-'93) or ('94-'96),8 ('91-'93) or ('94-'96)).
16. Install the head cover gasket in the groove of the
cylinder head cover. Seat the recesses for the
camshaft first, then work it into the groove around
the outside edges.
NOTE:
Before installing the head cover gasket, thor-
oughly clean the seal and the groove. When installing, make sure the head cover gasket
is seated securely in the corners of the recesses
with no gap.
HEAD COVER
GASKET Clean.
RUBBER
SEAL
CORNERS OF
THE RECESSES
CYLINDER HEAD
COVER
CORNERS OF THE RECESSES
(cont'd)
RETAINING BOLTS
10 x
1.25
mm
70 N·m (7.0 kg-m, 51 Ib-ft)ProCarManuals.com
Page 143 of 1640
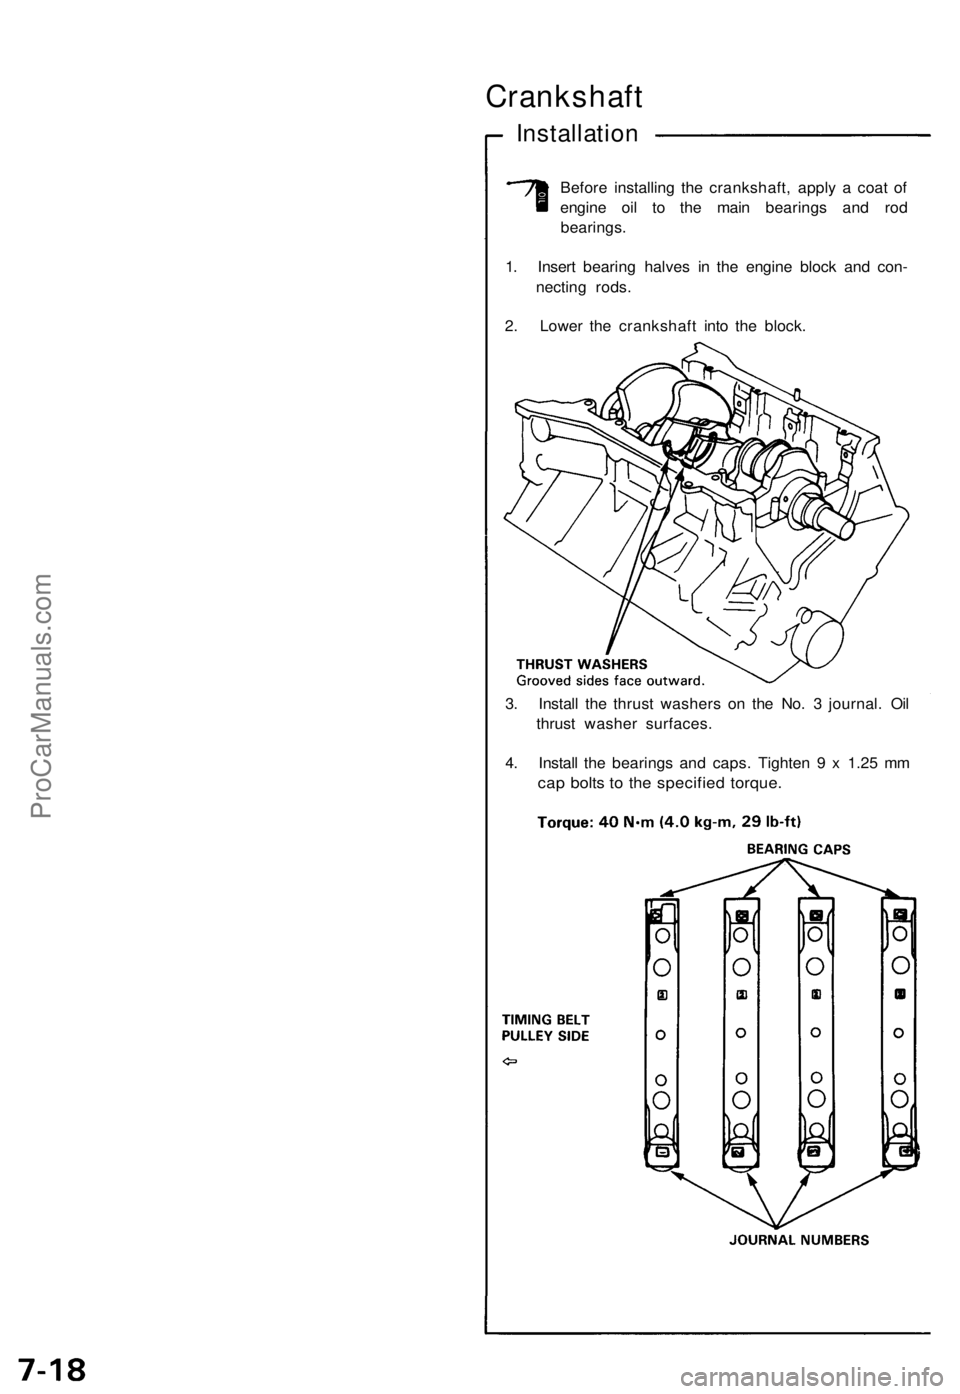
Crankshaft
Installation
Before installing the crankshaft, apply a coat of
engine oil to the main bearings and rod
bearings.
1. Insert bearing halves in the engine block and con-
necting rods.
2. Lower the crankshaft into the block.
3. Install the thrust washers on the No. 3 journal. Oil
thrust washer surfaces.
4. Install the bearings and caps. Tighten 9 x 1.25 mm
cap bolts to the specified torque.ProCarManuals.com
Page 145 of 1640
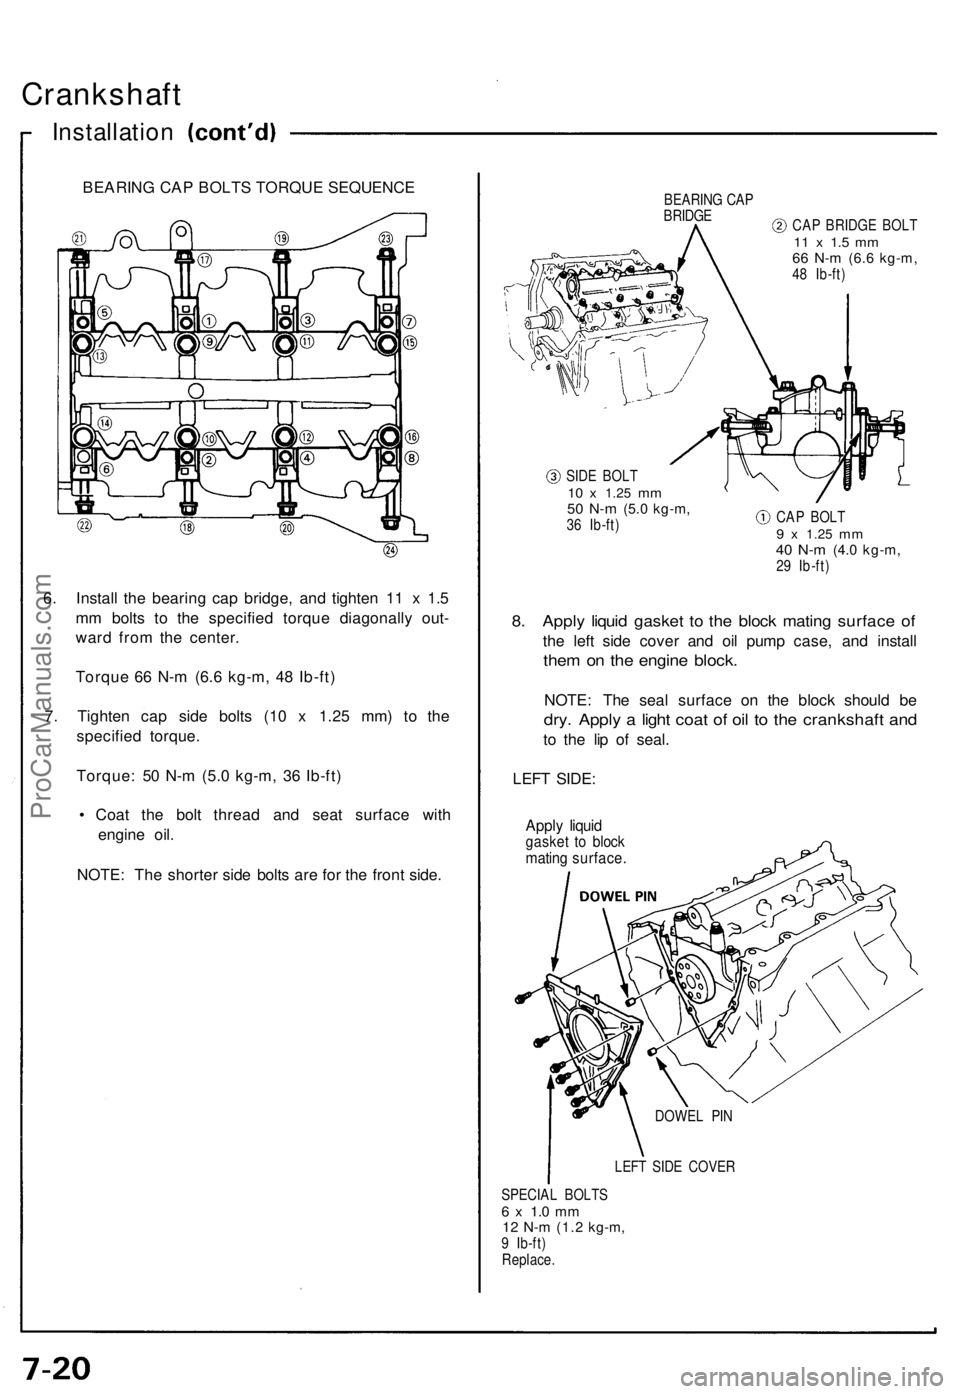
Crankshaft
Installation
6. Instal l th e bearin g ca p bridge , an d tighte n 1 1 x 1. 5
m m bolt s t o th e specifie d torqu e diagonall y out -
war d fro m th e center .
Torqu e 6 6 N- m (6. 6 kg-m , 4 8 Ib-ft )
7 . Tighte n ca p sid e bolt s (1 0 x 1.2 5 mm ) t o th e
specifie d torque .
Torque : 5 0 N- m (5. 0 kg-m , 3 6 Ib-ft )
• Coa t th e bol t threa d an d sea t surfac e wit h
engin e oil .
NOTE : Th e shorte r sid e bolt s ar e fo r th e fron t side .
BEARIN G CA PBRIDG ECAP BRIDG E BOL T11 x 1. 5 m m66 N- m (6. 6 kg-m ,48 Ib-ft )
SID E BOL T
10 x 1.2 5 mm50 N- m (5. 0 kg-m ,36 Ib-ft ) CA
P BOL T9 x 1.2 5 mm40 N- m (4. 0 kg-m ,29 Ib-ft )
8. Appl y liqui d gaske t t o th e bloc k matin g surfac e o f
the lef t sid e cove r an d oi l pum p case , an d instal l
them o n th e engin e block .
NOTE : Th e sea l surfac e o n th e bloc k shoul d b e
dry . Appl y a ligh t coa t o f oi l t o th e crankshaf t an d
to th e li p o f seal .
LEF T SIDE :
Apply liqui dgaske t t o bloc kmatin g surface .
LEFT SID E COVE R
SPECIA L BOLT S
6 x 1. 0 m m12 N- m (1. 2 kg-m ,9 Ib-ft )
Replace . DOWE
L PI N
BEARIN G CA P BOLT S TORQU E SEQUENC E
ProCarManuals.com
Page 150 of 1640
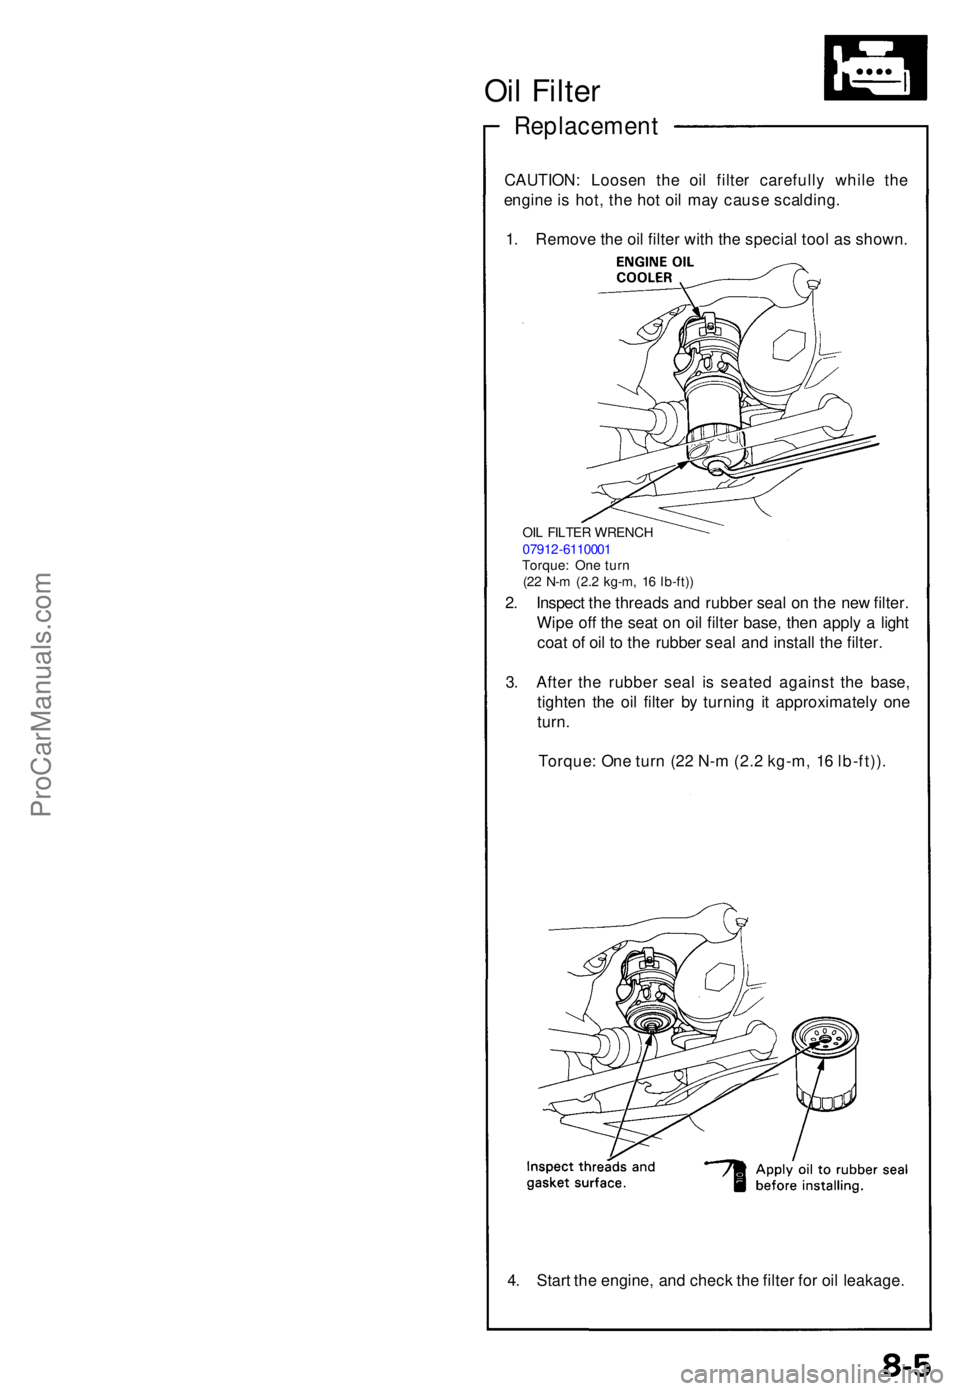
Oil Filte r
Replacemen t
CAUTION: Loose n th e oi l filte r carefull y whil e th e
engin e is hot , th e ho t oi l ma y caus e scalding .
1 . Remov e th e oi l filte r wit h th e specia l too l a s shown .
2 . Inspec t th e thread s an d rubbe r sea l o n th e ne w filter .
Wip e of f th e sea t o n oi l filte r base , the n appl y a ligh t
coa t o f oi l t o th e rubbe r sea l an d instal l th e filter .
3 . Afte r th e rubbe r sea l i s seate d agains t th e base ,
tighte n th e oi l filte r b y turnin g i t approximatel y on e
turn .
Torque : On e tur n (2 2 N- m (2. 2 kg-m , 1 6 lb-ft)) .
OIL FILTE R WRENC H
0791 2-611000 1
Torque : On e tur n
(2 2 N- m (2. 2 kg-m , 1 6 lb-ft) )
4. Star t th e engine , an d chec k th e filte r fo r oi l leakage .
ProCarManuals.com
Page 156 of 1640
28. Tighten bolts and nuts finger tight at six points as
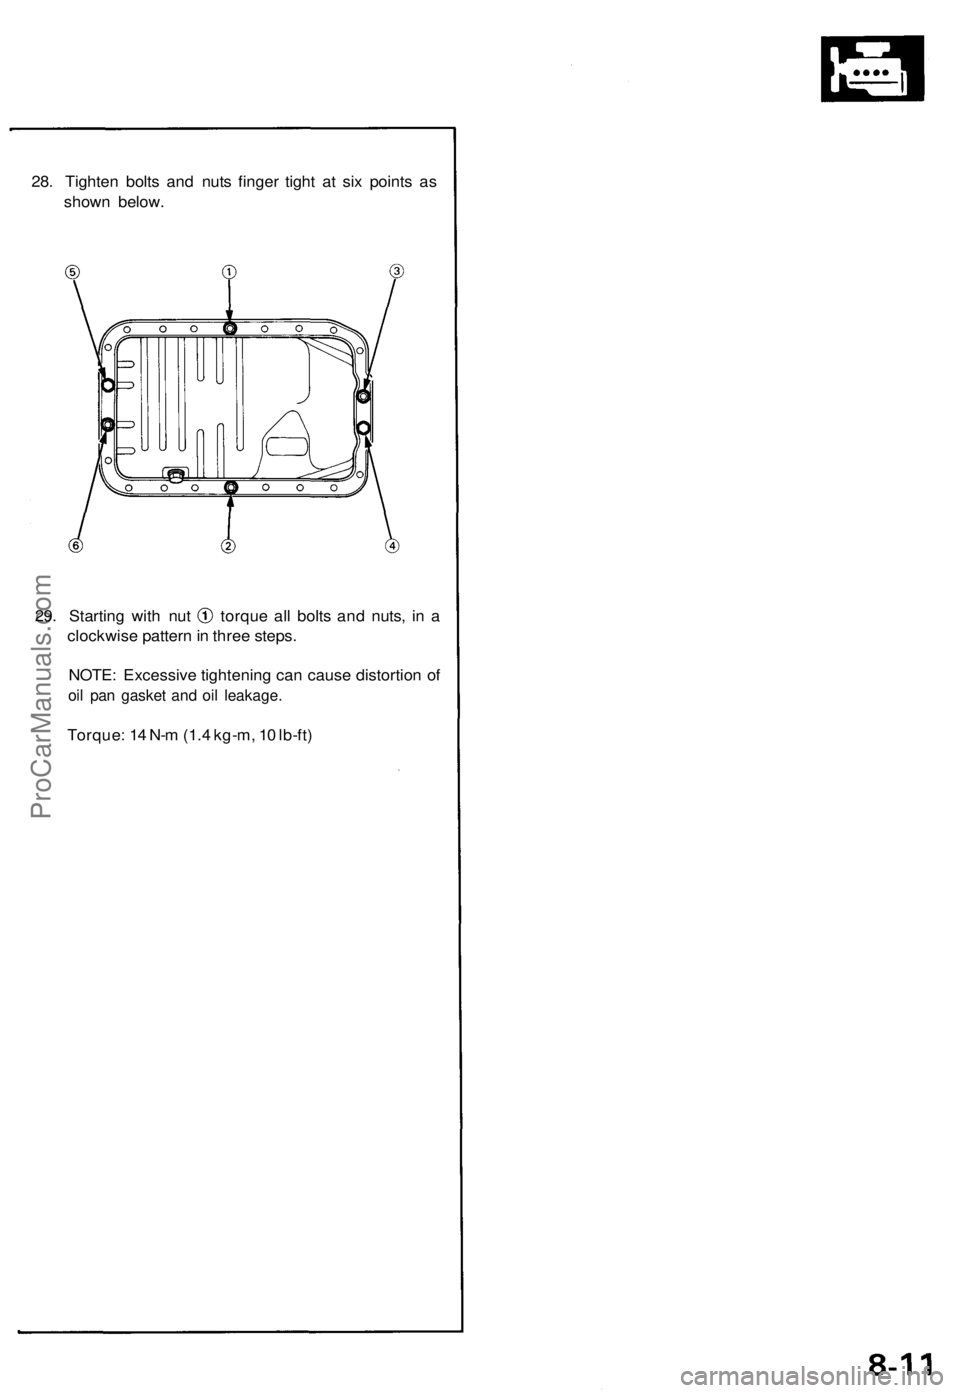
shown below.
29. Starting with nut torque all bolts and nuts, in a
clockwise pattern in three steps.
NOTE: Excessive tightening can cause distortion of
oil pan gasket and oil leakage.
Torque: 14 N-m (1.4 kg-m, 10 lb-ft)ProCarManuals.com
Page 274 of 1640
Intake Air System
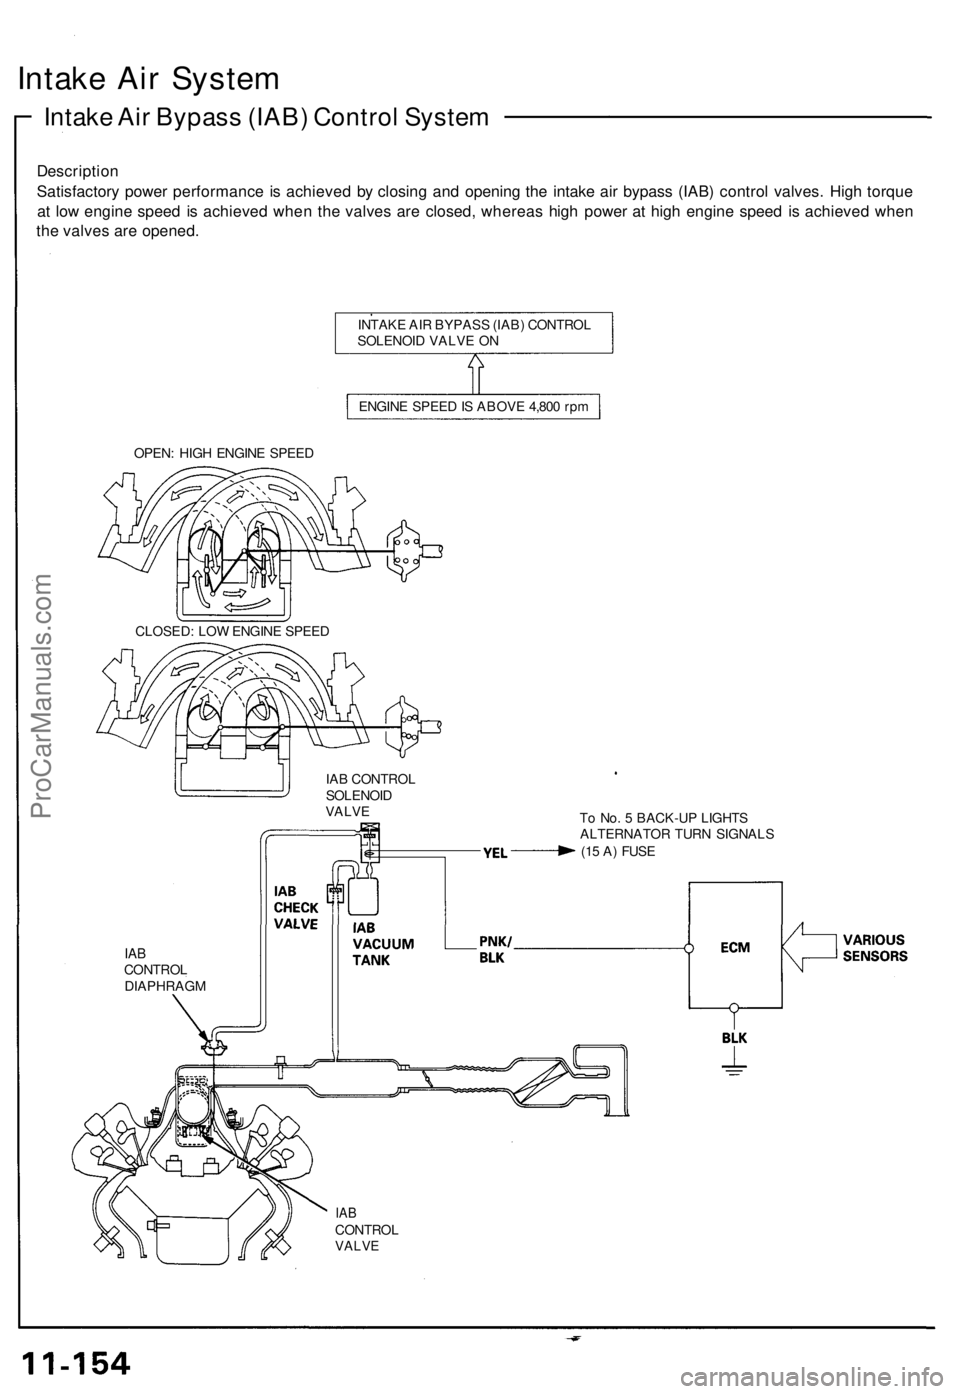
Intake Air Bypass (IAB) Control System
Description
Satisfactory power performance is achieved by closing and opening the intake air bypass (IAB) control valves. High torque
at low engine speed is achieved when the valves are closed, whereas high power at high engine speed is achieved when
the valves are opened.
INTAKE AIR BYPASS (IAB) CONTROL
SOLENOID VALVE ON
ENGINE SPEED IS ABOVE 4,800 rpm
OPEN: HIGH ENGINE SPEED
IAB CONTROL
SOLENOID
VALVE
To No. 5 BACK-UP LIGHTS
ALTERNATOR TURN SIGNALS
(15 A) FUSE
IAB
CONTROL
DIAPHRAGM
IAB
CONTROL
VALVE
CLOSED: LOW ENGINE SPEEDProCarManuals.com