check engine light Acura NSX 2017 Owner's Manual
[x] Cancel search | Manufacturer: ACURA, Model Year: 2017, Model line: NSX, Model: Acura NSX 2017Pages: 473, PDF Size: 16.01 MB
Page 27 of 473
26
Quick Reference Guide
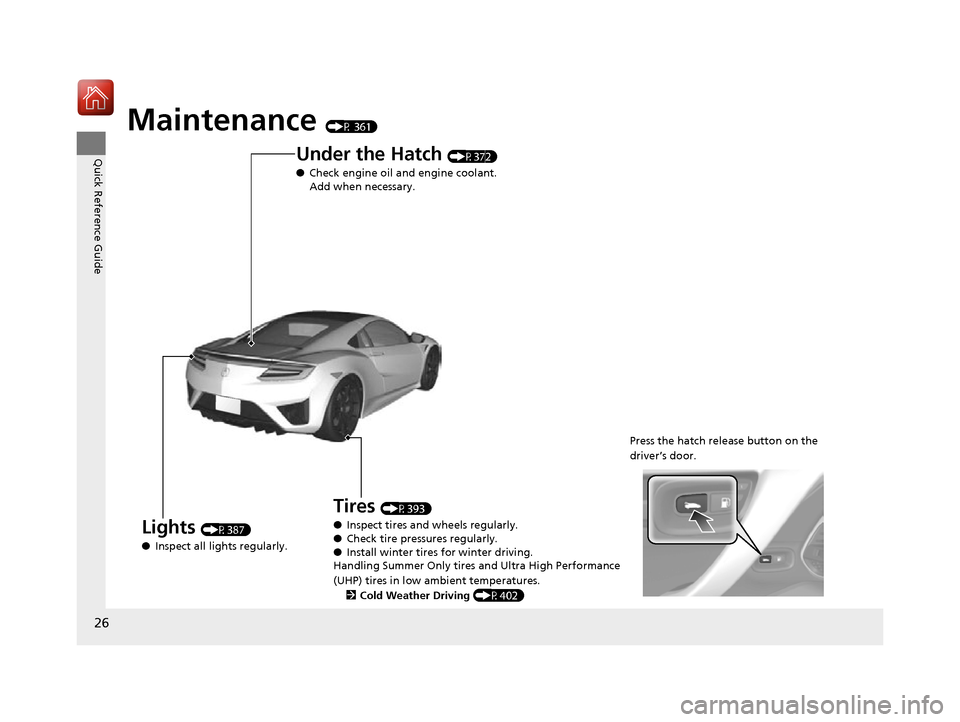
Maintenance (P 361)
Press the hatch release button on the
driver’s door.
Lights (P387)
● Inspect all lights regularly.
Under the Hatch (P372)
● Check engine oil and engine coolant.
Add when necessary.
Tires (P393)
● Inspect tires and wheels regularly.
● Check tire pressures regularly.
● Install winter tires for winter driving.
Handling Summer Only tires and Ultra High Performance
(UHP) tires in low ambient temperatures.
2 Cold Weather Driving (P402)
17 NSX-31T6N6000.book 26 ページ 2016年4月22日 金曜日 午後3時44分
Page 299 of 473
298
Driving
Before Driving
Driving Preparation
Check the following items before you start driving.
• Make sure there are no obstructions on the windows, door mirrors, exterior
lights, or other parts of the vehicle.
u Remove any frost, snow, or ice.
u Remove any snow on the roof, as this can slip down and obstruct your field of
vision while driving. If frozen solid , remove ice once it has softened.
u When removing ice from around the wheels, be sure not to damage the wheel
or wheel components.
• Make sure the hood is securely closed.
u If the hood opens while driving, your front view will be blocked.
• Make sure the tires are in good condition.
u Check air pressures, and check for damage and excessive wear.
2Checking and Maintaining Tires P. 393
•Make sure there are no people or ob jects behind or around the vehicle.
u There are blind spots from the inside.
• Check the front bumper ducts and side intercooler ducts for mud, leaves, and
road debris that could build up and prevent proper cooling performance.
■Exterior Checks1Exterior Checks
NOTICE
When doors are frozen s hut, use warm water around
the door edges to melt any ice. Do not try to force
them open, as this can damage the rubber trim
around the doors. When done, wipe dry to avoid
further freezing.
Do not pour warm water into the key cylinder.
You will be unable to insert the key if the water
freezes in the hole.
Heat from the engine and exhaust can ignite
flammable materials left und er the hatch, causing a
fire. If you’ve parked y our vehicle for an extended
period, inspect and remove any debris that may have
collected, such as dried grass and leaves that have
fallen or have been carried in for use as a nest by a
small animal.
Also check under the hatch for leftover flammable
materials after you or someone else has performed
maintenance on your vehicle.
17 NSX-31T6N6000.book 298 ページ 2016年4月22日 金曜日 午後3時44分
Page 310 of 473

309Continued
Driving
When Driving
Turning on the Power
1.Make sure the parkin g brake is applied.
u The electric parking brake indicator
comes on for 15 seconds when you pull
up the electric parking brake switch.
2. Depress the brake pedal.
u Make sure the transmission is in
(P.
1Turning on the Power
Keep your foot firmly on the brake pedal when
starting the power system.
The engine is harder to st art in cold weather and in
thinner air found at altitudes above 8,000 feet (2,400
meters).
When turning on the power system in cold weather,
turn off all electrical accessories such as the lights,
climate control system, and rear defogger in order to
reduce 12-volt battery drain.
If the exhaust system sounds abnormal or you can
smell exhaust gas inside the vehicle, have your vehicle
checked by an authorized Acura NSX dealer. There
may be a problem with the engine or exhaust system.
Electric Parking
Brake Switch
Brake Pedal
17 NSX-31T6N6000.book 309 ページ 2016年4月22日 金曜日 午後3時44分
Page 317 of 473
uuWhen Driving uShifting
316
Driving
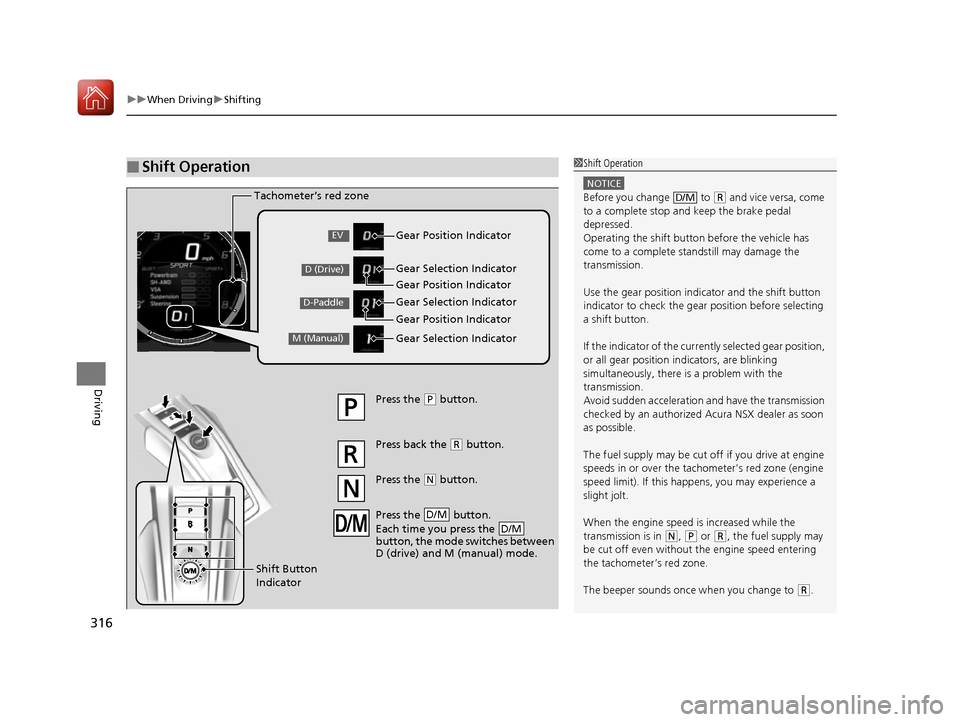
■Shift Operation1Shift Operation
NOTICE
Before you change to (R and vice versa, come
to a complete stop and keep the brake pedal
depressed.
Operating the shift button before the vehicle has
come to a complete standstill may damage the
transmission.
Use the gear position indicator and the shift button
indicator to check the gear position before selecting
a shift button.
If the indicator of the curren tly selected gear position,
or all gear position in dicators, are blinking
simultaneously, there is a problem with the
transmission.
Avoid sudden acceleration and have the transmission
checked by an authorized Acura NSX dealer as soon
as possible.
The fuel supply may be cut of f if you drive at engine
speeds in or over the tac hometer’s red zone (engine
speed limit). If this happe ns, you may experience a
slight jolt.
When the engine speed is increased while the
transmission is in
( N, (P or (R, the fuel supply may
be cut off even without the engine speed entering
the tachometer’s red zone.
The beeper sounds once when you change to
( R.
D/M
Gear Position Indicator
Tachometer’s red zone
Press the (
P button.
Press back the ( R button.
Press the
( N button.
Press the button.
Each time you press the
button, the mode switches between
D (drive) and M (manual) mode.
D/M
D/M
Shift Button
Indicator Gear Selection Indicator
Gear Position Indicator
Gear Selection Indicator
Gear Position Indicator
Gear Selection IndicatorEV
D (Drive)
D-Paddle
M (Manual)
17 NSX-31T6N6000.book 316 ページ 2016年4月22日 金曜日 午後3時44分
Page 362 of 473
361
Maintenance
This chapter discusses basic maintenance.
Before Performing MaintenanceInspection and Maintenance ............ 362
Safety When Performing Maintenance .... 363Parts and Fluids Used in Maintenance Service ........................................... 364
Maintenance Minder
TM..................... 365
Maintenance Under the Hood and Hatch Maintenance Items Under the Hood and Hatch ............................................. 371
Opening the Hatch .......................... 373
Opening the Hood ........................... 374
Engine Compartment Cover ............. 375
Recommended Engine Oil ................ 376
Oil Check ......................................... 377
Adding Engine Oil ............................ 380 Cooling System ................................ 382
Inverter Coolant ............................... 384
Transmission Fluids .......................... 385
Brake Fluid ....................................... 386
Refilling Window Wa
sher Fluid......... 386
Replacing Light Bulbs ....................... 387Checking and Maintaining Wiper Blades.... 390Checking and Maintaining Tires
Checking Tires ................................. 393
Tire and Loading Information Label ..... 394Tire Labeling .................................... 394DOT Tire Quality Grading (U.S. Vehicles) ...... 396Wear Indicators................................ 398
Tire Service Life ................................ 398
Tire and Wheel Replacement............ 399 Tire Rotation .................................... 400
Winter Tires ..................................... 401
Cold Weather Driving ...................... 402
12-Volt Battery ................................. 403
Remote Transmitter Care Replacing the Button Battery ........... 404
Climate Control System Maintenance.... 405CleaningInterior Care .................................... 406
Exterior Care.................................... 408
Accessories and Modifications Accessories ...................................... 412
Modifications................................... 413
Storage .............................................. 414
17 NSX-31T6N6000.book 361 ページ 2016年4月22日 金曜日 午後3時44分
Page 378 of 473
377
uuMaintenance Under the Hood and Hatch uOil Check
Continued
Maintenance
Oil Check
We recommend that you check the engine oil level every time you refuel.
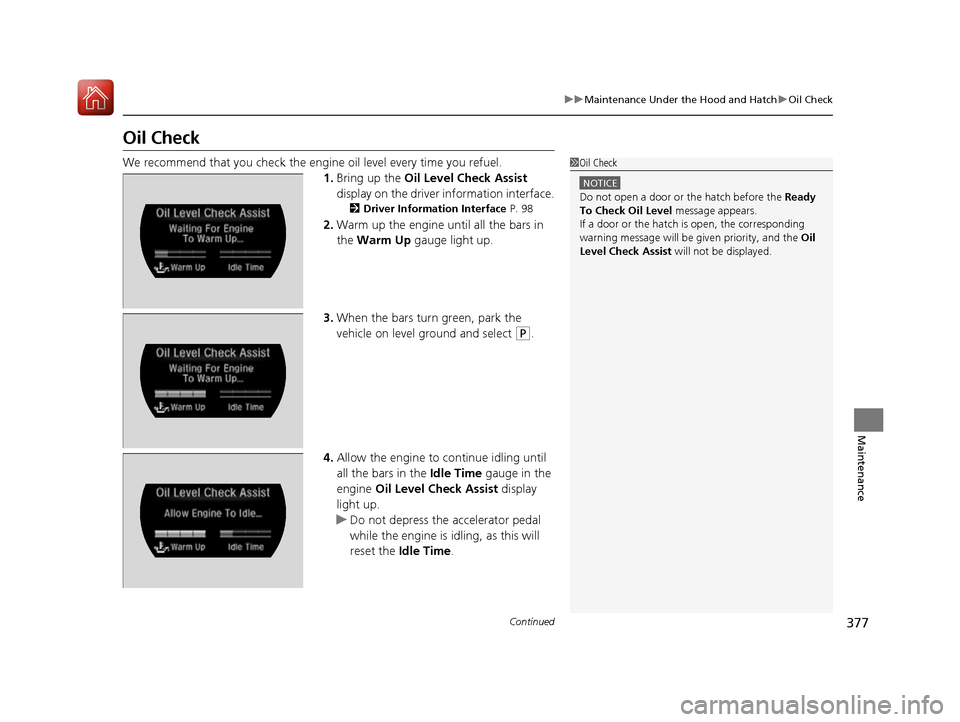
1. Bring up the Oil Level Check Assist
display on the driver information interface.
2 Driver Information Interface P. 98
2.Warm up the engine until all the bars in
the Warm Up gauge light up.
3. When the bars turn green, park the
vehicle on level ground and select
(P.
4. Allow the engine to continue idling until
all the bars in the Idle Time gauge in the
engine Oil Level Check Assist display
light up.
u Do not depress the accelerator pedal
while the engine is idling, as this will
reset the Idle Time .
1Oil Check
NOTICE
Do not open a door or the hatch before the Ready
To Check Oil Level message appears.
If a door or the hatch is open, the corresponding
warning message will be given priority, and the Oil
Level Check Assist will not be displayed.
17 NSX-31T6N6000.book 377 ページ 2016年4月22日 金曜日 午後3時44分
Page 415 of 473
414
Maintenance
Storage
Vehicle Storage
If you need to park your vehicle for an extended period (more than one month),
there are several things you should do to prepare it for storage. This helps reduce
possible deterioration of vehicle components and overall condition, which allows
you to get the vehicle back on the road with minimal delay. These are:
• If possible, store your NSX in a garage or enclosed area.
• Fill the fuel tank completely.
• Change the engine oil and filter.
• Wash and dry the exterior completely.
• Clean the interior. Make sure the carpeti ng, floor mats, etc., are completely dry.
• Put the transmission in
(P.
Release the parking brake.
• Leave one window open slightly (if th e vehicle is being stored indoors).
• To maintain the low-voltage 12-volt battery, connect it to an accessory battery
charger. For more information on how to maintain your 12-volt battery, consult
an authorized Acura NSX dealer.
2 Checking the 12-Volt Battery P. 403
•If the vehicle is to be stored for a longer period of time, it should be supported on
jack stands to raise the tires off th e ground to prevent tire flat spotting.
2Handling of the Jack P. 430
•Support the front wiper blade arms with a folded towel or rag so they do not
touch the windshield.
• Cover the vehicle with a “breathable” co ver, one made from a porous material
such as cotton. Nonporous materials (suc h as plastic sheeting) may trap moisture,
which can damage the paint.
• If possible, remove the vehicle from th e garage or enclosed area, remove
covering, and periodically run the engine until it reaches full operating
temperature (the cooling fa n cycles on and off twice).
Preferably, do this once a month.
17 NSX-31T6N6000.book 414 ページ 2016年4月22日 金曜日 午後3時44分
Page 432 of 473

431
Handling the Unexpected
Power System Won’t Start
Checking the Procedure
When the READY indicator does not come on and the Ready To Drive message
does not appear on the driver information interface, check the following items and
take appropriate action.
ChecklistConditionWhat to Do
Check if the related
indicator or driver
information interface
messages come on.The Temperature Is Too Cold For Vehicle To Operate
message appears.2 Driver Information Interface Warning and
Information Messages P. 83
The To Start, Hold Remote Near Start Button message
appears.
u Make sure the keyless access remote is in its operating range.
2ENGINE START/STOP Button Operating Range P. 127
2If the Keyless Access Remote Battery is
Weak P. 432
The POWER SYSTEM indicator comes on.Have your vehicle checked by an authorized
Acura NSX dealer.
The transmission system indicator blinks and Transmission
Problem Apply Parking Brake When Parked message
appears.The power system can be activated as a
temporary measure.
2 If the Transmission System Indicator Blinks
along with the Warning Message P. 442
Check the brightness
of the interior lights. The interior lights are dim or do not come on at
all. Have the 12-volt battery checked by an
authorized Acura NSX dealer.
The interior lights come on normally. Check all fuses, or have your vehicle checked by
an authorized Acura NSX dealer.
2 Inspecting and Changing Fuses P. 447
Check the gear
position.The transmission is not in (P.Change the gear position to (P.
Check the
immobilizer system
indicator. When the immobilizer system in
dicator is blinking, the power
system cannot be turned on.
2 Immobilizer System Indicator P. 81
1Checking the Procedure
If you must start the vehi cle immediately, use an
assisting vehicle to jump start it.
2 Jump Starting P. 434
17 NSX-31T6N6000.book 431 ページ 2016年4月22日 金曜日 午後3時44分
Page 435 of 473
434
Handling the Unexpected
Jump Starting
Turn off the power to electric devices, such as audio and lights. Turn off the power
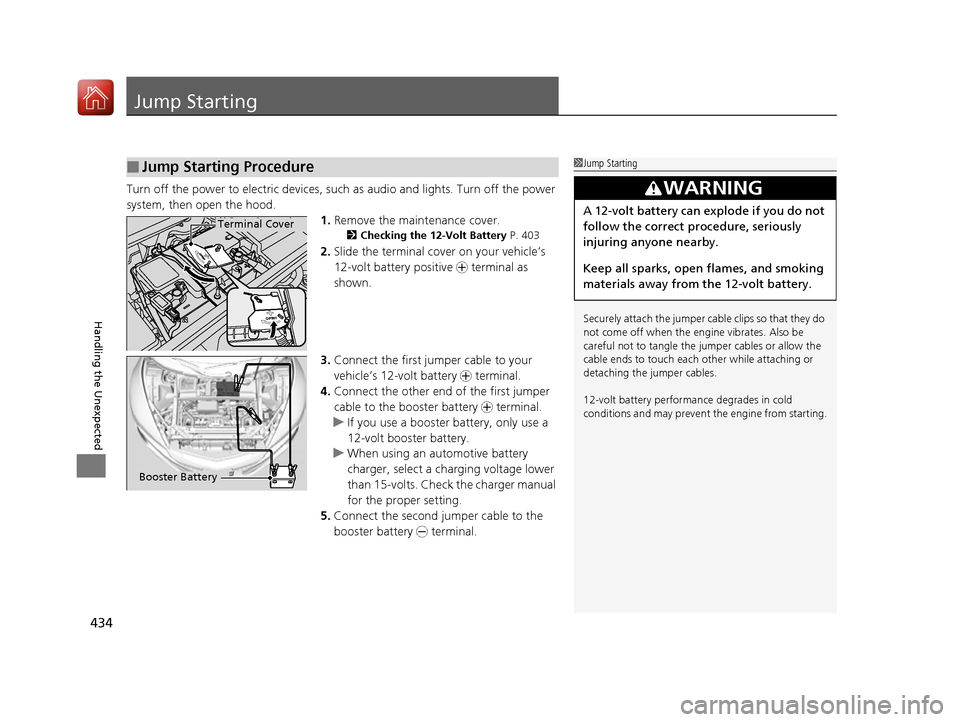
system, then open the hood. 1.Remove the maintenance cover.
2 Checking the 12-Volt Battery P. 403
2.Slide the terminal cover on your vehicle’s
12-volt battery positive + terminal as
shown.
3. Connect the first jump er cable to your
vehicle’s 12-volt battery + terminal.
4. Connect the other end of the first jumper
cable to the booster battery + terminal.
u If you use a booster battery, only use a
12-volt booster battery.
u When using an automotive battery
charger, select a charging voltage lower
than 15-volts. Check the charger manual
for the proper setting.
5. Connect the second jumper cable to the
booster battery - terminal.
■Jump Starting Procedure1Jump Starting
Securely attach the jumper cable clips so that they do
not come off when the engine vibrates. Also be
careful not to tangle the ju mper cables or allow the
cable ends to touch each other while attaching or
detaching the jumper cables.
12-volt battery performa nce degrades in cold
conditions and may prevent the engine from starting.
3WARNING
A 12-volt battery can explode if you do not
follow the correct procedure, seriously
injuring anyone nearby.
Keep all sparks, open flames, and smoking
materials away from the 12-volt battery.Terminal Cover
Booster Battery
17 NSX-31T6N6000.book 434 ページ 2016年4月22日 金曜日 午後3時44分
Page 436 of 473
435
uuJump Starting u
Handling the Unexpected
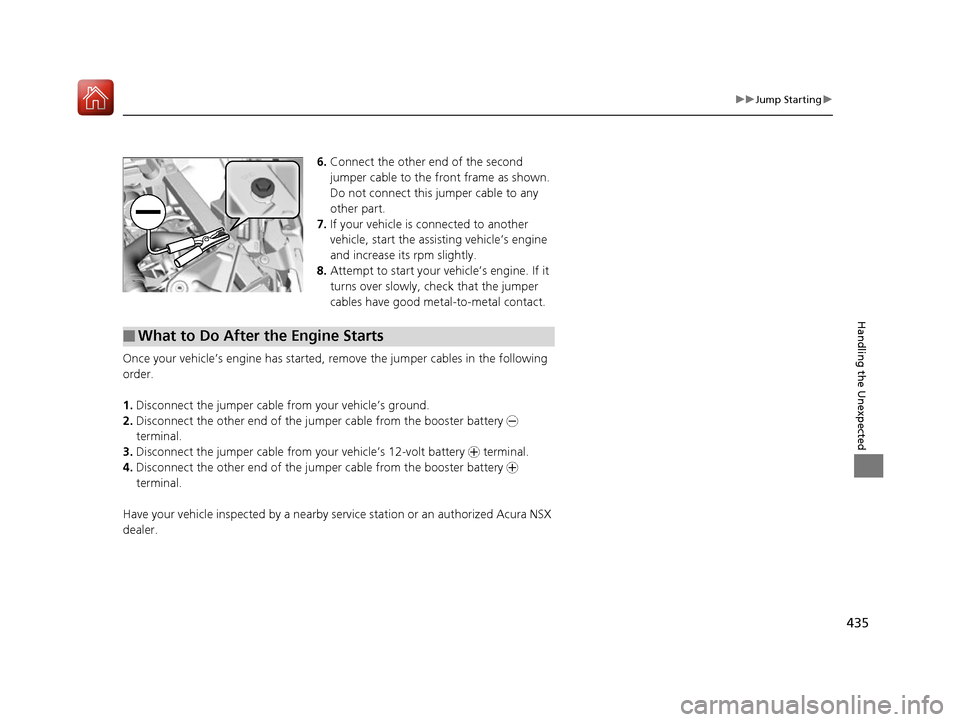
6.Connect the other end of the second
jumper cable to the front frame as shown.
Do not connect this jumper cable to any
other part.
7. If your vehicle is connected to another
vehicle, start the assisting vehicle’s engine
and increase its rpm slightly.
8. Attempt to start your ve hicle’s engine. If it
turns over slowly, check that the jumper
cables have good metal-to-metal contact.
Once your vehicle’s engine has started, re move the jumper cables in the following
order.
1. Disconnect the jumper cable from your vehicle’s ground.
2. Disconnect the other end of the jumper cable from the booster battery -
terminal.
3. Disconnect the jumper cable from your vehicle’s 12-volt battery + terminal.
4. Disconnect the other end of the jumper cable from the booster battery +
terminal.
Have your vehicle inspected by a nearby service station or an authorized Acura NSX
dealer.
■What to Do After the Engine Starts
17 NSX-31T6N6000.book 435 ページ 2016年4月22日 金曜日 午後3時44分