dashboard Acura NSX 2018 User Guide
[x] Cancel search | Manufacturer: ACURA, Model Year: 2018, Model line: NSX, Model: Acura NSX 2018Pages: 489, PDF Size: 27.64 MB
Page 157 of 489

156
Controls
Climate Control System
Using Automatic Climate Control
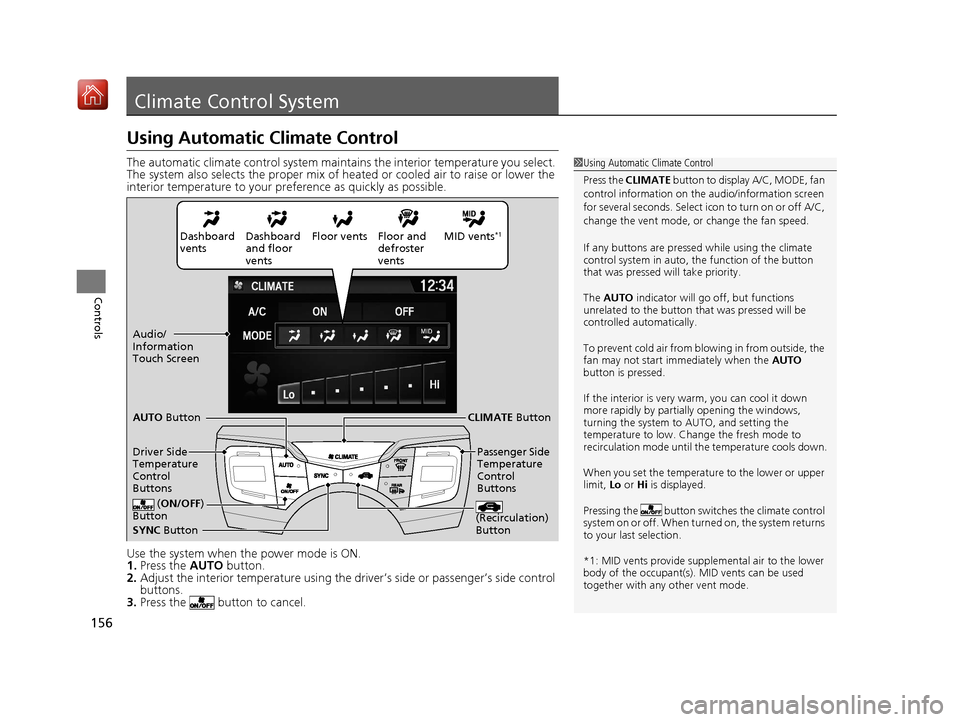
The automatic climate control system maintains the interior temperature you select.
The system also selects the proper mix of heated or cooled air to raise or lower the
interior temperature to your pr eference as quickly as possible.
Use the system when the power mode is ON.
1. Press the AUTO button.
2. Adjust the interior temperature using the dr iver’s side or passenger’s side control
buttons.
3. Press the butto n to cancel.1Using Automatic Climate Control
Press the CLIMATE button to display A/C, MODE, fan
control information on the audio/information screen
for several seconds. Select ic on to turn on or off A/C,
change the vent mode, or change the fan speed.
If any buttons are presse d while using the climate
control system in auto, the function of the button
that was pressed will take priority.
The AUTO indicator will go off, but functions
unrelated to the button th at was pressed will be
controlled automatically.
To prevent cold air from bl owing in from outside, the
fan may not start i mmediately when the AUTO
button is pressed.
If the interior is very warm, you can cool it down
more rapidly by partial ly opening the windows,
turning the system to AUTO, and setting the
temperature to low. Change the fresh mode to
recirculation mode until the temperature cools down.
When you set the temperat ure to the lower or upper
limit, Lo or Hi is displayed.
Pressing the butt on switches the climate control
system on or off. When turned on, the system returns
to your last selection.
*1: MID vents provide supple mental air to the lower
body of the occupant(s). MID vents can be used
together with any other vent mode.
Dashboard
vents Dashboard
and floor
vents Floor vents Floor and
defroster
ventsMID vents*1
SYNC
Button
AUTO
Button
CLIMATE Button
Driver Side
Temperature
Control
Buttons Passenger Side
Temperature
Control
Buttons
( ON/OFF )
Button
(Recirculation)
Button
Audio/
Information
Touch Screen
18 NSX-31T6N6100.book 156 ページ 2017年10月27日 金曜日 午後1時39分
Page 185 of 489

184
uuAudio System Basic Operation uVoice Control Operation
Features
Voice Control Operation
Your vehicle has a voice control system that allows hands-free operation.
The voice control system uses the ( Talk) and (hang-up/back) buttons on
the steering wheel and a microphone near the map lights on the ceiling.
To achieve optimum voice recognition when using the voice control system:
• Make sure the correct screen is displa yed for the voice command that you are
using.
The system recognizes only certain commands. Available voice commands.
2 Voice Portal Screen P. 185
•Close the windows.
• Adjust the dashboard and side vents so air does not blow onto the microphone
on the ceiling.
• Speak clearly in a natural speaking vo ice without pausing between words.
• Reduce any background noise if possible. The system may misinterpret your
command if more than one person is speaking at the same time.
■Voice Recognition
1Voice Control Operation
When you press the button, a helpful prompt asks
what you would like to do. Press and release the
button again to bypass th is prompt and give a
command.
1 Voice Recognition
The voice control system can only be used from the
driver’s seat because the microphone unit removes
noises from the front passenger’s side.
18 NSX-31T6N6100.book 184 ページ 2017年10月27日 金曜日 午後1時39分
Page 389 of 489

388
uuMaintenance Under the Hood and Hatch uOpening the Hood
Maintenance
Opening the Hood
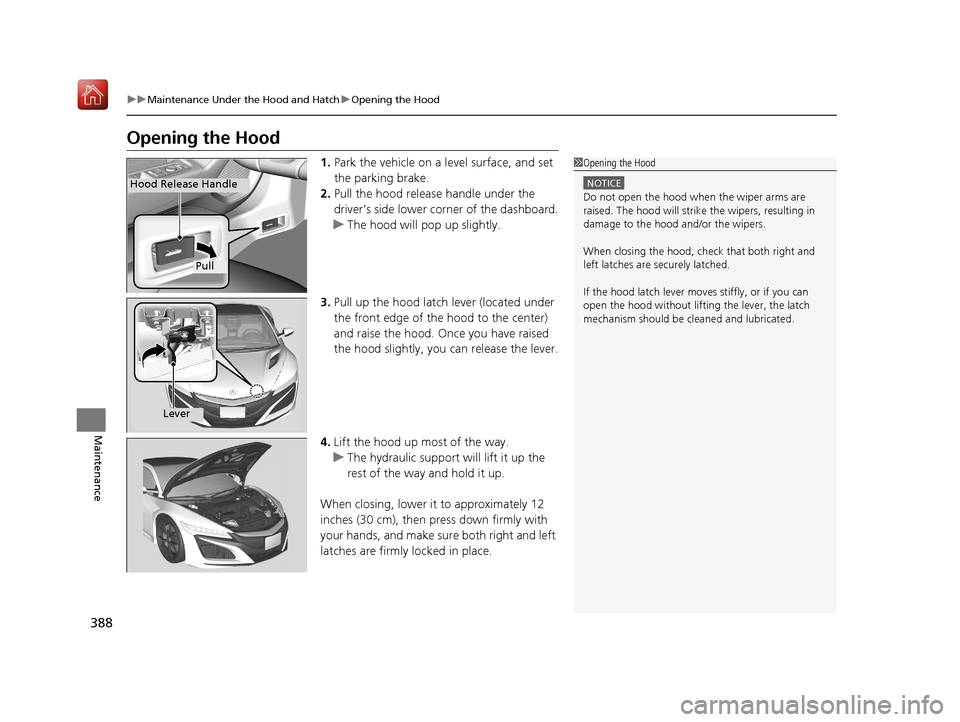
1. Park the vehicle on a level surface, and set
the parking brake.
2. Pull the hood release handle under the
driver’s side lower co rner of the dashboard.
u The hood will pop up slightly.
3. Pull up the hood latch lever (located under
the front edge of the hood to the center)
and raise the hood. On ce you have raised
the hood slightly, you can release the lever.
4. Lift the hood up most of the way.
u The hydraulic support will lift it up the
rest of the way and hold it up.
When closing, lower it to approximately 12
inches (30 cm), then pr ess down firmly with
your hands, and make su re both right and left
latches are firmly locked in place.1 Opening the Hood
NOTICE
Do not open the hood when the wiper arms are
raised. The hood will strike the wipers, resulting in
damage to the hood and/or the wipers.
When closing the hood, check that both right and
left latches are securely latched.
If the hood latch lever moves stiffly, or if you can
open the hood without lifti ng the lever, the latch
mechanism should be cleaned and lubricated.
Pull
Hood Release Handle
Lever
18 NSX-31T6N6100.book 388 ページ 2017年10月27日 金曜日 午後1時39分
Page 460 of 489

459
uuFuses uFuse Locations
Continued
Handling the Unexpected
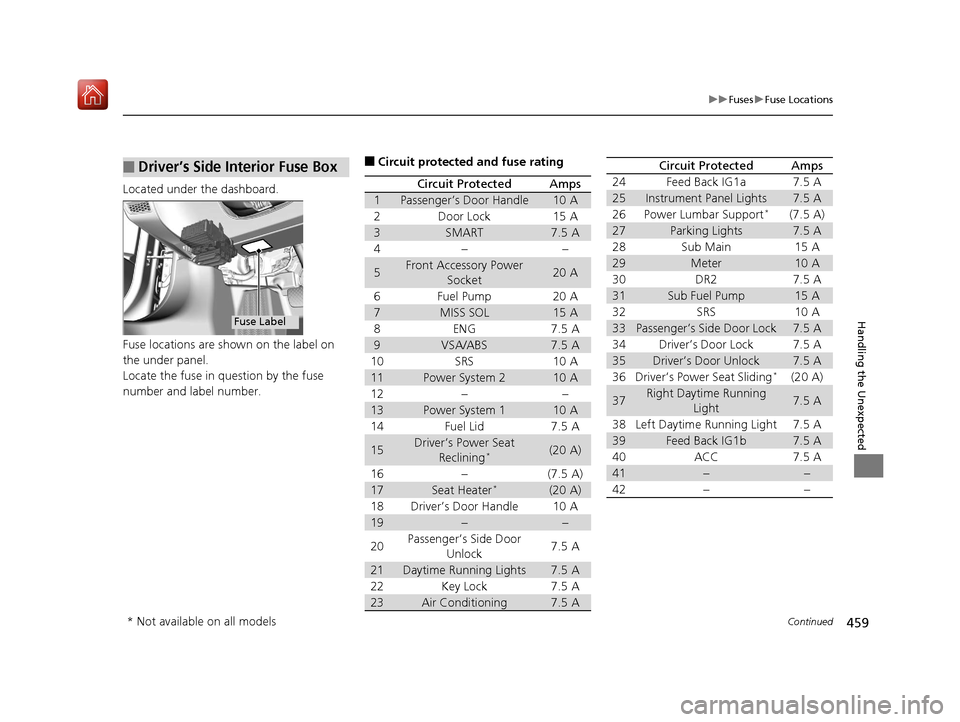
Located under the dashboard.
Fuse locations are shown on the label on
the under panel.
Locate the fuse in question by the fuse
number and label number.
■Driver’s Side Interior Fuse Box
Fuse Label
■Circuit protected and fuse rating
Circuit ProtectedAmps
1Passenger’s Door Handle10 A
2Door Lock15 A
3SMART7.5 A
4−−
5Front Accessory Power
Socket20 A
6Fuel Pump20 A
7MISS SOL15 A
8ENG7.5 A
9VSA/ABS7.5 A
10SRS10 A
11Power System 210 A
12−−
13Power System 110 A
14Fuel Lid7.5 A
15Driver’s Power Seat Reclining*(20 A)
16−(7.5 A)
17Seat Heater*(20 A)
18Driver’s Door Handle10 A
19−−
20Passenger’s Side Door Unlock7.5 A
21Daytime Running Lights7.5 A
22Key Lock7.5 A
23Air Conditioning7.5 A
24Feed Back IG1a7.5 A
25Instrument Panel Lights7.5 A
26Power Lumbar Support*(7.5 A)
27Parking Lights7.5 A
28Sub Main15 A
29Meter10 A
30DR27.5 A
31Sub Fuel Pump15 A
32SRS10 A
33Passenger’s Side Door Lock7.5 A
34Driver’s Door Lock7.5 A
35Driver’s Door Unlock7.5 A
36Driver’s Power Seat Sliding*(20 A)
37Right Daytime Running
Light7.5 A
38Left Daytime Running Light7.5 A
39Feed Back IG1b7.5 A
40ACC7.5 A
41−−
42−−
Circuit ProtectedAmps
* Not available on all models
18 NSX-31T6N6100.book 459 ページ 2017年10月27日 金曜日 午後1時39分