brake light Acura NSX 2019 User Guide
[x] Cancel search | Manufacturer: ACURA, Model Year: 2019, Model line: NSX, Model: Acura NSX 2019Pages: 485, PDF Size: 27.6 MB
Page 320 of 485
319Continued
Driving
When Driving
Turning on the Power
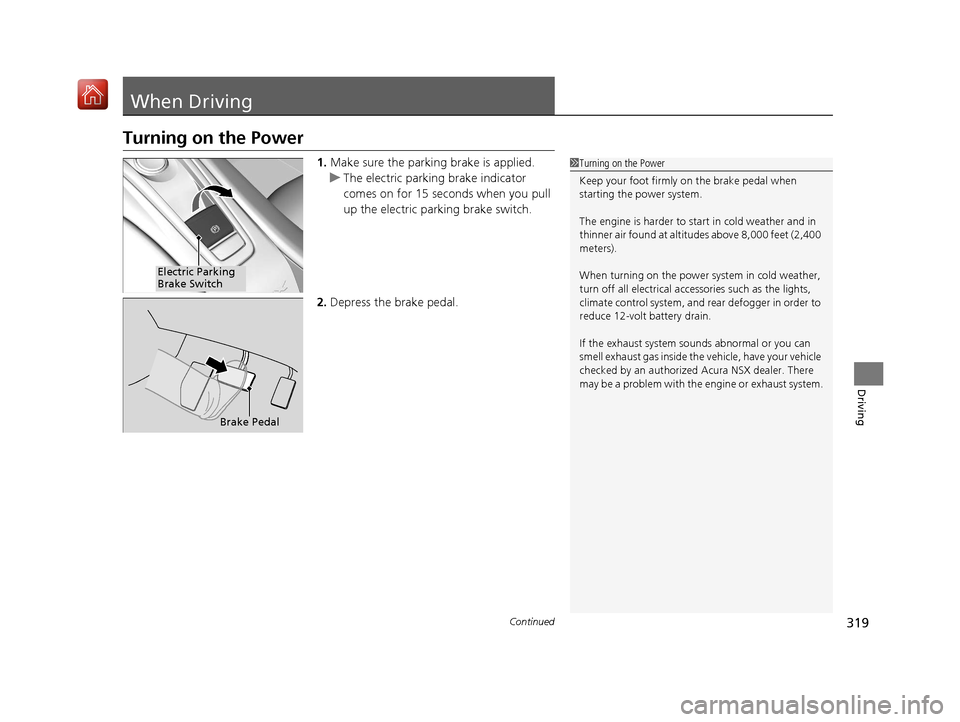
1.Make sure the parkin g brake is applied.
u The electric parking brake indicator
comes on for 15 seconds when you pull
up the electric parking brake switch.
2. Depress the brake pedal.1Turning on the Power
Keep your foot firmly on the brake pedal when
starting the power system.
The engine is harder to st art in cold weather and in
thinner air found at altitudes above 8,000 feet (2,400
meters).
When turning on the power system in cold weather,
turn off all electrical accessories such as the lights,
climate control system, and rear defogger in order to
reduce 12-volt battery drain.
If the exhaust system sounds abnormal or you can
smell exhaust gas inside the vehicle, have your vehicle
checked by an authorized Acura NSX dealer. There
may be a problem with the engine or exhaust system.
Electric Parking
Brake Switch
Brake Pedal
19 NSX-31T6N6200.book 319 ページ 2018年8月9日 木曜日 午前11時12分
Page 327 of 485
uuWhen Driving uShifting
326
Driving
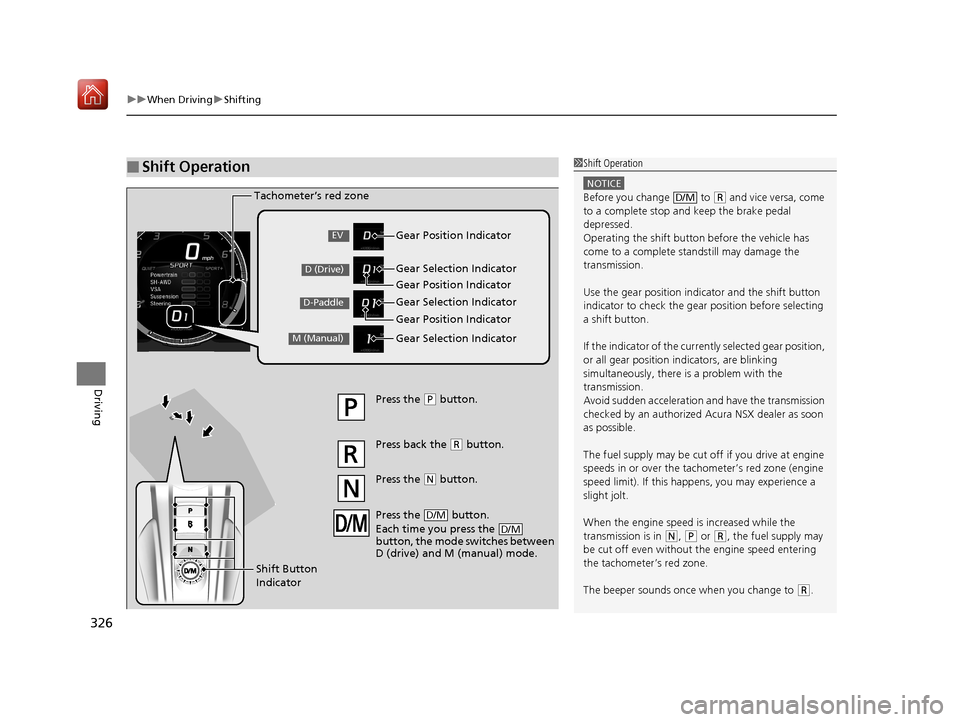
■Shift Operation1Shift Operation
NOTICE
Before you change to (R and vice versa, come
to a complete stop and keep the brake pedal
depressed.
Operating the shift button before the vehicle has
come to a complete standstill may damage the
transmission.
Use the gear position indicator and the shift button
indicator to check the gear position before selecting
a shift button.
If the indicator of the curren tly selected gear position,
or all gear position in dicators, are blinking
simultaneously, there is a problem with the
transmission.
Avoid sudden acceleration and have the transmission
checked by an authorized Acura NSX dealer as soon
as possible.
The fuel supply may be cut of f if you drive at engine
speeds in or over the tac hometer’s red zone (engine
speed limit). If this happe ns, you may experience a
slight jolt.
When the engine speed is increased while the
transmission is in
( N, (P or (R, the fuel supply may
be cut off even without the engine speed entering
the tachometer’s red zone.
The beeper sounds once when you change to
( R.
D/M
Gear Position Indicator
Tachometer’s red zone
Press the (
P button.
Press back the ( R button.
Press the
( N button.
Press the button.
Each time you press the
button, the mode switches between
D (drive) and M (manual) mode.
D/M
D/M
Shift Button
Indicator Gear Selection Indicator
Gear Position Indicator
Gear Selection Indicator
Gear Position Indicator
Gear Selection IndicatorEV
D (Drive)
D-Paddle
M (Manual)
19 NSX-31T6N6200.book 326 ページ 2018年8月9日 木曜日 午前11時12分
Page 348 of 485
347
uuWhen Driving uAgile Handling Assist
Driving
Agile Handling Assist
Lightly brakes each of the front and rear wheels, as needed, when you turn the
steering wheel, and helps support the vehicle’s stability and performance during
cornering.1 Agile Handling Assist
The agile handling assist ca nnot enhance stability in
all driving situations. You still need to drive and
corner at speeds appropriate for the conditions and
always leave a sufficient margin of safety.
When the VSA ® system indicator comes on and stays
on while driving, the agil e handling assist does not
activate.
You may hear a sound coming from the front of the
car while the agile handling assi st is activated. This is
normal.
19 NSX-31T6N6200.book 347 ページ 2018年8月9日 木曜日 午前11時12分
Page 357 of 485
uuBraking uBrake System
356
Driving
Your vehicle is equipped with disc brakes at all four wh eels. The brake assist system
increases the stopping force when you depress the brake pedal hard in an
emergency situation. The anti-lock brake system (ABS) helps you retain steering
control when braking very hard.
2 Brake Assist System P. 360
2 Anti-lock Brake System (ABS) P. 359
■Brake squeal
To satisfy the performance under a wide range of driving conditions, a high-
performance braking system is equipped on your vehicle. You may hear the brake
squeal under certain conditions, such as vehicle speed, deceleration, humidity, and
so on. This is not a malfunction.
■Foot Brake1 Foot Brake
Check the brakes after driving through deep water,
or if there is a buildup of road surface water. If
necessary, dry the brakes by lightly depressing the
pedal several times.
If you hear a continuous me tallic friction sound when
applying the brakes, this is caused by the brake wear
indicator rubbing on the brake rotor and indicates
that the brake pads need to replaced. Have your
vehicle checked by an authorized Acura NSX dealer.
If you hear only an occasion al squeak or squeal when
you initially apply the brake pedal, this may be normal
and caused by high frequen cy vibration of the brake
pads against the rotating brake disc.
Constantly using the brak e pedal while going down a
long hill builds up heat, which reduces the brake
effectiveness. Apply regene rative braking by taking
your foot off the accelera tor pedal and downshifting
to a lower gear.
Do not rest your foot on the brake pedal while
driving, as it will lightly apply the brakes and cause
them to lose effectiveness over time and reduce pad
life. It will also conf use drivers behind you.
Models with iron brake discs
Models with iron brake discs
19 NSX-31T6N6200.book 356 ページ 2018年8月9日 木曜日 午前11時12分
Page 358 of 485
Continued357
uuBraking uBrake System
Driving
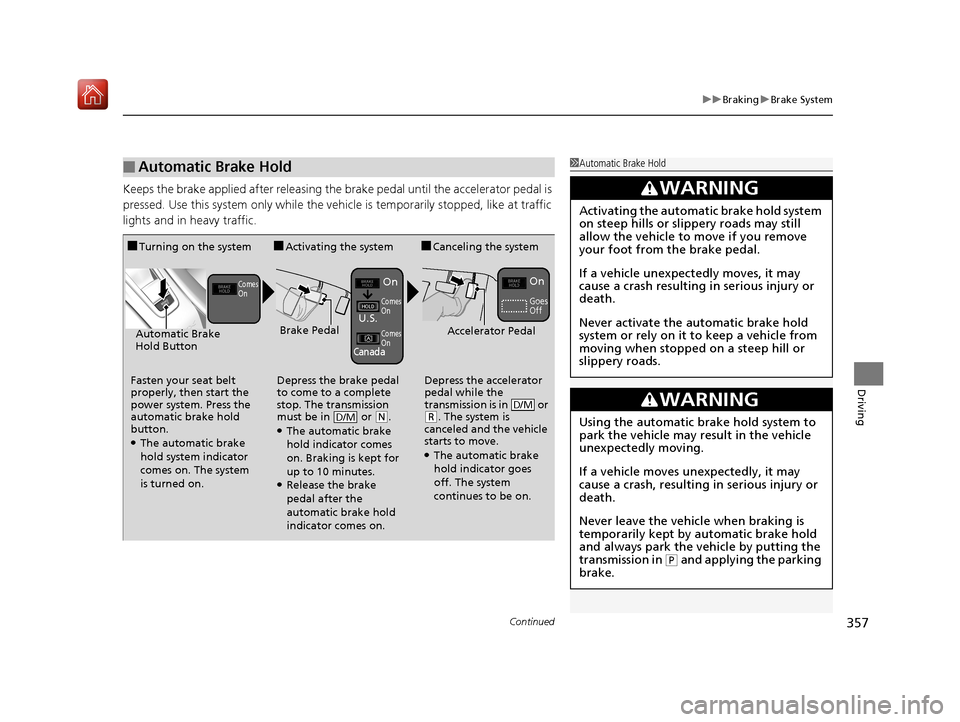
Keeps the brake applied after releasing the brake pedal until the accelerator pedal is
pressed. Use this system only while the ve hicle is temporarily stopped, like at traffic
lights and in heavy traffic.
■Automatic Brake Hold1 Automatic Brake Hold
3WARNING
Activating the automatic brake hold system
on steep hills or slippery roads may still
allow the vehicle to move if you remove
your foot from the brake pedal.
If a vehicle unexpectedly moves, it may
cause a crash resulting in serious injury or
death.
Never activate the automatic brake hold
system or rely on it to keep a vehicle from
moving when stopped on a steep hill or
slippery roads.
3WARNING
Using the automatic brake hold system to
park the vehicle may result in the vehicle
unexpectedly moving.
If a vehicle moves unexpectedly, it may
cause a crash, resulting in serious injury or
death.
Never leave the vehicle when braking is
temporarily kept by automatic brake hold
and always park the vehicle by putting the
transmission in
( P and applying the parking
brake.
■Turning on the system
Fasten your seat belt
properly, then start the
power system. Press the
automatic brake hold
button.
●The automatic brake
hold system indicator
comes on. The system
is turned on.
■Activating the system
Depress the brake pedal
to come to a complete
stop. The transmission
must be in or
( N.●The automatic brake
hold indicator comes
on. Braking is kept for
up to 10 minutes.
●Release the brake
pedal after the
automatic brake hold
indicator comes on.
D/M
■Canceling the system
Depress the accelerator
pedal while the
transmission is in or
( R. The system is
canceled and the vehicle
starts to move.
●The automatic brake
hold indicator goes
off. The system
continues to be on.
D/M
Accelerator PedalBrake PedalAutomatic Brake
Hold Button
Goes
Off
On On
U.S.
Canada
Comes
On
Comes
On
Comes
On
19 NSX-31T6N6200.book 357 ページ 2018年8月9日 木曜日 午前11時12分
Page 374 of 485

373
Maintenance
This chapter discusses basic maintenance.
Before Performing MaintenanceInspection and Maintenance ............ 374
Safety When Performing Maintenance .... 375Parts and Fluids Used in Maintenance Service ........................................... 376
Maintenance Minder
TM..................... 377
Maintenance Under the Hood and Hatch Maintenance Items Under the Hood and Hatch ............................................. 383
Opening the Hatch .......................... 385
Opening the Hood ........................... 386
Engine Compartment Cover ............. 387
Recommended Engine Oil ................ 388
Oil Check ......................................... 389
Adding Engine Oil ............................ 392 Cooling System ................................ 394
Inverter Coolant ............................... 396
Transmission Fluids .......................... 397
Brake Fluid ....................................... 398
Refilling Window Wa
sher Fluid......... 398
Replacing Light Bulbs ....................... 399Checking and Maintaining Wiper Blades.... 402Checking and Maintaining Tires
Checking Tires ................................. 405
Tire and Loading Information Label ..... 406Tire Labeling .................................... 406DOT Tire Quality Grading (U.S. Vehicles) ...... 408Wear Indicators................................ 410
Tire Service Life ................................ 410
Tire and Wheel Replacement............ 411 Tire Rotation .................................... 412
Winter Tires ..................................... 413
Cold Weather Driving ...................... 414
12-Volt Battery ................................. 415
Remote Transmitter Care Replacing the Button Battery ........... 416
Climate Control System Maintenance.... 417CleaningInterior Care .................................... 418
Exterior Care.................................... 420
Accessories and Modifications Accessories ...................................... 424
Modifications................................... 425
Storage .............................................. 426
19 NSX-31T6N6200.book 373 ページ 2018年8月9日 木曜日 午前11時12分
Page 375 of 485

374
Maintenance
Before Performing Maintenance
Inspection and Maintenance
For your safety, perform all listed inspections and maintenance to keep your vehicle
in good condition. If you become aware of any abnormality (noise, smell, insufficient
brake fluid, oil residue on the ground, etc .), have your vehicle inspected by an
authorized Acura NSX dealer. (Note, however, that service at an authorized Acura
NSX dealer is not mandatory to keep your wa rranties in effect.) Refer to the separate
maintenance booklet for detailed main tenance and inspection information.
■Daily inspections
Perform inspections before long distance tri ps, when washing the vehicle, or when
refueling.
■Periodic inspections
• Check the brake fluid level monthly.
2 Brake Fluid P. 398
•Check the tire pressure monthly. Examin e the tread for wear and foreign objects.
2Checking and Maintaining Tires P. 405
•Check the operation of the exterior lights monthly.
2 Replacing Light Bulbs P. 399
•Check the condition of the wiper bl ades at least every six months.
2Checking and Maintaining Wiper Blades P. 402
■Types of Inspection and Maintenance
1Inspection and Maintenance
Maintenance, replacement, or repair of
emissions control devices and systems may be
done by any automotive repair establishment or
individuals using parts that are “certified” to
EPA standards.
According to state and fede ral regulations, failure to
perform maintenance on the maintenance main
items marked with # will not void your emissions
warranties. However, all ma intenance services should
be performed in accordan ce with the intervals
indicated by the driver information interface.
2 Maintenance Service Items P. 380
If you want to perform complex maintenance tasks
that require more skills a nd tools, you can purchase a
subscription to the Service Express website at
www.techinfo.honda.com .
2 Authorized Manuals P. 475
If you want to perform ma intenance yourself, make
sure that you have the necessary tools and skills first.
After performing ma intenance, update the records in
the separate maintenance booklet.
U.S. models
19 NSX-31T6N6200.book 374 ページ 2018年8月9日 木曜日 午前11時12分
Page 387 of 485

386
uuMaintenance Under the Hood and Hatch uOpening the Hood
Maintenance
Opening the Hood
1. Park the vehicle on a level surface, and set
the parking brake.
2. Pull the hood release handle under the
driver’s side lower corner of the dashboard.
u The hood will pop up slightly.
3. Pull up the hood latch lever (located under
the front edge of the hood to the center)
and raise the hood. Once you have raised
the hood slightly, you can release the lever.
4. Lift the hood up most of the way.
u The hydraulic support will lift it up the
rest of the way and hold it up.
When closing, lower it to approximately 12
inches (30 cm), then pr ess down firmly with
your hands, and make su re both right and left
latches are firmly locked in place.1 Opening the Hood
NOTICE
Do not open the hood when the wiper arms are
raised. The hood will strike the wipers, resulting in
damage to the hood and/or the wipers.
When closing the hood, check that both right and
left latches are securely latched.
If the hood latch lever moves stiffly, or if you can
open the hood without lifti ng the lever, the latch
mechanism should be cl eaned and lubricated.
Pull
Hood Release Handle
Lever
19 NSX-31T6N6200.book 386 ページ 2018年8月9日 木曜日 午前11時12分
Page 401 of 485

400
uuReplacing Light Bulbs uRear Turn Signal Lights
Maintenance
Rear Turn Signal Lights
Rear Turn Signal lights are LED type. Have an authorized Acura NSX dealer inspect
and replace the light assembly.
Brake/Taillights
Brake/Taillights are LED type. Have an aut horized Acura NSX dealer inspect and
replace the light assembly.
Rear Side Marker Lights
Rear side marker lights are LED type. Have an authorized Acura NSX dealer inspect
and replace the light assembly.
Taillights
Taillights are LED type. Have an authorized Acura NSX dealer inspect and replace the
light assembly.
Back-Up Lights
Back-up lights are LED type. Have an au thorized Acura NSX dealer inspect and
replace the light assembly.
19 NSX-31T6N6200.book 400 ページ 2018年8月9日 木曜日 午前11時12分
Page 402 of 485

401
uuReplacing Light Bulbs uRear License Plate Lights
Maintenance
Rear License Plate Lights
Rear license plate lights are LED type. Have an authorized Acura NSX dealer inspect
and replace the light assembly.
High-Mount Brake Light
High-mount brake light is LED type. Have an authorized Acura NSX dealer inspect
and replace the light assembly.
19 NSX-31T6N6200.book 401 ページ 2018年8月9日 木曜日 午前11時12分